
 Web Front-end
HTML Tutorial
After each time you create a new dialog and drag and stretch it, the code for how to save the position and size of each dialog is as follows. _html/css_WEB-ITnose
Web Front-end
HTML Tutorial
After each time you create a new dialog and drag and stretch it, the code for how to save the position and size of each dialog is as follows. _html/css_WEB-ITnose
After each time you create a new dialog and drag and stretch it, the code for how to save the position and size of each dialog is as follows. _html/css_WEB-ITnose

<script> <br> var z=1,i=1,left=10 <br> var isIE = (document.all) ? true : false; <br> var $ = function (id) { <br> return document.getElementById(id); <br> }; <br> var Extend = function(destination, source) { <br> for (var property in source) { <br> destination[property] = source[property]; <br> } <br> } <br> var Bind = function(object, fun,args) { <br> return function() { <br> return fun.apply(object,args||[]); <br> } <br> } <br> var BindAsEventListener = function(object, fun) { <br> var args = Array.prototype.slice.call(arguments).slice(2); <br> return function(event) { <br> return fun.apply(object, [event || window.event].concat(args)); <br> } <br> } <br> var CurrentStyle = function(element){ <br> return element.currentStyle || document.defaultView.getComputedStyle(element, null); <br> } <br> function create(elm,parent,fn){var element = document.createElement(elm);fn&&fn(element); parent&&parent.appendChild(element);return element}; <br> function addListener(element,e,fn){ element.addEventListener?element.addEventListener(e,fn,false):element.attachEvent("on" e,fn)}; <br> function removeListener(element,e,fn){ element.removeEventListener?element.removeEventListener(e,fn,false):element.detachEvent("on" e,fn)}; <br> var Class = function(properties){ <br> var _class = function(){return (arguments[0] !== null && this.initialize && typeof(this.initialize) == 'function') ? this.initialize.apply(this, arguments) : this;}; <br> _class.prototype = properties; <br> return _class; <br> }; <br> var Dialog = new Class({ <br> options:{ <br> Width : 400, <br> Height : 400, <br> Left : 100, <br> Top : 100, <br> Titleheight : 26, <br> Minwidth : 200, <br> Minheight : 200, <br> CancelIco : true, <br> ResizeIco : false, <br> Info : "新闻标题", <br> Content : "无内容", <br> Zindex : 2 <br> }, <br> initialize:function(options){ <br> this._dragobj = null; <br> this._resize = null; <br> this._cancel = null; <br> this._body = null; <br> this._x = 0; <br> this._y = 0; <br> this._fM = BindAsEventListener(this, this.Move); <br> this._fS = Bind(this, this.Stop); <br> this._isdrag = null; <br> this._Css = null; <br> this.Width = this.options.Width; <br> this.Height = this.options.Height; <br> this.Left = this.options.Left; <br> this.Top = this.options.Top; <br> this.CancelIco = this.options.CancelIco; <br> this.Info = this.options.Info; <br> this.Content = this.options.Content; <br> this.Minwidth = this.options.Minwidth; <br> this.Minheight = this.options.Minheight; <br> this.Titleheight= this.options.Titleheight; <br> this.Zindex = this.options.Zindex; <br> Extend(this,options); <br> Dialog.Zindex = this.Zindex <br> //构造dialog <br> var obj = ['dialogcontainter','dialogtitle','dialogtitleinfo','dialogtitleico','dialogbody','dialogbottom']; <br> for(var i = 0;i<obj.length;i ) <br /> { obj[i]=create('div',null,function(elm){elm.className = obj[i];}); } <br /> obj[2].innerHTML = this.Info; <br /> obj[4].innerHTML = this.Content; <br /> obj[1].appendChild(obj[2]); <br /> obj[1].appendChild(obj[3]); <br /> obj[0].appendChild(obj[1]); <br /> obj[0].appendChild(obj[4]); <br /> obj[0].appendChild(obj[5]); <br /> document.body.appendChild(obj[0]); <br /> this._dragobj = obj[0]; <br /> this._resize = obj[5]; <br /> this._cancel = obj[3]; <br /> this._body = obj[4]; <br /> ///o,x1,x2 <br /> ////设置Dialog的长 宽 ,left ,top <br /> with(this._dragobj.style){ <br /> height = this.Height "px";top = this.Top "px";width = this.Width "px";left = this.Left "px";zIndex = this.Zindex; <br /> } <br /> this._body.style.height = this.Height - this.Titleheight-parseInt(CurrentStyle(this._body).paddingLeft)*2 'px'; <br /> /////////////////////////////////////////////////////////////////////////////// 添加事件 <br /> addListener(this._dragobj,'mousedown',BindAsEventListener(this, this.Start,true)); <br /> addListener(this._cancel,'mouseover',Bind(this,this.Changebg,[this._cancel,'0px 0px','-21px 0px'])); <br /> addListener(this._cancel,'mouseout',Bind(this,this.Changebg,[this._cancel,'0px 0px','-21px 0px'])); <br /> addListener(this._cancel,'mousedown',BindAsEventListener(this,this.Disappear)); <br /> addListener(this._body,'mousedown',BindAsEventListener(this, this.Cancelbubble)); <br /> addListener(this._resize,'mousedown',BindAsEventListener(this, this.Start,false)); <br /> }, <br /> Disappear:function(e){ <br /> this.Cancelbubble(e); <br /> document.body.removeChild(this._dragobj); <br /> }, <br /> Cancelbubble:function(e){ <br /> this._dragobj.style.zIndex = Dialog.Zindex; <br /> document.all?(e.cancelBubble=true):(e.stopPropagation()) <br /> }, <br /> Changebg:function(o,x1,x2){ <br /> o.style.backgroundPosition =(o.style.backgroundPosition==x1)?x2:x1; <br /> }, <br /> Start:function(e,isdrag){ <br /> if(!isdrag){this.Cancelbubble(e);} <br /> this._Css = isdrag?{x:"left",y:"top"}:{x:"width",y:"height"} <br /> this._dragobj.style.zIndex = Dialog.Zindex; <br /> this._isdrag = isdrag; <br /> this._x = isdrag?(e.clientX - this._dragobj.offsetLeft||0):(this._dragobj.offsetLeft||0) ; <br /> this._y = isdrag?(e.clientY - this._dragobj.offsetTop ||0):(this._dragobj.offsetTop||0); <br /> if(isIE) <br /> { <br /> addListener(this._dragobj, "losecapture", this._fS); <br /> this._dragobj.setCapture(); <br /> } <br /> else <br /> { <br /> e.preventDefault(); <br /> addListener(window, "blur", this._fS); <br /> } <br /> addListener(document,'mousemove',this._fM) <br /> addListener(document,'mouseup',this._fS) <br /> }, <br /> Move:function(e){ <br /> window.getSelection ? window.getSelection().removeAllRanges() : document.selection.empty(); <br /> var i_x = e.clientX - this._x, i_y = e.clientY - this._y; <br /> this._dragobj.style[this._Css.x] = (this._isdrag?Math.max(i_x,0):Math.max(i_x,this.Minwidth)) 'px'; <br /> this._dragobj.style[this._Css.y] = (this._isdrag?Math.max(i_y,0):Math.max(i_y,this.Minheight)) 'px' <br /> if(!this._isdrag) <br /> this._body.style.height = Math.max(i_y -this.Titleheight,this.Minheight-this.Titleheight)-2*parseInt(CurrentStyle(this._body).paddingLeft) 'px'; <br /> }, <br /> Stop:function(){ <br /> removeListener(document,'mousemove',this._fM); <br /> removeListener(document,'mouseup',this._fS); <br /> if(isIE) <br /> { <br /> removeListener(this._dragobj, "losecapture", this._fS); <br /> this._dragobj.releaseCapture(); <br /> } <br /> else <br /> { <br /> removeListener(window, "blur", this._fS); <br /> }; <br /> } <br /> }) <br /> new Dialog({Width:400,Height:400,Left:700,Top:100}); <br /> new Dialog({Info:"欢迎",Content:"欢迎光临 "}); <br /> function creat(){ <br /> new Dialog({Info:title="标题" i,Left:300 left,Top:300 left,Content:'内容' i,Zindex:( Dialog.Zindex)}); <br /> i ;left =10; <br /> var width=Left; <br /> } <br /> </script>
<%=width%>
回复讨论(解决方案)
在创建的时候保存一下相关信息,在拖动的时候保存一下相关信息。如果拖动的时候有性能问题,可以在加个setTimeout进行延迟处理。时间有限,只能修改到这:
<!DOCTYPE html PUBLIC "-//W3C//DTD XHTML 1.0 Transitional//EN" "http://www.w3.org/TR/xhtml1/DTD/xhtml1-transitional.dtd"><html xmlns="http://www.w3.org/1999/xhtml"><head> <meta charset="utf-8"/> <title>JS模拟Dialog实现可创建可拖拽拉伸可拖动可关闭的浮动div层</title> <style type="text/css"> .dialogcontainter{ height:400px; width:400px; border:1px solid #14495f; position:absolute; font-size:13px; } .dialogtitle{ height:26px; width:auto; background-image:url(/imagesforcode/201209/103444839_p.gif); } .dialogtitleinfo{ float:left; height:20px; margin-top:2px; margin-left:10px; line-height:20px; vertical-align:middle; color:#FFFFFF; font-weight:bold; } .dialogtitleico{ float:right; height:20px; width:21px; margin-top:2px; margin-right:5px; text-align:center; line-height:20px; vertical-align:middle; background-image:url(/imagesforcode/201209/103419495_p.gif); background-position:-21px 0px } .dialogbody{ padding:10px; width:auto; background-color:#FFFFFF; } .dialogbottom{ bottom:1px; right:1px; cursor:nw-resize; position:absolute; background-image:url(imagesforcode/201209/103419495_p.gif); background-position:-42px -10px; width:10px; height:10px; font-size:0; } </style></head><body><input value="创建" type="button" onclick="creat()"/><div id='aa'></div><script> var z = 1, i = 1, left = 10 var isIE = (document.all) ? true : false; var $ = function (id) { return document.getElementById(id); }; var Extend = function (destination, source) { for (var property in source) { destination[property] = source[property]; } } var Bind = function (object, fun, args) { return function () { return fun.apply(object, args || []); } } var BindAsEventListener = function (object, fun) { var args = Array.prototype.slice.call(arguments).slice(2); return function (event) { return fun.apply(object, [event || window.event].concat(args)); } } var CurrentStyle = function (element) { return element.currentStyle || document.defaultView.getComputedStyle(element, null); } function create(elm, parent, fn) { var element = document.createElement(elm); fn && fn(element); parent && parent.appendChild(element); return element } function addListener(element, e, fn) { element.addEventListener ? element.addEventListener(e, fn, false) : element.attachEvent("on" + e, fn) } function removeListener(element, e, fn) { element.removeEventListener ? element.removeEventListener(e, fn, false) : element.detachEvent("on" + e, fn) } var Class = function (properties) { var _class = function () { return (arguments[0] !== null && this.initialize && typeof(this.initialize) == 'function') ? this.initialize.apply(this, arguments) : this; }; _class.prototype = properties; return _class; }; var Dialog = new Class({ options : { Width : 400, Height : 400, Left : 100, Top : 100, Titleheight : 26, Minwidth : 200, Minheight : 200, CancelIco : true, ResizeIco : false, Info : "新闻标题", Content : "无内容", Zindex : 2 }, initialize : function (options) { this._dragobj = null; this._resize = null; this._cancel = null; this._body = null; this._x = 0; this._y = 0; this._fM = BindAsEventListener(this, this.Move); this._fS = Bind(this, this.Stop); this._isdrag = null; this._Css = null; this.Width = this.options.Width; this.Height = this.options.Height; this.Left = this.options.Left; this.Top = this.options.Top; this.CancelIco = this.options.CancelIco; this.Info = this.options.Info; this.Content = this.options.Content; this.Minwidth = this.options.Minwidth; this.Minheight = this.options.Minheight; this.Titleheight = this.options.Titleheight; this.Zindex = this.options.Zindex; Extend(this, options); Dialog.Zindex = this.Zindex //构造dialog var obj = ['dialogcontainter', 'dialogtitle', 'dialogtitleinfo', 'dialogtitleico', 'dialogbody', 'dialogbottom']; for (var i = 0; i < obj.length; i++) { obj[i] = create('div', null, function (elm) { elm.className = obj[i]; }); } obj[2].innerHTML = this.Info; obj[4].innerHTML = this.Content; obj[1].appendChild(obj[2]); obj[1].appendChild(obj[3]); obj[0].appendChild(obj[1]); obj[0].appendChild(obj[4]); obj[0].appendChild(obj[5]); obj[0].id = 'dialog' + this.Zindex; document.body.appendChild(obj[0]); this._dragobj = obj[0]; this._resize = obj[5]; this._cancel = obj[3]; this._body = obj[4]; ///o,x1,x2 ////设置Dialog的长 宽 ,left ,top with (this._dragobj.style) { height = this.Height + "px"; top = this.Top + "px"; width = this.Width + "px"; left = this.Left + "px"; zIndex = this.Zindex; } this._body.style.height = this.Height - this.Titleheight - parseInt(CurrentStyle(this._body).paddingLeft) * 2 + 'px'; /////////////////////////////////////////////////////////////////////////////// 添加事件 addListener(this._dragobj, 'mousedown', BindAsEventListener(this, this.Start, true)); addListener(this._cancel, 'mouseover', Bind(this, this.Changebg, [this._cancel, '0px 0px', '-21px 0px'])); addListener(this._cancel, 'mouseout', Bind(this, this.Changebg, [this._cancel, '0px 0px', '-21px 0px'])); addListener(this._cancel, 'mousedown', BindAsEventListener(this, this.Disappear)); addListener(this._body, 'mousedown', BindAsEventListener(this, this.Cancelbubble)); addListener(this._resize, 'mousedown', BindAsEventListener(this, this.Start, false)); }, Disappear : function (e) { this.Cancelbubble(e); document.body.removeChild(this._dragobj); }, Cancelbubble : function (e) { this._dragobj.style.zIndex = ++Dialog.Zindex; document.all ? (e.cancelBubble = true) : (e.stopPropagation()) }, Changebg : function (o, x1, x2) { o.style.backgroundPosition = (o.style.backgroundPosition == x1) ? x2 : x1; }, Start : function (e, isdrag) { if (!isdrag) { this.Cancelbubble(e); } this._Css = isdrag ? {x : "left", y : "top"} : {x : "width", y : "height"} this._dragobj.style.zIndex = ++Dialog.Zindex; this._isdrag = isdrag; this._x = isdrag ? (e.clientX - this._dragobj.offsetLeft || 0) : (this._dragobj.offsetLeft || 0); this._y = isdrag ? (e.clientY - this._dragobj.offsetTop || 0) : (this._dragobj.offsetTop || 0); if (isIE) { addListener(this._dragobj, "losecapture", this._fS); this._dragobj.setCapture(); } else { e.preventDefault(); addListener(window, "blur", this._fS); } addListener(document, 'mousemove', this._fM) addListener(document, 'mouseup', this._fS) }, Move : function (e) { window.getSelection ? window.getSelection().removeAllRanges() : document.selection.empty(); var i_x = e.clientX - this._x, i_y = e.clientY - this._y; this._dragobj.style[this._Css.x] = (this._isdrag ? Math.max(i_x, 0) : Math.max(i_x, this.Minwidth)) + 'px'; this._dragobj.style[this._Css.y] = (this._isdrag ? Math.max(i_y, 0) : Math.max(i_y, this.Minheight)) + 'px' if (!this._isdrag) this._body.style.height = Math.max(i_y - this.Titleheight, this.Minheight - this.Titleheight) - 2 * parseInt(CurrentStyle(this._body).paddingLeft) + 'px'; savePos(this._dragobj.id); }, Stop : function () { removeListener(document, 'mousemove', this._fM); removeListener(document, 'mouseup', this._fS); if (isIE) { removeListener(this._dragobj, "losecapture", this._fS); this._dragobj.releaseCapture(); } else { removeListener(window, "blur", this._fS); } } }); var a = new Dialog({Width : 400, Height : 400, Left : 700, Top : 100}); new Dialog({Info : "欢迎", Content : "欢迎光临 "}); function creat() { var a = new Dialog({Info : title = "标题" + i, Left : 300 + left, Top : 300 + left, Content : '内容' + i, Zindex : (++Dialog.Zindex)}); savePos(a._dragobj.id); i++; left += 10; } function savePos(obj){// var aid = a._dragobj.id; var adig = $(obj).style; var b = {id : obj, w : adig.width, h : adig.height, t: adig.top, l : adig.left, z : adig.zIndex }; console.dir(b); }</script><%=width%></body></html>如何保存每个dialog的最后状态呢
如何保存每个dialog的最后状态呢
function savePos(obj){// var aid = a._dragobj.id; var adig = $(obj).style; var b = {id : obj, w : adig.width, h : adig.height, t: adig.top, l : adig.left, z : adig.zIndex }; console.dir(b); }在这个方法里边保存。

Hot AI Tools

Undresser.AI Undress
AI-powered app for creating realistic nude photos

AI Clothes Remover
Online AI tool for removing clothes from photos.

Undress AI Tool
Undress images for free

Clothoff.io
AI clothes remover

Video Face Swap
Swap faces in any video effortlessly with our completely free AI face swap tool!

Hot Article
Hot Tools

Notepad++7.3.1
Easy-to-use and free code editor

SublimeText3 Chinese version
Chinese version, very easy to use

Zend Studio 13.0.1
Powerful PHP integrated development environment

Dreamweaver CS6
Visual web development tools

SublimeText3 Mac version
God-level code editing software (SublimeText3)
Hot Topics


 Details on how to turn on environment variable settings on Windows 11
Dec 30, 2023 pm 06:07 PM
Details on how to turn on environment variable settings on Windows 11
Dec 30, 2023 pm 06:07 PM
The environment variable function is an essential tool for running the configuration program in the system. However, in the latest win11 system, there are still many users who do not know how to set it up. Here is a detailed introduction to the location of the win11 environment variable opening. Come and join us. Learn to operate it. Where are the win11 environment variables: 1. First enter "win+R" to open the run box. 2. Then enter the command: controlsystem. 3. In the system information interface that opens, select "Advanced System Settings" from the left menu. 4. Then select the "Environment Variables" option at the bottom of the "System Properties" window that opens. 5. Finally, in the opened environment variables, you can make relevant settings according to your needs.
 Win11 startup path and how to open it
Jan 03, 2024 pm 11:13 PM
Win11 startup path and how to open it
Jan 03, 2024 pm 11:13 PM
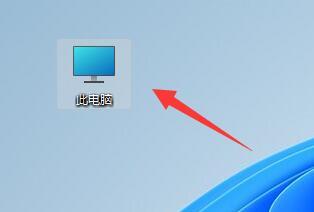
Every Windows system has a startup path. If you add files or software to it, it will be opened at boot time. However, many friends don’t know where the win11 startup path is. In fact, we only need to enter the corresponding folder on the C drive. Win11 startup path: 1. Double-click to open "This PC" 2. Directly paste the path "C:\ProgramData\Microsoft\Windows\StartMenu\Programs\Startup" into the path box. 3. Here is the win11 startup path. If we want to open the file after booting, we can put the file in. 4. If you cannot enter according to this path, it may be hidden.
 Location of Origami Bird at Stardome Railway Crocker Film and Television Park
Mar 27, 2024 pm 11:51 PM
Location of Origami Bird at Stardome Railway Crocker Film and Television Park
Mar 27, 2024 pm 11:51 PM
There are a total of 20 origami birds in Croaker Film and Television Park on Star Dome Railway. Many players don’t know where the origami birds are in Crocker Film and Television Park. The editor has summarized the locations of each origami bird to help everyone. Search for it, and take a look at this latest summary of the locations of the origami birds in Croaker Film and Television Park for specific content. Guide to the Honkai Star Dome Railway: Origami Bird in Crook Movie Park Location 1, Crook Movie Park 1st Floor 2, and Crook Movie Park 2nd Floor Star Dome Railway
 How to create pixel art in GIMP
Feb 19, 2024 pm 03:24 PM
How to create pixel art in GIMP
Feb 19, 2024 pm 03:24 PM
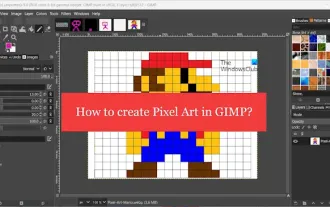
This article will interest you if you are interested in using GIMP for pixel art creation on Windows. GIMP is a well-known graphics editing software that is not only free and open source, but also helps users create beautiful images and designs easily. In addition to being suitable for beginners and professional designers alike, GIMP can also be used to create pixel art, a form of digital art that utilizes pixels as the only building blocks for drawing and creating. How to Create Pixel Art in GIMP Here are the main steps to create pixel pictures using GIMP on a Windows PC: Download and install GIMP, then launch the application. Create a new image. Resize width and height. Select the pencil tool. Set the brush type to pixels. set up
 How to create a folder on Realme Phone?
Mar 23, 2024 pm 02:30 PM
How to create a folder on Realme Phone?
Mar 23, 2024 pm 02:30 PM
Title: Realme Phone Beginner’s Guide: How to Create Folders on Realme Phone? In today's society, mobile phones have become an indispensable tool in people's lives. As a popular smartphone brand, Realme Phone is loved by users for its simple and practical operating system. In the process of using Realme phones, many people may encounter situations where they need to organize files and applications on their phones, and creating folders is an effective way. This article will introduce how to create folders on Realme phones to help users better manage their phone content. No.
 Understand the location and structure of pip installation package storage
Jan 18, 2024 am 08:23 AM
Understand the location and structure of pip installation package storage
Jan 18, 2024 am 08:23 AM
To learn more about the storage location of packages installed by pip, you need specific code examples. Pip is a commonly used package management tool in the Python language. It is used to easily install, upgrade and manage Python packages. When using pip to install a package, it will automatically download the corresponding package file from PyPI (Python Package Index) and install it to the specified location. So, where are the packages installed by pip stored? This is a problem that many Python developers will encounter. This article will delve into the location of the packages installed by pip and provide
 How to create a family with Gree+
Mar 01, 2024 pm 12:40 PM
How to create a family with Gree+
Mar 01, 2024 pm 12:40 PM
Many friends expressed that they want to know how to create a family in Gree+ software. Here is the operation method for you. Friends who want to know more, come and take a look with me. First, open the Gree+ software on your mobile phone and log in. Then, in the options bar at the bottom of the page, click the "My" option on the far right to enter the personal account page. 2. After coming to my page, there is a "Create Family" option under "Family". After finding it, click on it to enter. 3. Next jump to the page to create a family, enter the family name to be set in the input box according to the prompts, and click the "Save" button in the upper right corner after entering it. 4. Finally, a "save successfully" prompt will pop up at the bottom of the page, indicating that the family has been successfully created.
![How to increase disk size in VirtualBox [Guide]](https://img.php.cn/upload/article/000/887/227/171064142025068.jpg?x-oss-process=image/resize,m_fill,h_207,w_330) How to increase disk size in VirtualBox [Guide]
Mar 17, 2024 am 10:10 AM
How to increase disk size in VirtualBox [Guide]
Mar 17, 2024 am 10:10 AM
We often encounter situations where the predefined disk size has no room for more data? If you need more virtual machine hard disk space at a later stage, you must expand the virtual hard disk and partitions. In this post, we will see how to increase disk size in VirtualBox. Increasing the disk size in VirtualBox It is important to note that you may want to back up your virtual hard disk files before performing these operations, as there is always the possibility of something going wrong. It is always a good practice to have backups. However, the process usually works fine, just make sure to shut down your machine before continuing. There are two ways to increase disk size in VirtualBox. Expand VirtualBox disk size using GUI using CL
