
 Web Front-end
JS Tutorial
Solve the double border problem when Extjs 4 Panel is used as a subcomponent of Window component_extjs
Web Front-end
JS Tutorial
Solve the double border problem when Extjs 4 Panel is used as a subcomponent of Window component_extjs
Solve the double border problem when Extjs 4 Panel is used as a subcomponent of Window component_extjs

Extjs components such as Panel and Window are bordered by default. Normally, it does not matter when used alone. However, when Panel is used as a subcomponent of the Window component, double borders will appear. If the Window component If it contains two or more Panels, the borders between Panel and Panel components will be accumulated repeatedly, which means it will become a double border. In fact, the double border does not affect the appearance very much, but it will look somewhat unsatisfactory, so we have to find a way to remove the double border and turn it into a single border. Below are two comparison pictures before and after. If you carefully observe the borders of the two windows, you can find that the former is thicker and the latter is thinner.
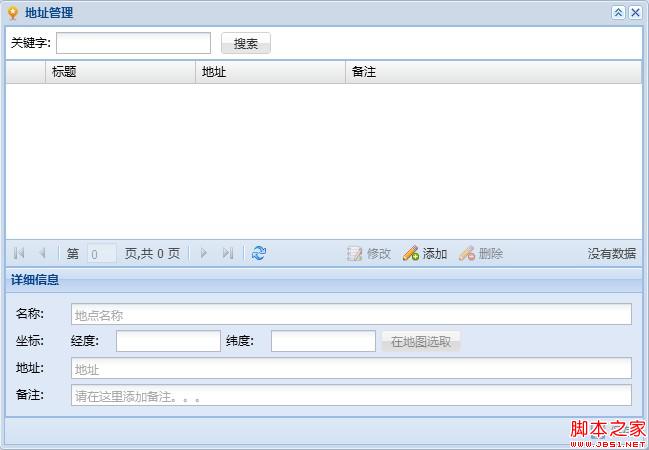
Picture 1
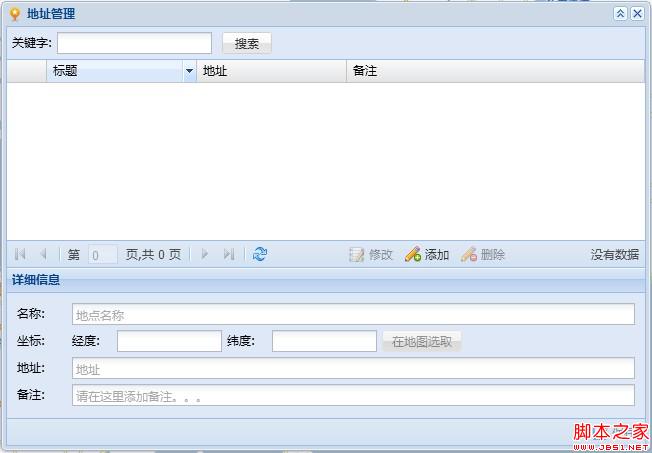
Picture 2
Now we are going to think of a solution.
The first thing that comes to mind is that we can set the border of the Window to 0, that is, set the properties of the Window component border:false. At this time, you can find that the borders around the Window are programmed as single borders, but inside the Window There will still be a double border between the GridPanel and the Panel below, which looks uncoordinated, and there is no border around the bottom toolbar (because the toolbar where the "Save" button is located belongs to Window, and after the Window's border is gone, of course Will affect the border of the bottom toolbar). So this solution is not feasible. Throw it away!
The second option is to retain the border of the Window component and find a way to remove the border of the Panel. By checking the help documentation of ExtJS, I found that the style of the Panel can be controlled by defining bodyStyle. So set the bodyStyle attribute for the above Panel respectively, GridPanel: bodyStyle: 'border-width:1px 0 1px 0;', and the lower Panel: bodyStyle: 'border-width:1px 0 0 0 ; background:transparent', After refreshing and re-looking at the effect, I found that the border was indeed programmed but the border was broken, but there were still some borders that were double, that is, the two sides of the GridPanel header above, and the Panel below. Both sides of the Header. This method is relatively reliable. We'll just revise it carefully. The next step is to define a cls attribute for each Panel, and then limit the header and header styles by writing your own styles, that is, overwriting the ExtJS default style (just modifying the border style). Through Chrome's "Inspect Element", I found that the default CSS style class for the table header is x-grid-header-ct, and the default style class for the Panel is x-panel-header. The next thing to do is to write your own style to overwrite the previous style. For example, the cls I set for the two Panels is addr-panel, and then add a new CSS style class .addr-panel .x-grid-header-ct {border-width: 1px 0 0 0 !important;}, .addr-panel .x-panel-header{border-width:0;}. After saving, refresh and check the effect. It is the effect in Figure 2. Complete!
If we encounter similar problems in the future, we can consider using CSS styles to solve them. (End)^_^

Hot AI Tools

Undresser.AI Undress
AI-powered app for creating realistic nude photos

AI Clothes Remover
Online AI tool for removing clothes from photos.

Undress AI Tool
Undress images for free

Clothoff.io
AI clothes remover

Video Face Swap
Swap faces in any video effortlessly with our completely free AI face swap tool!

Hot Article
Hot Tools

Notepad++7.3.1
Easy-to-use and free code editor

SublimeText3 Chinese version
Chinese version, very easy to use

Zend Studio 13.0.1
Powerful PHP integrated development environment

Dreamweaver CS6
Visual web development tools

SublimeText3 Mac version
God-level code editing software (SublimeText3)
Hot Topics
 1665
1665
 14
1424
52
1322
25
1270
29
1249
24
14
1424
52
1322
25
1270
29
1249
24

 How to restore accidentally deleted GNOME Panel in Ubuntu
Jan 06, 2024 pm 11:01 PM
How to restore accidentally deleted GNOME Panel in Ubuntu
Jan 06, 2024 pm 11:01 PM
If you delete the panel option on gnome and some options on power management in the Ubuntu system, the menu bar and status bar in the Ubuntu system will disappear. Restoring gnomepanel can solve this problem, so how to do it? The editor below will bring you the Ubuntu method to restore the accidentally deleted GNOMEPanel, let's go and take a look! The method is as follows: 1. Directly press Alt+F2, then enter gnome-terminal in the dialog box that comes out, and press Enter to execute Pop up the command line terminal, or Ctrl+Alt+T to pop up the command line terminal. 2. Enter gconftool-2--shutdown.
 How to use $children to access child component instances in Vue
Jun 11, 2023 am 10:09 AM
How to use $children to access child component instances in Vue
Jun 11, 2023 am 10:09 AM
How to use $children to access subcomponent instances in Vue Vue is a JavaScript framework oriented to the MVVM pattern. It provides many convenient APIs to create responsive data, control views, etc. Among them, components are an important concept in Vue, which can make the code more modular, reusable, and easy to maintain. In Vue, each component has its own instance, which can be accessed through this. However, if you want to access the instance of a child component, you need to use the $children attribute. Book
 OLED with 480 Hz and QHD resolution: LG Display begins mass production of new gaming panels
Sep 05, 2024 am 10:50 AM
OLED with 480 Hz and QHD resolution: LG Display begins mass production of new gaming panels
Sep 05, 2024 am 10:50 AM
LG Display recently announced in a press release that it had begun mass production of its latest OLED panel for gaming monitors. Specifically, this is a 27-inch OLED panel and the first of its kind to achieve a frame rate of 480 Hz, which is said to
 How to use panel control
Oct 10, 2023 am 09:36 AM
How to use panel control
Oct 10, 2023 am 09:36 AM
The steps to use the panel control are to first create a Panel control and set its width, height, background color, border color, border width and padding, create two buttons and add them to the Panel control, and finally Add the Panel control to the form.
 Vue and Vue-Router: How to use route parameters in child components?
Dec 17, 2023 am 10:26 AM
Vue and Vue-Router: How to use route parameters in child components?
Dec 17, 2023 am 10:26 AM
Vue and Vue-Router: How to use route parameters in child components? Introduction: Vue is a popular JavaScript framework for building user interfaces. Vue-Router is Vue's official routing manager, used to implement navigation functions for single-page applications. In application development, we often need to pass parameters between components, and Vue-Router provides a simple way to handle this problem. This article will introduce how to use routing parameters in Vue subcomponents.
 VUE3 Quick Start: Use Props to pass data to subcomponents
Jun 15, 2023 pm 09:30 PM
VUE3 Quick Start: Use Props to pass data to subcomponents
Jun 15, 2023 pm 09:30 PM
VUE3 is the latest version of Vue.js, which has been greatly enhanced in terms of performance, experience and flexibility. In this article, we will learn how to use VUE3’s Props to pass data to child components. Vue.js is an MVVM (Model-View-ViewModel) framework, which is based on components. Each component has a local state and possible actions, so communication between components is crucial. In Vue.js, parent components can pass Props
 How to use props to pass data to subcomponents in Vue
Jun 11, 2023 pm 01:24 PM
How to use props to pass data to subcomponents in Vue
Jun 11, 2023 pm 01:24 PM
How to use props in Vue to pass data to subcomponents In Vue, component-based development is a very common way. In components, sometimes it is necessary to pass data from parent components to child components so that the child components can use the data for rendering or other operations. This needs to be achieved using props in Vue. Props, or attributes, are a way in Vue for parent components to pass data to child components. By defining props, you can pass data to subcomponents so that subcomponents can access the data and proceed.
 Google Pixel 9 Pro Fold offers the best foldable camera according to DxOMark, but a worse display than the Galaxy Z Fold6
Sep 04, 2024 am 11:12 AM
Google Pixel 9 Pro Fold offers the best foldable camera according to DxOMark, but a worse display than the Galaxy Z Fold6
Sep 04, 2024 am 11:12 AM
The Google Pixel 9 Pro Fold has a 48 MP f/1.7 main camera based on a 1/2 inch sensor, a 10.8 MP f/3.1 telephoto camera with a 1/3.2 inch sensor and five-fold optical zoom, and a 10.5 MP f/2.2 ultra-wide-angle camera with a sensor in 1/3.4 inch format
