

Outlook signature: how to make, add and change

This comprehensive guide provides step-by-step instructions for creating and managing professional email signatures in Microsoft Outlook. Learn how to craft compelling signatures with images, clickable links, and more, across all Outlook versions (including Outlook 365, 2021, 2019, 2016, 2013, and earlier).
This tutorial focuses on practical application, offering clear guidance for creating, using, and modifying Outlook signatures. Discover tips for personalized, informative, and eye-catching email signatures that make a lasting impression.
Key Topics Covered:
- Creating Outlook Signatures
- Automating Signature Inclusion
- Manual Signature Insertion
- Editing Existing Signatures
- Adding Images (Logos, Photos, Social Icons)
- Incorporating Clickable Links
- Making Images Clickable
- Creating Signatures from Business Cards
- Designing Professional HTML Signatures
- Locating and Managing Signature Files
Note: This guide covers classic desktop Outlook. For the new Outlook app or web version, please consult separate documentation.
Creating an Outlook Signature:
Creating a signature is straightforward. Multiple email accounts can each have a unique signature. Signatures can be automatically added to all outgoing emails, or different auto-signatures can be set for new messages versus replies/forwards.
- Access the signature settings via the Home tab (New Email) > Message tab (Signature > Signatures…) or File > Options > Mail > Signatures….
- Add a new signature using the New button. Name your signature and select the associated email account.
- Compose your signature text, formatting it as desired.
- Choose default signature settings for new messages and replies/forwards in the Choose default signature section.
- Save your signature.
You can create multiple signatures for different accounts or occasions (e.g., a longer signature for new messages, a shorter one for replies).


Automating Signature Addition:
To set up automatic signatures, configure the Default signature settings:
- Create or edit a signature.
- In the Choose default signature section, select the desired signature for new messages and replies/forwards. (none) disables auto-signatures.

Manual Signature Insertion:
For manual signature insertion (when automatic signatures are disabled), use the Signature button on the Message tab to select a signature for each email.

Changing Signatures:
Modifying existing signatures is easy:
- Open signature settings (File > Options > Mail > Signatures…).
- Rename, update text, change formatting, and adjust auto-signature settings.
- Save changes.

Adding Images:
Insert images (.png, .jpg, .bmp, .gif) using the Insert Picture button in the signature editor.


Adding Hyperlinks:
Use the Hyperlink button to create clickable links from text or images.


Creating Signatures from Business Cards:
Insert business cards (vCards) via the Business Card button. Note that this adds a .vcf attachment. Alternatively, copy the business card image and paste it directly into the signature.


Creating Professional HTML Signatures:
For advanced design, create your signature in a new email or Word, then copy and paste it into the Outlook signature editor. This allows for precise control over layout and formatting. Examples are provided showing the process and resulting signatures.


Quick HTML Signature Creation (Add-on):
Consider using a visual editor (like the one mentioned in the original text, though not directly linked here) for quicker HTML signature creation.
Locating Signature Files:
Outlook signature files are typically stored in:
- Windows 11/7:
C:\Users\%username%\AppData\Roaming\Microsoft\Signatures - Windows XP:
C:\Documents and Settings\%username%\Application Data\Microsoft\Signatures
Access this folder directly by holding Ctrl while clicking Signatures… in Outlook's Mail options.

This guide empowers you to create professional, effective email signatures in Outlook. Remember to maintain readability, balance colors, and keep graphics simple for optimal impact.
The above is the detailed content of Outlook signature: how to make, add and change. For more information, please follow other related articles on the PHP Chinese website!

Hot AI Tools

Undresser.AI Undress
AI-powered app for creating realistic nude photos

AI Clothes Remover
Online AI tool for removing clothes from photos.

Undress AI Tool
Undress images for free

Clothoff.io
AI clothes remover

Video Face Swap
Swap faces in any video effortlessly with our completely free AI face swap tool!

Hot Article
Hot Tools

Notepad++7.3.1
Easy-to-use and free code editor

SublimeText3 Chinese version
Chinese version, very easy to use

Zend Studio 13.0.1
Powerful PHP integrated development environment

Dreamweaver CS6
Visual web development tools

SublimeText3 Mac version
God-level code editing software (SublimeText3)
Hot Topics
 1664
1664
 14
1423
52
1319
25
1269
29
1248
24
14
1423
52
1319
25
1269
29
1248
24

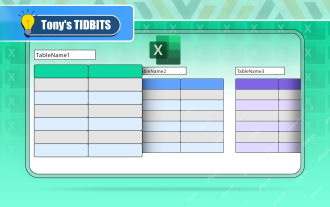 If You Don't Rename Tables in Excel, Today's the Day to Start
Apr 15, 2025 am 12:58 AM
If You Don't Rename Tables in Excel, Today's the Day to Start
Apr 15, 2025 am 12:58 AM
Quick link Why should tables be named in Excel How to name a table in Excel Excel table naming rules and techniques By default, tables in Excel are named Table1, Table2, Table3, and so on. However, you don't have to stick to these tags. In fact, it would be better if you don't! In this quick guide, I will explain why you should always rename tables in Excel and show you how to do this. Why should tables be named in Excel While it may take some time to develop the habit of naming tables in Excel (if you don't usually do this), the following reasons illustrate today
 How to change Excel table styles and remove table formatting
Apr 19, 2025 am 11:45 AM
How to change Excel table styles and remove table formatting
Apr 19, 2025 am 11:45 AM
This tutorial shows you how to quickly apply, modify, and remove Excel table styles while preserving all table functionalities. Want to make your Excel tables look exactly how you want? Read on! After creating an Excel table, the first step is usual
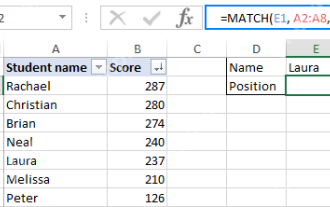 Excel MATCH function with formula examples
Apr 15, 2025 am 11:21 AM
Excel MATCH function with formula examples
Apr 15, 2025 am 11:21 AM
This tutorial explains how to use MATCH function in Excel with formula examples. It also shows how to improve your lookup formulas by a making dynamic formula with VLOOKUP and MATCH. In Microsoft Excel, there are many different lookup/ref

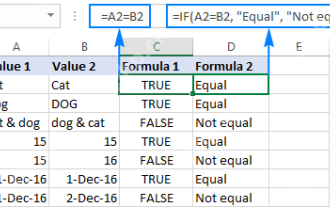 Excel: Compare strings in two cells for matches (case-insensitive or exact)
Apr 16, 2025 am 11:26 AM
Excel: Compare strings in two cells for matches (case-insensitive or exact)
Apr 16, 2025 am 11:26 AM
The tutorial shows how to compare text strings in Excel for case-insensitive and exact match. You will learn a number of formulas to compare two cells by their values, string length, or the number of occurrences of a specific character, a
 How to Make Your Excel Spreadsheet Accessible to All
Apr 18, 2025 am 01:06 AM
How to Make Your Excel Spreadsheet Accessible to All
Apr 18, 2025 am 01:06 AM
Improve the accessibility of Excel tables: A practical guide When creating a Microsoft Excel workbook, be sure to take the necessary steps to make sure everyone has access to it, especially if you plan to share the workbook with others. This guide will share some practical tips to help you achieve this. Use a descriptive worksheet name One way to improve accessibility of Excel workbooks is to change the name of the worksheet. By default, Excel worksheets are named Sheet1, Sheet2, Sheet3, etc. This non-descriptive numbering system will continue when you click " " to add a new worksheet. There are multiple benefits to changing the worksheet name to make it more accurate to describe the worksheet content: carry
 How to Use Excel's AGGREGATE Function to Refine Calculations
Apr 12, 2025 am 12:54 AM
How to Use Excel's AGGREGATE Function to Refine Calculations
Apr 12, 2025 am 12:54 AM
Quick Links The AGGREGATE Syntax
 Why You Should Always Rename Worksheets in Excel
Apr 17, 2025 am 12:56 AM
Why You Should Always Rename Worksheets in Excel
Apr 17, 2025 am 12:56 AM
Improve Excel’s productivity: A guide to efficient naming worksheets This article will guide you on how to effectively name Excel worksheets, improve productivity and enhance accessibility. Clear worksheet names significantly improve navigation, organization, and cross-table references. Why rename Excel worksheets? Using the default "Sheet1", "Sheet2" and other names is inefficient, especially in files containing multiple worksheets. Clearer names like “Dashboard,” “Sales,” and “Forecasts,” give you and others a clear picture of the workbook content and quickly find the worksheets you need. Use descriptive names (such as "Dashboard", "Sales", "Forecast")
