

How to set and change print area in Excel

This tutorial shows you how to easily manage print areas in Excel, both manually and using macros. Printing an entire spreadsheet can be cumbersome; Excel's print area feature lets you specify exactly what prints.
- Setting a Print Area
- Defining Multiple Print Areas
- Ignoring Print Areas
- Printing Multiple Areas on One Page
- Setting Print Areas Across Multiple Sheets (using VBA)
- Modifying a Print Area
- Clearing a Print Area
- Protecting a Print Area (using VBA)
- Troubleshooting Print Area Issues
Excel Print Areas Explained
A print area defines the cell range included in a printout. If you don't need the entire spreadsheet, define a print area encompassing only the necessary data. Selecting a print area ensures only that region prints when you use Ctrl P or the Print button. Multiple print areas on a single sheet each print on a separate page. Print areas are saved with the workbook.
Setting a Print Area
There are two ways to set a print area:
Quick Method:
- Select the data you want to print.
- Go to the Page Layout tab, Page Setup group, and click Print Area > Set Print Area.

A faint gray border indicates the print area.

Detailed Method:
- On the Page Layout tab, click the Page Setup dialog launcher
 .
. - In the Sheet tab, enter or select the desired range(s) in the Print area field (hold Ctrl for multiple ranges).
- Click OK.
 .
.
Tips: Print areas are saved with the workbook. Always preview (Ctrl P) before printing to verify the selection. To print a selection without setting a print area, select the range, press Ctrl P, and choose Print Selection.
Multiple Print Areas
To print several sections of a worksheet:
- Select the first range, hold Ctrl, and select additional ranges.
- On the Page Layout tab, click Print Area > Set Print Area.
Each area prints on a separate page. This works only for non-contiguous ranges.
Ignoring Print Areas
To print the entire sheet or workbook, ignoring defined print areas:
- Click File > Print or press Ctrl P.
- Under Settings, select Ignore Print Area from the Print Active Sheets dropdown.

Printing Multiple Areas on One Page
This depends on your printer's capabilities. Check your printer properties for a Pages per Sheet option. If unavailable, copy the print ranges to a new sheet using Paste Special > Linked Picture to maintain links to the original data, then print the new sheet.

Setting Print Areas Across Multiple Sheets (VBA)
For consistent print areas across many similarly structured worksheets, VBA macros are efficient.
Macro 1: Match Active Sheet's Print Area: This macro sets the print area of selected sheets to match the active sheet.
Sub SetPrintAreaSelectedSheets()
  Dim CurrentPrintArea As String
  Dim Sheet As Worksheet
  CurrentPrintArea = ActiveSheet.PageSetup.PrintArea
  For Each Sheet In ActiveWindow.SelectedSheets
    Sheet.PageSetup.PrintArea = CurrentPrintArea
  Next
End SubMacro 2: Apply Print Area to All Sheets: This macro applies the active sheet's print area to all sheets in the workbook.
Sub SetPrintAreaAllSheets()
  Dim CurrentPrintArea As String
  Dim Sheet As Worksheet
  CurrentPrintArea = ActiveSheet.PageSetup.PrintArea
  For Each Sheet In ActiveWorkbook.Sheets
    If Sheet.Name  ActiveSheet.Name Then
      Sheet.PageSetup.PrintArea = CurrentPrintArea
    End If
  Next
End SubMacro 3: User-Defined Print Area: This macro prompts the user to select a print area, then applies it to all selected sheets.
Sub SetPrintAreaMultipleSheets()
  Dim SelectedPrintAreaRange As Range
  Dim SelectedPrintAreaRangeAddress As String
  Dim Sheet As Worksheet
  On Error Resume Next
  Set SelectedPrintAreaRange = Application.InputBox("Please select the print area range", "Set Print Area in Multiple Sheets", Type:=8)
  If Not SelectedPrintAreaRange Is Nothing Then
    SelectedPrintAreaRangeAddress = SelectedPrintAreaRange.Address(True, True, xlA1, False)
    For Each Sheet In ActiveWindow.SelectedSheets
      Sheet.PageSetup.PrintArea = SelectedPrintAreaRangeAddress
    Next
  End If
  Set SelectedPrintAreaRange = Nothing
End SubDownload a sample workbook with these macros for easy use.
Modifying a Print Area
To expand a print area:
- Select cells to add.
- On the Page Layout tab, click Print Area > Add to Print Area.

Alternatively, use the Name Manager (Formulas tab > Defined Names > Name Manager) to edit the Print_Area range directly, or modify the range in the Page Setup dialog box.
Clearing a Print Area
On the Page Layout tab, click Print Area > Clear Print Area.
Protecting a Print Area (VBA)
There's no direct way to lock a print area. Use VBA's Workbook_BeforePrint event to enforce a specific print area before printing:
Private Sub Workbook_BeforePrint(Cancel As Boolean)
  ActiveSheet.PageSetup.PrintArea = "A1:D10" ' Or specify the desired range
End Sub
(Adapt for multiple sheets with different ranges as needed.) Place this code in the ThisWorkbook module of your macro-enabled workbook (.xlsm).
Troubleshooting
- Cannot set print area: Clear the print area and redefine it.
- Not all columns printed: Column width may exceed paper size. Adjust margins or scaling (Fit All Columns on One Page).
- Print area prints on multiple pages: Non-adjacent ranges print separately. If a single range spans multiple pages, reduce its size or adjust page settings (Fit Sheet on One Page).
This comprehensive guide enables efficient print area management in Excel, enhancing your worksheet printing experience.
The above is the detailed content of How to set and change print area in Excel. For more information, please follow other related articles on the PHP Chinese website!

Hot AI Tools

Undresser.AI Undress
AI-powered app for creating realistic nude photos

AI Clothes Remover
Online AI tool for removing clothes from photos.

Undress AI Tool
Undress images for free

Clothoff.io
AI clothes remover

Video Face Swap
Swap faces in any video effortlessly with our completely free AI face swap tool!

Hot Article
Hot Tools

Notepad++7.3.1
Easy-to-use and free code editor

SublimeText3 Chinese version
Chinese version, very easy to use

Zend Studio 13.0.1
Powerful PHP integrated development environment

Dreamweaver CS6
Visual web development tools

SublimeText3 Mac version
God-level code editing software (SublimeText3)
Hot Topics


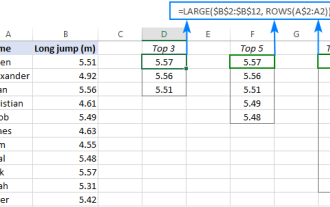 Excel formula to find top 3, 5, 10 values in column or row
Apr 01, 2025 am 05:09 AM
Excel formula to find top 3, 5, 10 values in column or row
Apr 01, 2025 am 05:09 AM
This tutorial demonstrates how to efficiently locate the top N values within a dataset and retrieve associated data using Excel formulas. Whether you need the highest, lowest, or those meeting specific criteria, this guide provides solutions. Findi
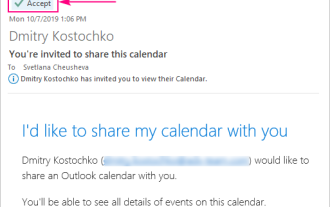 How to add calendar to Outlook: shared, Internet calendar, iCal file
Apr 03, 2025 am 09:06 AM
How to add calendar to Outlook: shared, Internet calendar, iCal file
Apr 03, 2025 am 09:06 AM
This article explains how to access and utilize shared calendars within the Outlook desktop application, including importing iCalendar files. Previously, we covered sharing your Outlook calendar. Now, let's explore how to view calendars shared with
 How to use Flash Fill in Excel with examples
Apr 05, 2025 am 09:15 AM
How to use Flash Fill in Excel with examples
Apr 05, 2025 am 09:15 AM
This tutorial provides a comprehensive guide to Excel's Flash Fill feature, a powerful tool for automating data entry tasks. It covers various aspects, from its definition and location to advanced usage and troubleshooting. Understanding Excel's Fla
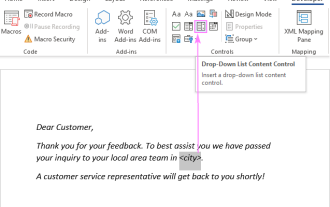 Add a dropdown list to Outlook email template
Apr 01, 2025 am 05:13 AM
Add a dropdown list to Outlook email template
Apr 01, 2025 am 05:13 AM
This tutorial shows you how to add dropdown lists to your Outlook email templates, including multiple selections and database population. While Outlook doesn't directly support dropdowns, this guide provides creative workarounds. Email templates sav
 MEDIAN formula in Excel - practical examples
Apr 11, 2025 pm 12:08 PM
MEDIAN formula in Excel - practical examples
Apr 11, 2025 pm 12:08 PM
This tutorial explains how to calculate the median of numerical data in Excel using the MEDIAN function. The median, a key measure of central tendency, identifies the middle value in a dataset, offering a more robust representation of central tenden
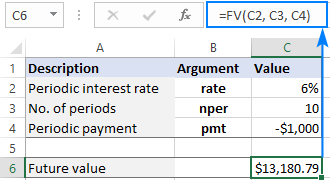 FV function in Excel to calculate future value
Apr 01, 2025 am 04:57 AM
FV function in Excel to calculate future value
Apr 01, 2025 am 04:57 AM
This tutorial explains how to use Excel's FV function to determine the future value of investments, encompassing both regular payments and lump-sum deposits. Effective financial planning hinges on understanding investment growth, and this guide prov
 How to remove / split text and numbers in Excel cell
Apr 01, 2025 am 05:07 AM
How to remove / split text and numbers in Excel cell
Apr 01, 2025 am 05:07 AM
This tutorial demonstrates several methods for separating text and numbers within Excel cells, utilizing both built-in functions and custom VBA functions. You'll learn how to extract numbers while removing text, isolate text while discarding numbers
 How to import contacts to Outlook (from CSV and PST file)
Apr 02, 2025 am 09:09 AM
How to import contacts to Outlook (from CSV and PST file)
Apr 02, 2025 am 09:09 AM
This tutorial demonstrates two methods for importing contacts into Outlook: using CSV and PST files, and also covers transferring contacts to Outlook Online. Whether you're consolidating data from an external source, migrating from another email pro
