Create and format tables in Outlook email templates
This tutorial explores Outlook table templates, demonstrating how to create, format, and manipulate them within email templates for efficient communication. We'll cover creating tables, formatting options, merging and unmerging cells, and conclude with a summary.
Before diving into table creation, let's briefly introduce Shared Email Templates, an Outlook add-in designed to streamline email correspondence. This tool simplifies the creation of visually appealing emails with formatting, links, images, and tables. Explore our documentation and blog for a comprehensive understanding of its capabilities. You can download and try Shared Email Templates from Microsoft AppSource for free.
Creating Tables in Outlook Email Templates
To create a table in a template:
- Launch Shared Email Templates.
- Create a new template or open an existing one.
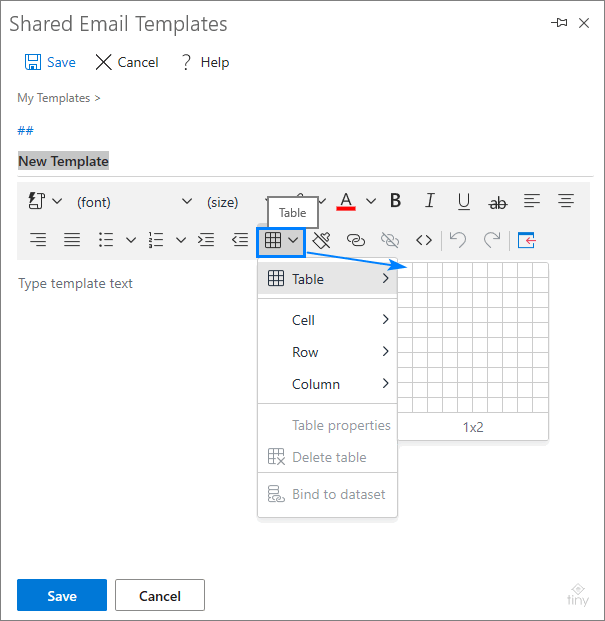
- Click the "Table" icon on the add-in's toolbar and specify the desired number of rows and columns.

Alternatively, paste an existing table. Note that pasted tables might lack borders; adjust border width to 1 in "Table properties" for visibility.

Adding or removing rows/columns is easily done by placing the cursor in a cell and using the dropdown menu. To delete a table, right-click and select "Delete table".


Formatting Tables
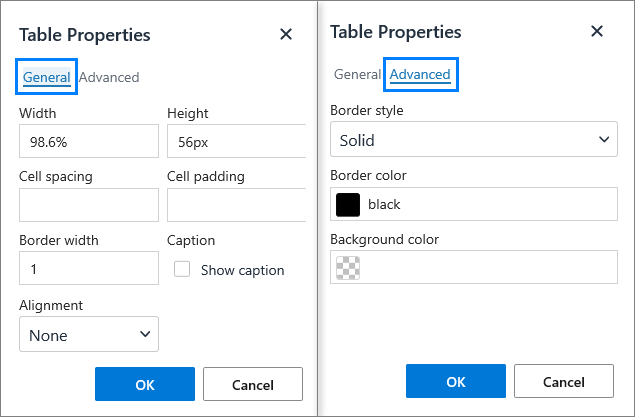
Enhance your tables beyond basic black borders. Right-click a cell, choose "Table properties," and access the "General" and "Advanced" tabs.
- General: Adjust cell size, spacing, padding, alignment, border width, and captions.
- Advanced: Customize border styles (solid, dotted, dashed), colors, and cell backgrounds.

Let's illustrate with an example: Applying a background color to a customer list table enhances its visual appeal.


Further customization, like highlighting the header row, is achieved by selecting the row, right-clicking, choosing "Row -> Row properties," and adjusting alignment, border style, and background color.


For advanced formatting, directly edit the template's HTML code.

Merging and Unmerging Cells
Shared Email Templates allows seamless merging and unmerging of cells without data loss.
To merge: Select the cells, right-click, and choose "Cell -> Merge cells."

To unmerge: Select the merged range, right-click, and choose "Cell -> Split cell."

Conclusion
This guide demonstrates creating, formatting, and manipulating tables within Outlook email templates using Shared Email Templates. We encourage you to utilize this add-in to enhance your email productivity. Questions? Leave a comment below!
Downloadable Resource:
Why choose Shared Email Templates? Top 10 reasons (.pdf file)
The above is the detailed content of Create and format tables in Outlook email templates. For more information, please follow other related articles on the PHP Chinese website!

Hot AI Tools

Undresser.AI Undress
AI-powered app for creating realistic nude photos

AI Clothes Remover
Online AI tool for removing clothes from photos.

Undress AI Tool
Undress images for free

Clothoff.io
AI clothes remover

Video Face Swap
Swap faces in any video effortlessly with our completely free AI face swap tool!

Hot Article

Hot Tools

Notepad++7.3.1
Easy-to-use and free code editor

SublimeText3 Chinese version
Chinese version, very easy to use

Zend Studio 13.0.1
Powerful PHP integrated development environment

Dreamweaver CS6
Visual web development tools

SublimeText3 Mac version
God-level code editing software (SublimeText3)

Hot Topics
 1666
1666
 14
14
 1426
1426
 52
52
 1328
1328
 25
25
 1273
1273
 29
29
 1254
1254
 24
24


