

How to create email rules in new Outlook and web

Here's a comprehensive guide on how to create your own email rules in the new Outlook and the web version of Outlook 365.
If you've become accustomed to using rules in classic Outlook to manage your email flow, you'll be pleased to know that the new Outlook also includes this feature. Despite some differences in the setup process and a slightly reduced set of options, you can still create rules to automate the sorting of your emails and keep a tidy inbox.
- New Outlook rules
- Create rule in new Outlook and web
- Set up rule for specific emails
- Manage rules
- Edit rule
- Disable and enable rule
- Remove rule
- Change order of rules
- Run rule manually
- New Outlook rules not working
- Client-side rules are out
- Rules are specific to each account
- Rules for Gmail and Yahoo accounts are not supported
New Outlook rules
Like the classic Outlook desktop app, the new Outlook lets you set up rules to manage your emails, but with a few less options. To grasp the nuances, you need to understand the difference between the server-side and client-side rules, and what you can and can't do with them.
Server-side rules work directly on the server, so they run whether or not Outlook is open on your computer. These are the kind of rules you'll find in Outlook on the web and the new Outlook app, which is pretty much a web client in disguise (a wrapper over the web client). They're great for organizing your emails - flagging the important ones, sorting them into categories, or moving to folders, all done on the server as soon as your emails come in.
But here's the catch: client-side rules, like printing emails or setting reminders, aren't available in the new Outlook or Outlook 365 online. That's because these rules need the Outlook client running on your computer to work. For example, you can't play a sound or print an email if you've logged into your Outlook account from a different computer that doesn't have a printer or speakers. Even if you could, in theory, set up such a rule, it won't work because there won't be any technical way to execute it.
So, while classic Outlook with an Exchange server has both server-side and client-only rules, in the new Outlook only server-side rules are available.

Examples of new Outlook rules:
- Block emails with certain words in new Outlook - filter spam emails by moving messages with certain words to the Junk folder.
- Set an out-of-office reply in new Outlook - notify senders that you are away with an automatic out-of-office reply.
- Forward or redirect mail - automatically forward or redirect all mail that you receive or specific messages only.
How to create a rule for Inbox in new Outlook and web
In the new Outlook and Outlook on the web (also known as Outlook 365 online), rules are applied to incoming messages that you receive.
To create an email rule for your Inbox, this is what you need to do:
- Click the Settings gear icon in the upper-right corner of the Outlook window. Alternatively, you can click Mail > View tab > View Settings.
- In the Settings menu, choose Mail > Rules.
- If you have multiple accounts, select the one for which you want to create a rule from the dropdown list at the top.
- Click on the plus icon to add a new rule.

- In the rules menu that opens, you need to define three essential components: a rule name, conditions, and actions.
-
Name the rule. Enter a shot descriptive name in the first box, for example "Forward messages".
-
Specify conditions. From the dropdown menu next to number 2, choose a condition. You can add more conditions by clicking the Add another condition link. For example, if you want to forward emails sent by a specific person, choose the "From" condition.
-
Define actions. Use the dropdown menu next to number 3 to select an action to apply to emails that meet your conditions. You can also add multiple actions by selecting Add another action. Actions are grouped into three categories:
- Organize: Move, copy, delete, or pin to the top.
- Mark message: as read, junk, with importance or assign a category.
- Route: forward, forward as attachment, or redirect.
For instance, select "Forward to" as an action, and then specify the email address of the recipient.
-
Add exceptions (optional). Outlook email rules can also include exceptions to conditions. Click Add an exception to specify an exception. For example, you may choose not to forward emails containing the word "confidential" in the subject or body.
- If you don't want to execute any more rules for a message after a certain rule is applied, select the Stop processing more rules checkbox. Find more about how this feature works: Stop processing more rules in Outlook.
- If you want to apply the rule to all existing emails meeting the condition, select the Run this rule checkbox. It's important to note that this option is limited to specific Outlook email rule types, such as move to folder, flag, or categorize, and is unavailable for forwarding rules.
- Finally, press Save to save the newly created rule or Discard to cancel any changes.


Done! You've successfully created a rule in the new Outlook, allowing you to manage your email flow according to your specified criteria.
Tip. In Outlook.com, the process of creating an email rule is essentially the same. While slight differences in the option names may exist, they don't hinder the understanding of overall functionality or the rule creation process.
How to make a rule for specific emails in new Outlook and web
The new Outlook also has a convenient feature to swiftly create a rule directly from an existing email, which is particularly useful for managing all messages from a specific sender. Here's how to do it:
- In your Inbox or any other folder, right-click the email for which you want to set up a rule.
- From the context menu, select Rules > Create rule.
- Choose the folder where you want all messages from that sender to be moved and click OK. If you wish to do something else, click More options.
- If you've chosen to create a rule that moves emails to the designated folder, a confirmation message will appear. To immediately apply the rule to all existing messages in the target folder, put a tick in the Run this rule now checkbox. Then, click OK to close the popup dialog, or click View rules to see the full description of the email rule that Outlook has just created for you.
- If you've opted for more options, you'll be directed to the rules menu where the first two settings - rule name and condition – are preconfigured (you are free to modify these as needed). Your task is to specify the action you wish to apply to messages from that specific sender.
- Optionally, add exceptions, and then save the rule.


With these simple steps, you can promptly organize your inbox by creating rules directly from messages.
How to manage rules in new Outlook and web
To change, remove, or rearrange existing rules in new Outlook and Outlook 365 online, open the rule menu (Settings > Mail > Rules). From there, you can perform various actions:
Change the rule
To edit an existing rule, click the pencil icon next to the rule. This will open the Rules Settings menu where you can modify the rule's conditions and behavior.
Temporarily disable / enable rule
To turn off the rule when you don't need it, toggle the switch box to the left of the rule. When you need the rule again, simply toggle it back on.
Delete the rule
To permanently delete the rule, click the trashcan icon.
Change the rules order
In the new Outlook, email rules are applied to incoming messages based on their order in the rules list.
To adjust the order in which rules are executed, use the Up or Down arrows to move a rule up or down in the list.
Run the rule manually
By default, rules trigger on incoming emails after creation. To apply a rule to the messages that are already in your inbox, click the Run button next to the rule.

Rules are not working in new Outlook and web
Having trouble with rules in the new Outlook and web app? There can be various reasons behind it. Sometimes, rules don't work because they’re set up wrong, conflict with other rules, or they're just turned off. But a couple of big reasons stand out in the new Outlook and web version.
Client-side rules are unavailable
In the transition from classic Outlook to the new Outlook or web platform, you'll find out that client-side rules (such as follow-up or print emails) are not supported, as they rely on the Outlook client running on your computer. Since the new Outlook and web version don't use the client, these rules get disabled and show an error message indicating their incompatibility. Unfortunately, there is no workaround to make client-side rules function in the new Outlook or web app.

Email rules are specific to each account
If you've got more than one account, you need to set up rules for each one separately. You can check which account you're setting rules for in the top right corner of the Settings menu.

Rules cannot be created for Gmail and Yahoo accounts
In the new Outlook, you can't make rules for Gmail or Yahoo accounts because Outlook's rules are designed to work with emails hosted on Microsoft's servers, while external email services like Gmail or Yahoo have a different infrastructure and their own set of rules and filters.

While these are the primary issues affecting rules in the new Outlook and web, there might be other reasons why your rules don't work. For further troubleshooting, please check out Why rules are not working in Outlook: reasons and fixes.
And there you have it – a straightforward guide to setting up and fine-tuning your own rules in both the new Outlook and Outlook 365 Online. Feel free to play around with different criteria and actions to find the perfect combination that works for you. A bit of experimentation and adjustment here and there, and you'll be navigating your inbox like a pro, leaving more time for the things you love instead of sorting emails.
The above is the detailed content of How to create email rules in new Outlook and web. For more information, please follow other related articles on the PHP Chinese website!

Hot AI Tools

Undresser.AI Undress
AI-powered app for creating realistic nude photos

AI Clothes Remover
Online AI tool for removing clothes from photos.

Undress AI Tool
Undress images for free

Clothoff.io
AI clothes remover

Video Face Swap
Swap faces in any video effortlessly with our completely free AI face swap tool!

Hot Article
Hot Tools

Notepad++7.3.1
Easy-to-use and free code editor

SublimeText3 Chinese version
Chinese version, very easy to use

Zend Studio 13.0.1
Powerful PHP integrated development environment

Dreamweaver CS6
Visual web development tools

SublimeText3 Mac version
God-level code editing software (SublimeText3)
Hot Topics


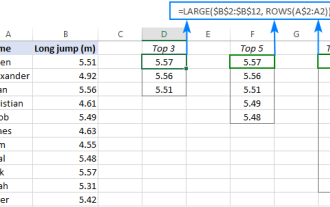 Excel formula to find top 3, 5, 10 values in column or row
Apr 01, 2025 am 05:09 AM
Excel formula to find top 3, 5, 10 values in column or row
Apr 01, 2025 am 05:09 AM
This tutorial demonstrates how to efficiently locate the top N values within a dataset and retrieve associated data using Excel formulas. Whether you need the highest, lowest, or those meeting specific criteria, this guide provides solutions. Findi
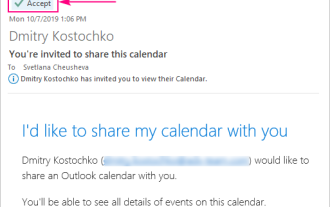 How to add calendar to Outlook: shared, Internet calendar, iCal file
Apr 03, 2025 am 09:06 AM
How to add calendar to Outlook: shared, Internet calendar, iCal file
Apr 03, 2025 am 09:06 AM
This article explains how to access and utilize shared calendars within the Outlook desktop application, including importing iCalendar files. Previously, we covered sharing your Outlook calendar. Now, let's explore how to view calendars shared with
 How to use Flash Fill in Excel with examples
Apr 05, 2025 am 09:15 AM
How to use Flash Fill in Excel with examples
Apr 05, 2025 am 09:15 AM
This tutorial provides a comprehensive guide to Excel's Flash Fill feature, a powerful tool for automating data entry tasks. It covers various aspects, from its definition and location to advanced usage and troubleshooting. Understanding Excel's Fla
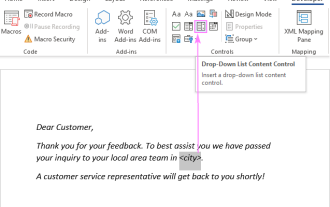 Add a dropdown list to Outlook email template
Apr 01, 2025 am 05:13 AM
Add a dropdown list to Outlook email template
Apr 01, 2025 am 05:13 AM
This tutorial shows you how to add dropdown lists to your Outlook email templates, including multiple selections and database population. While Outlook doesn't directly support dropdowns, this guide provides creative workarounds. Email templates sav
 MEDIAN formula in Excel - practical examples
Apr 11, 2025 pm 12:08 PM
MEDIAN formula in Excel - practical examples
Apr 11, 2025 pm 12:08 PM
This tutorial explains how to calculate the median of numerical data in Excel using the MEDIAN function. The median, a key measure of central tendency, identifies the middle value in a dataset, offering a more robust representation of central tenden
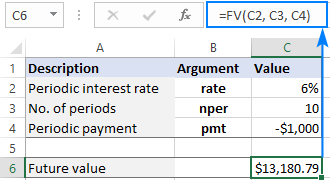 FV function in Excel to calculate future value
Apr 01, 2025 am 04:57 AM
FV function in Excel to calculate future value
Apr 01, 2025 am 04:57 AM
This tutorial explains how to use Excel's FV function to determine the future value of investments, encompassing both regular payments and lump-sum deposits. Effective financial planning hinges on understanding investment growth, and this guide prov
 How to remove / split text and numbers in Excel cell
Apr 01, 2025 am 05:07 AM
How to remove / split text and numbers in Excel cell
Apr 01, 2025 am 05:07 AM
This tutorial demonstrates several methods for separating text and numbers within Excel cells, utilizing both built-in functions and custom VBA functions. You'll learn how to extract numbers while removing text, isolate text while discarding numbers
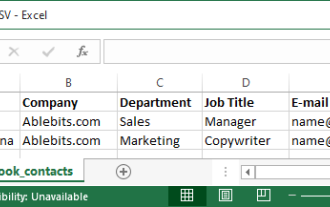 How to import contacts to Outlook (from CSV and PST file)
Apr 02, 2025 am 09:09 AM
How to import contacts to Outlook (from CSV and PST file)
Apr 02, 2025 am 09:09 AM
This tutorial demonstrates two methods for importing contacts into Outlook: using CSV and PST files, and also covers transferring contacts to Outlook Online. Whether you're consolidating data from an external source, migrating from another email pro
