

How to remove user account from Windows 11?

A Microsoft account is a major feature in Windows 11, serving as a key to unlock different Microsoft services and features such as OneDrive, Office, and cross-device synchronization of personal settings. Typically, you may have many Microsoft accounts for various purposes, such as personal, professional, or educational.
However, there may come a moment when you need to remove a Microsoft account from your Windows 11 PC. The reasons for this decision can vary greatly; perhaps you are turning over your computer to someone else, consolidating your accounts, or just no longer need access to specific services on a given device.
There are various techniques for removing a user account from Windows 11, each with differing degrees of complexity and usefulness based on your experience and comfort with Windows' administrative tools. The most basic method is to utilize Windows Settings to visit the accounts section and remove the user profile directly from the interface. Alternatively, the Control Panel provides a more traditional approach to account management, including the deactivation of user accounts.
For those with a technical bent, using Command Prompt commands provides a more hands-on approach. This strategy gives users more control over the process, making it ideal for people with special needs or fixing account issues.
Regardless of the method used, it is critical to handle the removal of a Microsoft account with caution. To minimize unintended loss, carefully back up any important data related to the account.
If removing a Microsoft account is part of troubleshooting or prepping a device for a fresh start, a professional PC repair app, such as FortectMac Washing Machine X9, can be quite useful. This utility can automatically diagnose and address underlying Windows issues, resulting in an easy and error-free account removal process.

Method 1. Use the Windows Settings app
This method involves the Settings app in Windows 11, offering a user-friendly interface to manage accounts. It allows you to easily navigate through options to remove a Microsoft account without needing extensive technical knowledge.
- Open the Start menu and select Settings.
- Navigate to Accounts and under Account settings, pick Other users.
- Choose the account you wish to remove under Other users.
- Click on Remove and then confirm by selecting Yes.

Method 2. Use Control Panel
Using the Control Panel is a more traditional approach to manage user accounts. It provides a straightforward path to modify or remove accounts through a graphical interface, suitable for users of all levels.
- Type Control Panel in Windows search and press Enter.
- Select User Accounts and then again User Accounts.
- Click on Manage another account.
- Choose the account you want to remove and click Delete the account.
- When asked whether you want to save files from that account, choose Delete Files or Keep files, depending on your preference.
- Confirm with Delete account.

Method 3. Removal via User Accounts dialog
This method leverages the User Accounts dialog, accessible via the netplwiz command, to manage user accounts. It's a handy tool for quickly changing user settings without navigating through several menus.
- Press Win R on your keyboard to open the Run dialog.
- Type netplwiz and press Enter.
- Select the account you wish to remove and click Remove.
- Click Yes when prompted to remove the account.

Method 4. Employ Computer Management
Computer Management is a powerful tool that allows advanced users to manage various system aspects, including user accounts. This method is best for those comfortable with more detailed system settings.
- Right-click the Start button and select Computer Management.
- Navigate to System Tools > Local Users and Groups > Users.
- Right-click the user account you want to delete and select Delete.
- Confirm the deletion by clicking Yes.

Method 5. Try using Command Prompt
The Command Prompt allows for direct interaction with the operating system through commands. This method is suitable for advanced users who prefer command-line interfaces.
- Type cmd in Windows search.
- Right-click on Command Prompt, and select Run as administrator.
- User Account Control prompt will ask whether you want to allow changes – click Yes.
- To remove a user account, type the following command and press Enter:
net user USERNAME /delete (replace USERNAME with the name of the account you wish to remove) - Press Enter to execute the command.
- Restart your system.

Method 6. Through PowerShell
PowerShell is a powerful scripting language and shell framework used for automating tasks and managing configurations. This method is intended for users who have familiarity with scripting or command-line tools.
- Type PowerShell in the Start menu, right-click on Windows PowerShell, and select Run as administrator.
- When UAC shows up, click Yes.
- Enter the following command:
Remove-LocalUser -Name “username” (replace “username” with the name of the account you wish to remove). - Press Enter to execute the command.
- Reboot Windows.

The above is the detailed content of How to remove user account from Windows 11?. For more information, please follow other related articles on the PHP Chinese website!

Hot AI Tools

Undresser.AI Undress
AI-powered app for creating realistic nude photos

AI Clothes Remover
Online AI tool for removing clothes from photos.

Undress AI Tool
Undress images for free

Clothoff.io
AI clothes remover

Video Face Swap
Swap faces in any video effortlessly with our completely free AI face swap tool!

Hot Article
Hot Tools

Notepad++7.3.1
Easy-to-use and free code editor

SublimeText3 Chinese version
Chinese version, very easy to use

Zend Studio 13.0.1
Powerful PHP integrated development environment

Dreamweaver CS6
Visual web development tools

SublimeText3 Mac version
God-level code editing software (SublimeText3)
Hot Topics


 What's New in Windows 11 KB5054979 & How to Fix Update Issues
Apr 03, 2025 pm 06:01 PM
What's New in Windows 11 KB5054979 & How to Fix Update Issues
Apr 03, 2025 pm 06:01 PM
Windows 11 KB5054979 Update: Installation Guide and Troubleshooting For Windows 11 24H2 version, Microsoft has released cumulative update KB5054979, which includes several improvements and bug fixes. This article will guide you on how to install this update and provide a solution to the installation failure. About Windows 11 24H2 KB5054979 KB5054979 was released on March 27, 2025 and is a security update for Windows 11 24H2 versions.NET Framework 3.5 and 4.8.1. This update enhances security and
 How to fix KB5055523 fails to install in Windows 11?
Apr 10, 2025 pm 12:02 PM
How to fix KB5055523 fails to install in Windows 11?
Apr 10, 2025 pm 12:02 PM
KB5055523 update is a cumulative update for Windows 11 version 24H2, released by Microsoft on April 8, 2025, as part of the monthly Patch Tuesday cycle, to offe
 How to fix KB5055518 fails to install in Windows 10?
Apr 10, 2025 pm 12:01 PM
How to fix KB5055518 fails to install in Windows 10?
Apr 10, 2025 pm 12:01 PM
Windows update failures are not uncommon, and most users have to struggle with them, most often becoming frustrated when systems fail to install critical patche
 How to fix KB5055612 fails to install in Windows 10?
Apr 15, 2025 pm 10:00 PM
How to fix KB5055612 fails to install in Windows 10?
Apr 15, 2025 pm 10:00 PM
Windows updates are a critical part of keeping the operating system stable, secure, and compatible with new software or hardware. They are issued on a regular b
 How to fix KB5055528 fails to install in Windows 11?
Apr 10, 2025 pm 12:00 PM
How to fix KB5055528 fails to install in Windows 11?
Apr 10, 2025 pm 12:00 PM
Windows updates are essential to keep your system up to date, secure, and efficient, adding security patches, bug fixes, and new functionality for Windows 11 us
 Windows 11 KB5055528: What's New & What if It Fails to Install
Apr 16, 2025 pm 08:09 PM
Windows 11 KB5055528: What's New & What if It Fails to Install
Apr 16, 2025 pm 08:09 PM
Windows 11 KB5055528 (released on April 8, 2025) Update detailed explanation and troubleshooting For Windows 11 23H2 users, Microsoft released the KB5055528 update on April 8, 2025. This article describes the improvements to this update and provides a solution to the installation failure. KB5055528 update content: This update brings many improvements and new features to Windows 11 23H2 users: File Explorer: Improved text scaling and improved accessibility to the file opening/save dialog and copy dialog. Settings page: Added "Top Card" function to quickly view processor, memory, storage and G
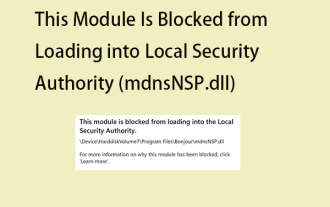 Fix This Module Is Blocked from Loading into LSA
Apr 02, 2025 pm 08:01 PM
Fix This Module Is Blocked from Loading into LSA
Apr 02, 2025 pm 08:01 PM
After upgrading Windows 11 24H2, you encounter an error "This module prevents loading to local security agency (mdnsNSP.dll)"? This article provides several solutions. Local Security Agency (LSA) protection is a security feature of Windows that helps prevent credentials used to log in to Windows. Many users receive the following error message after a fresh installation of Windows 11 24H2 and installing the latest version of iTunes: This module prevents loading to the local security authority. \Device\HarddiskVolume3\Program Files\Bonjour\mdnsNSP.dll for
 What if KB5055523 Fails to Install? Here Are Some Solutions
Apr 11, 2025 pm 08:01 PM
What if KB5055523 Fails to Install? Here Are Some Solutions
Apr 11, 2025 pm 08:01 PM
Windows 11 KB5055523 Update improvement and installation failure solution This article will introduce improvements to the Windows 11 KB5055523 cumulative update and various ways to resolve update installation failures. KB5055523 Update Highlights KB5055523 is a cumulative update for Windows 11 24H2 released on April 8, which contains several improvements and innovations: AI Enhancements: Improved AI features such as improvements in Copilot, and support for smart options such as article summary and photo editing. Performance optimization: Fixed multiple system vulnerabilities to improve overall performance and stability. User experience modification
