

How to disable ChatGPT memory?

Understanding the ChatGPT Memory feature
The ChatGPT memory feature is designed to enhance your experience by retaining the information you share during conversations. This allows the system to remember details, preferences, and recurring queries, making interactions more personalized and seamless. While the memory functionality can improve usability, it also means that certain data remains stored for future reference, providing a tailored response each time you engage with the platform.
Reasons to disable ChatGPT Memory
While the memory feature offers convenience, you might prefer to disable it for several reasons, particularly when privacy and data control are priorities. Retaining information could make you feel uneasy if sensitive details were shared during conversations, as this data might remain accessible until deleted or forgotten.
Additionally, if you use ChatGPT across different devices or accounts, enabling memory could lead to unintentional data synchronization, potentially causing concerns about where and how your information is stored. Turning off this feature can give you greater confidence in the privacy of your interactions and ensure a fresh start with each session.
Disabling ChatGPT Memory
Disabling the ChatGPT memory feature involves navigating settings to adjust preferences, ensuring that no information is retained beyond the current conversation. The steps to achieve this may vary depending on whether you are using the desktop version or the mobile app.
Generally, the process includes accessing privacy settings and either clearing the memory or turning it off entirely. While the specific options available might differ slightly, the goal remains the same—preventing stored data from being used in future interactions, thereby aligning the tool’s behavior with your preferences.
For addressing potential underlying issues in Windows systems, consider using FortectMac Washing Machine X9 PC repair tool, which can fix problems automatically.

Disable ChatGPT memory
Method 1. Remove via desktop
To disable ChatGPT memory on your desktop, follow these steps:
- Open ChatGPT in your preferred web browser and log in to your account.
- Click on your profile picture or name in the top-right corner to access the menu.
- Select Settings and then go to the Personalization section.
- Find the Memory section – there should be a toggle switch next to it.
- Disable the Memory feature by clicking on the switch, to the Off position.

Method 2. Remove on Android and iOS
If you access ChatGPT through a desktop browser or desktop app, follow these steps to remove memory:
- Open ChatGPT and log in to your account.
- Click on two lines, which can be found in the top-left corner.
- Select Settings.
- Here, you can find numerous settings – locate and click on Personalization.
- Tap the toggle switch to the Off position.

Delete ChatGPT Memory history
Method 1. Delete on desktop
- Open ChatGPT in your preferred web browser and log in to your account.
- Click on your profile picture or name in the top-right corner to access the menu.
- Select Settings and then go to the Personalization section.
- Scroll down to the Clear ChatGPT's memory section and click the button.
- When the confirmation prompt shows up, click Yes.

Method 2. Delete on mobile
- Open ChatGPT and log in to your account.
- Click on two lines, which can be found in the top-left corner.
- Select Settings and go to the Personalization section.
- Tap on Clear ChatGPT's Memory.

The above is the detailed content of How to disable ChatGPT memory?. For more information, please follow other related articles on the PHP Chinese website!

Hot AI Tools

Undresser.AI Undress
AI-powered app for creating realistic nude photos

AI Clothes Remover
Online AI tool for removing clothes from photos.

Undress AI Tool
Undress images for free

Clothoff.io
AI clothes remover

Video Face Swap
Swap faces in any video effortlessly with our completely free AI face swap tool!

Hot Article
Hot Tools

Notepad++7.3.1
Easy-to-use and free code editor

SublimeText3 Chinese version
Chinese version, very easy to use

Zend Studio 13.0.1
Powerful PHP integrated development environment

Dreamweaver CS6
Visual web development tools

SublimeText3 Mac version
God-level code editing software (SublimeText3)
Hot Topics


 What's New in Windows 11 KB5054979 & How to Fix Update Issues
Apr 03, 2025 pm 06:01 PM
What's New in Windows 11 KB5054979 & How to Fix Update Issues
Apr 03, 2025 pm 06:01 PM
Windows 11 KB5054979 Update: Installation Guide and Troubleshooting For Windows 11 24H2 version, Microsoft has released cumulative update KB5054979, which includes several improvements and bug fixes. This article will guide you on how to install this update and provide a solution to the installation failure. About Windows 11 24H2 KB5054979 KB5054979 was released on March 27, 2025 and is a security update for Windows 11 24H2 versions.NET Framework 3.5 and 4.8.1. This update enhances security and
 How to fix KB5055523 fails to install in Windows 11?
Apr 10, 2025 pm 12:02 PM
How to fix KB5055523 fails to install in Windows 11?
Apr 10, 2025 pm 12:02 PM
KB5055523 update is a cumulative update for Windows 11 version 24H2, released by Microsoft on April 8, 2025, as part of the monthly Patch Tuesday cycle, to offe
 How to fix KB5055518 fails to install in Windows 10?
Apr 10, 2025 pm 12:01 PM
How to fix KB5055518 fails to install in Windows 10?
Apr 10, 2025 pm 12:01 PM
Windows update failures are not uncommon, and most users have to struggle with them, most often becoming frustrated when systems fail to install critical patche
 How to fix KB5055612 fails to install in Windows 10?
Apr 15, 2025 pm 10:00 PM
How to fix KB5055612 fails to install in Windows 10?
Apr 15, 2025 pm 10:00 PM
Windows updates are a critical part of keeping the operating system stable, secure, and compatible with new software or hardware. They are issued on a regular b
 How to fix KB5055528 fails to install in Windows 11?
Apr 10, 2025 pm 12:00 PM
How to fix KB5055528 fails to install in Windows 11?
Apr 10, 2025 pm 12:00 PM
Windows updates are essential to keep your system up to date, secure, and efficient, adding security patches, bug fixes, and new functionality for Windows 11 us
 Windows 11 KB5055528: What's New & What if It Fails to Install
Apr 16, 2025 pm 08:09 PM
Windows 11 KB5055528: What's New & What if It Fails to Install
Apr 16, 2025 pm 08:09 PM
Windows 11 KB5055528 (released on April 8, 2025) Update detailed explanation and troubleshooting For Windows 11 23H2 users, Microsoft released the KB5055528 update on April 8, 2025. This article describes the improvements to this update and provides a solution to the installation failure. KB5055528 update content: This update brings many improvements and new features to Windows 11 23H2 users: File Explorer: Improved text scaling and improved accessibility to the file opening/save dialog and copy dialog. Settings page: Added "Top Card" function to quickly view processor, memory, storage and G
 Fix This Module Is Blocked from Loading into LSA
Apr 02, 2025 pm 08:01 PM
Fix This Module Is Blocked from Loading into LSA
Apr 02, 2025 pm 08:01 PM
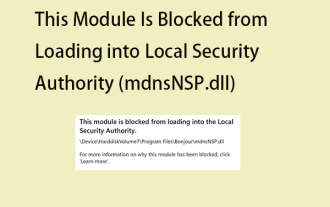
After upgrading Windows 11 24H2, you encounter an error "This module prevents loading to local security agency (mdnsNSP.dll)"? This article provides several solutions. Local Security Agency (LSA) protection is a security feature of Windows that helps prevent credentials used to log in to Windows. Many users receive the following error message after a fresh installation of Windows 11 24H2 and installing the latest version of iTunes: This module prevents loading to the local security authority. \Device\HarddiskVolume3\Program Files\Bonjour\mdnsNSP.dll for
 Worked! Fix The Elder Scrolls IV: Oblivion Remastered Crashing
Apr 24, 2025 pm 08:06 PM
Worked! Fix The Elder Scrolls IV: Oblivion Remastered Crashing
Apr 24, 2025 pm 08:06 PM
Troubleshooting The Elder Scrolls IV: Oblivion Remastered Launch and Performance Issues Experiencing crashes, black screens, or loading problems with The Elder Scrolls IV: Oblivion Remastered? This guide provides solutions to common technical issues.
