

How to Move Files on Mac? [Drag & Drop, Terminal, Title Bar, etc.]

To move files on your Mac efficiently, follow these steps:
- Open Finder.
- Select the files you wish to move.
- Drag and drop the selected files to your desired location.
With this straightforward method, you'll easily manage your files on a Mac using Finder.
Over time, Mac users often find their desktops and folders cluttered with a myriad of files—from work documents to personal photos. This can lead to wasted time searching for specific items, decreased productivity, and even slower computer performance. In this regard, a disorganized MacBook isn't just an eyesore—it's a hindrance to a smooth workflow.
The key to a smooth Mac lies in effective file management. After understanding how to move and categorize files efficiently, you can reclaim your digital space and boost your productivity.
If you feel overwhelmed by the chaos and are unsure how to organize files on Mac, our new guide will offer step-by-step instructions and expert tips.
1. Move files and folders using copy-paste
Ever found file management on your Mac a bit tricky? No worries—here's a quick way to do it using keyboard shortcuts:
- Click on the file you wish to move.
- Press Command C to copy the file.
- Go to the desired destination using Finder.
- Press Command Option V to move the file.
Besides, reorganizing your files becomes a breeze when you use Finder's copy and paste. If you're looking for a straightforward shortcut to move files on Mac, you're in the right place.
Follow these easy steps for the copy-paste method:
- Open Finder from the Dock.
- Navigate to the file you want to move.
- Right-click on the file and select Copy.
- Browse to the destination where you want the file.
- Right-click in a blank area and choose Paste Item.
![How to Move Files on Mac? [Drag & Drop, Terminal, Title Bar, etc.]](https://img.php.cn/upload/article/000/000/000/174105781421489.jpg)
![How to Move Files on Mac? [Drag & Drop, Terminal, Title Bar, etc.]](https://img.php.cn/upload/article/000/000/000/174105781615660.jpg)
Luckily, It’s easy to remove identical files with MacKeeper’s Duplicates Finder:
- Download and launch MacKeeper.
- Select Duplicates Finder from the left pane.
- Click Start Scan.
- Tick the duplicates finder checkbox and select Remove Selected.
![How to Move Files on Mac? [Drag & Drop, Terminal, Title Bar, etc.]](https://img.php.cn/upload/article/000/000/000/174105781812443.jpg)
![How to Move Files on Mac? [Drag & Drop, Terminal, Title Bar, etc.]](https://img.php.cn/upload/article/000/000/000/174105782251671.jpg)
![How to Move Files on Mac? [Drag & Drop, Terminal, Title Bar, etc.]](https://img.php.cn/upload/article/000/000/000/174105782491858.jpg)
2. Drag and drop files and folders
Here's a nifty method to drag and drop files on your Mac:
- On your Mac, spot the item you want to move.
- Hold and glide the item to its new location.
- Should you want to duplicate the file, tap and hold the Option key while moving it.
When you move files, the drag-and-drop method on Mac stands out for its simplicity. Use our instructions to move files and folders via drag and drop:
- Open Finder from the Dock.
- Locate the file or folder you wish to relocate.
- Notice the various destinations displayed on the left side of Finder.
- Click and hold your chosen file or folder, dragging it to its new home.
- Let go to finalize the move, placing the item in its new spot.
![How to Move Files on Mac? [Drag & Drop, Terminal, Title Bar, etc.]](https://img.php.cn/upload/article/000/000/000/174105782693721.jpg)
Unlike other methods, with a drag-and-drop method, you're relocating the file or folder on your MacBook, not just making a copy. This means your files stay organized without any accidental doubling up.
3. Move files around with the title bar
For those with a file already displayed in preview, there's a nifty way to relocate it without diving into Finder. This step uses the title bar for a seamless move.
Here's the other method to relocate files using the title bar:
- Launch the desired file.
- Position your cursor over the file's name displayed in the title bar.
- An arrow icon will emerge to the right of the file name—give it a click.
- A handy menu pops up, allowing you to modify the file's destination and even its name if necessary.
![How to Move Files on Mac? [Drag & Drop, Terminal, Title Bar, etc.]](https://img.php.cn/upload/article/000/000/000/174105783029341.jpg)
One of the best things about this method is that it doesn't involve making a copy, too. Instead, it's all about a direct transfer. That way, you're not cluttering up your space with duplicates.
4. Move files using Terminal
While Finder is the go-to for many when moving or copying files, Terminal can be a swift alternative, especially when dealing with multiple items or renaming them on-the-fly. In fact, to move files on Mac with Terminal is easier than you might think.
Here's how to carry files with Terminal:
- Navigate to the Finder menu.
- Head to Applications > Utilities, and finally open Terminal.
- Deploy the mv command to shift a file or directory.
How to move multiple files on Mac?
To group multiple items into a folder:
- Select and drag highlighted items to a folder. They'll move together.
- Move an entire window's contents into a folder by hovering near the window title.
- Then drag the appearing icon.
These steps make managing your Mac files a breeze. But when tidying up your device, you might also want to know how to select multiple files on Mac and move them into folders can be a game-changer. So, if you need more assistance on this, don’t ignore our tips.
Mac files on the move: Lessons and final tips
Today we've shared the helpful nuances you need to mind to move files on your Mac efficiently. From using Finder's drag-and-drop to the tricks with the title bar, we've explored various methods to make the process seamless. But one key takeaway? Preparation is crucial.
Before diving into the actual moving, remember to declutter. And this isn't just about organization—it's about efficiency. MacKeeper’s Duplicates Finder is the tool for this job. By swiftly identifying and removing duplicate files, it ensures you're only moving what's truly necessary.
So, as you apply what you've learned, remember to start with a clean, duplicate-free environment—it's the smart way to move.
P.S.: For even smarter work on your Mac, read on our expert insights on how to free up space on Mac and catch more hints to become a professional MacBook user. Good luck!
The above is the detailed content of How to Move Files on Mac? [Drag & Drop, Terminal, Title Bar, etc.]. For more information, please follow other related articles on the PHP Chinese website!

Hot AI Tools

Undresser.AI Undress
AI-powered app for creating realistic nude photos

AI Clothes Remover
Online AI tool for removing clothes from photos.

Undress AI Tool
Undress images for free

Clothoff.io
AI clothes remover

Video Face Swap
Swap faces in any video effortlessly with our completely free AI face swap tool!

Hot Article
Hot Tools

Notepad++7.3.1
Easy-to-use and free code editor

SublimeText3 Chinese version
Chinese version, very easy to use

Zend Studio 13.0.1
Powerful PHP integrated development environment

Dreamweaver CS6
Visual web development tools

SublimeText3 Mac version
God-level code editing software (SublimeText3)
Hot Topics
 1658
1658
 14
1415
52
1309
25
1257
29
1231
24
14
1415
52
1309
25
1257
29
1231
24

 Fix your Mac running slow after update to Sequoia
Apr 14, 2025 am 09:30 AM
Fix your Mac running slow after update to Sequoia
Apr 14, 2025 am 09:30 AM
After upgrading to the latest macOS, does the Mac run slower? Don't worry, you are not alone! This article will share my experience in solving slow Mac running problems after upgrading to macOS Sequoia. After the upgrade, I can’t wait to experience new features such as recording and transcription of voice notes and improved trail map planning capabilities. But after installation, my Mac started running slowly. Causes and solutions for slow Mac running after macOS update Here is my summary of my experience, I hope it can help you solve the problem of slow Mac running after macOS Sequoia update: Cause of the problem Solution Performance issues Using Novabe
 How to reduce WindowServer Mac CPU usage
Apr 16, 2025 pm 12:07 PM
How to reduce WindowServer Mac CPU usage
Apr 16, 2025 pm 12:07 PM
macOS WindowServer: Understanding High CPU Usage and Solutions Have you noticed WindowServer consuming significant CPU resources on your Mac? This process is crucial for your Mac's graphical interface, rendering everything you see on screen. High C
 How to make a video into a live photo on Mac and iPhone: Detailed steps
Apr 11, 2025 am 10:59 AM
How to make a video into a live photo on Mac and iPhone: Detailed steps
Apr 11, 2025 am 10:59 AM
This guide explains how to convert between Live Photos, videos, and GIFs on iPhones and Macs. Modern iPhones excel at image processing, but managing different media formats can be tricky. This tutorial provides solutions for various conversions, al
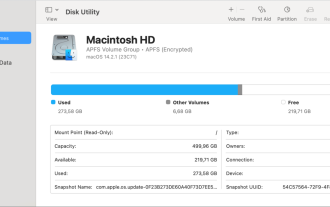 Mac Disk Utility: How to Repair Disk with First Aid? How to Recover It?
Apr 13, 2025 am 11:49 AM
Mac Disk Utility: How to Repair Disk with First Aid? How to Recover It?
Apr 13, 2025 am 11:49 AM
You might need to repair your Mac disk if your computer won’t start up, apps keep freezing, you can’t open certain documents, or the performance has slowed to a halt. Luckily, Apple includes a handy tool you can use to
 How to delete files on Mac
Apr 15, 2025 am 10:22 AM
How to delete files on Mac
Apr 15, 2025 am 10:22 AM
Managing Mac storage: A comprehensive guide to deleting files Daily Mac usage involves installing apps, creating files, and downloading data. However, even high-end Macs have limited storage. This guide provides various methods for deleting unneces
 Is Google Chrome Not Working on Mac? Why Are Websites Not Loading?
Apr 12, 2025 am 11:36 AM
Is Google Chrome Not Working on Mac? Why Are Websites Not Loading?
Apr 12, 2025 am 11:36 AM
With a market share of over 65.7%, Google Chrome is the biggest web browser in the world. You can use it if you use other operating systems like Windows and Android, but many Mac users also prefer Chrome over Safari. Mo
 How to show only active apps in Dock on Mac
Apr 09, 2025 am 11:44 AM
How to show only active apps in Dock on Mac
Apr 09, 2025 am 11:44 AM
Mac Dockbar Optimization Guide: Show only running applications The dock bar of your Mac is the core of the system, from which you can launch Finder, Trash, recently used apps, active apps, and bookmark apps, and even add folders such as Document and Downloads. By default, the Mac dock bar will display more than a dozen Apple-owned applications. Most users will add more applications, but rarely delete any applications, resulting in the dock bar being cluttered and difficult to use effectively. This article will introduce several ways to help you organize and clean up your Mac dock bar in just a few minutes. Method 1: Manually organize the dock bar You can manually remove unused applications and keep only commonly used applications. Remove the application: Right-click on the application
 How to connect bluetooth headphones to Mac?
Apr 12, 2025 pm 12:38 PM
How to connect bluetooth headphones to Mac?
Apr 12, 2025 pm 12:38 PM
From the dawn of time to just about a few years ago, all of us sported a pair of wired headphones and were convinced that this is simply how it will be done forever. After all, they are the easiest technology around: just plug them in, put them
