
 Computer Tutorials
Troubleshooting
How to kick strangers and exes out of your streaming accounts
Computer Tutorials
Troubleshooting
How to kick strangers and exes out of your streaming accounts
How to kick strangers and exes out of your streaming accounts

Password and account sharing is common with streaming services, and you’re likely logged into plenty of devices with your various accounts at this point. But so is everyone else, and you may be unknowingly sharing your subscription more widely than you’d like. Are you sure an ex-partner, young relative, or even a complete stranger isn’t unwantedly piggybacking on your account credentials?
Undesired account sharing puts your privacy at risk and can be a massive annoyance too—especially if a service limits the number of concurrent streams you can access and someone else decides to start watching a television show at the same time you’re settling in for movie night. Fortunately, there are steps you can take to make sure there are no unwelcome guests using your logins.
We’ve listed detailed instructions for four of the biggest video and music streaming services below (we can’t cover all of them—there are too many), but you’ll see similar options no matter which services you’re using. Just have a look around your account settings to find the relevant pages. We’re also going to focus on desktop app and web browser access, though you’ll be able to find a lot of the same settings in the corresponding mobile apps too.
At a high level, the steps are more or less the same on every streaming service: Scan the viewing or listening history on your account, check the devices you’re currently logged in on, and change your password if necessary. Setting a new password comes with the inconvenience of logging in everywhere again, but it’s the best way to ensure that no one is sharing your account without your permission.
Remove users from Netflix
Log into your Netflix account on the web, click your profile avatar (top right), then choose Manage Profiles. We’re guessing that if someone is secretly using your account, they won’t have an actual profile set up—it’s a bit of a giveaway—but if they do, you can delete it from here.
It’s a bit harder to detect if a streaming squatter is using your own profile to watch. Select your avatar and choose Account, then pick your profile from the list and click View next to Viewing activity. This will show you everything that’s been recently viewed using your profile, so you’ll be able to see if there’s anything you don’t recognize.
[Related: Hack Netflix with these add-ons and tricks]
From the Account screen, you can also click Recent device streaming activity to see the phones, laptops, and TVs your Netflix account has recently been used on—this is another way to find suspicious activity. You’ll get a list of the device types and their approximate locations.
Back on the Account screen, click Sign out of all devices to force a log out on every device, including the one you’re on. This will lock out anyone who might be using a device you’ve left Netflix signed in on, but who doesn’t know your password. To be even safer, click Change password on the Account screen, enter a new password, and make sure the Require all devices to sign in again with new password box is checked.
Clear everyone off your Spotify

Open up the Spotify desktop app, click the queue button (bottom right next to the microphone icon), then select Recently played at the top. This will show you songs and podcasts that have recently been played through your Spotify account, so you should be able to quickly spot anything that doesn’t look familiar.
The devices button can help too. It looks like a speaker with a TV behind it, and it’s in the lower right corner of the desktop app and the lower left corner of the “now playing” screen in the mobile app. Click or tap this button to see devices that are linked to your Spotify account and look for any suspicious activity.
If you need to lock down your account, head to your Spotify account page on the web. Click Account overview and then Sign out everywhere to do just that—this covers phones, tablets, and computers, but not other devices such as smart speakers and consoles. To delink these devices from your account, click Apps and then Remove access next to the relevant gadgets.
This will kick out anyone who’s taking advantage of a Spotify account you’ve left signed in somewhere, though they’ll be able to get back in if they know your password. To stop this from happening, click Change password and enter a new one—you’ll then have to sign in again in all the places where you’re using Spotify.
Sign unwanted users out of Disney Plus
Open Disney Plus in your browser, click your profile picture (top right), then Edit profiles. If someone is borrowing your streaming account without your permission and has actually set up a separate profile to do so, they haven’t been very smart—click the unwanted profile and choose Delete Profile to remove it.
Someone could, of course, be using your default profile to watch Disney’s offerings. For whatever reason, Disney Plus doesn’t let you load up your full viewing history, but you can scroll down the front screen to the Continue Watching section to see if there’s anything there you don’t remember viewing.
[Related: 7 tools to make streaming simpler, smarter, and more fun]
Click your profile picture and Account to find the Log out of all devices button, handy for when you think you’ve left your account logged in somewhere and want to remove it. While you’re here, it’s a good idea to turn on the Restrict Profile Creation toggle switch, which means anyone who wants to create a new profile will need a password.
Logging out of all your devices won’t stop someone who knows your account password though. From the Account page, click the small edit button (a pencil icon) next to Password and enter a new password. You’ll have to log in again on all the devices you want to watch Disney Plus on, but it will also boot off any freeloaders.
Manage access to Apple TV Plus

The steps are a little different with Apple TV Plus (and Apple Music) because your streaming accounts are linked to your Apple ID, which is linked to your Apple devices—it’s not quite like having a Netflix username and password that isn’t specifically tied to any one piece of hardware. In other words, any device where your Apple ID is being used could also be used to watch Apple TV Plus.
If you load up the TV app on a Mac, you can see what’s recently been watched, but you’ll need to scroll all the way down to the bottom of the Watch Now tab—click See All next to Recently Watched, and check for movies or shows that you don’t recognize. If there are any, someone else might be using your account.
From the TV app on macOS, choose Account, Account Settings, and next to Downloads and Purchases click Manage Devices. If there’s a device here that you don’t think should have access to your Apple TV Plus subscription and everything else your Apple ID is entitled to, click Remove next to it.
To see the devices linked to your Apple ID—and delink them if needed—open the Apple menu on a Mac and click System Preferences followed by Apple ID. Select a device from the list on the left, then click Remove from account to delink it. You can also pick Password & Security, then Change Password to reset your Apple ID password, though you will have to log in on all your Apple devices again.
The above is the detailed content of How to kick strangers and exes out of your streaming accounts. For more information, please follow other related articles on the PHP Chinese website!

Hot AI Tools

Undresser.AI Undress
AI-powered app for creating realistic nude photos

AI Clothes Remover
Online AI tool for removing clothes from photos.

Undress AI Tool
Undress images for free

Clothoff.io
AI clothes remover

Video Face Swap
Swap faces in any video effortlessly with our completely free AI face swap tool!

Hot Article
Hot Tools

Notepad++7.3.1
Easy-to-use and free code editor

SublimeText3 Chinese version
Chinese version, very easy to use

Zend Studio 13.0.1
Powerful PHP integrated development environment

Dreamweaver CS6
Visual web development tools

SublimeText3 Mac version
God-level code editing software (SublimeText3)
Hot Topics


 What's New in Windows 11 KB5054979 & How to Fix Update Issues
Apr 03, 2025 pm 06:01 PM
What's New in Windows 11 KB5054979 & How to Fix Update Issues
Apr 03, 2025 pm 06:01 PM
Windows 11 KB5054979 Update: Installation Guide and Troubleshooting For Windows 11 24H2 version, Microsoft has released cumulative update KB5054979, which includes several improvements and bug fixes. This article will guide you on how to install this update and provide a solution to the installation failure. About Windows 11 24H2 KB5054979 KB5054979 was released on March 27, 2025 and is a security update for Windows 11 24H2 versions.NET Framework 3.5 and 4.8.1. This update enhances security and
 How to fix KB5055523 fails to install in Windows 11?
Apr 10, 2025 pm 12:02 PM
How to fix KB5055523 fails to install in Windows 11?
Apr 10, 2025 pm 12:02 PM
KB5055523 update is a cumulative update for Windows 11 version 24H2, released by Microsoft on April 8, 2025, as part of the monthly Patch Tuesday cycle, to offe
 How to fix KB5055518 fails to install in Windows 10?
Apr 10, 2025 pm 12:01 PM
How to fix KB5055518 fails to install in Windows 10?
Apr 10, 2025 pm 12:01 PM
Windows update failures are not uncommon, and most users have to struggle with them, most often becoming frustrated when systems fail to install critical patche
 How to fix KB5055612 fails to install in Windows 10?
Apr 15, 2025 pm 10:00 PM
How to fix KB5055612 fails to install in Windows 10?
Apr 15, 2025 pm 10:00 PM
Windows updates are a critical part of keeping the operating system stable, secure, and compatible with new software or hardware. They are issued on a regular b
 How to fix KB5055528 fails to install in Windows 11?
Apr 10, 2025 pm 12:00 PM
How to fix KB5055528 fails to install in Windows 11?
Apr 10, 2025 pm 12:00 PM
Windows updates are essential to keep your system up to date, secure, and efficient, adding security patches, bug fixes, and new functionality for Windows 11 us
 Windows 11 KB5055528: What's New & What if It Fails to Install
Apr 16, 2025 pm 08:09 PM
Windows 11 KB5055528: What's New & What if It Fails to Install
Apr 16, 2025 pm 08:09 PM
Windows 11 KB5055528 (released on April 8, 2025) Update detailed explanation and troubleshooting For Windows 11 23H2 users, Microsoft released the KB5055528 update on April 8, 2025. This article describes the improvements to this update and provides a solution to the installation failure. KB5055528 update content: This update brings many improvements and new features to Windows 11 23H2 users: File Explorer: Improved text scaling and improved accessibility to the file opening/save dialog and copy dialog. Settings page: Added "Top Card" function to quickly view processor, memory, storage and G
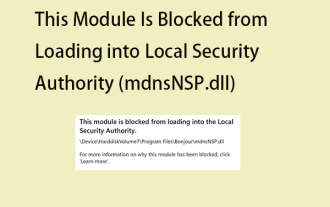 Fix This Module Is Blocked from Loading into LSA
Apr 02, 2025 pm 08:01 PM
Fix This Module Is Blocked from Loading into LSA
Apr 02, 2025 pm 08:01 PM
After upgrading Windows 11 24H2, you encounter an error "This module prevents loading to local security agency (mdnsNSP.dll)"? This article provides several solutions. Local Security Agency (LSA) protection is a security feature of Windows that helps prevent credentials used to log in to Windows. Many users receive the following error message after a fresh installation of Windows 11 24H2 and installing the latest version of iTunes: This module prevents loading to the local security authority. \Device\HarddiskVolume3\Program Files\Bonjour\mdnsNSP.dll for
 Worked! Fix The Elder Scrolls IV: Oblivion Remastered Crashing
Apr 24, 2025 pm 08:06 PM
Worked! Fix The Elder Scrolls IV: Oblivion Remastered Crashing
Apr 24, 2025 pm 08:06 PM
Troubleshooting The Elder Scrolls IV: Oblivion Remastered Launch and Performance Issues Experiencing crashes, black screens, or loading problems with The Elder Scrolls IV: Oblivion Remastered? This guide provides solutions to common technical issues.
