

10 Microsoft Word tips you need to learn right now


Even if you have a PC for many years, you may not think you need to learn Microsoft Word skills. After all, it has been around for 40 years, and all its secrets have been revealed long ago, right? Oh, we have news to tell you.
Whether you use Word frequently or only turn it on when you need to update your resume, you need to dig deep into the features of Word, not just bold and underscore. Fortunately, we delved into the various options of Word and found some very practical tips.
1. Create virtual text blocks using the Lorem ipsum tool
People who do not process text often may not know that Lorem ipsum is a "subtitle" in written text. It’s just some meaningless text—a combination of letters that look like words, helping people to intuitively understand how text looks in a website, magazine, book, or styling document.
[Related: Become a better writer with these online tools]
If you prefer to design documents rather than writing documents, or like to delay writing drafts by adjusting page format, you can use Lorem ipsum in Word. You don't even need to open the menu - just type =Lorem() anywhere on the page and press Enter.
People who do not process text often may not know that Lorem ipsum is a "subtitle" in written text. It’s just some meaningless text—a combination of letters that look like words, helping people to intuitively understand how text looks in a website, magazine, book, or styling document.
[Related: Become a better writer with these online tools]
By default, this command will create five short text paragraphs. If that's not enough, you can add numbers in brackets to specify the number of paragraphs you want. For example, if you want 12 paragraphs, type =Lorem(12) and enjoy your free text.
2. Add a real-time timestamp to your work
If you have a document template that needs to be constantly updated with the current date, Word provides a tool that allows you to avoid the dilemma of talking to yourself, "What day today?" while looking at the corner of the screen.
You can add a timestamp to your document by going to the Insert tab and clicking the Insert Date and Time tool - it is a small icon that displays the calendar and clock, located in The left side of the formula button.
If you have a document template that needs to be constantly updated with the current date, Word provides a tool that allows you to avoid the dilemma of talking to yourself, "What day today?" while looking at the corner of the screen.
In the pop-up window, you can choose from many time formats, such as the classic double-digit "month/day/year" and even the exact number of seconds you insert it into the document. By default, this feature is static unless you select the Automatically update check box below the list. After completion, click to confirm .
If you work with colleagues in other countries, or use a non-system default language, the Insert Date and Time window will provide a drop-down menu where you can change the language and date format options. Microsoft will immediately display the language you have added to the operating system, so if you need to use an unlisted language, you need to set via , then Time and Language (Windows) Or System settings>General>Language and Region (macOS) to add it.
3. Sign the document in Microsoft Word
Once upon a time, signing documents received by email would need to be printed out, signed, and then taken a photo or scanned. Word now allows you to use the shape option to skip the physical signature step.
Go to Insert Tab, click Shape, and select the wavy line under Line. This will allow you to use the cursor as a pen to draw your signature, which you can then move to anywhere in the document, and you can even copy/cut and paste it at any time. Of course, drawing signatures with the mouse is not easy, but practicing more will make perfect.
Once upon a time, signing documents received by email would need to be printed out, signed, and then taken a photo or scanned. Word now allows you to use the shape option to skip the physical signature step.
On the other hand, if you are signing important documents and can't stand seeing your trembling signature last forever, there is another option. If you subscribe to Office 365 and have a PC, you can sign with the trackpad and drawing features.
Go to the Draw tab and open the toggle switch on using the trackpad drawing. Word displays a rectangular area on the screen—filling it with your fingers drawing on the trackpad. You don't need to press, just slide your fingers. Use two fingers to move the area to another position on the screen (which is useful if you need to select a checkbox), and press any key when you are done. Your doodle will be like objects you can resize and copy/cut and paste in your document.
4. Turn off interference using Microsoft's Focus Mode
Word (or any word processor) can't do the writing itself for you. You can look for inspiration elsewhere, but ultimately, your words must be your own. Although it sounds simple, it is not easy to do.
Use Microsoft's focus mode to avoid distractions. This feature will set your document to full screen with a black background so you have little to do except typing. The default view won't even show the main navigation bar or the ribbon that contains all the options you're used to. But they still exist – just move the pointer to the top of the screen and the options will scroll down. Oh, the entire interface is monochrome, so you won't be distracted by any bright colors.
To activate the focus mode, go to the view and select Focus. You can press the Esc key at any time to exit this function.
5. Let Word evaluate your writing with readability ratings
As we said, Word can't write prose for you, but it can be used as a useful editor. The program can evaluate your writing and tell you what needs improvement so that your text fits your target audience.
When there is text on the page, go to the tool, spelling and grammar and select Editor. A sidebar will appear on the right side of the screen, showing your writing’s overall rating and three aspects that can be improved: Spellow, Grammar and Simplicity . Click on each aspect to see Word's suggestions. Remember, this is just a program, so some of its suggestions are meaningless to you and are completely possible. If this is the case, you can choose to ignore them.
Word (or any word processor) can't do the writing itself for you. You can look for inspiration elsewhere, but ultimately, your words must be your own. Although it sounds simple, it is not easy to do.
To activate the focus mode, go to the view and select Focus. You can press the Esc key at any time to exit this function.
As we said, Word can't write prose for you, but it can be used as a useful editor. The program can evaluate your writing and tell you what needs improvement so that your text fits your target audience.
The bottom of the sidebar is magical: click Document Statistics, and after a few seconds you will see a window with detailed information about the document, such as the number of words and sentences and The average number of characters per word.
But the really interesting part is readability. There, Word will display your text rating based on the Flesch Readability Rating and the Flesch-Kincaid Grade Level Index. The two systems are designed to determine the readability of a document and what reading level your audience should have to fully understand it easily.
For readability scores, the higher the number, the easier it is to understand. Generally speaking, you want anything you write is between 70 and 80, which means that the average adult should be easy to understand. Meanwhile, the Flesch-Kincaid index uses grade levels of the U.S. education system as a parameter to help you determine whether your text is suitable for your audience—for example, if you speak at an academic conference, high scores won’t be a problem.
From the top of the page to the paragraph above, Word says the readability score of this story is 65, which is not ideal, but that's why we still need manual editing. (If you want to know, the ratings have improved after I edited and revised it.)
6. Click to select the entire sentence
When talking about editing, selecting text is one of the best ways to move sentences and delete invalid content when writing in Word.
You might use shortcut keys such as Shift arrow to select text characters by character, and Shift Option arrow (Mac) or Shift Control arrow (Windows) to Choose word by word. If you are a "rough" editor, you might just three-click on a paragraph to select and delete the entire paragraph. But Word offers another option: Click to select a single sentence. The trick is to hold Command (Mac) or Control (Windows) while doing this.
7. Jump between important editing points
A more niche but still useful trick is to use keyboard shortcuts to jump between edits. Press Shift F5 and Microsoft will take you back to where you last edited the text. Press it again and you will return to the previous position.
Remember that if your laptop or keyboard uses the F key line for other functions (such as mute the computer or adjusting the screen brightness), you may need to add Function or Fn key. This will tell your computer that you are using F5 as the F5 and that you have no intention of, for example, to adjust the backlight of the keyboard.
This is very useful for modifying particularly long documents or being in the final stage of editing (where changes may be few and far apart from each other).
When talking about editing, selecting text is one of the best ways to move sentences and delete invalid content when writing in Word.
A more niche but still useful trick is to use keyboard shortcuts to jump between edits. Press Shift F5 and Microsoft will take you back to where you last edited the text. Press it again and you will return to the previous position.
8. Find and replace invisible characters
If you have ever struggled with complicated formatted documents, or wondered why pressing Enter does not provide the correct spacing, you may have encountered hidden or invisible characters.
You see, most of the content in the document has a character, even the space between paragraphs. If you need to view what you are working on, you can have Microsoft display them by pressing
Command 8 (Mac) or Ctrl Shift 8 (Windows). When you do this, you will see many new characters appear in different colors. Some of the most common characters include hanging points between words, representing a single space, and a left-facing "P", indicating that there is a single paragraph line break.
You may not use this shortcut in simple documents, but if you use templates found in Word or online, it may help you understand what the problem lies if the file starts to fail.
You see, most of the content in the document has a character, even the space between paragraphs. If you need to view what you are working on, you can have Microsoft display them by pressing
9. Protect your document with a password
Not everyone should read what you write, and if you want to make sure that even the snooping person can't read what you're working on, you can use your password to protect your Word document.
Depending on the version of Word you have, you may find this option by clicking File , Information , and then Protect Document . The following menu will list actions you can do, such as restricting editing or allowing only specific people to access files. But if you want to take safer measures, select Encrypt with password and follow the instructions.
[Related: Stop choosing a bad password]
In the 2023 version of Word, you can find the Protect Documents option under the Review tab. The next window will show you many things you can do, from setting up a password to access the document to requiring authentication for specific actions such as viewing comments, editing, or tracking changes. Enter your password (remember it or save it in a safe place) and click OK to complete the operation.
10. Align all objects perfectly
Word provides a lot of freedom when inserting objects into documents. You can embed images, videos, GIFs, and doodles and move them anywhere you want.
However, all this freedom can sometimes make it difficult for you to tell if the charts added to the annual report are actually aligned correctly. You have spent too much time working to let a picture ruin your day.
To make sure everything is in the desired location, use a grid. Under the Layout tab, click Align and select from the drop-down menu to view grid lines. This option will immediately overlay a grid on the page's work area, which you can use as a reference to see where the objects are placed or make sure they are the same size. On the Alignment menu, you can also click Grid Settings to customize options such as the page area or the size of the grid that the object will capture. When finished, click OKSave your settings.
Depending on the version of Word you have, you may find this option by clicking File , Information , and then Protect Document . The following menu will list actions you can do, such as restricting editing or allowing only specific people to access files. But if you want to take safer measures, select Encrypt with password and follow the instructions.
In the 2023 version of Word, you can find the Protect Documents option under the Review tab. The next window will show you many things you can do, from setting up a password to access the document to requiring authentication for specific actions such as viewing comments, editing, or tracking changes. Enter your password (remember it or save it in a safe place) and click OK to complete the operation.
Word provides a lot of freedom when inserting objects into documents. You can embed images, videos, GIFs, and doodles and move them anywhere you want.
To make sure everything is in the desired location, use a grid. Under the Layout tab, click Align and select from the drop-down menu to view grid lines. This option will immediately overlay a grid on the page's work area, which you can use as a reference to see where the objects are placed or make sure they are the same size. On the Alignment menu, you can also click Grid Settings to customize options such as the page area or the size of the grid that the object will capture. When finished, click OKSave your settings.
The above is the detailed content of 10 Microsoft Word tips you need to learn right now. For more information, please follow other related articles on the PHP Chinese website!

Hot AI Tools

Undresser.AI Undress
AI-powered app for creating realistic nude photos

AI Clothes Remover
Online AI tool for removing clothes from photos.

Undress AI Tool
Undress images for free

Clothoff.io
AI clothes remover

Video Face Swap
Swap faces in any video effortlessly with our completely free AI face swap tool!

Hot Article
Hot Tools

Notepad++7.3.1
Easy-to-use and free code editor

SublimeText3 Chinese version
Chinese version, very easy to use

Zend Studio 13.0.1
Powerful PHP integrated development environment

Dreamweaver CS6
Visual web development tools

SublimeText3 Mac version
God-level code editing software (SublimeText3)
Hot Topics


 What's New in Windows 11 KB5054979 & How to Fix Update Issues
Apr 03, 2025 pm 06:01 PM
What's New in Windows 11 KB5054979 & How to Fix Update Issues
Apr 03, 2025 pm 06:01 PM
Windows 11 KB5054979 Update: Installation Guide and Troubleshooting For Windows 11 24H2 version, Microsoft has released cumulative update KB5054979, which includes several improvements and bug fixes. This article will guide you on how to install this update and provide a solution to the installation failure. About Windows 11 24H2 KB5054979 KB5054979 was released on March 27, 2025 and is a security update for Windows 11 24H2 versions.NET Framework 3.5 and 4.8.1. This update enhances security and
 How to fix KB5055523 fails to install in Windows 11?
Apr 10, 2025 pm 12:02 PM
How to fix KB5055523 fails to install in Windows 11?
Apr 10, 2025 pm 12:02 PM
KB5055523 update is a cumulative update for Windows 11 version 24H2, released by Microsoft on April 8, 2025, as part of the monthly Patch Tuesday cycle, to offe
 How to fix KB5055518 fails to install in Windows 10?
Apr 10, 2025 pm 12:01 PM
How to fix KB5055518 fails to install in Windows 10?
Apr 10, 2025 pm 12:01 PM
Windows update failures are not uncommon, and most users have to struggle with them, most often becoming frustrated when systems fail to install critical patche
 Proven Fixes and Tips for KB5054980 Not Installing
Mar 31, 2025 pm 02:40 PM
Proven Fixes and Tips for KB5054980 Not Installing
Mar 31, 2025 pm 02:40 PM
Troubleshooting KB5054980 Installation Issues on Windows 11 Microsoft released KB5054980 on March 25, 2025, for Windows 11 versions 22H2 and 23H2. While this update doesn't include new security features, it incorporates all previously released securi
 Windows 10 KB5055063: What's New & How to Download It
Mar 31, 2025 pm 03:54 PM
Windows 10 KB5055063: What's New & How to Download It
Mar 31, 2025 pm 03:54 PM
Windows 10 KB5055063 update details and installation troubleshooting KB5055063 is an update for the .NET Framework for Windows 10 22H2 version, including important improvements and fixes. This article will explore KB5055063 in depth, including download methods and various ways to solve installation failure problems. Introduction to Windows 10 KB5055063 KB5055063 is a cumulative update for .NET Framework 3.5, 4.8, and 4.8.1 for Windows 10 version 22H2, on March 25, 2025
 How to fix KB5055612 fails to install in Windows 10?
Apr 15, 2025 pm 10:00 PM
How to fix KB5055612 fails to install in Windows 10?
Apr 15, 2025 pm 10:00 PM
Windows updates are a critical part of keeping the operating system stable, secure, and compatible with new software or hardware. They are issued on a regular b
 How to fix KB5055528 fails to install in Windows 11?
Apr 10, 2025 pm 12:00 PM
How to fix KB5055528 fails to install in Windows 11?
Apr 10, 2025 pm 12:00 PM
Windows updates are essential to keep your system up to date, secure, and efficient, adding security patches, bug fixes, and new functionality for Windows 11 us
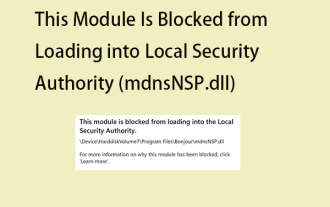 Fix This Module Is Blocked from Loading into LSA
Apr 02, 2025 pm 08:01 PM
Fix This Module Is Blocked from Loading into LSA
Apr 02, 2025 pm 08:01 PM
After upgrading Windows 11 24H2, you encounter an error "This module prevents loading to local security agency (mdnsNSP.dll)"? This article provides several solutions. Local Security Agency (LSA) protection is a security feature of Windows that helps prevent credentials used to log in to Windows. Many users receive the following error message after a fresh installation of Windows 11 24H2 and installing the latest version of iTunes: This module prevents loading to the local security authority. \Device\HarddiskVolume3\Program Files\Bonjour\mdnsNSP.dll for
