

How to write unit tests and Etests for NestJS applications

Introduction
Recently, I have been writing unit tests and E2E tests for a NestJS project. This is my first time writing tests for a backend project, and I found the process different from my experience with frontend testing, making it challenging to begin. After looking at some examples, I have gained a clearer understanding of how to approach testing, so I plan to write an article to record and share my learning to help others who may be facing similar confusion.
In addition, I have put together a demo project with the relevant unit and E2E tests completed, which may be of interest. The code has been uploaded to Github: https://github.com/woai3c/nestjs-demo.
Difference Between Unit Testing and E2E Testing
Unit tests and E2E tests are methods of software testing, but they have different goals and scopes.
Unit testing involves checking and verifying the smallest testable unit within the software. A function or a method, for example, can be considered a unit. In unit testing, you provide expected outputs for various inputs of a function and validate the correctness of its operation. The goal of unit testing is to quickly identify bugs within the function, and they are easy to write and execute rapidly.
On the other hand, E2E tests often simulate real-world user scenarios to test the entire application. For instance, the frontend typically uses a browser or headless browser for testing, while the backend does so by simulating API calls.
Within a NestJS project, unit tests might assess a specific service or a method of a controller, such as verifying if the update method in the Users module correctly updates a user. An E2E test, however, may examine a complete user journey, from creating a new user to updating their password and eventually deleting the user, which involves multiple services and controllers.
Writing Unit Tests
Writing unit tests for a utility function or method that doesn’t involve interfaces is relatively straightforward. You only need to consider the various inputs and write the corresponding test code. However, the situation becomes more complex once interfaces come into play. Let’s use code as an example:
async validateUser(
  username: string,
  password: string,
): Promise<UserAccountDto> {
  const entity = await this.usersService.findOne({ username });
  if (!entity) {
    throw new UnauthorizedException('User not found');
  }
  if (entity.lockUntil && entity.lockUntil > Date.now()) {
    const diffInSeconds = Math.round((entity.lockUntil - Date.now()) / 1000);
    let message = `The account is locked. Please try again in ${diffInSeconds} seconds.`;
    if (diffInSeconds > 60) {
      const diffInMinutes = Math.round(diffInSeconds / 60);
      message = `The account is locked. Please try again in ${diffInMinutes} minutes.`;
    }
    throw new UnauthorizedException(message);
  }
  const passwordMatch = bcrypt.compareSync(password, entity.password);
  if (!passwordMatch) {
    // $inc update to increase failedLoginAttempts
    const update = {
      $inc: { failedLoginAttempts: 1 },
    };
    // lock account when the third try is failed
    if (entity.failedLoginAttempts + 1 >= 3) {
      // $set update to lock the account for 5 minutes
      update['$set'] = { lockUntil: Date.now() + 5 * 60 * 1000 };
    }
    await this.usersService.update(entity._id, update);
    throw new UnauthorizedException('Invalid password');
  }
  // if validation is sucessful, then reset failedLoginAttempts and lockUntil
  if (
    entity.failedLoginAttempts > 0 ||
    (entity.lockUntil && entity.lockUntil > Date.now())
  ) {
    await this.usersService.update(entity._id, {
      $set: { failedLoginAttempts: 0, lockUntil: null },
    });
  }
  return { userId: entity._id, username } as UserAccountDto;
}
The code above is a method validateUser in the auth.service.ts file, primarily used to verify whether the username and password entered by the user during login are correct. It contains the following logic:
- Check if the user exists based on username; if not, throw a 401 exception (a 404 exception is also feasible).
- See if the user is locked out; if so, throw a 401 exception with a relevant message.
- Encrypt the password and compare it with the password in the database; if it's incorrect, throw a 401 exception (three consecutive failed login attempts will lock the account for 5 minutes).
- If the login is successful, clear any previously failed login attempt counts (if applicable) and return the user id and username to the next stage.
As can be seen, the validateUser method includes four processing logics, and we need to write corresponding unit test code for these four points to ensure that the entire validateUser function is operating correctly.
The First Test Case
When we start writing unit tests, we encounter a problem: the findOne method needs to interact with the database, and it looks for corresponding users in the database through username. However, if every unit test has to interact with the database, the testing would become very cumbersome. Therefore, we can mock fake data to achieve this.
For example, assume we have registered a user named woai3c. Then, during login, the user data can be retrieved in the validateUser method through const entity = await this.usersService.findOne({ username });. As long as this line of code can return the desired data, there is no problem, even without database interaction. We can achieve this through mock data. Now, let's look at the relevant test code for the validateUser method:
async validateUser(
  username: string,
  password: string,
): Promise<UserAccountDto> {
  const entity = await this.usersService.findOne({ username });
  if (!entity) {
    throw new UnauthorizedException('User not found');
  }
  if (entity.lockUntil && entity.lockUntil > Date.now()) {
    const diffInSeconds = Math.round((entity.lockUntil - Date.now()) / 1000);
    let message = `The account is locked. Please try again in ${diffInSeconds} seconds.`;
    if (diffInSeconds > 60) {
      const diffInMinutes = Math.round(diffInSeconds / 60);
      message = `The account is locked. Please try again in ${diffInMinutes} minutes.`;
    }
    throw new UnauthorizedException(message);
  }
  const passwordMatch = bcrypt.compareSync(password, entity.password);
  if (!passwordMatch) {
    // $inc update to increase failedLoginAttempts
    const update = {
      $inc: { failedLoginAttempts: 1 },
    };
    // lock account when the third try is failed
    if (entity.failedLoginAttempts + 1 >= 3) {
      // $set update to lock the account for 5 minutes
      update['$set'] = { lockUntil: Date.now() + 5 * 60 * 1000 };
    }
    await this.usersService.update(entity._id, update);
    throw new UnauthorizedException('Invalid password');
  }
  // if validation is sucessful, then reset failedLoginAttempts and lockUntil
  if (
    entity.failedLoginAttempts > 0 ||
    (entity.lockUntil && entity.lockUntil > Date.now())
  ) {
    await this.usersService.update(entity._id, {
      $set: { failedLoginAttempts: 0, lockUntil: null },
    });
  }
  return { userId: entity._id, username } as UserAccountDto;
}
We get the user data by calling the findOne method of usersService, so we need to mock the findOne method of usersService in the test code:
import { Test } from '@nestjs/testing';
import { AuthService } from '@/modules/auth/auth.service';
import { UsersService } from '@/modules/users/users.service';
import { UnauthorizedException } from '@nestjs/common';
import { TEST_USER_NAME, TEST_USER_PASSWORD } from '@tests/constants';
describe('AuthService', () => {
  let authService: AuthService; // Use the actual AuthService type
  let usersService: Partial<Record<keyof UsersService, jest.Mock>>;
  beforeEach(async () => {
    usersService = {
      findOne: jest.fn(),
    };
    const module = await Test.createTestingModule({
      providers: [        AuthService,
        {
          provide: UsersService,
          useValue: usersService,
        },
      ],
    }).compile();
    authService = module.get<AuthService>(AuthService);
  });
  describe('validateUser', () => {
    it('should throw an UnauthorizedException if user is not found', async () => {
      await expect(
        authService.validateUser(TEST_USER_NAME, TEST_USER_PASSWORD),
      ).rejects.toThrow(UnauthorizedException);
    });
    // other tests...
  });
});
We use jest.fn() to return a function to replace the real usersService.findOne(). If usersService.findOne() is called now, there will be no return value, so the first unit test case will pass:
beforeEach(async () => {
    usersService = {
      findOne: jest.fn(), // mock findOne method
    };
    const module = await Test.createTestingModule({
      providers: [        AuthService, // real AuthService, because we are testing its methods
        {
          provide: UsersService, // use mock usersService instead of real usersService
          useValue: usersService,
        },
      ],
    }).compile();
    authService = module.get<AuthService>(AuthService);
  });
Since findOne in const entity = await this.usersService.findOne({ username }); of the validateUser method is a mocked fake function with no return value, the 2nd to 4th lines of code in the validateUser method could execute:
it('should throw an UnauthorizedException if user is not found', async () => {
  await expect(
    authService.validateUser(TEST_USER_NAME, TEST_USER_PASSWORD),
  ).rejects.toThrow(UnauthorizedException);
});
Throw a 401 error, which is as expected.
The Second Test Case
The second logic in the validateUser method is to determine if the user is locked, with the corresponding code as follows:
if (!entity) {
  throw new UnauthorizedException('User not found');
}
As you can see, we can determine that the current account is locked if there is a lock time lockUntil in the user data and the lock end time is greater than the current time. Therefore, we need to mock a user data with the lockUntil field:
async validateUser(
  username: string,
  password: string,
): Promise<UserAccountDto> {
  const entity = await this.usersService.findOne({ username });
  if (!entity) {
    throw new UnauthorizedException('User not found');
  }
  if (entity.lockUntil && entity.lockUntil > Date.now()) {
    const diffInSeconds = Math.round((entity.lockUntil - Date.now()) / 1000);
    let message = `The account is locked. Please try again in ${diffInSeconds} seconds.`;
    if (diffInSeconds > 60) {
      const diffInMinutes = Math.round(diffInSeconds / 60);
      message = `The account is locked. Please try again in ${diffInMinutes} minutes.`;
    }
    throw new UnauthorizedException(message);
  }
  const passwordMatch = bcrypt.compareSync(password, entity.password);
  if (!passwordMatch) {
    // $inc update to increase failedLoginAttempts
    const update = {
      $inc: { failedLoginAttempts: 1 },
    };
    // lock account when the third try is failed
    if (entity.failedLoginAttempts + 1 >= 3) {
      // $set update to lock the account for 5 minutes
      update['$set'] = { lockUntil: Date.now() + 5 * 60 * 1000 };
    }
    await this.usersService.update(entity._id, update);
    throw new UnauthorizedException('Invalid password');
  }
  // if validation is sucessful, then reset failedLoginAttempts and lockUntil
  if (
    entity.failedLoginAttempts > 0 ||
    (entity.lockUntil && entity.lockUntil > Date.now())
  ) {
    await this.usersService.update(entity._id, {
      $set: { failedLoginAttempts: 0, lockUntil: null },
    });
  }
  return { userId: entity._id, username } as UserAccountDto;
}
In the test code above, an object lockedUser is first defined, which contains the lockUntil field we need. Then, it is used as the return value for findOne, achieved by usersService.findOne.mockResolvedValueOnce(lockedUser);. Thus, when the validateUser method is executed, the user data within it is the mocked data, successfully allowing the second test case to pass.
Unit Test Coverage
Unit test coverage (Code Coverage) is a metric used to describe how much of the application code has been covered or tested by unit tests. It is typically expressed as a percentage, indicating how much of all possible code paths have been covered by test cases.
Unit test coverage usually includes the following types:
- Line Coverage: How many lines of code are covered by the tests.
- Function Coverage: How many functions or methods are covered by the tests.
- Branch Coverage: How many code branches are covered by the tests (for example, if/else statements).
- Statement Coverage: How many statements in the code are covered by the tests.
Unit test coverage is an important metric to measure the quality of unit tests, but it is not the only metric. A high coverage rate can help to detect errors in the code, but it does not guarantee the quality of the code. A low coverage rate may mean that there is untested code, potentially with undetected errors.
The image below shows the unit test coverage results for a demo project:
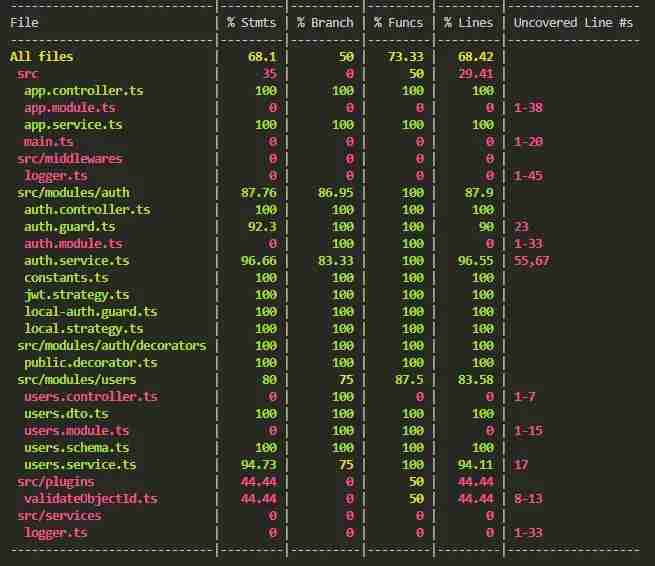
For files like services and controllers, it’s generally better to have a higher unit test coverage, while for files like modules there’s no need to write unit tests, nor is it possible to write them, as it’s meaningless. The above image represents the overall metrics for the entire unit test coverage. If you want to view the test coverage for a specific function, you can open the coverage/lcov-report/index.html file in the project's root directory. For example, I want to see the specific test situation for the validateUser method:
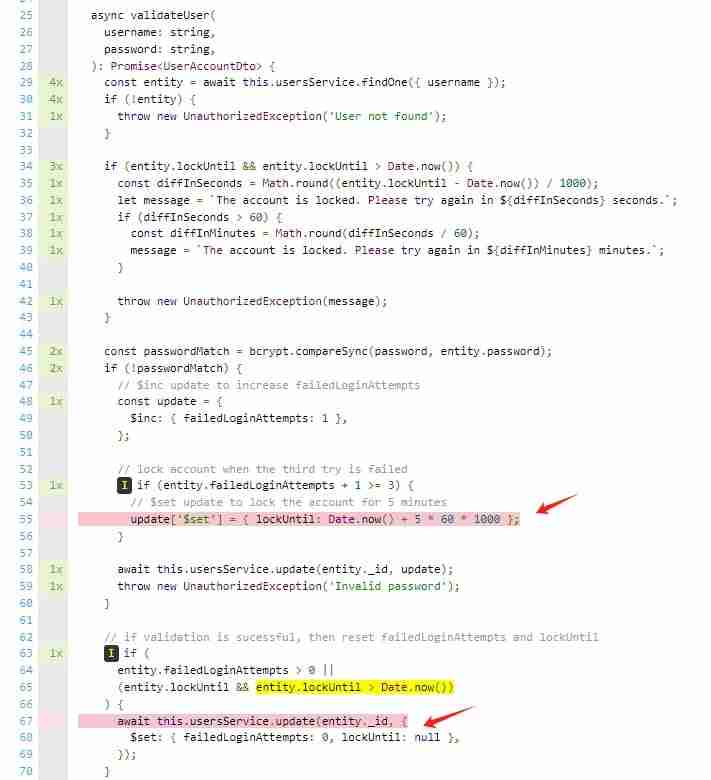
As can be seen, the original unit test coverage for the validateUser method is not 100%, and there are still two lines of code that were not executed. However, it doesn’t matter much, as it does not affect the four key processing nodes, and one should not pursue high test coverage unidimensionally.
Writing E2E Tests
In the unit tests, we demonstrated how to write unit tests for each feature of the validateUser() function, using mocked data to ensure that each feature could be tested. In e2E testing, we need to simulate real user scenarios, so connecting to a database for testing is necessary. Therefore, the methods in the auth.service.ts module that we'll be testing all interact with the database.
The auth module primarily includes the following features:
- Registration
- Login
- Token refresh
- Reading user information
- Changing password
- Deleting users
E2E tests need to test these six features one by one, starting with registration and ending with deleting users. During testing, we can create a dedicated test user to conduct the tests and then delete this test user upon completion, so as not to leave any unnecessary information in the test database.
async validateUser(
  username: string,
  password: string,
): Promise<UserAccountDto> {
  const entity = await this.usersService.findOne({ username });
  if (!entity) {
    throw new UnauthorizedException('User not found');
  }
  if (entity.lockUntil && entity.lockUntil > Date.now()) {
    const diffInSeconds = Math.round((entity.lockUntil - Date.now()) / 1000);
    let message = `The account is locked. Please try again in ${diffInSeconds} seconds.`;
    if (diffInSeconds > 60) {
      const diffInMinutes = Math.round(diffInSeconds / 60);
      message = `The account is locked. Please try again in ${diffInMinutes} minutes.`;
    }
    throw new UnauthorizedException(message);
  }
  const passwordMatch = bcrypt.compareSync(password, entity.password);
  if (!passwordMatch) {
    // $inc update to increase failedLoginAttempts
    const update = {
      $inc: { failedLoginAttempts: 1 },
    };
    // lock account when the third try is failed
    if (entity.failedLoginAttempts + 1 >= 3) {
      // $set update to lock the account for 5 minutes
      update['$set'] = { lockUntil: Date.now() + 5 * 60 * 1000 };
    }
    await this.usersService.update(entity._id, update);
    throw new UnauthorizedException('Invalid password');
  }
  // if validation is sucessful, then reset failedLoginAttempts and lockUntil
  if (
    entity.failedLoginAttempts > 0 ||
    (entity.lockUntil && entity.lockUntil > Date.now())
  ) {
    await this.usersService.update(entity._id, {
      $set: { failedLoginAttempts: 0, lockUntil: null },
    });
  }
  return { userId: entity._id, username } as UserAccountDto;
}
The beforeAll hook function runs before all tests begin, so we can register a test account TEST_USER_NAME here. The afterAll hook function runs after all tests end, so it's suitable to delete the test account TEST_USER_NAME here, and it also conveniently tests the registration and deletion functions.
In the previous section’s unit tests, we wrote relevant unit tests around the validateUser method. Actually, this method is executed during login to validate if the user's account and password are correct. Therefore, this e2E test will also use the login process to demonstrate how to compose e2E test cases.
The entire login test process includes five small tests:
import { Test } from '@nestjs/testing';
import { AuthService } from '@/modules/auth/auth.service';
import { UsersService } from '@/modules/users/users.service';
import { UnauthorizedException } from '@nestjs/common';
import { TEST_USER_NAME, TEST_USER_PASSWORD } from '@tests/constants';
describe('AuthService', () => {
  let authService: AuthService; // Use the actual AuthService type
  let usersService: Partial<Record<keyof UsersService, jest.Mock>>;
  beforeEach(async () => {
    usersService = {
      findOne: jest.fn(),
    };
    const module = await Test.createTestingModule({
      providers: [        AuthService,
        {
          provide: UsersService,
          useValue: usersService,
        },
      ],
    }).compile();
    authService = module.get<AuthService>(AuthService);
  });
  describe('validateUser', () => {
    it('should throw an UnauthorizedException if user is not found', async () => {
      await expect(
        authService.validateUser(TEST_USER_NAME, TEST_USER_PASSWORD),
      ).rejects.toThrow(UnauthorizedException);
    });
    // other tests...
  });
});
These five tests are as follows:
- Successful login, return 200
- If the user does not exist, throw a 401 exception
- If password or username is not provided, throw a 400 exception
- Login with the wrong password, throw a 401 exception
- If the account is locked, throw a 401 exception
Now let’s start writing the e2E tests:
beforeEach(async () => {
    usersService = {
      findOne: jest.fn(), // mock findOne method
    };
    const module = await Test.createTestingModule({
      providers: [        AuthService, // real AuthService, because we are testing its methods
        {
          provide: UsersService, // use mock usersService instead of real usersService
          useValue: usersService,
        },
      ],
    }).compile();
    authService = module.get<AuthService>(AuthService);
  });
Writing e2E test code is relatively straightforward: you simply call the interface and then verify the result. For example, for the successful login test, we just need to verify that the returned result is 200.
The first four tests are quite simple. Now let’s look at a slightly more complicated e2E test, which is to verify whether an account is locked.
async validateUser(
  username: string,
  password: string,
): Promise<UserAccountDto> {
  const entity = await this.usersService.findOne({ username });
  if (!entity) {
    throw new UnauthorizedException('User not found');
  }
  if (entity.lockUntil && entity.lockUntil > Date.now()) {
    const diffInSeconds = Math.round((entity.lockUntil - Date.now()) / 1000);
    let message = `The account is locked. Please try again in ${diffInSeconds} seconds.`;
    if (diffInSeconds > 60) {
      const diffInMinutes = Math.round(diffInSeconds / 60);
      message = `The account is locked. Please try again in ${diffInMinutes} minutes.`;
    }
    throw new UnauthorizedException(message);
  }
  const passwordMatch = bcrypt.compareSync(password, entity.password);
  if (!passwordMatch) {
    // $inc update to increase failedLoginAttempts
    const update = {
      $inc: { failedLoginAttempts: 1 },
    };
    // lock account when the third try is failed
    if (entity.failedLoginAttempts + 1 >= 3) {
      // $set update to lock the account for 5 minutes
      update['$set'] = { lockUntil: Date.now() + 5 * 60 * 1000 };
    }
    await this.usersService.update(entity._id, update);
    throw new UnauthorizedException('Invalid password');
  }
  // if validation is sucessful, then reset failedLoginAttempts and lockUntil
  if (
    entity.failedLoginAttempts > 0 ||
    (entity.lockUntil && entity.lockUntil > Date.now())
  ) {
    await this.usersService.update(entity._id, {
      $set: { failedLoginAttempts: 0, lockUntil: null },
    });
  }
  return { userId: entity._id, username } as UserAccountDto;
}
When a user fails to log in three times in a row, the account will be locked. Therefore, in this test, we cannot use the test account TEST_USER_NAME, because if the test is successful, this account will be locked and unable to continue the following tests. We need to register another new user TEST_USER_NAME2 specifically to test account locking, and delete this user after the test is successful. So, as you can see, the code for this e2E test is quite substantial, requiring a lot of setup and teardown work, but the actual test code is just these few lines:
import { Test } from '@nestjs/testing';
import { AuthService } from '@/modules/auth/auth.service';
import { UsersService } from '@/modules/users/users.service';
import { UnauthorizedException } from '@nestjs/common';
import { TEST_USER_NAME, TEST_USER_PASSWORD } from '@tests/constants';
describe('AuthService', () => {
  let authService: AuthService; // Use the actual AuthService type
  let usersService: Partial<Record<keyof UsersService, jest.Mock>>;
  beforeEach(async () => {
    usersService = {
      findOne: jest.fn(),
    };
    const module = await Test.createTestingModule({
      providers: [        AuthService,
        {
          provide: UsersService,
          useValue: usersService,
        },
      ],
    }).compile();
    authService = module.get<AuthService>(AuthService);
  });
  describe('validateUser', () => {
    it('should throw an UnauthorizedException if user is not found', async () => {
      await expect(
        authService.validateUser(TEST_USER_NAME, TEST_USER_PASSWORD),
      ).rejects.toThrow(UnauthorizedException);
    });
    // other tests...
  });
});
Writing e2E test code is relatively simple. You don’t need to consider mock data or test coverage. It’s sufficient if the entire system process runs as expected.
Whether to Write Tests
If possible, I generally recommend writing tests. Doing so can enhance the robustness, maintainability, and development efficiency of the system.
Enhancing System Robustness
When writing code, we usually focus on the program flow under normal inputs to ensure the core functionality works properly. However, we might often overlook some edge cases, such as abnormal inputs. Writing tests changes this; it forces you to consider how to handle these cases and respond appropriately, thus preventing crashes. It can be said that writing tests indirectly improves system robustness.
Enhancing Maintainability
Taking over a new project that includes comprehensive tests can be very pleasant. They act as a guide, helping you quickly understand the various functionalities. Just by looking at the test code, you can easily grasp the expected behavior and boundary conditions of each function without having to go through each line of the function’s code.
Enhancing Development Efficiency
Imagine, a project that hasn’t been updated for a while suddenly receives new requirements. After making changes, you might worry about introducing bugs. Without tests, you would need to manually test the entire project again — wasting time and being inefficient. With complete tests, a single command can tell you whether the code changes have impacted existing functionalities. Even if there are errors, they can be quickly located and addressed.
When Not to Write Tests?
For short-term projects and projects with very fast requirement iterations, it’s not recommended to write tests. For example, some project meant for events that will be useless after the event ends doesn’t need tests. Also, for projects that undergo very fast requirement iterations, I said that writing tests could enhance development efficiency, but that’s based on the premise that function iterations are slow. If the function you just completed changes in a day or two, the related test code must be rewritten. So, it’s better not to write tests at all and rely on the testing team instead because writing tests is very time-consuming and not worth the effort.
Conclusion
After explaining in detail how to write unit tests and e2E tests for NestJS projects, I still want to reiterate the importance of testing. It can enhance the robustness, maintainability, and development efficiency of the system. If you don’t have the opportunity to write tests, I suggest you start a practice project yourself or participate in some open-source projects and contribute code to them. Open-source projects generally have stricter code requirements. Contributing code may require you to write new test cases or modify existing ones.
Reference Materials
- NestJS: A framework for building efficient, scalable Node.js server-side applications.
- MongoDB: A NoSQL database used for data storage.
- Jest: A testing framework for JavaScript and TypeScript.
- Supertest: A library for testing HTTP servers.
The above is the detailed content of How to write unit tests and Etests for NestJS applications. For more information, please follow other related articles on the PHP Chinese website!

Hot AI Tools

Undresser.AI Undress
AI-powered app for creating realistic nude photos

AI Clothes Remover
Online AI tool for removing clothes from photos.

Undress AI Tool
Undress images for free

Clothoff.io
AI clothes remover

Video Face Swap
Swap faces in any video effortlessly with our completely free AI face swap tool!

Hot Article
Hot Tools

Notepad++7.3.1
Easy-to-use and free code editor

SublimeText3 Chinese version
Chinese version, very easy to use

Zend Studio 13.0.1
Powerful PHP integrated development environment

Dreamweaver CS6
Visual web development tools

SublimeText3 Mac version
God-level code editing software (SublimeText3)
Hot Topics
 1662
1662
 14
1419
52
1311
25
1261
29
1234
24
14
1419
52
1311
25
1261
29
1234
24

 Demystifying JavaScript: What It Does and Why It Matters
Apr 09, 2025 am 12:07 AM
Demystifying JavaScript: What It Does and Why It Matters
Apr 09, 2025 am 12:07 AM
JavaScript is the cornerstone of modern web development, and its main functions include event-driven programming, dynamic content generation and asynchronous programming. 1) Event-driven programming allows web pages to change dynamically according to user operations. 2) Dynamic content generation allows page content to be adjusted according to conditions. 3) Asynchronous programming ensures that the user interface is not blocked. JavaScript is widely used in web interaction, single-page application and server-side development, greatly improving the flexibility of user experience and cross-platform development.
 The Evolution of JavaScript: Current Trends and Future Prospects
Apr 10, 2025 am 09:33 AM
The Evolution of JavaScript: Current Trends and Future Prospects
Apr 10, 2025 am 09:33 AM
The latest trends in JavaScript include the rise of TypeScript, the popularity of modern frameworks and libraries, and the application of WebAssembly. Future prospects cover more powerful type systems, the development of server-side JavaScript, the expansion of artificial intelligence and machine learning, and the potential of IoT and edge computing.
 JavaScript Engines: Comparing Implementations
Apr 13, 2025 am 12:05 AM
JavaScript Engines: Comparing Implementations
Apr 13, 2025 am 12:05 AM
Different JavaScript engines have different effects when parsing and executing JavaScript code, because the implementation principles and optimization strategies of each engine differ. 1. Lexical analysis: convert source code into lexical unit. 2. Grammar analysis: Generate an abstract syntax tree. 3. Optimization and compilation: Generate machine code through the JIT compiler. 4. Execute: Run the machine code. V8 engine optimizes through instant compilation and hidden class, SpiderMonkey uses a type inference system, resulting in different performance performance on the same code.
 JavaScript: Exploring the Versatility of a Web Language
Apr 11, 2025 am 12:01 AM
JavaScript: Exploring the Versatility of a Web Language
Apr 11, 2025 am 12:01 AM
JavaScript is the core language of modern web development and is widely used for its diversity and flexibility. 1) Front-end development: build dynamic web pages and single-page applications through DOM operations and modern frameworks (such as React, Vue.js, Angular). 2) Server-side development: Node.js uses a non-blocking I/O model to handle high concurrency and real-time applications. 3) Mobile and desktop application development: cross-platform development is realized through ReactNative and Electron to improve development efficiency.
 Python vs. JavaScript: The Learning Curve and Ease of Use
Apr 16, 2025 am 12:12 AM
Python vs. JavaScript: The Learning Curve and Ease of Use
Apr 16, 2025 am 12:12 AM
Python is more suitable for beginners, with a smooth learning curve and concise syntax; JavaScript is suitable for front-end development, with a steep learning curve and flexible syntax. 1. Python syntax is intuitive and suitable for data science and back-end development. 2. JavaScript is flexible and widely used in front-end and server-side programming.
 How to Build a Multi-Tenant SaaS Application with Next.js (Frontend Integration)
Apr 11, 2025 am 08:22 AM
How to Build a Multi-Tenant SaaS Application with Next.js (Frontend Integration)
Apr 11, 2025 am 08:22 AM
This article demonstrates frontend integration with a backend secured by Permit, building a functional EdTech SaaS application using Next.js. The frontend fetches user permissions to control UI visibility and ensures API requests adhere to role-base
 From C/C to JavaScript: How It All Works
Apr 14, 2025 am 12:05 AM
From C/C to JavaScript: How It All Works
Apr 14, 2025 am 12:05 AM
The shift from C/C to JavaScript requires adapting to dynamic typing, garbage collection and asynchronous programming. 1) C/C is a statically typed language that requires manual memory management, while JavaScript is dynamically typed and garbage collection is automatically processed. 2) C/C needs to be compiled into machine code, while JavaScript is an interpreted language. 3) JavaScript introduces concepts such as closures, prototype chains and Promise, which enhances flexibility and asynchronous programming capabilities.
 Building a Multi-Tenant SaaS Application with Next.js (Backend Integration)
Apr 11, 2025 am 08:23 AM
Building a Multi-Tenant SaaS Application with Next.js (Backend Integration)
Apr 11, 2025 am 08:23 AM
I built a functional multi-tenant SaaS application (an EdTech app) with your everyday tech tool and you can do the same. First, what’s a multi-tenant SaaS application? Multi-tenant SaaS applications let you serve multiple customers from a sing
