

How to set up your own Mac server (with an old or new Mac)


Macs can last a long time. It’s not uncommon to have a Mac that is ten years old, or even older. While you can’t always update old Macs to the latest version of macOS, there are workarounds that let you run the current version of the operating system on unsupported Macs.
If you have an old Mac, it may or may not be worth selling it, but there are lots of things you can do with an old Mac. One of the most useful options is to repurpose it as a server. You can use it to store files and to back up other Macs in your home or office. Here’s how to set up an old (or new) Mac as a server.
In this article:
- A historical look at Mac server software
- Why a SOHO or personal Mac server is useful
- How to set up your Mac as a server
- File sharing
- Time Machine or Intego Personal Backup network destination
- Content caching, to save bandwidth and data usage
- Printer sharing
- Now you know how to set up your own Mac server!
- How can I learn more?
A historical look at Mac server software
For many years, Apple had a separate server version of macOS (or Mac OS X, as it was known at the time). First released in 1999, even before the consumer version of Mac OS X was released, Mac OS X Server was updated with each OS version through Mac OS X Server 10.6, Snow Leopard. It was designed for businesses, and provided services to manage users and groups, run an email server, share calendars, and more.
Initially expensive — Mac OS X Server 10.0 cost $499 for a 10-client version, and $999 for an unlimited client version — the price dropped over the years. With the release of Mac OS X Lion in 2011, the server software was no longer sold separately, as all of its elements were built into the operating system. For $50, you could buy a Server app via the App Store that let you easily configure the server features. With Mac OS X Mountain Lion, this price dropped to $20. After that, the software remained available for many years, though it gradually lost features over time. In 2016, we wrote about how you could bring an old Mac back to life using this software, by turning on file sharing, Time Machine server, and content caching services.
Apple also sold server versions of Mac hardware for many years, such as the early Workgroup Servers in the 1990s, the Macintosh Server G3 and G4 from 1999 to 2003, the Xserve from 2002 to 2011, and even server versions of the Mac mini, from 2009 to 2014.
In 2018, Apple alerted Server users that many features would be removed, and signaled that macOS Server was reaching the end of its life. With the release of macOS Monterey, this server software no longer worked.
Since macOS is built upon a UNIX-like operating system kernel, many of these server features remain available, but are either difficult to manually configure or need to be obtained from a third party. You could run much of what macOS Server offered for free, configuring the services from the command line, if you knew how.
But with the growth of cloud computing, it made little sense to continue selling a server version of macOS — at least for use as a public-facing server, or even a server for medium-to-large sized businesses.
But many home users and small businesses were disappointed with Apple’s decision, for good reason.
Why a SOHO or personal Mac server is useful
If you have a couple of Macs in your house, or in your small or home office, it can be useful to have an old Mac running as a server. There are several useful features you can enable:
- A file server lets you store files on the Mac and access them from any Mac on the network. You can connect one or more drives to the Mac running as a server, and have plenty of storage without having to connect external hard drives to individual Macs. This is especially useful if you use a laptop and don’t want to connect external drives to it, and if you want to store a media collection and share it on your network, to other Macs, iPads, iPhones, and Apple TVs, using software like Plex or Infuse.
- You can set up a server as a destination for Time Machine backups. Your Macs can automatically back up to the server every hour, again without the need for drives physically connected to these Macs.
- Content caching is a feature in macOS that lets you keep copies of files downloaded from Apple’s servers so that if you have multiple devices on your network, they don’t each need to download the new content separately. Instead, they’ll grab the copy from your caching server, saving your Internet bandwidth and data usage. Apple’s content caching feature saves local copies of apps from the iOS/iPadOS or Mac App Store, iOS/iPadOS/macOS operating system updates, and iCloud content.
- You can enable printer sharing so all the Macs on a network can interact with a printer that’s physically connected to the server. This, of course, is most often useful if you have a USB-connected printer; printers with built-in Wi-Fi or Ethernet can be connected directly to your network without the need for a print server.
How to set up your Mac as a server
To use a Mac as a server, you don’t need a fast Mac or a lot of RAM. You do, however, need a lot of storage (for all scenarios above except for printer sharing). You can add one or more external drives to the Mac to provide as much storage as you need.
Since Apple doesn’t reliably issue security updates for versions of macOS prior to the current version, it’s best to install macOS Ventura. If your Mac doesn’t support Ventura, then you can use some third-party software to allow it to run this version of macOS.
You can use any Mac as a server. If the Mac doesn’t have a display (e.g. a Mac mini, a Mac Pro, or other “headless” desktop Mac), you can use the Remote Management service to control the server without having to connect a physical monitor. (You will probably need to do the initial setup with a display, but after that you can disconnect it.) Certain MacBook models can also run in “headless” mode, although you may need a dongle to trick the Mac into thinking an external display is attached.
Even if the Mac you choose as your server does have a display, it makes sense to turn on Remote Management anyway, so you can control the server without being in front of it.
You can put your remote-managed server in any room of your home or office, as long as it has network access. Use a wired Ethernet cable for the fastest and most stable connection. If that’s not an option for you, use can use Wi-Fi too, assuming you have a strong wireless signal where you keep your server.
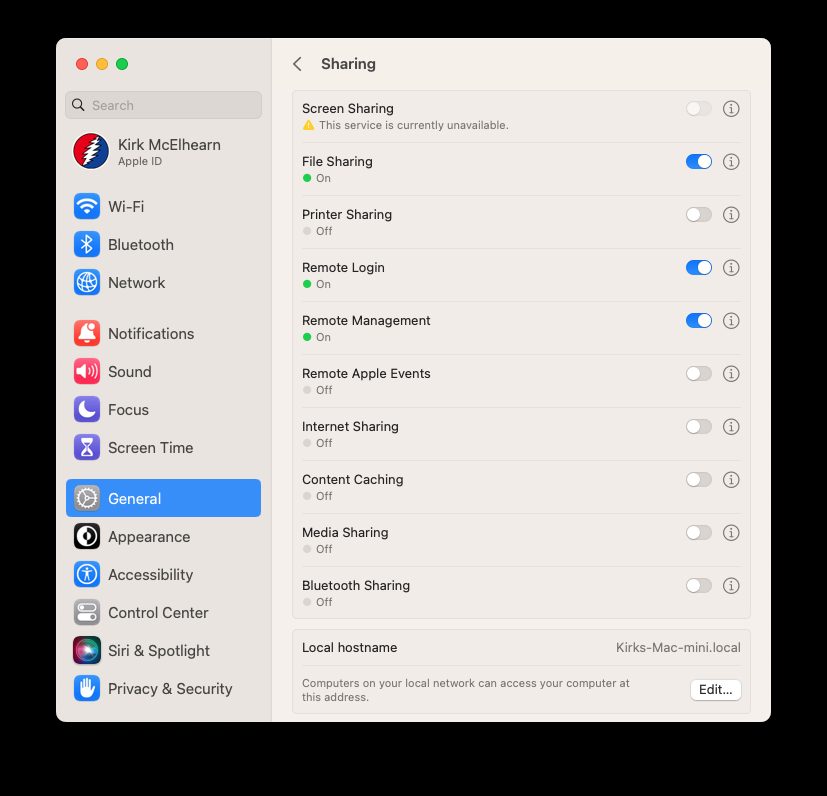
To turn on Remote Management, go to Settings > Sharing, then toggle Remote Management.
Once you’ve done this, you can configure other useful services to turn that Mac into a server.
File sharing
Go to Settings > General > Sharing and toggle File Sharing. If you click the ⓘ button, you can choose which users and groups have access to the server. You need to create accounts for each user who accesses the file server; they log in with their user name and password. For more on using file sharing, see this Apple support document.
The easiest way to use file sharing is with an external drive. Any logged in user can access external drives connected to the Mac. When you mount a network volume, it acts like it is connected to the Mac from which you access it.
Click Network in the Finder sidebar on your Mac, then double-click the Mac server. Enter your username and password, and it mounts in the Finder, showing your user folder (of course, as a prerequisite, you’ll need to have created a user account on the Mac server for each user). Your user’s public folder, along with the top-level drive on the Mac, and any external drives, may also appear as selectable options.

You can also see above two buttons: one is “Share Screen…” which connects via Remote Management. The second is “Disconnect,” which, as you might expect, disconnects you from the server.
When you use screen sharing, you open a window on your Mac that shows the server’s display, and you can control it just as you would locally.
Time Machine or Intego Personal Backup network destination
Time Machine sharing lets you designate a volume to be used for network Time Machine backup of other Macs. To turn this on, go to Settings > Sharing > File Sharing, click the ⓘ button, then click Options. Make sure that “Share files and folders using SMB” is checked.
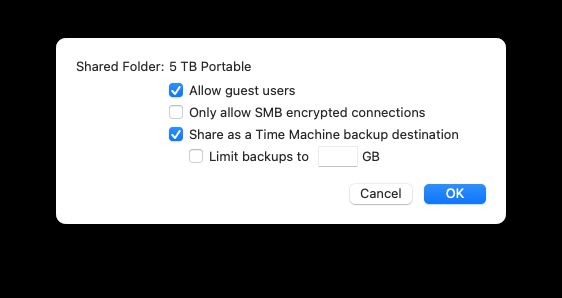
At the bottom of the Shared Folders list, click then add the drive. Right-click on the drive, choose Advanced Options, then check “Share as a Time Machine backup destination.”
If you want, you can set a limit for the size of the Time Machine backups, to ensure that you always have free space on the drive. If there is a limit, Time Machine will prune backups to leave the space free.
Network Time Machine backups store files in disk images, and each Mac backing up to the volume writes to a different disk image. These are encrypted, and aren’t readable by users other than those whose Macs are backed up.
Note that you can use your Mac server as a destination for backups made with Intego Personal Backup, which is part of Intego’s Mac Premium Bundle. You don’t need to do anything special on the server; just mount a network volume and choose that volume as your destination.
Content caching to save bandwidth and data usage
To turn on content caching, go to Settings > General > Sharing, then toggle Content Caching. Click the ⓘ button to access some options:

In the Cache menu, you can choose All Content, Shared Content, or iCloud Content. Shared content is apps and operating system updates. iCloud content includes photos and iCloud Drive content. For example, if you don’t want to store all the content of your iCloud Drive on a Mac, you can cache it on your server, and download it much more quickly than downloading it from Apple’s servers.
If you click Options, you can set a size limit for cached content.
For more on content caching, see this Apple support document, and if you want to know everything about how content caching works, this section of Apple’s Platform Deployment guide goes into detail about this service.
Printer sharing
To share a printer connected to your Mac, toggle Printer Sharing on. Click the ⓘ button to select your printer, and, by default, you’ll see that it’s set to allow everyone on the network to print to it. If you share a printer like this, other users will see that printer in Print dialogs on their Macs, iPads, or iPhones.

Now you know how to set up your own Mac server!
A Mac server is a great way to repurpose an old Mac. It’s easy to set up, and can provide useful services for a small office, or even a home. If you have a lot of videos, and use software such as Plex or Infuse, it’s a great way to store your media and stream to your devices.
For even more tips on what you can do with an old Mac, be sure to check out our article, 9 Things You Can Do With an Old Mac.
9 Things You Can Do With an Old Mac
The above is the detailed content of How to set up your own Mac server (with an old or new Mac). For more information, please follow other related articles on the PHP Chinese website!

Hot AI Tools

Undresser.AI Undress
AI-powered app for creating realistic nude photos

AI Clothes Remover
Online AI tool for removing clothes from photos.

Undress AI Tool
Undress images for free

Clothoff.io
AI clothes remover

Video Face Swap
Swap faces in any video effortlessly with our completely free AI face swap tool!

Hot Article
Hot Tools

Notepad++7.3.1
Easy-to-use and free code editor

SublimeText3 Chinese version
Chinese version, very easy to use

Zend Studio 13.0.1
Powerful PHP integrated development environment

Dreamweaver CS6
Visual web development tools

SublimeText3 Mac version
God-level code editing software (SublimeText3)
Hot Topics


 Spotify on Apple Watch: How to use it in 2025
Apr 04, 2025 am 09:55 AM
Spotify on Apple Watch: How to use it in 2025
Apr 04, 2025 am 09:55 AM
With the support of Apple devices' interconnected ecosystem, managing and synchronizing your Apple devices has become a breeze. Unlock Mac with Apple Watch? Simple! (If you haven't set this unlocking method yet, you should really try it, it's very time-saving). Can you pay with Apple Watch without using iPhone? Apple can handle it easily! Today we will focus on how to download the Spotify playlist to an Apple Watch and play without an iPhone. Spoiler: This is possible. How to use Spotify on Apple Watch: A quick overview Let's dive into the key issues and their solutions directly. If this form helps you, that would be great! If you

 Fix your Mac running slow after update to Sequoia
Apr 14, 2025 am 09:30 AM
Fix your Mac running slow after update to Sequoia
Apr 14, 2025 am 09:30 AM
After upgrading to the latest macOS, does the Mac run slower? Don't worry, you are not alone! This article will share my experience in solving slow Mac running problems after upgrading to macOS Sequoia. After the upgrade, I can’t wait to experience new features such as recording and transcription of voice notes and improved trail map planning capabilities. But after installation, my Mac started running slowly. Causes and solutions for slow Mac running after macOS update Here is my summary of my experience, I hope it can help you solve the problem of slow Mac running after macOS Sequoia update: Cause of the problem Solution Performance issues Using Novabe
 How to get rid of 'Your screen is being observed' error
Apr 05, 2025 am 10:19 AM
How to get rid of 'Your screen is being observed' error
Apr 05, 2025 am 10:19 AM
When you see the message "Your screen is being monitored", the first thing you think of is someone hacking into your computer. But that's not always the case. Let's try to find out if there are any issues that need you to worry about. Protect your Mac With Setapp, you don't need to worry about choosing a tool to protect your computer. You can quickly form your own suite of privacy and security software on Setapp. Free Trial Security Test What does "Your screen is being monitored" mean? There are many reasons why there is a Mac lock screen message that appears with “Your screen is being monitored”. You are sharing the screen with others You are recording the screen You are using AirPlay You are using some apps that try to access your screen Your computer is infected with evil
 How to reduce WindowServer Mac CPU usage
Apr 16, 2025 pm 12:07 PM
How to reduce WindowServer Mac CPU usage
Apr 16, 2025 pm 12:07 PM
macOS WindowServer: Understanding High CPU Usage and Solutions Have you noticed WindowServer consuming significant CPU resources on your Mac? This process is crucial for your Mac's graphical interface, rendering everything you see on screen. High C

 Email is not syncing? How to refresh the Mail app on Mac
Apr 04, 2025 am 09:45 AM
Email is not syncing? How to refresh the Mail app on Mac
Apr 04, 2025 am 09:45 AM
Mac mail synchronization failed? Quick solution! Many Mac users rely on the included Mail app because it is simple and convenient. But even reliable software can have problems. One of the most common problems is that Mail cannot be synced, resulting in recent emails not being displayed. This article will guide you through email synchronization issues and provide some practical tips to prevent such issues. How to refresh the Mail app on your Mac Operation steps Click the envelope icon Open the Mail app > View > Show Tab Bar > Click the Envelope icon to refresh. Use shortcut keys or menu options Press Shift Command N. Or open the Mail app
 How to make a video into a live photo on Mac and iPhone: Detailed steps
Apr 11, 2025 am 10:59 AM
How to make a video into a live photo on Mac and iPhone: Detailed steps
Apr 11, 2025 am 10:59 AM
This guide explains how to convert between Live Photos, videos, and GIFs on iPhones and Macs. Modern iPhones excel at image processing, but managing different media formats can be tricky. This tutorial provides solutions for various conversions, al
