
 Computer Tutorials
Troubleshooting
Quick Guide to Fixing Hard Drive Still Appears After Removal
Computer Tutorials
Troubleshooting
Quick Guide to Fixing Hard Drive Still Appears After Removal
Quick Guide to Fixing Hard Drive Still Appears After Removal

Occasionally, your USB flash drive or internal/external hard drive still appears after removal on Windows. If this problem bothers you, you can try the proven workarounds in this MiniTool guide to address it.
Phenomenon: USB Drive/Hard Drive Still Appears After Removal on Windows
Normally, when you remove an internal or removable disk from your computer, the system will detect that the device has been disconnected, and the disk will no longer be displayed in File Explorer and Disk Management. At the same time, the drive letter occupied by the disk will be released for other disks to use. However, sometimes you may find that your hard drive still appears after removal.
You may see the disconnected disk in File Explorer but will be prompted to insert a disk when you try to access it. Or, it will show up in Disk Management but have no disk capacity and cannot be accessed. In the case of this fake disk, you should save any current work and restart the computer to make it recognize that the disk has been removed. If this does not help, you can implement the following workarounds.
How to Fix Hard Drive/USB Drive Still Showing After Disconnect
Fix 1. Rescan Disks
If your hard drive or USB drive still showing after disconnect, you can rescan the disks in Disk Management to let the system redetect and recognize all connected storage devices. In Disk Management, click Action and Rescan Disks sequentially.
Fix 2. Re-assign a Drive Letter & Reboot the Computer
Reassigning a new drive letter to the problematic disk and restarting the computer can make the system refresh the hardware connection and eliminate the incorrectly displayed disk.
Step 1. Right-click the Start button and choose Disk Management to open it.
Step 2. Right-click the target disk and choose Change Drive Letter and Paths from the context menu.
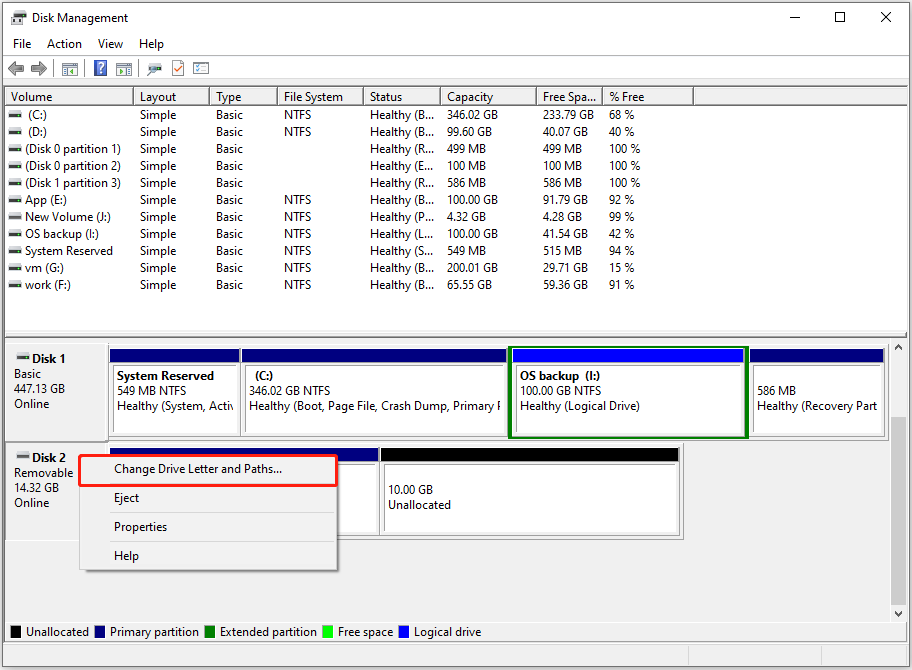
Step 3. In the pop-up window, click Change, choose a different drive letter from the drop-down list, and click OK. Apply this change in each window, and then restart your computer and check if the problematic disk disappears.
Fix 3. Modify the Registry
MountPoints2 is a key in the Windows registry that stores information about the drives that have been mounted on the system. You can delete this registry to remove the information it contains. When you connect your disks again, the system will regenerate this information automatically.
Step 1. Press the Windows R key combination to open Run.
Step 2. Type regedit in the input box and press Enter. If the UAC window pops up, select Yes to continue.
Step 3. In the top address bar, copy and paste the following location and press Enter:
ComputerHKEY_CURRENT_USERSOFTWAREMicrosoftWindowsCurrentVersionExplorerMountPoints2
Step 4. Right-click the MountPoints2 registry and choose Delete from the context menu.

Step 5. Restart your computer and verify if the disconnected USB drive/hard drive still appears.
Fix 4. Uninstall the Disk Manually
Apart from the approaches above, you can also remove your disk forcibly from Device Manager. Here are the operation steps.
Step 1. Right-click the Windows logo button from the taskbar and click Device Manager to open it.
Step 2. Double-click Disk drives to expand this category.
Step 3. Check if your USB drive or internal/external hard disk is here. If yes, right-click on it and choose Uninstall device from the context menu.
Now you should know how to resolve the problem of “hard drive still appears after removal”.
Bonus Time: USB Drive/Hard Drive Data Recovery Software Recommended
In this era of widespread use of various data storage devices, disk failure or data loss happens from time to time. If you unfortunately delete or lose files, you may consider using MiniTool Power Data Recovery to recover data. It is adept at restoring all types of files, including documents, videos, photos, audio, emails, archives, databases, and other files from all file storage devices.
If this is the first time you use it, you can try the free edition which supports 1 GB of free secure data recovery.
Wrapping Things Up
Based on user feedback and my personal experience, I’ve identified four effective methods for efficiently removing stubborn disks that persistently appear on your computer. Hope the information above can help you out.
The above is the detailed content of Quick Guide to Fixing Hard Drive Still Appears After Removal. For more information, please follow other related articles on the PHP Chinese website!

Hot AI Tools

Undresser.AI Undress
AI-powered app for creating realistic nude photos

AI Clothes Remover
Online AI tool for removing clothes from photos.

Undress AI Tool
Undress images for free

Clothoff.io
AI clothes remover

Video Face Swap
Swap faces in any video effortlessly with our completely free AI face swap tool!

Hot Article
Hot Tools

Notepad++7.3.1
Easy-to-use and free code editor

SublimeText3 Chinese version
Chinese version, very easy to use

Zend Studio 13.0.1
Powerful PHP integrated development environment

Dreamweaver CS6
Visual web development tools

SublimeText3 Mac version
God-level code editing software (SublimeText3)
Hot Topics


 What's New in Windows 11 KB5054979 & How to Fix Update Issues
Apr 03, 2025 pm 06:01 PM
What's New in Windows 11 KB5054979 & How to Fix Update Issues
Apr 03, 2025 pm 06:01 PM
Windows 11 KB5054979 Update: Installation Guide and Troubleshooting For Windows 11 24H2 version, Microsoft has released cumulative update KB5054979, which includes several improvements and bug fixes. This article will guide you on how to install this update and provide a solution to the installation failure. About Windows 11 24H2 KB5054979 KB5054979 was released on March 27, 2025 and is a security update for Windows 11 24H2 versions.NET Framework 3.5 and 4.8.1. This update enhances security and
 How to fix KB5055523 fails to install in Windows 11?
Apr 10, 2025 pm 12:02 PM
How to fix KB5055523 fails to install in Windows 11?
Apr 10, 2025 pm 12:02 PM
KB5055523 update is a cumulative update for Windows 11 version 24H2, released by Microsoft on April 8, 2025, as part of the monthly Patch Tuesday cycle, to offe
 How to fix KB5055518 fails to install in Windows 10?
Apr 10, 2025 pm 12:01 PM
How to fix KB5055518 fails to install in Windows 10?
Apr 10, 2025 pm 12:01 PM
Windows update failures are not uncommon, and most users have to struggle with them, most often becoming frustrated when systems fail to install critical patche
 How to fix KB5055612 fails to install in Windows 10?
Apr 15, 2025 pm 10:00 PM
How to fix KB5055612 fails to install in Windows 10?
Apr 15, 2025 pm 10:00 PM
Windows updates are a critical part of keeping the operating system stable, secure, and compatible with new software or hardware. They are issued on a regular b
 How to fix KB5055528 fails to install in Windows 11?
Apr 10, 2025 pm 12:00 PM
How to fix KB5055528 fails to install in Windows 11?
Apr 10, 2025 pm 12:00 PM
Windows updates are essential to keep your system up to date, secure, and efficient, adding security patches, bug fixes, and new functionality for Windows 11 us
 Windows 11 KB5055528: What's New & What if It Fails to Install
Apr 16, 2025 pm 08:09 PM
Windows 11 KB5055528: What's New & What if It Fails to Install
Apr 16, 2025 pm 08:09 PM
Windows 11 KB5055528 (released on April 8, 2025) Update detailed explanation and troubleshooting For Windows 11 23H2 users, Microsoft released the KB5055528 update on April 8, 2025. This article describes the improvements to this update and provides a solution to the installation failure. KB5055528 update content: This update brings many improvements and new features to Windows 11 23H2 users: File Explorer: Improved text scaling and improved accessibility to the file opening/save dialog and copy dialog. Settings page: Added "Top Card" function to quickly view processor, memory, storage and G
 Fix This Module Is Blocked from Loading into LSA
Apr 02, 2025 pm 08:01 PM
Fix This Module Is Blocked from Loading into LSA
Apr 02, 2025 pm 08:01 PM
After upgrading Windows 11 24H2, you encounter an error "This module prevents loading to local security agency (mdnsNSP.dll)"? This article provides several solutions. Local Security Agency (LSA) protection is a security feature of Windows that helps prevent credentials used to log in to Windows. Many users receive the following error message after a fresh installation of Windows 11 24H2 and installing the latest version of iTunes: This module prevents loading to the local security authority. \Device\HarddiskVolume3\Program Files\Bonjour\mdnsNSP.dll for
 What if KB5055523 Fails to Install? Here Are Some Solutions
Apr 11, 2025 pm 08:01 PM
What if KB5055523 Fails to Install? Here Are Some Solutions
Apr 11, 2025 pm 08:01 PM
Windows 11 KB5055523 Update improvement and installation failure solution This article will introduce improvements to the Windows 11 KB5055523 cumulative update and various ways to resolve update installation failures. KB5055523 Update Highlights KB5055523 is a cumulative update for Windows 11 24H2 released on April 8, which contains several improvements and innovations: AI Enhancements: Improved AI features such as improvements in Copilot, and support for smart options such as article summary and photo editing. Performance optimization: Fixed multiple system vulnerabilities to improve overall performance and stability. User experience modification
