
 Web Front-end
JS Tutorial
Comparison of Spload feature between Documenso and aws-smage-upload example
Web Front-end
JS Tutorial
Comparison of Spload feature between Documenso and aws-smage-upload example
Comparison of Spload feature between Documenso and aws-smage-upload example

In this article, we will compare the steps involved to upload a file to AWS S3 between Documenso and AWS S3 image upload example.
We start with the simple example provided by Vercel.
examples/aws-s3-image-upload
Vercel provides a good working example of uploading a file to AWS S3.
This example’s README provides two options, either you can use an existing S3 bucket or create a new bucket. Understanding this helps
you configure your upload feature correctly.
It is about the time we look at the source code. We are looking for an input element with type=file. In the app/page.tsx, you will find this below code:
return (
    <main>
      <h1>Upload a File to S3</h1>
      <form onSubmit={handleSubmit}>
        <input
         >


<h2>


  <strong>onChange</strong>
</h2>

<p>onChange updates state using setFile, but it does not do the uploading. upload happens when you submit this form.<br>
</p>

<pre class="brush:php;toolbar:false">onChange={(e) => {
  const files = e.target.files
  if (files) {
    setFile(files[0])
  }
}}
handleSubmit
A lot is happening in the handleSubmit function. We need to analyse the list of operations in this handleSubmit function. I have written the comments inside this code snippet to explain the steps.
const handleSubmit = async (e: React.FormEvent<HTMLFormElement>) => {
    e.preventDefault()

    if (!file) {
      alert('Please select a file to upload.')
      return
    }

    setUploading(true)

    const response = await fetch(
      process.env.NEXT_PUBLIC_BASE_URL + '/api/upload',
      {
        method: 'POST',
        headers: {
          'Content-Type': 'application/json',
        },
        body: JSON.stringify({ filename: file.name, contentType: file.type }),
      }
    )

    if (response.ok) {
      const { url, fields } = await response.json()

      const formData = new FormData()
      Object.entries(fields).forEach(([key, value]) => {
        formData.append(key, value as string)
      })
      formData.append('file', file)

      const uploadResponse = await fetch(url, {
        method: 'POST',
        body: formData,
      })

      if (uploadResponse.ok) {
        alert('Upload successful!')
      } else {
        console.error('S3 Upload Error:', uploadResponse)
        alert('Upload failed.')
      }
    } else {
      alert('Failed to get pre-signed URL.')
    }

    setUploading(false)
  }
api/upload
api/upload/route.ts has the below code:
import { createPresignedPost } from '@aws-sdk/s3-presigned-post'
import { S3Client } from '@aws-sdk/client-s3'
import { v4 as uuidv4 } from 'uuid'

export async function POST(request: Request) {
  const { filename, contentType } = await request.json()

  try {
    const client = new S3Client({ region: process.env.AWS_REGION })
    const { url, fields } = await createPresignedPost(client, {
      Bucket: process.env.AWS_BUCKET_NAME,
      Key: uuidv4(),
      Conditions: [
        ['content-length-range', 0, 10485760], // up to 10 MB
        ['starts-with', '$Content-Type', contentType],
      ],
      Fields: {
        acl: 'public-read',
        'Content-Type': contentType,
      },
      Expires: 600, // Seconds before the presigned post expires. 3600 by default.
    })

    return Response.json({ url, fields })
  } catch (error) {
    return Response.json({ error: error.message })
  }
}
The first request in the handleSubmit was to /api/upload and sends content type and filename as payload. It is parsed as below:
const { filename, contentType } = await request.json()
Next step is to create a S3 client and then create a presigned post that returns url and field. You would use this url to upload your file.
With this knowledge, let’s analyse how the upload works in Documenso and draw some comparison.
PDF file upload in Documenso
Let’s start with the input element with type=file. Code is organized differently in Documenso. You would find input element in a file named document-dropzone.tsx.
<input {...getInputProps()} />

<p className="text-foreground mt-8 font-medium">{_(heading[type])}</p>
Here getInputProps is returned useDropzone. Documenso uses react-dropzone.
import { useDropzone } from 'react-dropzone';
onDrop calls props.onDrop, you will find an attribute value named onFileDrop in upload-document.tsx.
<DocumentDropzone
  className="h-[min(400px,50vh)]"
  disabled={remaining.documents === 0 || !session?.user.emailVerified}
  disabledMessage={disabledMessage}
  onDrop={onFileDrop}
  onDropRejected={onFileDropRejected}
/>
Let’s see what happens in onFileDrop function.
const onFileDrop = async (file: File) => {
    try {
      setIsLoading(true);

      const { type, data } = await putPdfFile(file);

      const { id: documentDataId } = await createDocumentData({
        type,
        data,
      });

      const { id } = await createDocument({
        title: file.name,
        documentDataId,
        teamId: team?.id,
      });

      void refreshLimits();

      toast({
        title: _(msg`Document uploaded`),
        description: _(msg`Your document has been uploaded successfully.`),
        duration: 5000,
      });

      analytics.capture('App: Document Uploaded', {
        userId: session?.user.id,
        documentId: id,
        timestamp: new Date().toISOString(),
      });

      router.push(`${formatDocumentsPath(team?.url)}/${id}/edit`);
    } catch (err) {
      const error = AppError.parseError(err);

      console.error(err);

      if (error.code === 'INVALID_DOCUMENT_FILE') {
        toast({
          title: _(msg`Invalid file`),
          description: _(msg`You cannot upload encrypted PDFs`),
          variant: 'destructive',
        });
      } else if (err instanceof TRPCClientError) {
        toast({
          title: _(msg`Error`),
          description: err.message,
          variant: 'destructive',
        });
      } else {
        toast({
          title: _(msg`Error`),
          description: _(msg`An error occurred while uploading your document.`),
          variant: 'destructive',
        });
      }
    } finally {
      setIsLoading(false);
    }
  };
There’s a lot of happening but for our analysis, let’s only consider the function named putFile.
putPdfFile
putPdfFile is defined in upload/put-file.ts
/**
 * Uploads a document file to the appropriate storage location and creates
 * a document data record.
 */
export const putPdfFile = async (file: File) => {
  const isEncryptedDocumentsAllowed = await getFlag('app_allow_encrypted_documents').catch(
    () => false,
  );

  const pdf = await PDFDocument.load(await file.arrayBuffer()).catch((e) => {
    console.error(`PDF upload parse error: ${e.message}`);

    throw new AppError('INVALID_DOCUMENT_FILE');
  });

  if (!isEncryptedDocumentsAllowed && pdf.isEncrypted) {
    throw new AppError('INVALID_DOCUMENT_FILE');
  }

  if (!file.name.endsWith('.pdf')) {
    file.name = `${file.name}.pdf`;
  }

  removeOptionalContentGroups(pdf);

  const bytes = await pdf.save();

  const { type, data } = await putFile(new File([bytes], file.name, { type: 'application/pdf' }));

  return await createDocumentData({ type, data });
};
putFile
This calls putFile function.
/**
 * Uploads a file to the appropriate storage location.
 */
export const putFile = async (file: File) => {
  const NEXT_PUBLIC_UPLOAD_TRANSPORT = env('NEXT_PUBLIC_UPLOAD_TRANSPORT');

  return await match(NEXT_PUBLIC_UPLOAD_TRANSPORT)
    .with('s3', async () => putFileInS3(file))
    .otherwise(async () => putFileInDatabase(file));
};
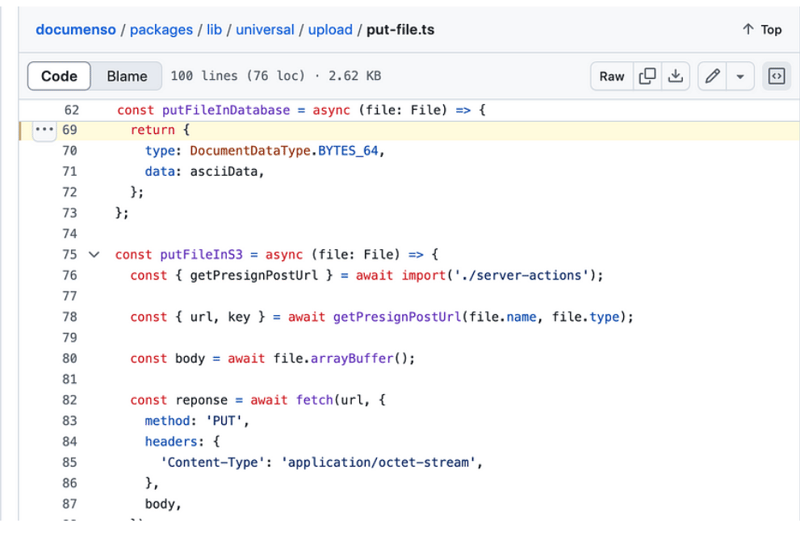
putFileInS3
const putFileInS3 = async (file: File) => {
  const { getPresignPostUrl } = await import('./server-actions');

  const { url, key } = await getPresignPostUrl(file.name, file.type);

  const body = await file.arrayBuffer();

  const reponse = await fetch(url, {
    method: 'PUT',
    headers: {
      'Content-Type': 'application/octet-stream',
    },
    body,
  });

  if (!reponse.ok) {
    throw new Error(
      `Failed to upload file "${file.name}", failed with status code ${reponse.status}`,
    );
  }

  return {
    type: DocumentDataType.S3_PATH,
    data: key,
  };
};
getPresignPostUrl
export const getPresignPostUrl = async (fileName: string, contentType: string) => {
  const client = getS3Client();

  const { getSignedUrl } = await import('@aws-sdk/s3-request-presigner');

  let token: JWT | null = null;

  try {
    const baseUrl = APP_BASE_URL() ?? 'http://localhost:3000';

    token = await getToken({
      req: new NextRequest(baseUrl, {
        headers: headers(),
      }),
    });
  } catch (err) {
    // Non server-component environment
  }

  // Get the basename and extension for the file
  const { name, ext } = path.parse(fileName);

  let key = `${alphaid(12)}/${slugify(name)}${ext}`;

  if (token) {
    key = `${token.id}/${key}`;
  }

  const putObjectCommand = new PutObjectCommand({
    Bucket: process.env.NEXT_PRIVATE_UPLOAD_BUCKET,
    Key: key,
    ContentType: contentType,
  });

  const url = await getSignedUrl(client, putObjectCommand, {
    expiresIn: ONE_HOUR / ONE_SECOND,
  });

  return { key, url };
};
Comparison
You do not see any POST request in Documenso. It uses a function named getSignedUrl to get the url, whereas
vercel example makes a POST request to api/upload route.Input element can be located easily in Vercel example as this is just an example, but Documenso is found
to be using react-dropzone and the input element is located according to business context.
About us:
At Thinkthroo, we study large open source projects and provide architectural guides. We have developed reusable Components, built with tailwind, that you can use in your project.
We offer Next.js, React and Node development services.
Book a meeting with us to discuss your project.

References:
https://github.com/documenso/documenso/blob/main/packages/lib/universal/upload/put-file.ts#L69
https://github.com/vercel/examples/blob/main/solutions/aws-s3-image-upload/README.md
https://github.com/vercel/examples/tree/main/solutions/aws-s3-image-upload
https://github.com/vercel/examples/blob/main/solutions/aws-s3-image-upload/app/page.tsx#L58C5-L76C12
https://github.com/vercel/examples/blob/main/solutions/aws-s3-image-upload/app/api/upload/route.ts
https://github.com/documenso/documenso/blob/main/packages/ui/primitives/document-dropzone.tsx#L157
https://react-dropzone.js.org/
https://github.com/documenso/documenso/blob/main/apps/web/src/app/(dashboard)/documents/upload-document.tsx#L61
https://github.com/documenso/documenso/blob/main/packages/lib/universal/upload/put-file.ts#L22
The above is the detailed content of Comparison of Spload feature between Documenso and aws-smage-upload example. For more information, please follow other related articles on the PHP Chinese website!

Hot AI Tools

Undresser.AI Undress
AI-powered app for creating realistic nude photos

AI Clothes Remover
Online AI tool for removing clothes from photos.

Undress AI Tool
Undress images for free

Clothoff.io
AI clothes remover

Video Face Swap
Swap faces in any video effortlessly with our completely free AI face swap tool!

Hot Article
Hot Tools

Notepad++7.3.1
Easy-to-use and free code editor

SublimeText3 Chinese version
Chinese version, very easy to use

Zend Studio 13.0.1
Powerful PHP integrated development environment

Dreamweaver CS6
Visual web development tools

SublimeText3 Mac version
God-level code editing software (SublimeText3)
Hot Topics
 1672
1672
 14
1428
52
1332
25
1276
29
1256
24
14
1428
52
1332
25
1276
29
1256
24

 Python vs. JavaScript: The Learning Curve and Ease of Use
Apr 16, 2025 am 12:12 AM
Python vs. JavaScript: The Learning Curve and Ease of Use
Apr 16, 2025 am 12:12 AM
Python is more suitable for beginners, with a smooth learning curve and concise syntax; JavaScript is suitable for front-end development, with a steep learning curve and flexible syntax. 1. Python syntax is intuitive and suitable for data science and back-end development. 2. JavaScript is flexible and widely used in front-end and server-side programming.
 From C/C to JavaScript: How It All Works
Apr 14, 2025 am 12:05 AM
From C/C to JavaScript: How It All Works
Apr 14, 2025 am 12:05 AM
The shift from C/C to JavaScript requires adapting to dynamic typing, garbage collection and asynchronous programming. 1) C/C is a statically typed language that requires manual memory management, while JavaScript is dynamically typed and garbage collection is automatically processed. 2) C/C needs to be compiled into machine code, while JavaScript is an interpreted language. 3) JavaScript introduces concepts such as closures, prototype chains and Promise, which enhances flexibility and asynchronous programming capabilities.
 JavaScript and the Web: Core Functionality and Use Cases
Apr 18, 2025 am 12:19 AM
JavaScript and the Web: Core Functionality and Use Cases
Apr 18, 2025 am 12:19 AM
The main uses of JavaScript in web development include client interaction, form verification and asynchronous communication. 1) Dynamic content update and user interaction through DOM operations; 2) Client verification is carried out before the user submits data to improve the user experience; 3) Refreshless communication with the server is achieved through AJAX technology.
 JavaScript in Action: Real-World Examples and Projects
Apr 19, 2025 am 12:13 AM
JavaScript in Action: Real-World Examples and Projects
Apr 19, 2025 am 12:13 AM
JavaScript's application in the real world includes front-end and back-end development. 1) Display front-end applications by building a TODO list application, involving DOM operations and event processing. 2) Build RESTfulAPI through Node.js and Express to demonstrate back-end applications.
 Understanding the JavaScript Engine: Implementation Details
Apr 17, 2025 am 12:05 AM
Understanding the JavaScript Engine: Implementation Details
Apr 17, 2025 am 12:05 AM
Understanding how JavaScript engine works internally is important to developers because it helps write more efficient code and understand performance bottlenecks and optimization strategies. 1) The engine's workflow includes three stages: parsing, compiling and execution; 2) During the execution process, the engine will perform dynamic optimization, such as inline cache and hidden classes; 3) Best practices include avoiding global variables, optimizing loops, using const and lets, and avoiding excessive use of closures.
 Python vs. JavaScript: Community, Libraries, and Resources
Apr 15, 2025 am 12:16 AM
Python vs. JavaScript: Community, Libraries, and Resources
Apr 15, 2025 am 12:16 AM
Python and JavaScript have their own advantages and disadvantages in terms of community, libraries and resources. 1) The Python community is friendly and suitable for beginners, but the front-end development resources are not as rich as JavaScript. 2) Python is powerful in data science and machine learning libraries, while JavaScript is better in front-end development libraries and frameworks. 3) Both have rich learning resources, but Python is suitable for starting with official documents, while JavaScript is better with MDNWebDocs. The choice should be based on project needs and personal interests.
 Python vs. JavaScript: Development Environments and Tools
Apr 26, 2025 am 12:09 AM
Python vs. JavaScript: Development Environments and Tools
Apr 26, 2025 am 12:09 AM
Both Python and JavaScript's choices in development environments are important. 1) Python's development environment includes PyCharm, JupyterNotebook and Anaconda, which are suitable for data science and rapid prototyping. 2) The development environment of JavaScript includes Node.js, VSCode and Webpack, which are suitable for front-end and back-end development. Choosing the right tools according to project needs can improve development efficiency and project success rate.
 The Role of C/C in JavaScript Interpreters and Compilers
Apr 20, 2025 am 12:01 AM
The Role of C/C in JavaScript Interpreters and Compilers
Apr 20, 2025 am 12:01 AM
C and C play a vital role in the JavaScript engine, mainly used to implement interpreters and JIT compilers. 1) C is used to parse JavaScript source code and generate an abstract syntax tree. 2) C is responsible for generating and executing bytecode. 3) C implements the JIT compiler, optimizes and compiles hot-spot code at runtime, and significantly improves the execution efficiency of JavaScript.
