
 System Tutorial
Windows Series
11 Steps to Create a Monthly Budget Tracker Using Microsoft Excel
System Tutorial
Windows Series
11 Steps to Create a Monthly Budget Tracker Using Microsoft Excel
11 Steps to Create a Monthly Budget Tracker Using Microsoft Excel

Microsoft Excel is perhaps one of the easiest tools to use to keep up with basic expenses, so long as you’re willing to maintain a steady stream of inputs. Even more importantly, you can get a lot done without much knowledge or experience in Excel. With a basic template or outline made, you can start tinkering to get just the information you need.
Steps to Create a Monthly Budget Tracker in Excel Manually
Step 1: Create a Blank Workbook and Make a Sheet for Income and Expense Sources
If you’re working from scratch, it’s useful to have a list of possible income and expense streams you expect. You can keep the list as general as possible, but you can also use more narrow categories as well.
Here’s a basic overview of some categories you can use. We placed this table in the first sheet “Categories.”

Step 2: Create a Blank Sheet for the First Month
Choose a new sheet in the workbook and rename it to the month and year you want to track.

Step 3: List the Categories
Create two smaller tables to list the income and expenses. This time, the categories will go below one another.

From here on, you have a couple of options. You can either tally your budget for each month and just put the result in, or you can have a slightly more complicated table, with each day or week in the month accounted for.
Step 4: Divide Expenses in Days or Weeks
We’ll use a mixed approach. For example, it’ll be easier to track your spending if you go by week, but some mandatory expenses are only done once a month. Therefore, we’ll expand the “Food” categories to cover specific weeks.
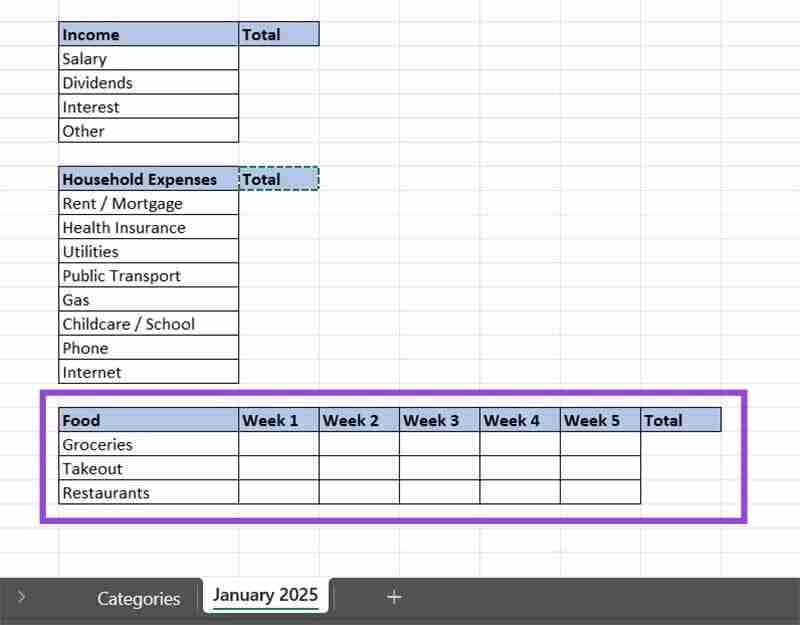
Step 5: Insert Formulas for Weekly or Daily Totals
For every category where you have weekly or daily spending, you need to create a “Total” cell that sums the values of the row. The basic formula is “=SUM(Start_Cell:End_Cell)”
You can apply the formula in the following few steps:
- Select a cell where you need the total.
- Insert the equals sign.
- Enter “SUM” and press “Tab.”
- Drag your mouse over the cells which need to be summed.
- Press “Enter.”

You’ll need to repeat the process for every category you have, but you can also click on the Fill Handle of the cell (the bottom-right corner) and drag down from one category below to automatically apply the formula for the next row.

Step 6: Add Subtotals for Every Category
To keep things simple, you can add another row to each subcategory to list its subtotal, which will be used for the final tally.
To insert a row, right-click on the row header below the row you want to add, then select “Insert.” For example, to make a subtotal for the “Salary” category, right-click on row 7 to insert a new one there.

Here’s a small example of how the table should look like.

Step 7: Calculate the Subtotals
Similarly to how you made the subtotals for the weekly tally for food, use the SUM formula to calculate the subtotal for each category.

Step 8: Calculate the Monthly Totals
Make a smaller table that lists all the categories and their subtotals. Use a direct reference to each “Subtotal” category. For example, for the subtotal for the Income, we referenced the cell C7 as “=C7.” You can do this by selecting a cell, entering the equals sign, clicking on the cell you want to reference, then pressing “Enter.”

Note that we applied a merge action for the name of the category to make it more visible. You can get the “Merge” option in the “Alignment” group in the “Home” tab.
Step 9: Calculate the Monthly Total
Use the last sum formula to calculate the total for the month. Note that this time, you’ll need to subtract the sum of all expenses from the income subtotal. To do this:
- Select the “Monthly Total” cell (in this case, H7).
- Enter the equals sign.
- Click on the Income subtotal.
- Enter the minus sign.
- Enter “SUM,” then press “Tab,”
- Select all the other cells in the smaller table.
- Insert a closed parenthesis “)” and hit “Enter.”
You can see the resulting formula bar of cell H7.

Step 10: Copy the Monthly Sheet for Each Month
To copy a sheet, right-click on its name in the bottom bar and select “Move or Copy.”

In the dialog window that opens, check “Create a copy” and click on “OK.”

Rename the new sheet (Right-click and select “Rename”), then repeat the process until you have as many sheets as you need.
Step 11: Start Entering Data
Your tracker is done and you can enter data as you wish.
The above is the detailed content of 11 Steps to Create a Monthly Budget Tracker Using Microsoft Excel. For more information, please follow other related articles on the PHP Chinese website!

Hot AI Tools

Undresser.AI Undress
AI-powered app for creating realistic nude photos

AI Clothes Remover
Online AI tool for removing clothes from photos.

Undress AI Tool
Undress images for free

Clothoff.io
AI clothes remover

Video Face Swap
Swap faces in any video effortlessly with our completely free AI face swap tool!

Hot Article
Hot Tools

Notepad++7.3.1
Easy-to-use and free code editor

SublimeText3 Chinese version
Chinese version, very easy to use

Zend Studio 13.0.1
Powerful PHP integrated development environment

Dreamweaver CS6
Visual web development tools

SublimeText3 Mac version
God-level code editing software (SublimeText3)
Hot Topics


 Microsoft's New PowerToys Search Is the Missing Feature Windows 11 Needs
Apr 03, 2025 am 03:53 AM
Microsoft's New PowerToys Search Is the Missing Feature Windows 11 Needs
Apr 03, 2025 am 03:53 AM
Microsoft's latest PowerToys update introduces a game-changing search feature reminiscent of macOS' Spotlight. This improved "Command Palette" (formerly PowerToys Run) surpasses the functionality of the Windows R Run command and the task
 Windows kb5054979 update information Update content list
Apr 15, 2025 pm 05:36 PM
Windows kb5054979 update information Update content list
Apr 15, 2025 pm 05:36 PM
KB5054979 is a cumulative security update released on March 27, 2025, for Windows 11 version 24H2. It targets .NET Framework versions 3.5 and 4.8.1, enhancing security and overall stability. Notably, the update addresses an issue with file and directory operations on UNC shares using System.IO APIs. Two installation methods are provided: one through Windows Settings by checking for updates under Windows Update, and the other via a manual download from the Microsoft Update Catalog.
 Nanoleaf Wants to Change How You Charge Your Tech
Apr 17, 2025 am 01:03 AM
Nanoleaf Wants to Change How You Charge Your Tech
Apr 17, 2025 am 01:03 AM
Nanoleaf's Pegboard Desk Dock: A Stylish and Functional Desk Organizer Tired of the same old charging setup? Nanoleaf's new Pegboard Desk Dock offers a stylish and functional alternative. This multifunctional desk accessory boasts 32 full-color RGB
 Dell UltraSharp 4K Thunderbolt Hub Monitor (U2725QE) Review: The Best Looking LCD Monitor I've Tested
Apr 06, 2025 am 02:05 AM
Dell UltraSharp 4K Thunderbolt Hub Monitor (U2725QE) Review: The Best Looking LCD Monitor I've Tested
Apr 06, 2025 am 02:05 AM
Dell's UltraSharp 4K Thunderbolt Hub Monitor (U2725QE): An LCD That Rivals OLED For years, I've coveted OLED monitors. However, Dell's new UltraSharp 4K Thunderbolt Hub Monitor (U2725QE) has changed my mind, exceeding expectations with its impressiv
 3 Best Ways to Detect and Remove Malware in Windows 11
Apr 02, 2025 pm 06:27 PM
3 Best Ways to Detect and Remove Malware in Windows 11
Apr 02, 2025 pm 06:27 PM
Mastering Malware Detection in Windows 11: Three Easy Methods Malware, encompassing viruses, adware, and data-stealing code, poses a significant threat. With a staggering 190,000 attacks per second, effective malware detection is crucial. This guide
 You Can Get This Powerful Mini PC for Under $150 Today
Apr 02, 2025 am 03:55 AM
You Can Get This Powerful Mini PC for Under $150 Today
Apr 02, 2025 am 03:55 AM
Kamrui GK3Plus Mini PC: Small and powerful, affordable! During Amazon's spring sale, the Kamrui GK3Plus Mini PC is priced as low as $150! This mini computer has powerful performance, easy upgrade and small size, making it an ideal choice for users who pursue cost-effectiveness. Whether it’s a mini computer enthusiast or a first-time user who’s trying out a small computer, the Kamrui GK3Plus Mini PC is an excellent starter choice. Originally priced at $199, Amazon currently enjoys a 15% discount (and a $20 coupon) and can be purchased for less than $149. Such a affordable price, but with a good configuration: equipped with a slightly old but competent In
 These Are My Go-To Free Alternatives for Paid Windows Apps
Apr 04, 2025 am 03:42 AM
These Are My Go-To Free Alternatives for Paid Windows Apps
Apr 04, 2025 am 03:42 AM
Many free apps rival their paid counterparts in functionality. This list showcases excellent free Windows alternatives to popular paid software. I firmly believe in using free software unless a paid option offers a crucial, missing feature. These
 I Never Use Windows Without Tweaking These Accessibility Features
Apr 02, 2025 am 06:01 AM
I Never Use Windows Without Tweaking These Accessibility Features
Apr 02, 2025 am 06:01 AM
The accessibility features of Windows systems are not designed only for people with disabilities, they can also significantly improve the productivity of ordinary users. Even without a disability, I rely on some accessibility features to improve efficiency and can't even imagine how to use Windows without them. Here are some features worth trying: Watch videos easily: Use real-time subtitles Sometimes to save time, I speed up the video, but this makes the audio difficult to understand. Or, the speaker has a heavier accent, contains professional terms, or I can’t use my headphones in the library. In these cases, I would rely on Windows' real-time subtitles feature, which generates real-time subtitles for any audio for easy reading. Enable this feature, open the Settings app, and navigate to Assistant
