

Tutorial Setup Localhost Mac (ApacheMySQL , and PHP )

Haloo gaes, pada tutorial kali ini aku akan share tutorial cara setup local development tanpa menginstall aplikasi web server seperti XAMPP ataupun MAMP. Kita akan menggunakan beberapa fitur bawaan Mac OS.
Mac OS yang aku gunakan saat ini adalah Mac OS Big Sur version 11.6.2
Apache2
Secara default Mac OS sudah terinstall apache2. Untuk mengeceknya buka terminal run apachectl -v . Hasilnya seperti ini.
dhimaskirana:~$ apachectl -v
Server version: Apache/2.4.51 (Unix)
Server built:   Nov  1 2021 21:26:04
Secara default lokasi file-file yang akan ditampilkan oleh apache berlokasi di /Library/WebServer/Documents.
PHP
Secara default Mac OS sudah terinstall php versi 7.3. Untuk mengecek kalian bisa menjalankan php -v
dhimaskirana:~$ php -v
WARNING: PHP is not recommended
PHP is included in macOS for compatibility with legacy software.
Future versions of macOS will not include PHP.
PHP 7.3.29-to-be-removed-in-future-macOS (cli) (built: Sep  6 2021 05:14:39) ( NTS )
Copyright (c) 1997-2018 The PHP Group
Zend Engine v3.3.29, Copyright (c) 1998-2018 Zend Technologies
Tetapi akan ada warning bahwa di versi mac berikutnya php akan dihapus dari Mac OS. Jadi sebaiknya kalian menginstall php sendiri menggunakan Homebrew.
Menginstall Homebrew
Nah, kita akan menginstall php menggunakan homebrew. Homebrew merupakan sebuah package manager untuk iOS, yang dapat diinstall dengan mudah melalui terminal.
Sebelum menginstall php, install homebrew dulu. Kunjungi website homebrew di brew.sh. Kemudian kalian copy script Install Homebrew dan jalankan pada terminal. Tunggu sampai proses instalasi selesai. Kalau kalian baru pertama kali menginstall homebrew, proses instalasi akan memakan waktu yang cukup lama.
Menginstall PHP
Oke homebrew sudah terinstall saatnya menginstall php. Untuk menginstall php jalankan perintah brew install php. Homebrew akan menginstall PHP versi terbaru. Tunggu sampai proses install selesai.
Setelah instalasi php selesai, jalankan perintah export PATH="/usr/local/opt/php/bin:$PATH" untuk menambahkan path php ke environment variable pada Mac OS, sehingga perintah php bisa dieksekusi secara global.
Jika berhasil, silahkan lakukan perintah php -v, maka versi yang muncul adalah versi terbaru.
dhimaskirana:~$ php -v
PHP 8.1.3 (cli) (built: Mar  1 2022 10:23:25) (NTS)
Copyright (c) The PHP Group
Zend Engine v4.1.3, Copyright (c) Zend Technologies
with Zend OPcache v8.1.3, Copyright (c), by Zend Technologies
Menginstall MySQL
Langkah selanjutnya adalah menginstall MySQL untuk keperluan database. Untuk menginstall mysql jalankan perintah brew install mysql@5.7. Tunggu hingga proses instalasi selesai. Jika sudah selesai, untuk mengecek versi mysql yang terinstall gunakan mysql –version
dhimaskirana:~$ mysql --version
mysql  Ver 14.14 Distrib 5.7.37, for osx10.16 (x86\_64) using  EditLine wrapper
Set Modul PHP di Apache
Secara default apache di Mac OS tidak memuat modul php, oleh karena itu jalankan perintah brew info php. Maka akan keluar informasi terkait modul php yang sudah kita install melalui homebrew tadi seperti berikut ini.
\==> Caveats
To enable PHP in Apache add the following to httpd.conf and restart Apache:
    LoadModule php\_module /usr/local/opt/php/lib/httpd/modules/libphp.so

    <FilesMatch \\.php$>
        SetHandler application/x-httpd-php
    </FilesMatch>

Finally, check DirectoryIndex includes index.php
    DirectoryIndex index.php index.html
Informasi ini yang akan kita gunakan untuk menkonfigurasikan apache supaya memuat modul php yang telah kita install.
Jalankan perintah berikut ini untuk membuat teks editor.
sudo /System/Applications/TextEdit.app/Contents/MacOS/TextEdit /private/etc/apache2/httpd.conf
Perintah ini akan membuka file httpd.conf (file konfigurasi apache2) menggunakan aplikasi bawaan Mac OS yaitu TextEdit secara administrator atau root. Jangan lupa masukan password.
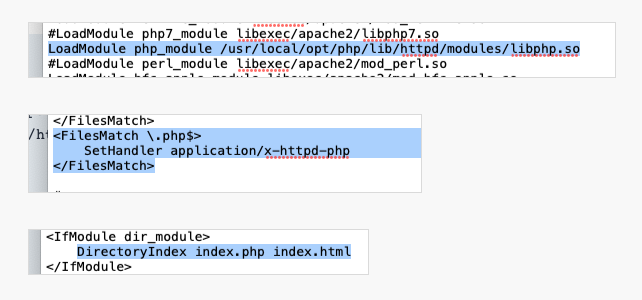
Masukan semua konfigurasi ke dalam file httpd.conf seperti pada gambar di atas. Konfigurasi yang perlu di set adalah:
- LoadModule php
- SetHandler supaya bisa membaca file php
- DirectoryIndex
Jangan lupa klik simpan tersebut. Kemudian tutup aplikasi teks editornya.
Kemudian restart apache nya supaya apache nya mengenali php 8.1 yang telah di install tadi. Cara nya jalankan perintah untuk merestart apache.
sudo apachectl restart
Test PHP
Buat file index.php dalam sebuah folder phpinfo, kemudian masukan fungsi phpinfo(). Kemudian akses dengan alamat http://localhost/phpinfo/.
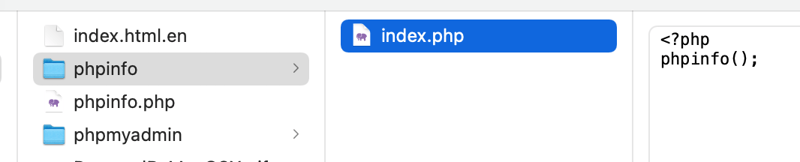
Jika informasi PHP muncul, maka apache sukses memuat modul php. Nah kalian bisa mencoba menginstall WordPress.
Install phpMyAdmin
Setelah php berhasil, kita akan gunakan phpMyAdmin untuk mengakses database mysql kita. phpMyAdmin adalah database management berbasis web browser, sehingga akan mempermudah kita membuat database.
Download phpMyAdmin di https://www.phpmyadmin.net/downloads/ kemudian pilih saja yang bahasa English saja.
Unzip, kemudian rename folder menjadi phpmyadmin, copy ke /Library/WebServer/Documents.
Akses menggunakan alamat http://localhost/phpmyadmin/.
Secara default akses mysql menggunakan username root dan password kosong.
Jika kalian mendapati error Login without a password is forbidden by configuration (see AllowNoPassword) berarti phpMyAdmin tidak mengijinkan password kosong.
Solusinya gampang, kalian buka folder phpmyadmin kemudian ada file config.sample.inc.php rename jadi config.inc.php.
Kemudian buka file config.inc.php dengan text editor kalian, kemudian set AllowNoPassword menjadi true. Simpan konfigurasi file kalian.
$cfg\['Servers'\]\[$i\]\['AllowNoPassword'\] = true;
mod_rewrite
Jika permalink WordPress kalian error padahal sudah buat file .htaccess di instalasi WordPress kemungkinan penyebabnya adalah modul mod_rewrite belum dimuat di apache.

Caranya adalah buka kembali file httpd.conf menggunakan perintah sudo supaya dibuka menggunakan akses root, kemudian uncomment rewrite_module. Kemudian simpan dan restart apache menggunakan perintah sudo apachectl restart.
Permission
Jika kalian mengcopy file ke dalam folder /Library/WebServer/Documents maka file kalian hanya bisa dibaca tetapi tidak bisa dieksekusi. Ini terjadi karena secara default apache berjalan diatas user _www dan group _www.
Solusinya adalah:
- Menambahkan username account kalian ke group _www
- Semua file yang kalian copy ke /Library/WebServer/Documents harus diubah owner dan groupnya ke _www
- Memberikan akses write ke group _www
Tambah Username ke Group _www
Langsung kita coba, tambahkan username kalian ke group _www dengan command berikut. whoami di command akan digantikan dengan username kalian.
sudo dseditgroup -o edit -a `whoami` -t user _www
Untuk mengecek apakah username kalian sudah masuk ke group _www bisa menggunakan command berikut
dscacheutil -q group -a name _www
Ubah Owner dan Group file ke _www
Setelah itu, setiap kita mengcopy file atau folder ke dalam /Library/WebServer/Documents, kita harus mengubah owner dan group semua file yg dicopy ke _www.
Sebagai contoh kalian copy folder wordpress ke /Library/WebServer/Documents. Maka buka terminal di /Library/WebServer/Documents, kemudian jalankan perintah:
sudo chown -R _www:_www wordpress
Memberikan akses write ke group _www
Setelah semua file menjadi owner dan group _www, maka sekarang kita akan memberikan akses supaya semua user di dalam group _www dapat write file kita.
g+w artinya group + (tambahkan) write.
sudo chmod -R g+w wordpress
Nah begitulah tutorial konfigurasi Apache, PHP, dan MySQL di Mac OS. Jika kalian menemui kesulitan bisa tulis di kolom komentar yaa, kita sama-sama belajar bareng.
Selamat mencoba.
The above is the detailed content of Tutorial Setup Localhost Mac (ApacheMySQL , and PHP ). For more information, please follow other related articles on the PHP Chinese website!

Hot AI Tools

Undresser.AI Undress
AI-powered app for creating realistic nude photos

AI Clothes Remover
Online AI tool for removing clothes from photos.

Undress AI Tool
Undress images for free

Clothoff.io
AI clothes remover

Video Face Swap
Swap faces in any video effortlessly with our completely free AI face swap tool!

Hot Article
Hot Tools

Notepad++7.3.1
Easy-to-use and free code editor

SublimeText3 Chinese version
Chinese version, very easy to use

Zend Studio 13.0.1
Powerful PHP integrated development environment

Dreamweaver CS6
Visual web development tools

SublimeText3 Mac version
God-level code editing software (SublimeText3)
Hot Topics


 Alipay PHP SDK transfer error: How to solve the problem of 'Cannot declare class SignData'?
Apr 01, 2025 am 07:21 AM
Alipay PHP SDK transfer error: How to solve the problem of 'Cannot declare class SignData'?
Apr 01, 2025 am 07:21 AM
Alipay PHP...
 Explain JSON Web Tokens (JWT) and their use case in PHP APIs.
Apr 05, 2025 am 12:04 AM
Explain JSON Web Tokens (JWT) and their use case in PHP APIs.
Apr 05, 2025 am 12:04 AM
JWT is an open standard based on JSON, used to securely transmit information between parties, mainly for identity authentication and information exchange. 1. JWT consists of three parts: Header, Payload and Signature. 2. The working principle of JWT includes three steps: generating JWT, verifying JWT and parsing Payload. 3. When using JWT for authentication in PHP, JWT can be generated and verified, and user role and permission information can be included in advanced usage. 4. Common errors include signature verification failure, token expiration, and payload oversized. Debugging skills include using debugging tools and logging. 5. Performance optimization and best practices include using appropriate signature algorithms, setting validity periods reasonably,
 How does session hijacking work and how can you mitigate it in PHP?
Apr 06, 2025 am 12:02 AM
How does session hijacking work and how can you mitigate it in PHP?
Apr 06, 2025 am 12:02 AM
Session hijacking can be achieved through the following steps: 1. Obtain the session ID, 2. Use the session ID, 3. Keep the session active. The methods to prevent session hijacking in PHP include: 1. Use the session_regenerate_id() function to regenerate the session ID, 2. Store session data through the database, 3. Ensure that all session data is transmitted through HTTPS.
 What are Enumerations (Enums) in PHP 8.1?
Apr 03, 2025 am 12:05 AM
What are Enumerations (Enums) in PHP 8.1?
Apr 03, 2025 am 12:05 AM
The enumeration function in PHP8.1 enhances the clarity and type safety of the code by defining named constants. 1) Enumerations can be integers, strings or objects, improving code readability and type safety. 2) Enumeration is based on class and supports object-oriented features such as traversal and reflection. 3) Enumeration can be used for comparison and assignment to ensure type safety. 4) Enumeration supports adding methods to implement complex logic. 5) Strict type checking and error handling can avoid common errors. 6) Enumeration reduces magic value and improves maintainability, but pay attention to performance optimization.
 Describe the SOLID principles and how they apply to PHP development.
Apr 03, 2025 am 12:04 AM
Describe the SOLID principles and how they apply to PHP development.
Apr 03, 2025 am 12:04 AM
The application of SOLID principle in PHP development includes: 1. Single responsibility principle (SRP): Each class is responsible for only one function. 2. Open and close principle (OCP): Changes are achieved through extension rather than modification. 3. Lisch's Substitution Principle (LSP): Subclasses can replace base classes without affecting program accuracy. 4. Interface isolation principle (ISP): Use fine-grained interfaces to avoid dependencies and unused methods. 5. Dependency inversion principle (DIP): High and low-level modules rely on abstraction and are implemented through dependency injection.
 How to debug CLI mode in PHPStorm?
Apr 01, 2025 pm 02:57 PM
How to debug CLI mode in PHPStorm?
Apr 01, 2025 pm 02:57 PM
How to debug CLI mode in PHPStorm? When developing with PHPStorm, sometimes we need to debug PHP in command line interface (CLI) mode...
 How to send a POST request containing JSON data using PHP's cURL library?
Apr 01, 2025 pm 03:12 PM
How to send a POST request containing JSON data using PHP's cURL library?
Apr 01, 2025 pm 03:12 PM
Sending JSON data using PHP's cURL library In PHP development, it is often necessary to interact with external APIs. One of the common ways is to use cURL library to send POST�...
 Explain late static binding in PHP (static::).
Apr 03, 2025 am 12:04 AM
Explain late static binding in PHP (static::).
Apr 03, 2025 am 12:04 AM
Static binding (static::) implements late static binding (LSB) in PHP, allowing calling classes to be referenced in static contexts rather than defining classes. 1) The parsing process is performed at runtime, 2) Look up the call class in the inheritance relationship, 3) It may bring performance overhead.
