

Solar system with Three.js

Hi! Today, I’m going to build a solar system using Three.js. But before we begin, you should know that the inspiration for this article came from a client's representative whose project I’m currently working on. Yes, that's you—the one who believes the Earth is flat.
JavaScript/Node has largest ecosystem of libraries that cover enormous amount of feature that simplifies your development, so I always can choose which one is better for you purpose. However If we are talking about 3D graphics there is not that much cool options and three.js is probably the best amoug them all and has the biggest comunity.
So let's dive in Three.js and build the Solar system using it. In this article I will cover:
- Init Project and Scene
- Creating Sun
- Creating Planets
- Deploying to GitHub Pages
Init Project and Scene
First things first: to initialize the project, I'm using Vite and installing the Three.js dependency. Now, the question is how to set up Three.js. For this, you'll need three things: a scene, a camera, and a renderer. I'm also using the built-in addon, OrbitControls, which allows me to navigate within the scene. After starting the app, a black screen should appear.
import { Scene, WebGLRenderer, PerspectiveCamera } from "three";
import { OrbitControls } from "three/addons/controls/OrbitControls.js";

const w = window.innerWidth;
const h = window.innerHeight;

const scene = new Scene();
const camera = new PerspectiveCamera(75, w / h, 0.1, 100);
const renderer = new WebGLRenderer();
const controls = new OrbitControls(camera, renderer.domElement);

controls.minDistance = 10;
controls.maxDistance = 60;
camera.position.set(30 * Math.cos(Math.PI / 6), 30 * Math.sin(Math.PI / 6), 40);

renderer.setSize(w, h);
document.body.appendChild(renderer.domElement);

renderer.render(scene, camera);

window.addEventListener("resize", () => {
  const w = window.innerWidth;
  const h = window.innerHeight;
  renderer.setSize(w, h);
  camera.aspect = w / h;
  camera.updateProjectionMatrix();
});

const animate = () => {
  requestAnimationFrame(animate);
  controls.update();
  renderer.render(scene, camera);
};

animate();
You may notice that I'm limiting the zoom via controls and also changing the default angle of the camera. This will be helpful for properly displaying the scene in the next steps.
Now it’s time to add a simple starfield since our solar system should be surrounded by stars. To simplify the explanation, imagine you have a sphere, and you pick 1,000 random points on this sphere. Then, you create stars from these points by mapping a star texture onto them. Finally, I’m adding animation to make all these points spin around the y-axis. With this, the starfield is ready to be added to the scene.
import {
  Group,
  Color,
  Points,
  Vector3,
  TextureLoader,
  PointsMaterial,
  BufferGeometry,
  AdditiveBlending,
  Float32BufferAttribute,
} from "three";

export class Starfield {
  group;
  loader;
  animate;

  constructor({ numStars = 1000 } = {}) {
    this.numStars = numStars;

    this.group = new Group();
    this.loader = new TextureLoader();

    this.createStarfield();

    this.animate = this.createAnimateFunction();
    this.animate();
  }

  createStarfield() {
    let col;
    const verts = [];
    const colors = [];
    const positions = [];

    for (let i = 0; i < this.numStars; i += 1) {
      let p = this.getRandomSpherePoint();
      const { pos, hue } = p;
      positions.push(p);
      col = new Color().setHSL(hue, 0.2, Math.random());
      verts.push(pos.x, pos.y, pos.z);
      colors.push(col.r, col.g, col.b);
    }

    const geo = new BufferGeometry();
    geo.setAttribute("position", new Float32BufferAttribute(verts, 3));
    geo.setAttribute("color", new Float32BufferAttribute(colors, 3));
    const mat = new PointsMaterial({
      size: 0.2,
      alphaTest: 0.5,
      transparent: true,
      vertexColors: true,
      blending: AdditiveBlending,
      map: this.loader.load("/solar-system-threejs/assets/circle.png"),
    });
    const points = new Points(geo, mat);
    this.group.add(points);
  }

  getRandomSpherePoint() {
    const radius = Math.random() * 25 + 25;
    const u = Math.random();
    const v = Math.random();
    const theta = 2 * Math.PI * u;
    const phi = Math.acos(2 * v - 1);
    let x = radius * Math.sin(phi) * Math.cos(theta);
    let y = radius * Math.sin(phi) * Math.sin(theta);
    let z = radius * Math.cos(phi);

    return {
      pos: new Vector3(x, y, z),
      hue: 0.6,
      minDist: radius,
    };
  }

  createAnimateFunction() {
    return () => {
      requestAnimationFrame(this.animate);
      this.group.rotation.y += 0.00005;
    };
  }

  getStarfield() {
    return this.group;
  }
}
Adding the starfield is easy, just by using add method in scene class
const starfield = new Starfield().getStarfield();
scene.add(starfield);
As for the textures, you can find all the textures used in this project inside the repository, which is linked at the end of the article. Most of the textures were taken from this site, with the exceptions being the star and planets' rings textures.
Creating Sun
For the sun, I used Icosahedron geometry and mapped a texture onto it. Using Improved Noise, I achieved an effect where the sun pulses, simulating the way a real star emits streams of energy into space. The sun isn't just a figure with a mapped texture; it also needs to be a light source in the scene, so I'm using PointLight to simulate this.
import {
  Mesh,
  Group,
  Color,
  Vector3,
  BackSide,
  PointLight,
  TextureLoader,
  ShaderMaterial,
  AdditiveBlending,
  DynamicDrawUsage,
  MeshBasicMaterial,
  IcosahedronGeometry,
} from "three";
import { ImprovedNoise } from "three/addons/math/ImprovedNoise.js";

export class Sun {
  group;
  loader;
  animate;
  corona;
  sunRim;
  glow;

  constructor() {
    this.sunTexture = "/solar-system-threejs/assets/sun-map.jpg";

    this.group = new Group();
    this.loader = new TextureLoader();

    this.createCorona();
    this.createRim();
    this.addLighting();
    this.createGlow();
    this.createSun();

    this.animate = this.createAnimateFunction();
    this.animate();
  }

  createSun() {
    const map = this.loader.load(this.sunTexture);
    const sunGeometry = new IcosahedronGeometry(5, 12);
    const sunMaterial = new MeshBasicMaterial({
      map,
      emissive: new Color(0xffff99),
      emissiveIntensity: 1.5,
    });
    const sunMesh = new Mesh(sunGeometry, sunMaterial);
    this.group.add(sunMesh);

    this.group.add(this.sunRim);

    this.group.add(this.corona);

    this.group.add(this.glow);

    this.group.userData.update = (t) => {
      this.group.rotation.y = -t / 5;
      this.corona.userData.update(t);
    };
  }

  createCorona() {
    const coronaGeometry = new IcosahedronGeometry(4.9, 12);
    const coronaMaterial = new MeshBasicMaterial({
      color: 0xff0000,
      side: BackSide,
    });
    const coronaMesh = new Mesh(coronaGeometry, coronaMaterial);
    const coronaNoise = new ImprovedNoise();

    let v3 = new Vector3();
    let p = new Vector3();
    let pos = coronaGeometry.attributes.position;
    pos.usage = DynamicDrawUsage;
    const len = pos.count;

    const update = (t) => {
      for (let i = 0; i < len; i += 1) {
        p.fromBufferAttribute(pos, i).normalize();
        v3.copy(p).multiplyScalar(5);
        let ns = coronaNoise.noise(
          v3.x + Math.cos(t),
          v3.y + Math.sin(t),
          v3.z + t
        );
        v3.copy(p)
          .setLength(5)
          .addScaledVector(p, ns * 0.4);
        pos.setXYZ(i, v3.x, v3.y, v3.z);
      }
      pos.needsUpdate = true;
    };

    coronaMesh.userData.update = update;
    this.corona = coronaMesh;
  }

  createGlow() {
    const uniforms = {
      color1: { value: new Color(0x000000) },
      color2: { value: new Color(0xff0000) },
      fresnelBias: { value: 0.2 },
      fresnelScale: { value: 1.5 },
      fresnelPower: { value: 4.0 },
    };

    const vertexShader = `
    uniform float fresnelBias;
    uniform float fresnelScale;
    uniform float fresnelPower;

    varying float vReflectionFactor;

    void main() {
      vec4 mvPosition = modelViewMatrix * vec4( position, 1.0 );
      vec4 worldPosition = modelMatrix * vec4( position, 1.0 );

      vec3 worldNormal = normalize( mat3( modelMatrix[0].xyz, modelMatrix[1].xyz, modelMatrix[2].xyz ) * normal );

      vec3 I = worldPosition.xyz - cameraPosition;

      vReflectionFactor = fresnelBias + fresnelScale * pow( 1.0 + dot( normalize( I ), worldNormal ), fresnelPower );

      gl_Position = projectionMatrix * mvPosition;
    }
    `;

    const fragmentShader = `
      uniform vec3 color1;
      uniform vec3 color2;

      varying float vReflectionFactor;

      void main() {
        float f = clamp( vReflectionFactor, 0.0, 1.0 );
        gl_FragColor = vec4(mix(color2, color1, vec3(f)), f);
      }
    `;

    const sunGlowMaterial = new ShaderMaterial({
      uniforms,
      vertexShader,
      fragmentShader,
      transparent: true,
      blending: AdditiveBlending,
    });
    const sunGlowGeometry = new IcosahedronGeometry(5, 12);
    const sunGlowMesh = new Mesh(sunGlowGeometry, sunGlowMaterial);
    sunGlowMesh.scale.setScalar(1.1);
    this.glow = sunGlowMesh;
  }

  createRim() {
    const uniforms = {
      color1: { value: new Color(0xffff99) },
      color2: { value: new Color(0x000000) },
      fresnelBias: { value: 0.2 },
      fresnelScale: { value: 1.5 },
      fresnelPower: { value: 4.0 },
    };

    const vertexShader = `
    uniform float fresnelBias;
    uniform float fresnelScale;
    uniform float fresnelPower;

    varying float vReflectionFactor;

    void main() {
      vec4 mvPosition = modelViewMatrix * vec4( position, 1.0 );
      vec4 worldPosition = modelMatrix * vec4( position, 1.0 );

      vec3 worldNormal = normalize( mat3( modelMatrix[0].xyz, modelMatrix[1].xyz, modelMatrix[2].xyz ) * normal );

      vec3 I = worldPosition.xyz - cameraPosition;

      vReflectionFactor = fresnelBias + fresnelScale * pow( 1.0 + dot( normalize( I ), worldNormal ), fresnelPower );

      gl_Position = projectionMatrix * mvPosition;
    }
    `;
    const fragmentShader = `
    uniform vec3 color1;
    uniform vec3 color2;

    varying float vReflectionFactor;

    void main() {
      float f = clamp( vReflectionFactor, 0.0, 1.0 );
      gl_FragColor = vec4(mix(color2, color1, vec3(f)), f);
    }
    `;

    const sunRimMaterial = new ShaderMaterial({
      uniforms,
      vertexShader,
      fragmentShader,
      transparent: true,
      blending: AdditiveBlending,
    });
    const sunRimGeometry = new IcosahedronGeometry(5, 12);
    const sunRimMesh = new Mesh(sunRimGeometry, sunRimMaterial);
    sunRimMesh.scale.setScalar(1.01);
    this.sunRim = sunRimMesh;
  }

  addLighting() {
    const sunLight = new PointLight(0xffff99, 1000);
    sunLight.position.set(0, 0, 0);
    this.group.add(sunLight);
  }

  createAnimateFunction() {
    return (t = 0) => {
      const time = t * 0.00051;
      requestAnimationFrame(this.animate);
      this.group.userData.update(time);
    };
  }

  getSun() {
    return this.group;
  }
}
Creating Planets
All planets are built using a similar logic: each planet needs an orbit, a texture, an orbit speed, and a rotation speed. For planets that require them, rings should also be added.
import {
  Mesh,
  Color,
  Group,
  DoubleSide,
  RingGeometry,
  TorusGeometry,
  TextureLoader,
  ShaderMaterial,
  SRGBColorSpace,
  AdditiveBlending,
  MeshPhongMaterial,
  MeshBasicMaterial,
  IcosahedronGeometry,
} from "three";

export class Planet {
  group;
  loader;
  animate;
  planetGroup;
  planetGeometry;

  constructor({
    orbitSpeed = 1,
    orbitRadius = 1,
    orbitRotationDirection = "clockwise",

    planetSize = 1,
    planetAngle = 0,
    planetRotationSpeed = 1,
    planetRotationDirection = "clockwise",
    planetTexture = "/solar-system-threejs/assets/mercury-map.jpg",

    rimHex = 0x0088ff,
    facingHex = 0x000000,

    rings = null,
  } = {}) {
    this.orbitSpeed = orbitSpeed;
    this.orbitRadius = orbitRadius;
    this.orbitRotationDirection = orbitRotationDirection;

    this.planetSize = planetSize;
    this.planetAngle = planetAngle;
    this.planetTexture = planetTexture;
    this.planetRotationSpeed = planetRotationSpeed;
    this.planetRotationDirection = planetRotationDirection;

    this.rings = rings;

    this.group = new Group();
    this.planetGroup = new Group();
    this.loader = new TextureLoader();
    this.planetGeometry = new IcosahedronGeometry(this.planetSize, 12);

    this.createOrbit();
    this.createRings();
    this.createPlanet();
    this.createGlow(rimHex, facingHex);

    this.animate = this.createAnimateFunction();
    this.animate();
  }

  createOrbit() {
    const orbitGeometry = new TorusGeometry(this.orbitRadius, 0.01, 100);
    const orbitMaterial = new MeshBasicMaterial({
      color: 0xadd8e6,
      side: DoubleSide,
    });
    const orbitMesh = new Mesh(orbitGeometry, orbitMaterial);
    orbitMesh.rotation.x = Math.PI / 2;
    this.group.add(orbitMesh);
  }

  createPlanet() {
    const map = this.loader.load(this.planetTexture);
    const planetMaterial = new MeshPhongMaterial({ map });
    planetMaterial.map.colorSpace = SRGBColorSpace;
    const planetMesh = new Mesh(this.planetGeometry, planetMaterial);
    this.planetGroup.add(planetMesh);
    this.planetGroup.position.x = this.orbitRadius - this.planetSize / 9;
    this.planetGroup.rotation.z = this.planetAngle;
    this.group.add(this.planetGroup);
  }

  createGlow(rimHex, facingHex) {
    const uniforms = {
      color1: { value: new Color(rimHex) },
      color2: { value: new Color(facingHex) },
      fresnelBias: { value: 0.2 },
      fresnelScale: { value: 1.5 },
      fresnelPower: { value: 4.0 },
    };

    const vertexShader = `
    uniform float fresnelBias;
    uniform float fresnelScale;
    uniform float fresnelPower;

    varying float vReflectionFactor;

    void main() {
      vec4 mvPosition = modelViewMatrix * vec4( position, 1.0 );
      vec4 worldPosition = modelMatrix * vec4( position, 1.0 );

      vec3 worldNormal = normalize( mat3( modelMatrix[0].xyz, modelMatrix[1].xyz, modelMatrix[2].xyz ) * normal );

      vec3 I = worldPosition.xyz - cameraPosition;

      vReflectionFactor = fresnelBias + fresnelScale * pow( 1.0 + dot( normalize( I ), worldNormal ), fresnelPower );

      gl_Position = projectionMatrix * mvPosition;
    }
    `;

    const fragmentShader = `
      uniform vec3 color1;
      uniform vec3 color2;

      varying float vReflectionFactor;

      void main() {
        float f = clamp( vReflectionFactor, 0.0, 1.0 );
        gl_FragColor = vec4(mix(color2, color1, vec3(f)), f);
      }
    `;

    const planetGlowMaterial = new ShaderMaterial({
      uniforms,
      vertexShader,
      fragmentShader,
      transparent: true,
      blending: AdditiveBlending,
    });
    const planetGlowMesh = new Mesh(this.planetGeometry, planetGlowMaterial);
    planetGlowMesh.scale.setScalar(1.1);
    this.planetGroup.add(planetGlowMesh);
  }

  createRings() {
    if (!this.rings) return;

    const innerRadius = this.planetSize + 0.1;
    const outerRadius = innerRadius + this.rings.ringsSize;

    const ringsGeometry = new RingGeometry(innerRadius, outerRadius, 32);

    const ringsMaterial = new MeshBasicMaterial({
      side: DoubleSide,
      transparent: true,
      map: this.loader.load(this.rings.ringsTexture),
    });

    const ringMeshs = new Mesh(ringsGeometry, ringsMaterial);
    ringMeshs.rotation.x = Math.PI / 2;
    this.planetGroup.add(ringMeshs);
  }

  createAnimateFunction() {
    return () => {
      requestAnimationFrame(this.animate);

      this.updateOrbitRotation();
      this.updatePlanetRotation();
    };
  }

  updateOrbitRotation() {
    if (this.orbitRotationDirection === "clockwise") {
      this.group.rotation.y -= this.orbitSpeed;
    } else if (this.orbitRotationDirection === "counterclockwise") {
      this.group.rotation.y += this.orbitSpeed;
    }
  }

  updatePlanetRotation() {
    if (this.planetRotationDirection === "clockwise") {
      this.planetGroup.rotation.y -= this.planetRotationSpeed;
    } else if (this.planetRotationDirection === "counterclockwise") {
      this.planetGroup.rotation.y += this.planetRotationSpeed;
    }
  }

  getPlanet() {
    return this.group;
  }
}
For Earth, I'm extending the Planet class to add extra textures, such as clouds and a night texture for the planet's night side.
import {
  Mesh,
  AdditiveBlending,
  MeshBasicMaterial,
  MeshStandardMaterial,
} from "three";
import { Planet } from "./planet";

export class Earth extends Planet {
  constructor(props) {
    super(props);

    this.createPlanetLights();
    this.createPlanetClouds();
  }

  createPlanetLights() {
    const planetLightsMaterial = new MeshBasicMaterial({
      map: this.loader.load("/solar-system-threejs/assets/earth-map-2.jpg"),
      blending: AdditiveBlending,
    });
    const planetLightsMesh = new Mesh(
      this.planetGeometry,
      planetLightsMaterial
    );
    this.planetGroup.add(planetLightsMesh);

    this.group.add(this.planetGroup);
  }

  createPlanetClouds() {
    const planetCloudsMaterial = new MeshStandardMaterial({
      map: this.loader.load("/solar-system-threejs/assets/earth-map-3.jpg"),
      transparent: true,
      opacity: 0.8,
      blending: AdditiveBlending,
      alphaMap: this.loader.load(
        "/solar-system-threejs/assets/earth-map-4.jpg"
      ),
    });
    const planetCloudsMesh = new Mesh(
      this.planetGeometry,
      planetCloudsMaterial
    );
    planetCloudsMesh.scale.setScalar(1.003);
    this.planetGroup.add(planetCloudsMesh);

    this.group.add(this.planetGroup);
  }
}
By searching on Google for about five minutes, you’ll come across a table with all the necessary values for adding planets to the scene.
| Planet | Size (diameter) | Rotation speed | Rotation direction | Orbit speed |
|---|---|---|---|---|
| Mercury | 4,880 km | 10.83 km/h | Counterclockwise | 47.87 km/s |
| Venus | 12,104 km | 6.52 km/h | Clockwise | 35.02 km/s |
| Earth | 12,742 km | 1674.4 km/h | Counterclockwise | 29.78 km/s |
| Mars | 6,779 km | 866.5 km/h | Counterclockwise | 24.07 km/s |
| Jupiter | 142,984 km | 45,300 km/h | Counterclockwise | 13.07 km/s |
| Saturn | 120,536 km | 35,500 km/h | Counterclockwise | 9.69 km/s |
| Uranus | 51,118 km | 9,320 km/h | Clockwise | 6.81 km/s |
| Neptune | 49,528 km | 9,720 km/h | Counterclockwise | 5.43 km/s |
Now, all the planets and the sun can be added to the scene.
const planets = [
  {
    orbitSpeed: 0.00048,
    orbitRadius: 10,
    orbitRotationDirection: "clockwise",
    planetSize: 0.2,
    planetRotationSpeed: 0.005,
    planetRotationDirection: "counterclockwise",
    planetTexture: "/solar-system-threejs/assets/mercury-map.jpg",
    rimHex: 0xf9cf9f,
  },
  {
    orbitSpeed: 0.00035,
    orbitRadius: 13,
    orbitRotationDirection: "clockwise",
    planetSize: 0.5,
    planetRotationSpeed: 0.0005,
    planetRotationDirection: "clockwise",
    planetTexture: "/solar-system-threejs/assets/venus-map.jpg",
    rimHex: 0xb66f1f,
  },
  {
    orbitSpeed: 0.00024,
    orbitRadius: 19,
    orbitRotationDirection: "clockwise",
    planetSize: 0.3,
    planetRotationSpeed: 0.01,
    planetRotationDirection: "counterclockwise",
    planetTexture: "/solar-system-threejs/assets/mars-map.jpg",
    rimHex: 0xbc6434,
  },
  {
    orbitSpeed: 0.00013,
    orbitRadius: 22,
    orbitRotationDirection: "clockwise",
    planetSize: 1,
    planetRotationSpeed: 0.06,
    planetRotationDirection: "counterclockwise",
    planetTexture: "/solar-system-threejs/assets/jupiter-map.jpg",
    rimHex: 0xf3d6b6,
  },
  {
    orbitSpeed: 0.0001,
    orbitRadius: 25,
    orbitRotationDirection: "clockwise",
    planetSize: 0.8,
    planetRotationSpeed: 0.05,
    planetRotationDirection: "counterclockwise",
    planetTexture: "/solar-system-threejs/assets/saturn-map.jpg",
    rimHex: 0xd6b892,
    rings: {
      ringsSize: 0.5,
      ringsTexture: "/solar-system-threejs/assets/saturn-rings.jpg",
    },
  },
  {
    orbitSpeed: 0.00007,
    orbitRadius: 28,
    orbitRotationDirection: "clockwise",
    planetSize: 0.5,
    planetRotationSpeed: 0.02,
    planetRotationDirection: "clockwise",
    planetTexture: "/solar-system-threejs/assets/uranus-map.jpg",
    rimHex: 0x9ab6c2,
    rings: {
      ringsSize: 0.4,
      ringsTexture: "/solar-system-threejs/assets/uranus-rings.jpg",
    },
  },
  {
    orbitSpeed: 0.000054,
    orbitRadius: 31,
    orbitRotationDirection: "clockwise",
    planetSize: 0.5,
    planetRotationSpeed: 0.02,
    planetRotationDirection: "counterclockwise",
    planetTexture: "/solar-system-threejs/assets/neptune-map.jpg",
    rimHex: 0x5c7ed7,
  },
];

planets.forEach((item) => {
  const planet = new Planet(item).getPlanet();
  scene.add(planet);
});

const earth = new Earth({
  orbitSpeed: 0.00029,
  orbitRadius: 16,
  orbitRotationDirection: "clockwise",
  planetSize: 0.5,
  planetAngle: (-23.4 * Math.PI) / 180,
  planetRotationSpeed: 0.01,
  planetRotationDirection: "counterclockwise",
  planetTexture: "/solar-system-threejs/assets/earth-map-1.jpg",
}).getPlanet();

scene.add(earth);
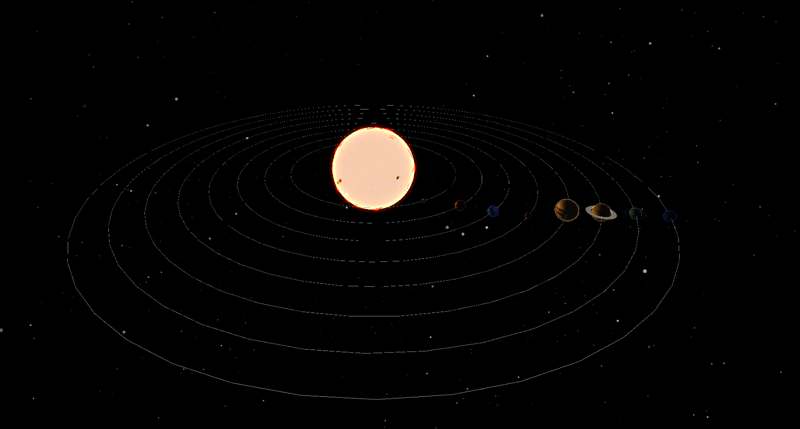
In result all solar system will look sth like:
Deploying to GitHub Pages
For deploying to set the correct base in vite.config.js.
If you are deploying to https://
If you are deploying to https://
Go to your GitHub Pages configuration in the repository settings page and choose the source of deployment as "GitHub Actions", this will lead you to create a workflow that builds and deploys your project, a sample workflow that installs dependencies and builds using npm is provided:
# Simple workflow for deploying static content to GitHub Pages
name: Deploy static content to Pages

on:
  # Runs on pushes targeting the default branch
  push:
    branches: ['main']

  # Allows you to run this workflow manually from the Actions tab
  workflow_dispatch:

# Sets the GITHUB_TOKEN permissions to allow deployment to GitHub Pages
permissions:
  contents: read
  pages: write
  id-token: write

# Allow one concurrent deployment
concurrency:
  group: 'pages'
  cancel-in-progress: true

jobs:
  # Single deploy job since we're just deploying
  deploy:
    environment:
      name: github-pages
      url: ${{ steps.deployment.outputs.page_url }}
    runs-on: ubuntu-latest
    steps:
      - name: Checkout
        uses: actions/checkout@v4
      - name: Set up Node
        uses: actions/setup-node@v4
        with:
          node-version: 20
          cache: 'npm'
      - name: Install dependencies
        run: npm ci
      - name: Build
        run: npm run build
      - name: Setup Pages
        uses: actions/configure-pages@v4
      - name: Upload artifact
        uses: actions/upload-pages-artifact@v3
        with:
          # Upload dist folder
          path: './dist'
      - name: Deploy to GitHub Pages
        id: deployment
        uses: actions/deploy-pages@v4
That is it. If your deployment has not started automatically you can always start it manually in Actions tab in your repo. Link with deployed project can be found below.
Conclusion
That’s it for today! You can find the link to the entire project below. I hope you found this entertaining and don’t still believe the Earth is flat.
See ya!
Repository link
Deployment link
The above is the detailed content of Solar system with Three.js. For more information, please follow other related articles on the PHP Chinese website!

Hot AI Tools

Undresser.AI Undress
AI-powered app for creating realistic nude photos

AI Clothes Remover
Online AI tool for removing clothes from photos.

Undress AI Tool
Undress images for free

Clothoff.io
AI clothes remover

Video Face Swap
Swap faces in any video effortlessly with our completely free AI face swap tool!

Hot Article
Hot Tools

Notepad++7.3.1
Easy-to-use and free code editor

SublimeText3 Chinese version
Chinese version, very easy to use

Zend Studio 13.0.1
Powerful PHP integrated development environment

Dreamweaver CS6
Visual web development tools

SublimeText3 Mac version
God-level code editing software (SublimeText3)
Hot Topics
 1669
1669
 14
1428
52
1329
25
1273
29
1256
24
14
1428
52
1329
25
1273
29
1256
24

 Python vs. JavaScript: The Learning Curve and Ease of Use
Apr 16, 2025 am 12:12 AM
Python vs. JavaScript: The Learning Curve and Ease of Use
Apr 16, 2025 am 12:12 AM
Python is more suitable for beginners, with a smooth learning curve and concise syntax; JavaScript is suitable for front-end development, with a steep learning curve and flexible syntax. 1. Python syntax is intuitive and suitable for data science and back-end development. 2. JavaScript is flexible and widely used in front-end and server-side programming.
 From C/C to JavaScript: How It All Works
Apr 14, 2025 am 12:05 AM
From C/C to JavaScript: How It All Works
Apr 14, 2025 am 12:05 AM
The shift from C/C to JavaScript requires adapting to dynamic typing, garbage collection and asynchronous programming. 1) C/C is a statically typed language that requires manual memory management, while JavaScript is dynamically typed and garbage collection is automatically processed. 2) C/C needs to be compiled into machine code, while JavaScript is an interpreted language. 3) JavaScript introduces concepts such as closures, prototype chains and Promise, which enhances flexibility and asynchronous programming capabilities.
 JavaScript and the Web: Core Functionality and Use Cases
Apr 18, 2025 am 12:19 AM
JavaScript and the Web: Core Functionality and Use Cases
Apr 18, 2025 am 12:19 AM
The main uses of JavaScript in web development include client interaction, form verification and asynchronous communication. 1) Dynamic content update and user interaction through DOM operations; 2) Client verification is carried out before the user submits data to improve the user experience; 3) Refreshless communication with the server is achieved through AJAX technology.
 JavaScript in Action: Real-World Examples and Projects
Apr 19, 2025 am 12:13 AM
JavaScript in Action: Real-World Examples and Projects
Apr 19, 2025 am 12:13 AM
JavaScript's application in the real world includes front-end and back-end development. 1) Display front-end applications by building a TODO list application, involving DOM operations and event processing. 2) Build RESTfulAPI through Node.js and Express to demonstrate back-end applications.
 Understanding the JavaScript Engine: Implementation Details
Apr 17, 2025 am 12:05 AM
Understanding the JavaScript Engine: Implementation Details
Apr 17, 2025 am 12:05 AM
Understanding how JavaScript engine works internally is important to developers because it helps write more efficient code and understand performance bottlenecks and optimization strategies. 1) The engine's workflow includes three stages: parsing, compiling and execution; 2) During the execution process, the engine will perform dynamic optimization, such as inline cache and hidden classes; 3) Best practices include avoiding global variables, optimizing loops, using const and lets, and avoiding excessive use of closures.
 Python vs. JavaScript: Community, Libraries, and Resources
Apr 15, 2025 am 12:16 AM
Python vs. JavaScript: Community, Libraries, and Resources
Apr 15, 2025 am 12:16 AM
Python and JavaScript have their own advantages and disadvantages in terms of community, libraries and resources. 1) The Python community is friendly and suitable for beginners, but the front-end development resources are not as rich as JavaScript. 2) Python is powerful in data science and machine learning libraries, while JavaScript is better in front-end development libraries and frameworks. 3) Both have rich learning resources, but Python is suitable for starting with official documents, while JavaScript is better with MDNWebDocs. The choice should be based on project needs and personal interests.
 Python vs. JavaScript: Development Environments and Tools
Apr 26, 2025 am 12:09 AM
Python vs. JavaScript: Development Environments and Tools
Apr 26, 2025 am 12:09 AM
Both Python and JavaScript's choices in development environments are important. 1) Python's development environment includes PyCharm, JupyterNotebook and Anaconda, which are suitable for data science and rapid prototyping. 2) The development environment of JavaScript includes Node.js, VSCode and Webpack, which are suitable for front-end and back-end development. Choosing the right tools according to project needs can improve development efficiency and project success rate.
 The Role of C/C in JavaScript Interpreters and Compilers
Apr 20, 2025 am 12:01 AM
The Role of C/C in JavaScript Interpreters and Compilers
Apr 20, 2025 am 12:01 AM
C and C play a vital role in the JavaScript engine, mainly used to implement interpreters and JIT compilers. 1) C is used to parse JavaScript source code and generate an abstract syntax tree. 2) C is responsible for generating and executing bytecode. 3) C implements the JIT compiler, optimizes and compiles hot-spot code at runtime, and significantly improves the execution efficiency of JavaScript.
