
 System Tutorial
Windows Series
How to Easily Delete Duplicate MP3 Music Files on Windows 10/Mac
System Tutorial
Windows Series
How to Easily Delete Duplicate MP3 Music Files on Windows 10/Mac
How to Easily Delete Duplicate MP3 Music Files on Windows 10/Mac

"I have thousands of songs on my Windows spread across several folders. There are dozens of songs that I have multiple copies of, often in different folders. Since about half of my songs are in one big folder, unorganized, there's no easy way to go through them with a file browser and delete the duplicates. Is there any way to help me find and remove duplicate songs?"
Usually, you may use Windows File Explorer to manually sort out and pick out your duplicate songs in folder. However, it is hard to search for duplicate songs if they spread across different forders on Windows, Here in this article, you can learn how to easily find and delete duplicate mp3 music files on Windows 10/Mac.

- 1. Does Windows 10 Have Duplicate File Finder
- 2. How to Delete Duplicate MP3 Music Files on Windows 10
- 3. Bonus Tips: How to Delete Duplicate Music Files on Mac
Does Windows 10 Have Duplicate File Finder
Not Yet. So far the duplicate file finder has not been created as built-in feature in Windows 10. However, you can still find and remove duplicate files with Windows built-in tool such as Windows File Explorer, Command Prompt or professional third-party tool. To find and delete duplicate mp3 music files on Windows 10, you can consider using Windows Media Player, iTunes or iSumsoft DupFile Refixer. The next part will walk you through these 3 easy ways to remove duplicate songs.
How to Delete Duplicate MP3 Music Files on Windows 10
- Way 1: Delete Duplicate MP3 Music Files in Windows Media Player
- Way 2: Delete Duplicate MP3 Music Files with iTunes
- Way 3: Delete Duplicate MP3 Music Files with iSumsoft DupFile Refixer
Way 1: Delete Duplicate MP3 Music Files in Windows Media Player
On Windows 10, type Windows Media Player in search Window and open it. If this tool cannot be found, go to get and enable Windows Media Player from Microsoft official website.
Step 1: In Windows Media Player, right-click on Music in the sidebar and choose Mange Music library.

Step 2: Click Add to choose the drive or folder containing your MP3 music files on Computer.

Step 3: When all MP3 music files are loaded in order by title, you are able to find and right-click on the duplicate music files with identical/similar names and choose Delete.

Step 4: Choose Delete from library and my computer and click OK.

Way 2: Delete Duplicate MP3 Music Files with iTunes
Make sure the latest version of iTunes has been installed on your Computer and launch it. Then follow these steps to find and delete duplicate mp3 music files on Windows 10 using iTunes.
Step 1: In iTunes, click File tab and choose Add Folder to Library.

Step 2: Choose the drive or folder that includes your mp3 music files and click Select Folder. Then click Skip to continue adding music files to iTunes.

Step 3: After adding files, click Library > Show Duplicate Items. Then all duplicate MP3 music files will be listed in iTunes.

Step 4: Before deleting duplicate music files, click Edit > Preference…

Step 5: Choose Advanced and click Change… to set the location where you added music files in iTunes.

Step 6: Find out and right-click the duplicate music file and choose Delete from Library.

Step 7: Click Delete Song to delete duplicate music file from iTunes library and click Move to Recycle Bin to remove duplicate music files from Computer to trash bin.

Way 3: Delete Duplicate MP3 Music Files with iSumsoft DupFile Refixer
If you are tired of manually searching and deleting duplicate music files, it is suggested that you use a safe and effective duplicate file finder named iSumsoft DupFile Refixer. This is an easy-to-use tool that can automatically and quickly go through all folders, find and sort out duplicate files. Moreover, you can select all duplicates in one click and delete all duplicates in mass.
- 曲、写真、ビデオ、テキストなどを含むすべての重複ファイルを検出します
- MP3、MP4、WAV、AAC、OGGなどのあらゆる種類のファイルをサポートします
- スキャンまたは削除からファイルを含めたり、除外したり、保護したりできます。
- カスタマイズされたスキャン設定とクリアなファイルプレビューを提供します。
- Windows/外付けハードドライブ/USBから重複ファイルを削除できます。
- Windows 11 以前のバージョンと互換性があります。
ステップ 1: 重複した MP3 音楽ファイルを削除するには、コンピュータに iSumsoft DupFile Refixer をインストールして実行します。
ダウンロード
ステップ 2: プラスアイコンをクリックして、重複した MP3 音楽ファイルをスキャンするフォルダーまたはドライブを追加します。 次に、スキャン設定に進みます。

ステップ 3: オーディオのボックスのみがチェックされていることを確認し、OKをクリックします。 その後、メインインターフェースでスキャン開始をクリックして、選択したドライブ/フォルダーの高速スキャンを実行します。

ステップ 4: iSumsoft DupFile Refixer はすぐに、すべての重複した MP3 音楽ファイルを自動的に検出し、スキャン レポートに表示します。 ファイル名をワンクリックするだけで、重複した音楽ファイルをすべて選択して削除できます。

ボーナスヒント: Mac で重複した音楽ファイルを削除する方法
Mac では、重複を表示 および正確な重複を表示 機能を提供する iTunes/ミュージック アプリを使用して、重複した音楽ファイルを検索できます。ここで、次の手順に従って、ミュージック アプリを使用してライブラリまたはコンピューターから重複した音楽ファイルを検索して削除できます。
ステップ 1: Mac でミュージック アプリを起動し、左側のペインで曲をクリックします。
ステップ 2: [ファイル] > をクリックします。ライブラリ>重複アイテムを表示すると、重複した曲がすべてリストされます。
完全な重複を見つけるには、Option キーを押したまま、ファイル > をクリックしてください。ライブラリ>完全に重複するアイテムを表示します。
 ステップ 2: 重複した曲を選択し、
キーを押します。ライブラリからのみ削除するには、[ファイルを保持する] をクリックします。コンピューターから削除するには、[ゴミ箱に移動] をクリックします。
The above is the detailed content of How to Easily Delete Duplicate MP3 Music Files on Windows 10/Mac. For more information, please follow other related articles on the PHP Chinese website!

Hot AI Tools

Undresser.AI Undress
AI-powered app for creating realistic nude photos

AI Clothes Remover
Online AI tool for removing clothes from photos.

Undress AI Tool
Undress images for free

Clothoff.io
AI clothes remover

Video Face Swap
Swap faces in any video effortlessly with our completely free AI face swap tool!

Hot Article
Hot Tools

Notepad++7.3.1
Easy-to-use and free code editor

SublimeText3 Chinese version
Chinese version, very easy to use

Zend Studio 13.0.1
Powerful PHP integrated development environment

Dreamweaver CS6
Visual web development tools

SublimeText3 Mac version
God-level code editing software (SublimeText3)
Hot Topics
 1671
1671
 14
1428
52
1329
25
1276
29
1256
24
14
1428
52
1329
25
1276
29
1256
24

 Windows kb5054979 update information Update content list
Apr 15, 2025 pm 05:36 PM
Windows kb5054979 update information Update content list
Apr 15, 2025 pm 05:36 PM
KB5054979 is a cumulative security update released on March 27, 2025, for Windows 11 version 24H2. It targets .NET Framework versions 3.5 and 4.8.1, enhancing security and overall stability. Notably, the update addresses an issue with file and directory operations on UNC shares using System.IO APIs. Two installation methods are provided: one through Windows Settings by checking for updates under Windows Update, and the other via a manual download from the Microsoft Update Catalog.
 Nanoleaf Wants to Change How You Charge Your Tech
Apr 17, 2025 am 01:03 AM
Nanoleaf Wants to Change How You Charge Your Tech
Apr 17, 2025 am 01:03 AM
Nanoleaf's Pegboard Desk Dock: A Stylish and Functional Desk Organizer Tired of the same old charging setup? Nanoleaf's new Pegboard Desk Dock offers a stylish and functional alternative. This multifunctional desk accessory boasts 32 full-color RGB
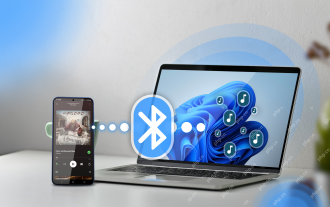 How to Use Windows 11 as a Bluetooth Audio Receiver
Apr 15, 2025 am 03:01 AM
How to Use Windows 11 as a Bluetooth Audio Receiver
Apr 15, 2025 am 03:01 AM
Turn your Windows 11 PC into a Bluetooth speaker and enjoy your favorite music from your phone! This guide shows you how to easily connect your iPhone or Android device to your computer for audio playback. Step 1: Pair Your Bluetooth Device First, pa
 ASUS' ROG Zephyrus G14 OLED Gaming Laptop Is $300 Off
Apr 16, 2025 am 03:01 AM
ASUS' ROG Zephyrus G14 OLED Gaming Laptop Is $300 Off
Apr 16, 2025 am 03:01 AM
ASUS ROG Zephyrus G14 Esports Laptop Special Offer! Buy ASUS ROG Zephyrus G14 Esports Laptop now and enjoy a $300 offer! Original price is $1999, current price is only $1699! Enjoy immersive gaming experience anytime, anywhere, or use it as a reliable portable workstation. Best Buy currently offers offers on this 2024 14-inch ASUS ROG Zephyrus G14 e-sports laptop. Its powerful configuration and performance are impressive. This ASUS ROG Zephyrus G14 e-sports laptop costs 16 on Best Buy
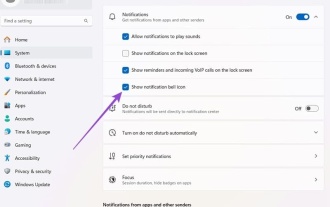 How to Customize Your Windows 11 Notifications
Apr 14, 2025 am 04:05 AM
How to Customize Your Windows 11 Notifications
Apr 14, 2025 am 04:05 AM
Detailed explanation of Windows 11 notification settings: Create a personalized notification experience Windows 11 integrates the Notification Center into the calendar, and although it takes some time to adapt, the frequency of notifications has not changed. If you are tired of the constantly popping up system updates and useless application notifications, this article will guide you to customize Windows 11 notifications and optimize your workflow. Global notification settings Almost all notification-related options are located in Settings in Windows 11. Step 1: Click the "Start" menu and select "Settings" (or press "Windows I"). Step 2: Select System in the left sidebar. Step 3: Click "Notification" to access all notification options.
 5 Hidden Windows Features You Should Be Using
Apr 16, 2025 am 12:57 AM
5 Hidden Windows Features You Should Be Using
Apr 16, 2025 am 12:57 AM
Unlock Hidden Windows Features for a Smoother Experience! Discover surprisingly useful Windows functionalities that can significantly enhance your computing experience. Even seasoned Windows users might find some new tricks here. Dynamic Lock: Auto
 How (and Why) to Turn Off Mouse Acceleration on Windows 11
Apr 15, 2025 am 06:06 AM
How (and Why) to Turn Off Mouse Acceleration on Windows 11
Apr 15, 2025 am 06:06 AM
Improve mouse accuracy: Disable Windows 11 mouse acceleration function The mouse cursor moves too fast on the screen, even if you only move the mouse a few centimeters? This is what the mouse acceleration function is. This article will guide you on how to disable this feature to better control mouse movement. Is it wise to disable mouse acceleration? There is no direct "Mouse Acceleration" option in Windows systems. Instead, it is the "Enhanced Pointer Precision" setting, which Microsoft sees as a mouse acceleration feature. When this feature is enabled, the mouse's DPI (dots per inch) setting takes effect. It controls the relationship between the physical movement speed of the mouse and the distance the cursor moves on the screen. Move the mouse slowly, Windows will reduce the effective DPI and the cursor moves shorter
 Your Keyboard Needs a Big Ol' Volume Knob
Apr 18, 2025 am 03:04 AM
Your Keyboard Needs a Big Ol' Volume Knob
Apr 18, 2025 am 03:04 AM
In today's touchscreen world, the satisfying tactile feedback of physical controls is a welcome change. That's why a keyboard with a large volume knob is surprisingly appealing. I recently experienced this firsthand, and it's been a revelation. For
