

How to Enable or Disable User Accounts in Windows 10

If you want a user account on Windows 10 to be unavailable, you don't have to delete it, but just disable it. This way, whenever you need the user account back, you can re-enable it. You won't lose any data. Now, this article will show you how to enable or disable a user account in Windows 10.
Related: Enable or Disable Built-in Administrator Account in Windows 10
Top 3 ways to enable or disable a user account in Windows 10:
- Way 1: to enable or disable a user account using the command
- Way 2: to enable or disable a user account using Group Policy
- Way 3: to enable or disable a user account in Registry Editor
How to enable or disable a user account in Command Prompt
Step 1: Start Command Prompt as an administrator.
Press "Windows key + X" shortcut keys, then enter A key.

Step 2: Type the command below in the command prompt, press Enter.
To disable a user account: Net user "User Name" /active:no
Tips: "User name" is the actual user name (ex: isum) of the account you want to disable or enable.

Step 3: When finished, you can close the Command Prompt window.
When a user account is disabled, its name will be removed from the sign-in screen and Start menu switch user areas so that it can no longer be signed in to.

To re-enable a user account: Net user "User Name" /active:yes

How to enable or disable a user account using Group Policy
You can easily enable or disable a user account in Local Users and Groups.
Step 1: Open the Local Users and Groups.
Press the Windows key + R keys to open the Run dialog, type lusrmgr.msc.

Step 2: Click on Users in the left pane, and double-click on the Name of the user account you want.

Step 3: In the opening Properties window, you can see the Account is disabled box is unchecked by default. To disable user account, check on that box.

When finished, you can close the Local Users and Groups.
How to Hide or Unhide User Account via Registry Editor
With this option, the account's details will be easily shown or hidden from the sign-in screen.
Step 1: Open the Registry Editor.
Press Win + R keys to bring out the Run dialog box. Then type regedit, then press Enter.

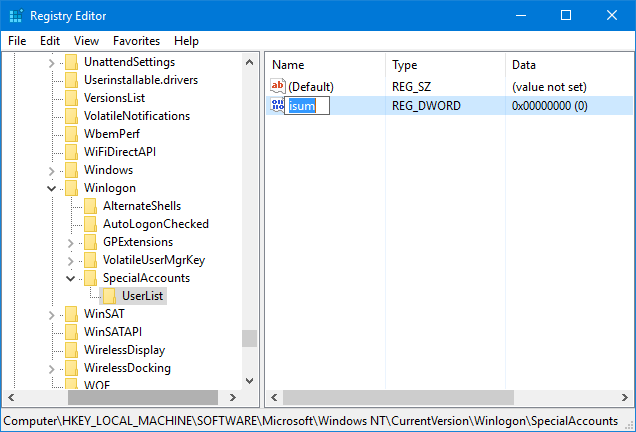
Step 2: When the Registry Editor opens, head to the following path: HKEY_LOCAL_MACHINESOFTWAREMicrosoftWindows NTCurrentVersionWinlogon
Right-click the Winlogon folder, then click New > Key. Name this new key as SpecialAccounts.

Step 3: Right-click the SpecialAccounts folder, then click New > Key. Name this new key as UserList. On the right pane of UserList, select New > DWORD (32-bit) Value. Name it with the user account that you want to hide on Windows 10 sign-in screen.
Tips: If you ever want to reverse this change and Unhide user account on the sign-in screen, navigate back to the UserList key, right-click on the name of the user account you want to unhide and click on Delete.

Click on Yes to confirm. Restart your computer to make the changes take effect.

The above is the detailed content of How to Enable or Disable User Accounts in Windows 10. For more information, please follow other related articles on the PHP Chinese website!

Hot AI Tools

Undresser.AI Undress
AI-powered app for creating realistic nude photos

AI Clothes Remover
Online AI tool for removing clothes from photos.

Undress AI Tool
Undress images for free

Clothoff.io
AI clothes remover

Video Face Swap
Swap faces in any video effortlessly with our completely free AI face swap tool!

Hot Article
Hot Tools

Notepad++7.3.1
Easy-to-use and free code editor

SublimeText3 Chinese version
Chinese version, very easy to use

Zend Studio 13.0.1
Powerful PHP integrated development environment

Dreamweaver CS6
Visual web development tools

SublimeText3 Mac version
God-level code editing software (SublimeText3)
Hot Topics


 Microsoft's New PowerToys Search Is the Missing Feature Windows 11 Needs
Apr 03, 2025 am 03:53 AM
Microsoft's New PowerToys Search Is the Missing Feature Windows 11 Needs
Apr 03, 2025 am 03:53 AM
Microsoft's latest PowerToys update introduces a game-changing search feature reminiscent of macOS' Spotlight. This improved "Command Palette" (formerly PowerToys Run) surpasses the functionality of the Windows R Run command and the task
 Windows kb5054979 update information Update content list
Apr 15, 2025 pm 05:36 PM
Windows kb5054979 update information Update content list
Apr 15, 2025 pm 05:36 PM
KB5054979 is a cumulative security update released on March 27, 2025, for Windows 11 version 24H2. It targets .NET Framework versions 3.5 and 4.8.1, enhancing security and overall stability. Notably, the update addresses an issue with file and directory operations on UNC shares using System.IO APIs. Two installation methods are provided: one through Windows Settings by checking for updates under Windows Update, and the other via a manual download from the Microsoft Update Catalog.
 Nanoleaf Wants to Change How You Charge Your Tech
Apr 17, 2025 am 01:03 AM
Nanoleaf Wants to Change How You Charge Your Tech
Apr 17, 2025 am 01:03 AM
Nanoleaf's Pegboard Desk Dock: A Stylish and Functional Desk Organizer Tired of the same old charging setup? Nanoleaf's new Pegboard Desk Dock offers a stylish and functional alternative. This multifunctional desk accessory boasts 32 full-color RGB
 Dell UltraSharp 4K Thunderbolt Hub Monitor (U2725QE) Review: The Best Looking LCD Monitor I've Tested
Apr 06, 2025 am 02:05 AM
Dell UltraSharp 4K Thunderbolt Hub Monitor (U2725QE) Review: The Best Looking LCD Monitor I've Tested
Apr 06, 2025 am 02:05 AM
Dell's UltraSharp 4K Thunderbolt Hub Monitor (U2725QE): An LCD That Rivals OLED For years, I've coveted OLED monitors. However, Dell's new UltraSharp 4K Thunderbolt Hub Monitor (U2725QE) has changed my mind, exceeding expectations with its impressiv
 These Are My Go-To Free Alternatives for Paid Windows Apps
Apr 04, 2025 am 03:42 AM
These Are My Go-To Free Alternatives for Paid Windows Apps
Apr 04, 2025 am 03:42 AM
Many free apps rival their paid counterparts in functionality. This list showcases excellent free Windows alternatives to popular paid software. I firmly believe in using free software unless a paid option offers a crucial, missing feature. These
 How to Use Windows 11 as a Bluetooth Audio Receiver
Apr 15, 2025 am 03:01 AM
How to Use Windows 11 as a Bluetooth Audio Receiver
Apr 15, 2025 am 03:01 AM
Turn your Windows 11 PC into a Bluetooth speaker and enjoy your favorite music from your phone! This guide shows you how to easily connect your iPhone or Android device to your computer for audio playback. Step 1: Pair Your Bluetooth Device First, pa
 Alienware 27 4K QD-OLED (AW2725Q) Review: A New Standard for Pixel Density
Apr 08, 2025 am 06:04 AM
Alienware 27 4K QD-OLED (AW2725Q) Review: A New Standard for Pixel Density
Apr 08, 2025 am 06:04 AM
The Alienware 27 4K QD-OLED (AW2725Q): A Stunning, High-Density Display The $899.99 price tag for a 27-inch monitor might seem steep, but the Alienware AW2725Q's exceptional pixel density delivers a transformative experience for both gaming and every
 Microsoft Might Finally Fix Windows 11's Start Menu
Apr 10, 2025 pm 12:07 PM
Microsoft Might Finally Fix Windows 11's Start Menu
Apr 10, 2025 pm 12:07 PM
Windows 11's Start Menu Gets a Much-Needed Overhaul Microsoft's Windows 11 Start menu, initially criticized for its less-than-intuitive app access, is undergoing a significant redesign. Early testing reveals a vastly improved user experience. The up
