

How to Enable or Disable Secure Sign-In for Windows 10

Windows is the most targeted operating system on the planet. That means you should fortify your PC's defenses to stay safe both online and offline. This guide shows you how to enable or disable Secure Sign-In for Windows 10 and Windows 11.
What is Secure Sign-in?
Secure Sign-In is an additional component on the Windows 10 login screen. It doesn’t prevent anyone from accessing your PC if they have your credentials. Instead, Windows 10 removes the login fields until you type a string of keys. After that, enter your password or PIN as usual.
This feature aims to thwart malware. Malicious code could reside in the background and spoof the Windows 10 or Windows 11 login screen to capture your credentials. Because apps and programs typically don’t have access to the Ctrl+At+Del command, you can bypass the fake login screen by using Secure Sign-In that's activated by typing this three-key command.
Enable or Disable Secure Sign-In Using the Netplwiz Command
To start, launch the Run command by pressing the "Windows" and "R" keys simultaneously (Windows+R). A small pop-up window will appear. Type netplwiz in the text field and then click the “OK” button (or press the Enter key) to continue.
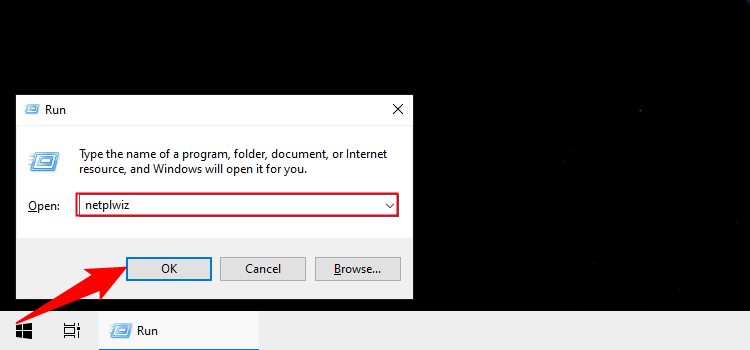
Alternatively, you can access the User Accounts panel by typing netplwiz into the taskbar’s search field and selecting the resulting Run command.
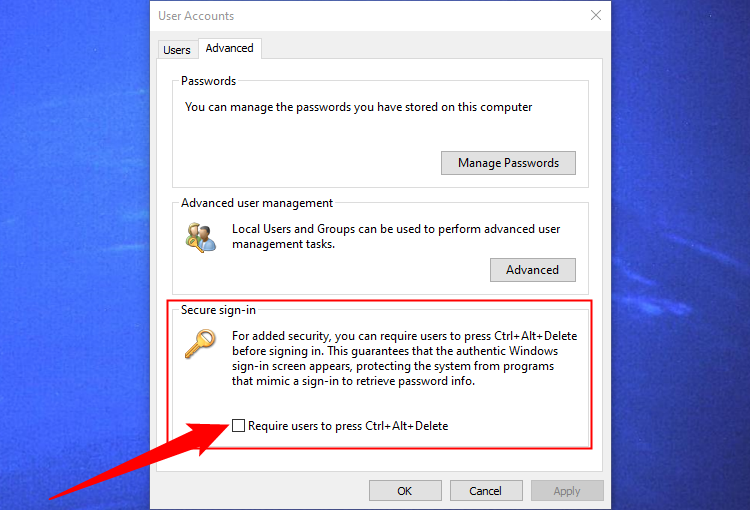
The User Accounts panel will appear onscreen. Click the “Advanced” tab (if it’s not loaded by default). Locate the “Require Users to Press Ctrl+Alt+Delete” option listed under “Secure Sign-In.” Check to enable or uncheck to disable.
Click the “Apply” button and then the “OK” button to finish.
Enable or Disable Secure Sign-in Using the Registry
If you want to take the hardcore route, why not edit the registry? Remember, tread lightly: Any changes you make could cause system instability. This option is for experienced individuals who enjoy digging deep into Windows.
Launch the Run command by pressing the "Windows" and "R" keys simultaneously (Windows+R). A small pop-up window will appear. Type regedit (without quotes) in the text field and then click the “OK” button (or press the Enter key) to continue.
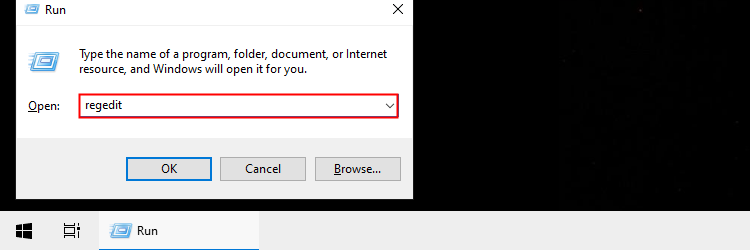
You can also access the Registry Editor by typing regedit into the taskbar’s search field and selecting the resulting desktop app.
Type or paste the following path into Registry Editor's address bar:
ComputerHKEY_LOCAL_MACHINESOFTWAREMicrosoftWindows NTCurrentVersionWinlogon <p> </p>
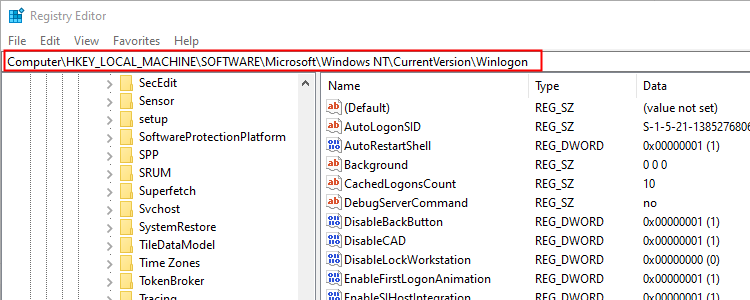
Double-click the "DisableCad" entry to edit its values.
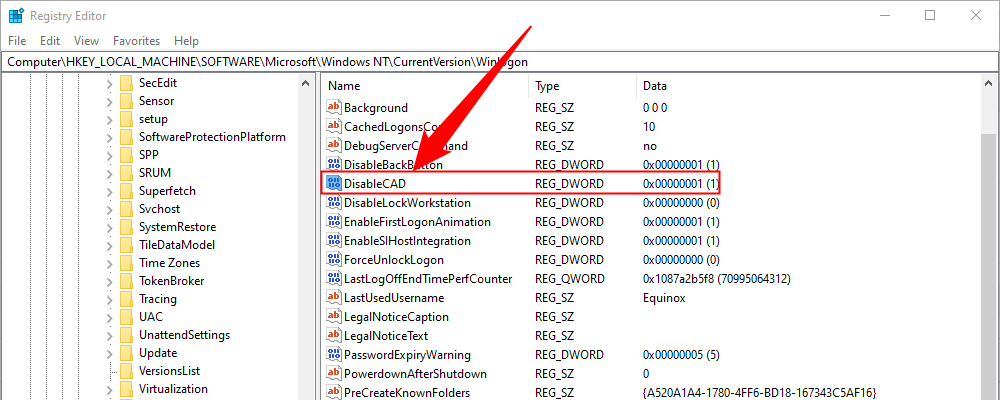
In the "Edit DWORD (32-bit) Value" pop-up box, change the Value Data with one of these values:
- Enable = 0
- Disable = 1
Click the “OK” button to finish. Restart your PC to save the settings.

If you don’t see a "DisableCad" entry in the "Winlogon" settings, right-click on "Winlogon," select “New” in the pop-up menu, and then click “DWORD (32-bit) Value" in the next list. Name this new DWORD DisableCAD and change its value.
Enable or Disable Using the Local Security Policy
Here’s another method that’s somewhat busier than following the User Accounts instructions. Use this method if you want to take the scenic route but avoid the Windows registry.
This option is not available on Home Editions of Windows 10 or Windows 11, only Pro or higher.
Launch the Run command by pressing the "Windows" and "R" keys simultaneously (Windows+R). A small pop-up window appears. Type secpol.msc in the text field and then click the “OK” button (or press the Enter key) to continue.
Like before, you can also access the Local Security Policy panel by typing secpol.msc into the taskbar’s search field and selecting the resulting desktop app.
In the Local Policy Window, expand “Local Policies” listed on the left and select the “Security Options” subfolder underneath. Next, scroll down on the right and double-click the “Interactive Logon: Do Not Require CTRL+ALT+DEL” entry.
The entry’s Properties panel appears onscreen with the "Local Security Setting" tab displayed by default. Click a radio button to enable or disable this feature. Finish by clicking the “Apply” button and then the “OK” button.
Enabling Secure Sign-in won't make your computer invulnerable to attackers, but it is a small change you can make that could help in some circumstances. You should always keep security concerns in the back of your mind these days, since so much sensitive information is stored or accessed via our computers. Make sure your keep Windows up to date and that you're using some kind of antivirus.


The above is the detailed content of How to Enable or Disable Secure Sign-In for Windows 10. For more information, please follow other related articles on the PHP Chinese website!

Hot AI Tools

Undresser.AI Undress
AI-powered app for creating realistic nude photos

AI Clothes Remover
Online AI tool for removing clothes from photos.

Undress AI Tool
Undress images for free

Clothoff.io
AI clothes remover

Video Face Swap
Swap faces in any video effortlessly with our completely free AI face swap tool!

Hot Article
Hot Tools

Notepad++7.3.1
Easy-to-use and free code editor

SublimeText3 Chinese version
Chinese version, very easy to use

Zend Studio 13.0.1
Powerful PHP integrated development environment

Dreamweaver CS6
Visual web development tools

SublimeText3 Mac version
God-level code editing software (SublimeText3)
Hot Topics
 1666
1666
 14
1425
52
1327
25
1273
29
1253
24
14
1425
52
1327
25
1273
29
1253
24

 Windows kb5054979 update information Update content list
Apr 15, 2025 pm 05:36 PM
Windows kb5054979 update information Update content list
Apr 15, 2025 pm 05:36 PM
KB5054979 is a cumulative security update released on March 27, 2025, for Windows 11 version 24H2. It targets .NET Framework versions 3.5 and 4.8.1, enhancing security and overall stability. Notably, the update addresses an issue with file and directory operations on UNC shares using System.IO APIs. Two installation methods are provided: one through Windows Settings by checking for updates under Windows Update, and the other via a manual download from the Microsoft Update Catalog.
 Nanoleaf Wants to Change How You Charge Your Tech
Apr 17, 2025 am 01:03 AM
Nanoleaf Wants to Change How You Charge Your Tech
Apr 17, 2025 am 01:03 AM
Nanoleaf's Pegboard Desk Dock: A Stylish and Functional Desk Organizer Tired of the same old charging setup? Nanoleaf's new Pegboard Desk Dock offers a stylish and functional alternative. This multifunctional desk accessory boasts 32 full-color RGB
 ASUS' ROG Zephyrus G14 OLED Gaming Laptop Is $300 Off
Apr 16, 2025 am 03:01 AM
ASUS' ROG Zephyrus G14 OLED Gaming Laptop Is $300 Off
Apr 16, 2025 am 03:01 AM
ASUS ROG Zephyrus G14 Esports Laptop Special Offer! Buy ASUS ROG Zephyrus G14 Esports Laptop now and enjoy a $300 offer! Original price is $1999, current price is only $1699! Enjoy immersive gaming experience anytime, anywhere, or use it as a reliable portable workstation. Best Buy currently offers offers on this 2024 14-inch ASUS ROG Zephyrus G14 e-sports laptop. Its powerful configuration and performance are impressive. This ASUS ROG Zephyrus G14 e-sports laptop costs 16 on Best Buy
 How to Use Windows 11 as a Bluetooth Audio Receiver
Apr 15, 2025 am 03:01 AM
How to Use Windows 11 as a Bluetooth Audio Receiver
Apr 15, 2025 am 03:01 AM
Turn your Windows 11 PC into a Bluetooth speaker and enjoy your favorite music from your phone! This guide shows you how to easily connect your iPhone or Android device to your computer for audio playback. Step 1: Pair Your Bluetooth Device First, pa
 5 Hidden Windows Features You Should Be Using
Apr 16, 2025 am 12:57 AM
5 Hidden Windows Features You Should Be Using
Apr 16, 2025 am 12:57 AM
Unlock Hidden Windows Features for a Smoother Experience! Discover surprisingly useful Windows functionalities that can significantly enhance your computing experience. Even seasoned Windows users might find some new tricks here. Dynamic Lock: Auto
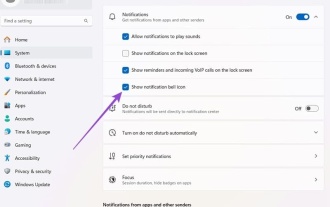 How to Customize Your Windows 11 Notifications
Apr 14, 2025 am 04:05 AM
How to Customize Your Windows 11 Notifications
Apr 14, 2025 am 04:05 AM
Detailed explanation of Windows 11 notification settings: Create a personalized notification experience Windows 11 integrates the Notification Center into the calendar, and although it takes some time to adapt, the frequency of notifications has not changed. If you are tired of the constantly popping up system updates and useless application notifications, this article will guide you to customize Windows 11 notifications and optimize your workflow. Global notification settings Almost all notification-related options are located in Settings in Windows 11. Step 1: Click the "Start" menu and select "Settings" (or press "Windows I"). Step 2: Select System in the left sidebar. Step 3: Click "Notification" to access all notification options.
 How (and Why) to Turn Off Mouse Acceleration on Windows 11
Apr 15, 2025 am 06:06 AM
How (and Why) to Turn Off Mouse Acceleration on Windows 11
Apr 15, 2025 am 06:06 AM
Improve mouse accuracy: Disable Windows 11 mouse acceleration function The mouse cursor moves too fast on the screen, even if you only move the mouse a few centimeters? This is what the mouse acceleration function is. This article will guide you on how to disable this feature to better control mouse movement. Is it wise to disable mouse acceleration? There is no direct "Mouse Acceleration" option in Windows systems. Instead, it is the "Enhanced Pointer Precision" setting, which Microsoft sees as a mouse acceleration feature. When this feature is enabled, the mouse's DPI (dots per inch) setting takes effect. It controls the relationship between the physical movement speed of the mouse and the distance the cursor moves on the screen. Move the mouse slowly, Windows will reduce the effective DPI and the cursor moves shorter
 Your Keyboard Needs a Big Ol' Volume Knob
Apr 18, 2025 am 03:04 AM
Your Keyboard Needs a Big Ol' Volume Knob
Apr 18, 2025 am 03:04 AM
In today's touchscreen world, the satisfying tactile feedback of physical controls is a welcome change. That's why a keyboard with a large volume knob is surprisingly appealing. I recently experienced this firsthand, and it's been a revelation. For
