
 Web Front-end
JS Tutorial
Implementing identity authentication and form verification functions for user access in AngularJS_AngularJS
Web Front-end
JS Tutorial
Implementing identity authentication and form verification functions for user access in AngularJS_AngularJS
Implementing identity authentication and form verification functions for user access in AngularJS_AngularJS

Authentication
The most common permission design is RBAC role-based access control. The basic idea is that various permissions for system operations are not directly granted to specific users, but a role set is established between the user set and the permission set. . Each role corresponds to a corresponding set of permissions.
Once a user is assigned the appropriate role, the user has all the operation permissions of this role. The advantage of this is that you don’t have to assign permissions every time you create a user. You only need to assign the corresponding role to the user. Moreover, the permission changes of roles are much less than the permission changes of users, which will simplify the user permissions. management and reduce system overhead.
In the single-page application built by Angular, we need to do some extra things to implement such an architecture. In terms of the overall project, there are about three places that front-end engineers need to deal with.
1. UI processing (determine whether some content on the page is displayed based on the permissions the user has)
2. Routing processing (when the user accesses a URL that he does not have permission to access, jump to an error page)
3. HTTP request processing (when we send a data request, if the returned status is 401 or 403, it is usually redirected to an error page)
Implementation of access identity control
First, we need to obtain all the permissions of the current user before Angular starts, and then a more elegant way is to store this mapping relationship through a service. For UI processing whether the content on a page is displayed according to permissions, we should use A directive is implemented. After processing these, we also need to add an additional "permission" attribute to it when adding a route, and assign a value to indicate which roles have permissions to jump to this URL, and then listen to the routeChangeStart event through Angular To verify whether the current user has access rights to this URL. Finally, an HTTP interceptor is needed to monitor when the status returned by a request is 401 or 403, and jump to an error page. This is roughly the work. It seems like a lot, but it’s actually quite easy to handle one by one.
Return 401, execute loginCtrl, return 403, execute PermissionCtrl.
Obtain the mapping relationship of permission before Angular runs
The Angular project is started through ng-app, but in some cases we want the startup of the Angular project to be under our control. For example, in this case, I hope to obtain all the permission mapping relationships of the currently logged in user, and then Start the Angular App. Fortunately, Angular itself provides this method, which is angular.bootstrap().
var permissionList;
angular.element(document).ready(function() {
 $.get('/api/UserPermission', function(data) {
 permissionList = data;
 angular.bootstrap(document, ['App']);
 });
});
Those who look carefully may notice that $.get() is used here. It is correct to use jQuery instead of Angular's $resource or $http, because Angular has not been started at this time. We can’t use function yet.
Further using the above code, you can put the obtained mapping relationship into a service and use it as a global variable.
// app.js
var app = angular.module('myApp', []), permissionList;

app.run(function(permissions) {
 permissions.setPermissions(permissionList)
});

angular.element(document).ready(function() {
 $.get('/api/UserPermission', function(data) {
 permissionList = data;
 angular.bootstrap(document, ['App']);
 });
});

// common_service.js
angular.module('myApp')
 .factory('permissions', function ($rootScope) {
 var permissionList;
 return {
  setPermissions: function(permissions) {
  permissionList = permissions;
  $rootScope.$broadcast('permissionsChanged')
  }
 };
 });
After obtaining the current user's permission set, we archived this set into a corresponding service, and then did two more things:
(1) Store permissions in the factory variable so that it remains in memory to achieve the role of global variables without polluting the namespace.
(2) Broadcast events through $broadcast when permissions change.
1. How to determine whether UI components are visible or hidden based on permissions
Here we need to write a directive ourselves, which will display or hide elements based on permission relationships.
<!-- If the user has edit permission the show a link -->
<div has-permission='Edit'>
 <a href="/#/courses/{{ id }}/edit"> {{ name }}</a>
</div>

<!-- If the user doesn't have edit permission then show text only (Note the "!" before "Edit") -->
<div has-permission='!Edit'>
 {{ name }}
</div>
Here we see that the ideal situation is to pass a has-permission attribute to verify the name of the permission. If the current user has one, it will be displayed, if not, it will be hidden.
angular.module('myApp').directive('hasPermission', function(permissions) {
 return {
 link: function(scope, element, attrs) {
  if(!_.isString(attrs.hasPermission))
  throw "hasPermission value must be a string";

  var value = attrs.hasPermission.trim();
  var notPermissionFlag = value[0] === '!';
  if(notPermissionFlag) {
  value = value.slice(1).trim();
  }

  function toggleVisibilityBasedOnPermission() {
  var hasPermission = permissions.hasPermission(value);

  if(hasPermission && !notPermissionFlag || !hasPermission && notPermissionFlag)
   element.show();
  else
   element.hide();
  }
  toggleVisibilityBasedOnPermission();
  scope.$on('permissionsChanged', toggleVisibilityBasedOnPermission);
 }
 };
});
Expand the previous factory:
angular.module('myApp')
 .factory('permissions', function ($rootScope) {
 var permissionList;
 return {
  setPermissions: function(permissions) {
  permissionList = permissions;
  $rootScope.$broadcast('permissionsChanged')
  },
  hasPermission: function (permission) {
  permission = permission.trim();
  return _.some(permissionList, function(item) {
   if(_.isString(item.Name))
   return item.Name.trim() === permission
  });
  }
 };
 });
2. Access based on permissions on the route
The idea of implementing this part is as follows: When we define a route, add a permission attribute. The value of the attribute is the permissions to access the current url. Then, the routeChangeStart event is used to monitor url changes. Every time the url changes, When , check whether the current url to be jumped meets the conditions, and then decide whether to jump successfully or jump to the wrong prompt page.
app.config(function ($routeProvider) {
 $routeProvider
 .when('/', {
  templateUrl: 'views/viewCourses.html',
  controller: 'viewCoursesCtrl'
 })
 .when('/unauthorized', {
  templateUrl: 'views/error.html',
  controller: 'ErrorCtrl'
 })
 .when('/courses/:id/edit', {
  templateUrl: 'views/editCourses.html',
  controller: 'editCourses',
  permission: 'Edit'
 });
});
mainController.js or indexController.js (in short, the parent controller)
app.controller('mainAppCtrl', function($scope, $location, permissions) {
 $scope.$on('$routeChangeStart', function(scope, next, current) {
 var permission = next.$$route.permission;
 if(_.isString(permission) && !permissions.hasPermission(permission))
  $location.path('/unauthorized');
 });
});
这里依然用到了之前写的hasPermission,这些东西都是高度可复用的.这样就搞定了,在每次view的route跳转前,在父容器的Controller中判断一些它到底有没有跳转的权限即可.
3.HTTP请求处理
这个应该相对来说好处理一点,思想的思路也很简单.因为Angular应用推荐的是RESTful风格的借口,所以对于HTTP协议的使用很清晰.对于请求返回的status code如果是401或者403则表示没有权限,就跳转到对应的错误提示页面即可.
当然我们不可能每个请求都去手动校验转发一次,所以肯定需要一个总的filter.代码如下:
angular.module('myApp')
 .config(function($httpProvider) {
 $httpProvider.responseInterceptors.push('securityInterceptor');
 })
 .provider('securityInterceptor', function() {
 this.$get = function($location, $q) {
  return function(promise) {
  return promise.then(null, function(response) {
   if(response.status === 403 || response.status === 401) {
   $location.path('/unauthorized');
   }
   return $q.reject(response);
  });
  };
 };
 });
写到这里就差不多可以实现在这种前后端分离模式下,前端部分的权限管理和控制了。
表单验证
AngularJS 前端验证指令
var rcSubmitDirective = {
 'rcSubmit': function ($parse) {
 return {
  restrict: "A",
  require: [ "rcSubmit", "?form" ],
  controller: function() {
  this.attempted = false;
  var formController = null;
  this.setAttempted = function() {
   this.attempted = true;
  };
  this.setFormController = function(controller) {
   formController = controller;
  };
  this.needsAttention = function(fieldModelController) {
   if (!formController) return false;
   if (fieldModelController) {
   return fieldModelController.$invalid && (fieldModelController.$dirty || this.attempted);
   } else {
   return formController && formController.$invalid && (formController.$dirty || this.attempted);
   }
  };
  },
  compile: function() {
  return {
   pre: function(scope, formElement, attributes, controllers) {
   var submitController = controllers[0];
   var formController = controllers.length > 1 ? controllers[1] : null;
   submitController.setFormController(formController);
   scope.rc = scope.rc || {};
   scope.rc[attributes.name] = submitController;
   },
   post: function(scope, formElement, attributes, controllers) {
   var submitController = controllers[0];
   var formController = controllers.length > 1 ? controllers[1] : null;
   var fn = $parse(attributes.rcSubmit);
   formElement.bind("submit", function(event) {
    submitController.setAttempted();
    if (!scope.$$phase) scope.$apply();
    if (!formController.$valid) return;
    scope.$apply(function() {
    fn(scope, {
     $event: event
    });
    });
   });
   }
  };
  }
 };
 }
};
验证通过
<form name="loginForm" novalidate
  ng-app="LoginApp" ng-controller="LoginController" rc-submit="login()">
 <div class="form-group"
   ng-class="{'has-error': rc.loginForm.needsAttention(loginForm.username)}">
  <input class="form-control" name="username" type="text"
    placeholder="Username" required ng-model="session.username" />
  <span class="help-block"
    ng-show="rc.form.needsAttention(loginForm.username) && loginForm.username.$error.required">Required</span>
 </div>
 <div class="form-group"
   ng-class="{'has-error': rc.loginForm.needsAttention(loginForm.password)}">
  <input class="form-control" name="password" type="password"
    placeholder="Password" required ng-model="session.password" />
  <span class="help-block"
    ng-show="rc.form.needsAttention(loginForm.password) && loginForm.password.$error.required">Required</span>
 </div>
 <div class="form-group">
  <button type="submit" class="btn btn-primary pull-right"
    value="Login" title="Login">
   <span>Login</span>
  </button>
 </div>
</form>
样式如下
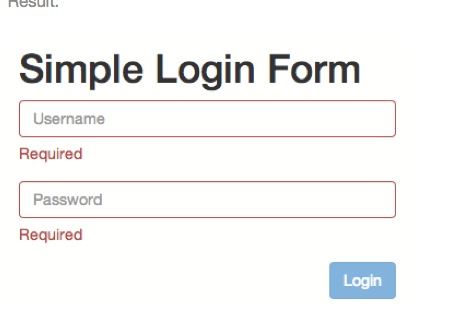
前端验证通过会调用login()。

Hot AI Tools

Undresser.AI Undress
AI-powered app for creating realistic nude photos

AI Clothes Remover
Online AI tool for removing clothes from photos.

Undress AI Tool
Undress images for free

Clothoff.io
AI clothes remover

Video Face Swap
Swap faces in any video effortlessly with our completely free AI face swap tool!

Hot Article
Hot Tools

Notepad++7.3.1
Easy-to-use and free code editor

SublimeText3 Chinese version
Chinese version, very easy to use

Zend Studio 13.0.1
Powerful PHP integrated development environment

Dreamweaver CS6
Visual web development tools

SublimeText3 Mac version
God-level code editing software (SublimeText3)
Hot Topics


 Recommended: Excellent JS open source face detection and recognition project
Apr 03, 2024 am 11:55 AM
Recommended: Excellent JS open source face detection and recognition project
Apr 03, 2024 am 11:55 AM
Face detection and recognition technology is already a relatively mature and widely used technology. Currently, the most widely used Internet application language is JS. Implementing face detection and recognition on the Web front-end has advantages and disadvantages compared to back-end face recognition. Advantages include reducing network interaction and real-time recognition, which greatly shortens user waiting time and improves user experience; disadvantages include: being limited by model size, the accuracy is also limited. How to use js to implement face detection on the web? In order to implement face recognition on the Web, you need to be familiar with related programming languages and technologies, such as JavaScript, HTML, CSS, WebRTC, etc. At the same time, you also need to master relevant computer vision and artificial intelligence technologies. It is worth noting that due to the design of the Web side
 How to install Angular on Ubuntu 24.04
Mar 23, 2024 pm 12:20 PM
How to install Angular on Ubuntu 24.04
Mar 23, 2024 pm 12:20 PM
Angular.js is a freely accessible JavaScript platform for creating dynamic applications. It allows you to express various aspects of your application quickly and clearly by extending the syntax of HTML as a template language. Angular.js provides a range of tools to help you write, update and test your code. Additionally, it provides many features such as routing and form management. This guide will discuss how to install Angular on Ubuntu24. First, you need to install Node.js. Node.js is a JavaScript running environment based on the ChromeV8 engine that allows you to run JavaScript code on the server side. To be in Ub
 WebSocket and JavaScript: key technologies for implementing real-time monitoring systems
Dec 17, 2023 pm 05:30 PM
WebSocket and JavaScript: key technologies for implementing real-time monitoring systems
Dec 17, 2023 pm 05:30 PM
WebSocket and JavaScript: Key technologies for realizing real-time monitoring systems Introduction: With the rapid development of Internet technology, real-time monitoring systems have been widely used in various fields. One of the key technologies to achieve real-time monitoring is the combination of WebSocket and JavaScript. This article will introduce the application of WebSocket and JavaScript in real-time monitoring systems, give code examples, and explain their implementation principles in detail. 1. WebSocket technology
 Essential tools for stock analysis: Learn the steps to draw candle charts with PHP and JS
Dec 17, 2023 pm 06:55 PM
Essential tools for stock analysis: Learn the steps to draw candle charts with PHP and JS
Dec 17, 2023 pm 06:55 PM
Essential tools for stock analysis: Learn the steps to draw candle charts in PHP and JS. Specific code examples are required. With the rapid development of the Internet and technology, stock trading has become one of the important ways for many investors. Stock analysis is an important part of investor decision-making, and candle charts are widely used in technical analysis. Learning how to draw candle charts using PHP and JS will provide investors with more intuitive information to help them make better decisions. A candlestick chart is a technical chart that displays stock prices in the form of candlesticks. It shows the stock price
 Angular components and their display properties: understanding non-block default values
Mar 15, 2024 pm 04:51 PM
Angular components and their display properties: understanding non-block default values
Mar 15, 2024 pm 04:51 PM
The default display behavior for components in the Angular framework is not for block-level elements. This design choice promotes encapsulation of component styles and encourages developers to consciously define how each component is displayed. By explicitly setting the CSS property display, the display of Angular components can be fully controlled to achieve the desired layout and responsiveness.
 PHP and JS Development Tips: Master the Method of Drawing Stock Candle Charts
Dec 18, 2023 pm 03:39 PM
PHP and JS Development Tips: Master the Method of Drawing Stock Candle Charts
Dec 18, 2023 pm 03:39 PM
With the rapid development of Internet finance, stock investment has become the choice of more and more people. In stock trading, candle charts are a commonly used technical analysis method. It can show the changing trend of stock prices and help investors make more accurate decisions. This article will introduce the development skills of PHP and JS, lead readers to understand how to draw stock candle charts, and provide specific code examples. 1. Understanding Stock Candle Charts Before introducing how to draw stock candle charts, we first need to understand what a candle chart is. Candlestick charts were developed by the Japanese
 JavaScript and WebSocket: Building an efficient real-time weather forecasting system
Dec 17, 2023 pm 05:13 PM
JavaScript and WebSocket: Building an efficient real-time weather forecasting system
Dec 17, 2023 pm 05:13 PM
JavaScript and WebSocket: Building an efficient real-time weather forecast system Introduction: Today, the accuracy of weather forecasts is of great significance to daily life and decision-making. As technology develops, we can provide more accurate and reliable weather forecasts by obtaining weather data in real time. In this article, we will learn how to use JavaScript and WebSocket technology to build an efficient real-time weather forecast system. This article will demonstrate the implementation process through specific code examples. We
 Simple JavaScript Tutorial: How to Get HTTP Status Code
Jan 05, 2024 pm 06:08 PM
Simple JavaScript Tutorial: How to Get HTTP Status Code
Jan 05, 2024 pm 06:08 PM
JavaScript tutorial: How to get HTTP status code, specific code examples are required. Preface: In web development, data interaction with the server is often involved. When communicating with the server, we often need to obtain the returned HTTP status code to determine whether the operation is successful, and perform corresponding processing based on different status codes. This article will teach you how to use JavaScript to obtain HTTP status codes and provide some practical code examples. Using XMLHttpRequest
