
 Computer Tutorials
Troubleshooting
Stability of assembling a computer? How to restore the system after assembling a computer?
Computer Tutorials
Troubleshooting
Stability of assembling a computer? How to restore the system after assembling a computer?
Stability of assembling a computer? How to restore the system after assembling a computer?

The stability of assembled computers and system restore skills are crucial for computer enthusiasts. Stability ensures your computer runs smoothly, and restoring your system is a valuable way to resolve problems and recover data. In order to let everyone have an in-depth understanding of these technologies, PHP editor Xin Yi brings you the following detailed content, covering the specific steps for assembling computer stability optimization and system restoration.

How stable is the assembled computer?
The stability of currently assembled computers can be guaranteed.
The assembly machine is to order different computer parts for assembly according to your own needs. As far as the current technology is concerned, most of the parts are compatible with each other, so you can rest assured. However, there will be some minor problems during the use of the assembly machine, such as the memory slot is easy to loosen, etc.
How to restore the system after assembling a computer?
Click the Start menu in the lower left corner, select Settings, enter the page, click Update and Security, select Recovery on the left, then under Reset this PC, click Start, a pop-up window will pop up, according to personal actual conditions You need to select the corresponding option, and the interface that will delete your application pops up. After confirming that it is correct, click Next, select Reset, the computer will automatically restart, and you are done.
How to install the system on a computer that I assembled myself?
Use pe system to install the operating system.
First make a pe system with a USB disk, and then use the pe system to boot the computer. After entering the pe system interface, use the hard disk partition tool to partition and advanced format the hard disk. After saving, install the operating system Copy the package to a partition other than the system, double-click to run, and follow the prompts to install.
How to install the system after the computer is assembled?
Copy the system using a USB disk, and then install it
Tutorial on assembling a computer and installing the system?
Nowadays, the system installation for assembling computers is very simple and convenient, and only requires a CD.
First enter the bios settings, set the computer to boot first with the CD-ROM drive, then restart the computer and load the system CD into the CD-ROM drive.
The CD will automatically enter the installation state. At this time, you only need to manually re-partition the partitions, and the rest will be completed automatically.
How to set up the system for a newly assembled computer?
Looks like your accessory doesn’t have a CD-ROM drive. Let’s not talk about installing the system from the CD. Prepare a U disk with a slightly larger capacity and the next U Master U disk boot disk creation tool. Run the program on the computer to make your U disk into a boot disk (it will format the U disk. data), download a win7/8/10 iso or gho system file and put it in the corresponding folder in the U disk (iso or gho folder). Insert the U disk into the new machine, boot into the bios to set the U disk boot, restart the computer. Select win8PE new machine mode, the computer will enter the desktop and automatically run the installation system. If your gho/iso file is placed in the correct location, the installation options will be automatically selected. Just go to the next step. The new hard drive can be partitioned.
How to install the system after assembling the computer and lighting it up?
Hello, after assembling the computer and lighting it up, you can follow the following steps to install the system:
1. Prepare an installation disk or U disk. You can download the Windows system image file from the official website and use Rufus or other tools to make it into a USB boot disk.
2. Insert the USB flash drive into the computer, restart the computer and press F12, F11 or F2 to enter the BIOS setting interface.
3. In the BIOS setting interface, find the "Boot" option and put the USB boot device first.
4. Save the settings and exit the BIOS. The computer will automatically restart and boot from the USB flash drive.
5. After entering the system installation interface, follow the prompts. Select the system version to be installed, installation location, etc.
6. After the system installation is completed, enter the user name, password and other information according to the prompts to complete the system settings.
7. After the installation is complete, you can download and install drivers and software.
Notes:
1. Before installing the system, it is best to back up important data to prevent data loss.
2. When installing the system, you need to pay attention to selecting the correct system version, otherwise it may not work properly.
3. After the installation is complete, you need to install the driver, otherwise the hardware may not work properly or the performance may decrease.
4. When installing software, it is best to choose genuine software to avoid copyright issues.
How to reinstall the system of a computer assembly machine?
1. A USB flash drive with a capacity greater than 8g. Before using the USB flash drive, you need to clear or transfer all files in the USB flash drive.
2. Install the Xiaobai system on a computer with Internet access
The first step. Making a USB boot disk
1. Insert the prepared U disk into the computer, open Xiaobai One-Click Reinstall System, and then click Production System.
How to install the system after assembling the computer by yourself?
After assembling the computer yourself, you need to prepare an operating system installation disk or USB flash drive, insert it into the computer and start the computer.
When the computer is turned on, you can press the F12 or DEL key to enter the BIOS settings and choose to boot from the installation disk or U disk.
Then follow the steps prompted by the installer to install the operating system, including selecting the installation hard disk, allocating disk space, entering the product key, setting the user name and password, etc.
During the installation process, you need to pay attention to selecting the correct operating system version, such as Windows 10 Home Edition or Professional Edition.
After the installation is completed, drivers and other software need to be installed to enable the computer to run and be used normally.
How to install the system after assembling the computer?
The installation method is as follows
1. Prepare the system installation disk or USB boot installation disk.
2. Set the BIOS to boot first. If the system disk is set to CD-ROM boot, if the USB boot disk is set to USB boot.
3. Press any key to enter the installation interface, select the correct installation method and installation drive letter, the system will automatically install the system, we only need to wait for the end, but you need to operate it at certain times, such as: time, Language settings, etc.
4. After the installation is completed, it is still not working, because some system disks may come with some drivers, but it is recommended to install the latest drivers.
The above is the detailed content of Stability of assembling a computer? How to restore the system after assembling a computer?. For more information, please follow other related articles on the PHP Chinese website!

Hot AI Tools

Undresser.AI Undress
AI-powered app for creating realistic nude photos

AI Clothes Remover
Online AI tool for removing clothes from photos.

Undress AI Tool
Undress images for free

Clothoff.io
AI clothes remover

Video Face Swap
Swap faces in any video effortlessly with our completely free AI face swap tool!

Hot Article
Hot Tools

Notepad++7.3.1
Easy-to-use and free code editor

SublimeText3 Chinese version
Chinese version, very easy to use

Zend Studio 13.0.1
Powerful PHP integrated development environment

Dreamweaver CS6
Visual web development tools

SublimeText3 Mac version
God-level code editing software (SublimeText3)
Hot Topics


 What's New in Windows 11 KB5054979 & How to Fix Update Issues
Apr 03, 2025 pm 06:01 PM
What's New in Windows 11 KB5054979 & How to Fix Update Issues
Apr 03, 2025 pm 06:01 PM
Windows 11 KB5054979 Update: Installation Guide and Troubleshooting For Windows 11 24H2 version, Microsoft has released cumulative update KB5054979, which includes several improvements and bug fixes. This article will guide you on how to install this update and provide a solution to the installation failure. About Windows 11 24H2 KB5054979 KB5054979 was released on March 27, 2025 and is a security update for Windows 11 24H2 versions.NET Framework 3.5 and 4.8.1. This update enhances security and
 How to fix KB5055523 fails to install in Windows 11?
Apr 10, 2025 pm 12:02 PM
How to fix KB5055523 fails to install in Windows 11?
Apr 10, 2025 pm 12:02 PM
KB5055523 update is a cumulative update for Windows 11 version 24H2, released by Microsoft on April 8, 2025, as part of the monthly Patch Tuesday cycle, to offe
 How to fix KB5055518 fails to install in Windows 10?
Apr 10, 2025 pm 12:01 PM
How to fix KB5055518 fails to install in Windows 10?
Apr 10, 2025 pm 12:01 PM
Windows update failures are not uncommon, and most users have to struggle with them, most often becoming frustrated when systems fail to install critical patche
 Proven Fixes and Tips for KB5054980 Not Installing
Mar 31, 2025 pm 02:40 PM
Proven Fixes and Tips for KB5054980 Not Installing
Mar 31, 2025 pm 02:40 PM
Troubleshooting KB5054980 Installation Issues on Windows 11 Microsoft released KB5054980 on March 25, 2025, for Windows 11 versions 22H2 and 23H2. While this update doesn't include new security features, it incorporates all previously released securi
 Windows 10 KB5055063: What's New & How to Download It
Mar 31, 2025 pm 03:54 PM
Windows 10 KB5055063: What's New & How to Download It
Mar 31, 2025 pm 03:54 PM
Windows 10 KB5055063 update details and installation troubleshooting KB5055063 is an update for the .NET Framework for Windows 10 22H2 version, including important improvements and fixes. This article will explore KB5055063 in depth, including download methods and various ways to solve installation failure problems. Introduction to Windows 10 KB5055063 KB5055063 is a cumulative update for .NET Framework 3.5, 4.8, and 4.8.1 for Windows 10 version 22H2, on March 25, 2025
 How to fix KB5055612 fails to install in Windows 10?
Apr 15, 2025 pm 10:00 PM
How to fix KB5055612 fails to install in Windows 10?
Apr 15, 2025 pm 10:00 PM
Windows updates are a critical part of keeping the operating system stable, secure, and compatible with new software or hardware. They are issued on a regular b
 How to fix KB5055528 fails to install in Windows 11?
Apr 10, 2025 pm 12:00 PM
How to fix KB5055528 fails to install in Windows 11?
Apr 10, 2025 pm 12:00 PM
Windows updates are essential to keep your system up to date, secure, and efficient, adding security patches, bug fixes, and new functionality for Windows 11 us
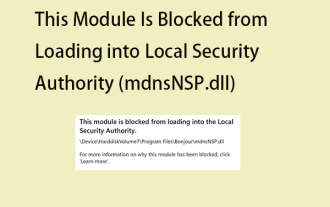 Fix This Module Is Blocked from Loading into LSA
Apr 02, 2025 pm 08:01 PM
Fix This Module Is Blocked from Loading into LSA
Apr 02, 2025 pm 08:01 PM
After upgrading Windows 11 24H2, you encounter an error "This module prevents loading to local security agency (mdnsNSP.dll)"? This article provides several solutions. Local Security Agency (LSA) protection is a security feature of Windows that helps prevent credentials used to log in to Windows. Many users receive the following error message after a fresh installation of Windows 11 24H2 and installing the latest version of iTunes: This module prevents loading to the local security authority. \Device\HarddiskVolume3\Program Files\Bonjour\mdnsNSP.dll for
