

Debian 6.04下PostgreSQL-9.1.3 安装教程

第一阶段-编译安装:1,从postgresql官网下载postgresql-9.1.3.tar.bz2这个我想大家都知道的2,把源代码复制到/usr/src/postgres
前言:本人机器:AMD64x2 4400++ 1G 内存
第一阶段-编译安装:
1,从postgresql官网下载postgresql-9.1.3.tar.bz2这个我想大家都知道的
2,把源代码复制到/usr/src/postgresql-9.1.3.tar.bz2 且 cd /usr/src
3,解压: tar xjvf postgresql-9.1.3.tar.bz2
4,进入源码目录: cd postgresql-9.1.3
5,建立pgsql安装目录。这里我选择 :mkdir /usr/pgsql-9.1.3
6,安装必须的工具执行:aptitude install build-essential zlib1g-dev libpam0g-dev libssl-dev libperl-dev kernel-package libncurses5-dev flex bison gawk chkconfig系统会自动安装所以来的软件
7,在源码目录里面执行下面命令:
./configure CFLAGS='-DLINUX_OOM_ADJ=0 -O2 -pipe -march=athlon64 -fomit-frame-pointer -fstack-protector' --prefix=/usr/pgsql-9.1.3 --with-perl --with-openssl --with-pam --enable-nls --disable-debug
8,开始编译 :make -j 4
9,变成成功后,执行 make install 安装
10,,建立postgresql数据库专用普通权限用户 :adduser psqlroot
11,切换到安装目录: cd /usr/pgsql-9.1.3建立初始化数据库集群文件夹:mkdir date
12,改变date所有权限 chown psqlroot:psqlroot date
13,执行数据库初始化(必须使用psqlroot用户):su - psqlroot -c './initdb /usr/pgsql-9.1.3/date'
14,好了,进入date目录可以看到初始化后的文件,比如conf配置文件等等。
第二阶段-制作启动脚本:
1,从源代码目录里面复制出原始的开机脚本:
cp /usr/src/postgresql-9.1.3/contrib/start-scripts/linux /etc/init.d/postgresql
2,给予执行权限:chmod 700 /etc/init.d/postgresql
3,建立s 2 3 4 5 6各个级别启动连接在(/etc/rcS.d rc1.d rc2.d rc3.d rc4.d rc5.d rc6.d)
使用:chkconfig /etc/init.d/postgresql自动建立 呵呵很方便哦!
4,修改/etc/init.d/postgresql文件,这个文件是用/bin/sh基础的,改成/bin/bash的:
#! /bin/bash
# chkconfig: 2345 98 02
# description: PostgreSQL RDBMS
# This is an example of a start/stop script for SysV-style init, such
# as is used on Linux systems. You should edit some of the variables
# and maybe the 'echo' commands.
#
# Place this file at /etc/init.d/postgresql (or
# /etc/rc.d/init.d/postgresql) and make symlinks to
# /etc/rc.d/rc0.d/K02postgresql
# /etc/rc.d/rc1.d/K02postgresql
# /etc/rc.d/rc2.d/K02postgresql
# /etc/rc.d/rc3.d/S98postgresql
# /etc/rc.d/rc4.d/S98postgresql
# /etc/rc.d/rc5.d/S98postgresql
# Or, if you have chkconfig, simply:
# chkconfig --add postgresql
#
# Proper init scripts on Linux systems normally require setting lock
# and pid files under /var/run as well as reacting to network
# settings, so you should treat this with care.
# Original author: Ryan Kirkpatrick
# contrib/start-scripts/linux
## EDIT FROM HERE
# Installation PREFIX
PREFIX=/usr/pgsql-9.1.3
# Data directory
PGDATA=$PREFIX/date
# Who to run the postmaster as, usually "postgres". (NOT "root")
PGUSER=psqlroot
# Where to keep a log file
PGLOG=/var/log/serverlog
# It's often a good idea to protect the postmaster from being killed by the
# OOM killer (which will tend to preferentially kill the postmaster because
# of the way it accounts for shared memory). Setting the OOM_ADJ value to
# -17 will disable OOM kill altogether. If you enable this, you probably want
# to compile PostgreSQL with "-DLINUX_OOM_ADJ=0", so that individual backends
# can still be killed by the OOM killer.
OOM_ADJ=-17
## STOP EDITING HERE
# The path that is to be used for the script
PATH=/usr/local/sbin:/usr/local/bin:/sbin:/bin:/usr/sbin:/usr/bin
# What to use to start up the postmaster. (If you want the script to wait
# until the server has started, you could use "pg_ctl start -w" here.
# But without -w, pg_ctl adds no value.)
DAEMON="$PREFIX/bin/postmaster"
# What to use to shut down the postmaster
PGCTL="$PREFIX/bin/pg_ctl"
set -e
# Only start if we can find the postmaster.
test -x $DAEMON ||
{
echo "$DAEMON not found"
if [ "$1" = "stop" ]
then exit 0
else exit 5
fi
}
# Parse command line parameters.
case $1 in
start)
echo -n "Starting PostgreSQL: "
test x"$OOM_ADJ" != x && echo "$OOM_ADJ" > /proc/self/oom_adj
su - $PGUSER -c "$DAEMON -D $PGDATA &" >>$PGLOG 2>&1
echo "ok"
;;
stop)
echo -n "Stopping PostgreSQL: "
su - $PGUSER -c "$PGCTL stop -D '$PGDATA' -s -m fast"
echo "ok"
;;
restart)
echo -n "Restarting PostgreSQL: "
su - $PGUSER -c "$PGCTL stop -D '$PGDATA' -s -m fast -w"
test x"$OOM_ADJ" != x && echo "$OOM_ADJ" > /proc/self/oom_adj
su - $PGUSER -c "$DAEMON -D '$PGDATA' &" >>$PGLOG 2>&1
echo "ok"
;;
reload)
echo -n "Reload PostgreSQL: "
su - $PGUSER -c "$PGCTL reload -D '$PGDATA' -s"
echo "ok"
;;
status)
su - $PGUSER -c "$PGCTL status -D '$PGDATA'"
;;
*)
# Print help
echo "Usage: $0 {start|stop|restart|reload|status}" 1>&2
exit 1
;;
esac
exit 0
5,注意上文提到的OOM_ADJ=-17 是为了逃避OOM自动封杀,OK!执行/etc/init.d/postgresql start stop restart 等等命令试试,大工告成!!
6,把安装目录中的conf配置文件复制到/etc/postgresql下面去,方便以后更改配置
mkdir /etc/postgresql
mv /usr/pgsql-9.1.3/date/*conf /etc/postgresql/
cd /usr/pgsql-9.1.3/date
su - psqlroot -c 'ln -s /etc/postgresql/pg_hba.conf pg_hba.conf'
su - psqlroot -c 'ln -s /etc/postgresql/pg_ident.conf pg_ident.conf'
su - psqlroot -c 'ln -s /etc/postgresql/postgresql.conf postgresql.conf'
第三阶段-优化
![]()

Hot AI Tools

Undresser.AI Undress
AI-powered app for creating realistic nude photos

AI Clothes Remover
Online AI tool for removing clothes from photos.

Undress AI Tool
Undress images for free

Clothoff.io
AI clothes remover

Video Face Swap
Swap faces in any video effortlessly with our completely free AI face swap tool!

Hot Article
Hot Tools

Notepad++7.3.1
Easy-to-use and free code editor

SublimeText3 Chinese version
Chinese version, very easy to use

Zend Studio 13.0.1
Powerful PHP integrated development environment

Dreamweaver CS6
Visual web development tools

SublimeText3 Mac version
God-level code editing software (SublimeText3)
Hot Topics
 1665
1665
 14
1424
52
1322
25
1269
29
1249
24
14
1424
52
1322
25
1269
29
1249
24

 How to install Snap on Debian 12
Mar 20, 2024 pm 08:51 PM
How to install Snap on Debian 12
Mar 20, 2024 pm 08:51 PM
Snap is an external package manager designed for Linux systems that provides you with a convenient way to install containerized applications. Snap allows you to easily download and install packages without worrying about installing additional dependencies. The manager automatically resolves the dependencies required by the package, ensuring that the package runs smoothly on your system. Snap complements the native apt package manager, giving you another option for installing and running applications on your system. In this guide, you will find a complete guide on how to install Snap on Debian12. Outline: How to install Snap on Debian12 How to find package availability on Snap How to find information about packages on Snap
 Debian installation of Wine and Debian installation of Wine tutorial
Feb 12, 2024 am 10:36 AM
Debian installation of Wine and Debian installation of Wine tutorial
Feb 12, 2024 am 10:36 AM
Wine is a compatibility layer that can run Windows applications on Linux systems. It allows users to seamlessly run Windows applications on Linux systems without the need for dual-system installation or virtual machine setup. This article will introduce how to run Windows applications on Debian systems. Install Wine and provide some related tutorials. Installing Wine Installing Wine on a Debian system is very simple, just use the apt command, open a terminal, and enter the following command: ```shellsudoapt-getupdatesudoapt-getinstallwine```This will update your package list and install Wine , after the installation is complete, you can
 A complete guide to installing Debian and deb files under Windows
Feb 14, 2024 pm 11:03 PM
A complete guide to installing Debian and deb files under Windows
Feb 14, 2024 pm 11:03 PM
Installing Debian in Windows systems and installing deb files directly in Windows are ways for many Linux enthusiasts to explore dual systems or try new software. This article will detail the steps and precautions for these two installation methods. Installing Debian under Windows To install Debian in a Windows system, you usually need to use virtual machine software, such as VirtualBox. The following are the specific steps: 1. Download and install VirtualBox, which is a free virtualization software that can run on the same computer. Multiple operating systems. 2. Download the Debian ISO image file. You can find the download link on the Debian official website. 3. in
 How to install Steam on Debian 12
Mar 21, 2024 pm 10:10 PM
How to install Steam on Debian 12
Mar 21, 2024 pm 10:10 PM
STEAM is a popular gaming platform developed by Valve Corporation that allows you to buy, download, install and play games. It provides features such as automatic updates, matchmaking, and a community forum to resolve software-related issues. In addition to this, you can also use Steam to interact with other players and developers as it has extensive community support. In this guide you will learn: How to install Steam on Debian12 How to run Steam on Debian12 How to remove Steam from Debian12 Conclusion How to install Steam on Debian12 You can install Steam on Debian12: Debian Official Repository deb packages
 How to log out or shut down the system in Debian 11
Dec 27, 2023 pm 02:22 PM
How to log out or shut down the system in Debian 11
Dec 27, 2023 pm 02:22 PM
How to shut down the system in Debian11? Let’s take a look at the specific operations with the editor. Method 1: Click [All Apps] - [Log Out]. In the pop-up interface, click [Shut Down]. Method 2: Execute the following command in the terminal: sudoshutdown-hnow
 Detailed guide to installing GCC and GCC10 on Debian
Feb 10, 2024 pm 03:57 PM
Detailed guide to installing GCC and GCC10 on Debian
Feb 10, 2024 pm 03:57 PM
Debian is a popular Linux distribution, widely used in servers and desktop systems. GCC (GNUCompilerCollection) is an open source compiler suite used to compile C, C++, Fortran and other programming languages. In the Debian system, Installing GCC and GCC10 is very simple. This article will provide you with a detailed installation guide. Install GCC1. Open Terminal and use the following command to update the package list: ```shellsudoaptupdate``` 2. Install GCC and its related tools: sudoaptinstallbuild-essential This command will install
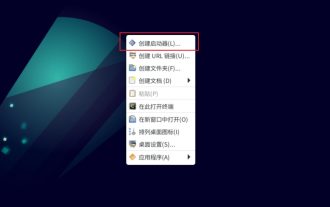 How to add desktop shortcut icon on Debian11
Jan 09, 2024 am 10:06 AM
How to add desktop shortcut icon on Debian11
Jan 09, 2024 am 10:06 AM
How to create application shortcuts on the desktop in Debian11? Windows system installation programs generally create application shortcuts on the desktop. How to create them in Debian11? Let’s take a look at the detailed tutorial below. Right-click on a blank space on the desktop and select [Create Launcher]. In the pop-up interface, set the program to create a shortcut in [Command]. The editor takes the terminal emulator as an example. The user can set the icon by himself. After the setting is completed, click [Create]. Then you can see the shortcut, as shown in the picture below. When the shortcut is no longer needed, right-click on the icon and select [Delete].
 Installing the GNOME desktop environment on Debian: step by step towards the gorgeous Linux world
Feb 10, 2024 am 10:15 AM
Installing the GNOME desktop environment on Debian: step by step towards the gorgeous Linux world
Feb 10, 2024 am 10:15 AM
Debian is a widely used Linux distribution known for its stability and reliability. The default Debian installation does not include a graphical user interface (GUI), which may make some novice users confused. This article will guide you in Install the GNOME desktop environment on Debian to add a bright color to your Linux experience. Before installing GNOME, please make sure that your Debian system has been updated to the latest version. The update can be completed through the following command: ```sqlsudoaptupdatesudoaptupgrade``` Next, we can start to install the GNOME desktop environment and install the core components of GNOME:`` `ard
