

[OpenCV]:Visual Studio 2012 搭建 OpenCV2.4.3

[OpenCV under Visual Studio 2012 Ultimate] [Tentative experimentation for x86] Thereare really sofew materials for installing the OpenCV(2.4.3) for Visual Studio 2012. Hence, I have read several blogs to do it, and fortunately Igot it. ---
[OpenCV under Visual Studio 2012 Ultimate]
[Tentative experimentation for x86]
There are really so few materials for installing the OpenCV(2.4.3) for Visual Studio 2012. Hence, I have read several blogs to do it, and fortunately I got it.
----------------------------------------------------------------------------------------------------------------------------
[Envrionment]:
[1] OpenCV 2.4.3
[2] Winodws Eight
[3] Visual Studio 2012 Ultimate
[Steps]:
[1]Based on that you have installed the visual studio 2012 under windows eight.
[2]Download the opencv2.4.3 fromhttp://opencv.org/, you may choose the windows vision.
And it will prompt the download page automatically.
[3]Double-Click the excutive file(.exe), which will help you unzip it, accurately not "installing".
And now, we assume the whole directory is -->H:\MySoftware\OpenCV\opencv\
[4]Thenceforth, you get a documentation folder named "opencv", which includes a lot of files
for current domainant platforms ie: Winodws, Mac, Linux/Unix, iOS, Android.
Make sure, you get the folder called "build", which is extreme significant for us.
[5]Add the items for your "Path" system variable. Carefully I push two directories into the "Path".
(1)H:\MySoftware\OpenCV\opencv\build\x86\vc10\bin\
(2)H:\MySoftware\OpenCV\opencv\build\x86\vc10\lib\
Maybe, the second one is meaningless.
Step by step, complish it.
[6]Restart the Visual Studio 2012, if you have runned it.
[7]Now, we may create a new VC++ project under VS2012.
I founded the Win32 Console Application and chose the "Empty Project".
[8]Look up at your VS2012 File Bar, and manipulate follow under sequence:
View -- Other Windows -- Property Manager, so you get the little "Propert Manager Window".
[9]Concentrate the "tree", you get the one like this:
yourSolutionName:
@Debug|Win32
#Microsoft.Cpp.Win32.user
#Application
#Unicode Support
#Core Windows.Libraries
@Release|Win32
#Microsoft.Cpp.Win32.user
..... .....
[10]Right-Click the orange one called "Microsoft.Cpp.Win32.user", and tap the "Properties" item.
[11]Thereby, a simple window show you where you will work.
[12]Press the "VC++ Directories" the resident on the left tree.
[13]Focus on the right part. And click the "Include Directories" and edit it by pressing the down-arrow.
Add the three items into it.
(1)H:\MySoftware\OpenCV\opencv\build\include\
(2)H:\MySoftware\OpenCV\opencv\build\include\opencv\
(3)H:\MySoftware\OpenCV\opencv\build\include\opencv2\
Save it after you have done.
[14]Further more, tap the item "Library Directories" and edit it too.
Push one directory into it :H:\MySoftware\OpenCV\opencv\build\x86\vc10\lib\
And save it.
[Additionally]Press the "Linker" one the left tree, and choose "Input". Concentrate the right part,
and edit the "Additional Dependencies" by adding three items:
(1)H:\MySoftware\OpenCV\opencv\build\x86\vc10\lib\opencv_core243d.lib
(2)H:\MySoftware\OpenCV\opencv\build\x86\vc10\lib\opencv_highgui243d.lib
(3)H:\MySoftware\OpenCV\opencv\build\x86\vc10\lib\opencv_imgproc243d.lib
And save it.
[15]Now, you can "cultivate" some opencv codes in your empty project.
[For example]:
#include "highgui.h";
int main(int argc , char** argv)
{
IplImage* img= cvLoadImage("./hello.jpg"); //Be sure you have a picture in the root dir
cvNamedWindow("Test One", CV_WINDOW_AUTOSIZE);
cvShowImage("Test One",img);
cvWaitKey(0);
cvReleaseImage(&img);
cvDestroyWindow("Test One");
return 0;
}
//Happily, you may find the visual studio 2012 can auto-complete the part of the function
//, which stands for the success of including the opencv header file.
//But if you attempt to run it, vs2012 will prompt error saying "Lacking MSVCP100D.dll".
//So Awful.
[16]So let's solve this problem and try to think about "WHY".
(Reason:)You may remember or not, we choose the folder which is named "vc10".
That stands for "Visual Studio 2010" not "2012", so maybe there is something
gone away from 2010 to 2012. To conquer it, we can find the nut called "MSVCP100D.dll"
, get it and put it into the right place.
[17]So "google" is a good buddy, get sufficient results of "MSVCP100D.dll" , and you can choose one
for downloading.
[18]Put this guy into the "Windows\System32\" folder, just it.
[19]Run your OpenCV Project again. What was worse, a "POP" again. This time it complain about
"NO MSVCR100D.dll". Look at it again: it is not "MSVCP100D.dll" but "MSVCR100D.dll".
[20]So, you may have got the method: google it --> download it -->put it into Windows\System32\.
[21]Now, come back to your cute Visual Studio 2012 andRUNyour OpenCV Project
(Whose codes you have done) again.
[22]HeHe, it works........................
[23]So, you get the OpenCV now, and it is the lastest one. Enjoy it.
----------------------------------------------------------------------------------------------------------------------------
[Notice]
The method above just show the [Debug Modle]. If you desire to get the [Release One], come back to the
[STEP NINE] and choose the GREEN ONE, and the setting for the "Linker" changing to :
(1)H:\MySoftware\OpenCV\opencv\build\x86\vc10\lib\opencv_core243.lib
(2)H:\MySoftware\OpenCV\opencv\build\x86\vc10\lib\opencv_highgui243.lib
(3)H:\MySoftware\OpenCV\opencv\build\x86\vc10\lib\opencv_imgproc243.lib
Remeber save it.
There is no "d", becuase the character "d" stands for "DEBUG" in this area.
----------------------------------------------------------------------------------------------------------------------------
[SO CUET THE OPENCV IS]

Hot AI Tools

Undresser.AI Undress
AI-powered app for creating realistic nude photos

AI Clothes Remover
Online AI tool for removing clothes from photos.

Undress AI Tool
Undress images for free

Clothoff.io
AI clothes remover

Video Face Swap
Swap faces in any video effortlessly with our completely free AI face swap tool!

Hot Article
Hot Tools

Notepad++7.3.1
Easy-to-use and free code editor

SublimeText3 Chinese version
Chinese version, very easy to use

Zend Studio 13.0.1
Powerful PHP integrated development environment

Dreamweaver CS6
Visual web development tools

SublimeText3 Mac version
God-level code editing software (SublimeText3)
Hot Topics
 1666
1666
 14
1425
52
1328
25
1273
29
1253
24
14
1425
52
1328
25
1273
29
1253
24

 Quickly install OpenCV study guide using pip package manager
Jan 18, 2024 am 09:55 AM
Quickly install OpenCV study guide using pip package manager
Jan 18, 2024 am 09:55 AM
Use the pip command to easily install OpenCV tutorial, which requires specific code examples. OpenCV (OpenSource Computer Vision Library) is an open source computer vision library. It contains a large number of computer vision algorithms and functions, which can help developers quickly build image and video processing related applications. Before using OpenCV, we need to install it first. Fortunately, Python provides a powerful tool pip to manage third-party libraries
 OpenCV installation tutorial: a must-read for PyCharm users
Feb 22, 2024 pm 09:21 PM
OpenCV installation tutorial: a must-read for PyCharm users
Feb 22, 2024 pm 09:21 PM
OpenCV is an open source library for computer vision and image processing, which is widely used in machine learning, image recognition, video processing and other fields. When developing using OpenCV, in order to better debug and run programs, many developers choose to use PyCharm, a powerful Python integrated development environment. This article will provide PyCharm users with an installation tutorial for OpenCV, with specific code examples. Step One: Install Python First, make sure you have Python installed
 Digital audio output interface on the motherboard-SPDIF OUT
Jan 14, 2024 pm 04:42 PM
Digital audio output interface on the motherboard-SPDIF OUT
Jan 14, 2024 pm 04:42 PM
SPDIFOUT connection line sequence on the motherboard. Recently, I encountered a problem regarding the wiring sequence of the wires. I checked online. Some information says that 1, 2, and 4 correspond to out, +5V, and ground; while other information says that 1, 2, and 4 correspond to out, ground, and +5V. The best way is to check your motherboard manual. If you can't find the manual, you can use a multimeter to measure it. Find the ground first, then you can determine the order of the rest of the wiring. How to connect motherboard VDG wiring When connecting the VDG wiring of the motherboard, you need to plug one end of the VGA cable into the VGA interface of the monitor and the other end into the VGA interface of the computer's graphics card. Please be careful not to plug it into the motherboard's VGA port. Once connected, you can
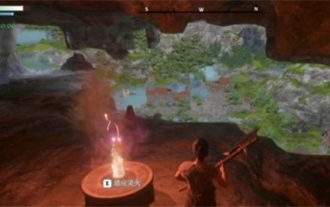 Can buildings be built in the wild in Mistlock Kingdom?
Mar 07, 2024 pm 08:28 PM
Can buildings be built in the wild in Mistlock Kingdom?
Mar 07, 2024 pm 08:28 PM
Players can collect different materials to build buildings when playing in the Mistlock Kingdom. Many players want to know whether to build buildings in the wild. Buildings cannot be built in the wild in the Mistlock Kingdom. They must be within the scope of the altar. . Can buildings be built in the wild in Mistlock Kingdom? Answer: No. 1. Buildings cannot be built in the wild areas of the Mist Lock Kingdom. 2. The building must be built within the scope of the altar. 3. Players can place the Spirit Fire Altar by themselves, but once they leave the range, they will not be able to construct buildings. 4. We can also directly dig a hole in the mountain as our home, so we don’t need to consume building materials. 5. There is a comfort mechanism in the buildings built by players themselves, that is to say, the better the interior, the higher the comfort. 6. High comfort will bring attribute bonuses to players, such as
 Newbies please read: Detailed tutorial on how to install OpenCV in PyCharm
Feb 26, 2024 pm 03:24 PM
Newbies please read: Detailed tutorial on how to install OpenCV in PyCharm
Feb 26, 2024 pm 03:24 PM
PyCharm is a powerful Python integrated development environment (IDE) developed by JetBrains. It provides a wealth of functions and tools to help Python developers write code, debug programs and manage projects. Using OpenCV, a powerful computer vision library, in PyCharm, you can easily perform image processing, video processing and other tasks. This article will detail the steps to install and configure OpenCV in PyCharm and provide specific code examples. 1.An
 Quickly install PyTorch in PyCharm: an easy guide
Feb 24, 2024 pm 09:54 PM
Quickly install PyTorch in PyCharm: an easy guide
Feb 24, 2024 pm 09:54 PM
PyTorch Installation Guide: Quickly set up a development environment in PyCharm PyTorch is one of the most popular frameworks in the current field of deep learning. It has the characteristics of ease of use and flexibility, and is favored by developers. This article will introduce how to quickly set up the PyTorch development environment in PyCharm, so that you can start the development of deep learning projects. Step 1: Install PyTorch First, we need to install PyTorch. The installation of PyTorch usually needs to take into account the system environment
 PyCharm Tutorial: How to Install OpenCV in PyCharm
Feb 23, 2024 am 10:39 AM
PyCharm Tutorial: How to Install OpenCV in PyCharm
Feb 23, 2024 am 10:39 AM
In today's world, computer vision technology is increasingly being used in various fields, such as face recognition, image processing, autonomous driving, etc. OpenCV (OpenSourceComputerVisionLibrary), as an open source computer vision library, provides developers with a wealth of functions and tools to help them achieve various vision tasks. When using OpenCV in a Python environment, you can use PyCharm, a powerful integrated development environment, to develop more efficiently.
 How to install OpenCV in Python using pip
Jan 18, 2024 am 08:57 AM
How to install OpenCV in Python using pip
Jan 18, 2024 am 08:57 AM
Using OpenCV in Python can help us perform work in image processing, computer vision, etc. Pip is a very important package management tool in Python, which allows us to easily install, upgrade or uninstall Python packages. In this article, I will introduce how to install OpenCV using pip, with specific code examples. Step 1: Install pip If you don't have pip installed yet, you need to install it first. Under Linux and macOS systems, you can use
