
 Web Front-end
JS Tutorial
Detailed explanation of using timers to execute functions regularly in Node.js_node.js
Web Front-end
JS Tutorial
Detailed explanation of using timers to execute functions regularly in Node.js_node.js
Detailed explanation of using timers to execute functions regularly in Node.js_node.js

If you are familiar with client-side JavaScript programming, you may have used the setTimeout and setInterval functions, which allow a delay in running a function for a period of time. For example, the following code, once loaded into the web page, will append "Hello there" to the page document after 1 second:
var oneSecond = 1000 * 1; // one second = 1000 x 1 ms
setTimeout(function() {
document.write('
Hello there.
');}, oneSecond);
And setInterval allows the function to be executed repeatedly at specified intervals. If the following code is injected into a Web page, it will cause "Hello there" to be appended to the page document every second:
var oneSecond = 1000 * 1; // one second = 1000 x 1 ms
setInterval(function() {
document.write('
Hello there.
'); }, oneSecond);
Because the Web has long become a platform for building applications, rather than simple static pages, this kind of similar demand is increasingly emerging. These task scheduling functions help developers implement periodic form validation, delayed remote data synchronization, or UI interactions that require delayed responses. Node also fully implements these methods. On the server side, you can use them to repeat or delay many tasks, such as cache expiration, connection pool cleanup, session expiration, polling, etc.
Use setTimeout delay function to execute
setTimeout can formulate an execution plan to run the specified function once in the future, such as:
var timeout_ms = 2000; // 2 seconds
var timeout = setTimeout(function() {
console.log("timed out!");
}, timeout_ms);
Exactly the same as client-side JavaScript, setTimeout accepts two parameters. The first parameter is the function that needs to be delayed, and the second parameter is the delay time (in milliseconds).
setTimeout returns a timeout handle, which is an internal object. You can use it as a parameter to call clearTimeout to cancel the timer. Otherwise, this handle has no effect.
Use clearTimeout to cancel the execution plan
Once you obtain the timeout handle, you can use clearTimeout to cancel the function execution plan, like this:
var timeoutTime = 1000; // one second
var timeout = setTimeout(function() {
console.log("timed out!");
}, timeoutTime);
clearTimeout(timeout);
In this example, the timer will never be triggered, nor will the words "time out!" be output. You can also cancel the execution plan at any time in the future, as in the following example:
var timeout = setTimeout(function A() {
console.log("timed out!");
}, 2000);
setTimeout(function B() {
}, 1000);
Make and cancel repeated execution plans for functions
setInterval is similar to setTimeout, but it will execute a function repeatedly at specified intervals. You can use it to periodically trigger a program to complete tasks such as cleaning, collection, logging, data acquisition, polling, etc. that need to be performed repeatedly.The following code will output a "tick" to the console every second:
setInterval(function() {
console.log("tick");
}, period);
setInterval returns an execution plan handle, which can be used as a parameter of clearInterval to cancel the execution plan:
console.log("tick");
}, 1000);
// …
clearInterval(interval);
Use process.nextTick to delay function execution until the next round of the event loop
Sometimes client-side JavaScript programmers use setTimeout(callback,0) to delay the task for a short period of time. The second parameter is 0 milliseconds, which tells the JavaScript runtime to wait immediately after all pending events have been processed. Execute this callback function. Sometimes this technique is used to delay the execution of operations that do not need to be performed immediately. For example, sometimes you need to start playing animation or do some other calculations after the user event is processed.
In Node, just like the literal meaning of "event loop", the event loop runs in a loop that processes the event queue. Each round of the event loop's work process is called a tick.
You can call the callback function once every time the event loop starts the next round (next tick) of execution. This is exactly the principle of process.nextTick, and setTimeout and setTimeout use the execution queue inside the JavaScript runtime, and Not using event loop.
By using process.nextTick(callback) instead of setTimeout(callback, 0), your callback function will be executed immediately after the event in the queue is processed, which is much faster than JavaScript's timeout queue (in CPU time to measure).
You can delay the function until the next round of the event loop as follows:
process.nextTick(function() {
my_expensive_computation_function();
});
Note: The process object is one of the few global objects in Node.
Blocking the event loop
The runtime of Node and JavaScript uses a single-threaded event loop. Each time it loops, the runtime processes the next event in the queue by calling the relevant callback function. When the event is executed, the event loop obtains the execution result and processes the next event, and so on until the event queue is empty. If one of the callback functions takes a long time to run, the event loop will not be able to handle other pending events during that time, which can make the application or service very slow.
When processing events, if memory-sensitive or processor-sensitive functions are used, the event loop will become slow, and a large number of events will accumulate, which cannot be processed in time, or even block the queue.
Look at the following example of blocking the event loop:
process.nextTick(function nextTick1() {
var a = 0;
while(true) {
a ;
}
});process.nextTick(function nextTick2() {
console.log("next tick");
});
setTimeout(function timeout() {
console.log("timeout");
}, 1000);
When using setTimeout, the callback functions will be added to the execution plan queue, and in this example they will not even be added to the queue. This is an extreme example, but you can see that running a processor-intensive task can block or slow down the event loop.
Exit the event loop
Using process.nextTick, you can postpone a non-critical task to the next round (tick) of the event loop, which releases the event loop so that it can continue to execute other pending events.Look at the example below. If you plan to delete a temporary file, but don’t want the callback function of the data event to wait for this IO operation, you can delay it like this:
stream.end("my response");
process.nextTick(function() {
fs.unlink("/path/to/file");
});
Suppose you plan to design a function called my_async_function, which can perform certain I/O operations (such as parsing log files), and intend to let it execute periodically. You can use setInterval to implement it like this:
var interval = 1000;
setInterval(function() {
my_async_function(function() {
console.log('my_async_function finished!');
},interval);//Translator’s Note: The previous “,interval” was added by me, the author may have omitted it due to a typographical error
Translator’s Note: (The bolded parts below are added by the translator and are not the content of the original book)
In order to facilitate the understanding of this part of the content, you can modify the author's code so that it can actually run:
setInterval(function(){
(function my_async_function(){
setTimeout(function(){
console.log("1");
},5000);
},interval);
Run this code and take a look. You will find that after waiting for 5 seconds, "hello" is output every 1 second. Our expectation is that after the current my_async_function is executed (it takes 5 seconds), wait for 1 second before executing the next my_async_function. There should be an interval of 6 seconds between each output. This result is caused by the fact that my_async_function is not executed serially, but multiple ones are running at the same time.

Hot AI Tools

Undresser.AI Undress
AI-powered app for creating realistic nude photos

AI Clothes Remover
Online AI tool for removing clothes from photos.

Undress AI Tool
Undress images for free

Clothoff.io
AI clothes remover

Video Face Swap
Swap faces in any video effortlessly with our completely free AI face swap tool!

Hot Article
Hot Tools

Notepad++7.3.1
Easy-to-use and free code editor

SublimeText3 Chinese version
Chinese version, very easy to use

Zend Studio 13.0.1
Powerful PHP integrated development environment

Dreamweaver CS6
Visual web development tools

SublimeText3 Mac version
God-level code editing software (SublimeText3)
Hot Topics


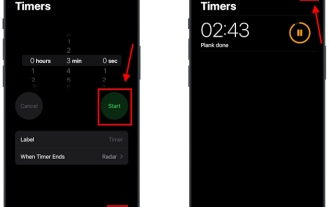 How to set multiple timers on iPhone iOS 17
Sep 18, 2023 am 09:01 AM
How to set multiple timers on iPhone iOS 17
Sep 18, 2023 am 09:01 AM
In iOS 17, you can set multiple timers on your iPhone using the Clock app, or use Siri to set it hands-free. We discuss both in this article. Let's take a look at them. Set Multiple Timers on iPhone Using the Clock App Open the Clock app on your iPhone and tap the Timers tab in the lower right corner. Now, set the hours, minutes, and seconds. You can use the "Label" and "When does the timer end" options to set a name for the timer and a preferred tone when the timer completes. This will help you differentiate between timers. Once done, click the "Start" button. Then, click the "+" icon in the upper right corner. Now, repeat the above steps to set multiple timers on iPhone. You can also browse
 Detailed graphic explanation of the memory and GC of the Node V8 engine
Mar 29, 2023 pm 06:02 PM
Detailed graphic explanation of the memory and GC of the Node V8 engine
Mar 29, 2023 pm 06:02 PM
This article will give you an in-depth understanding of the memory and garbage collector (GC) of the NodeJS V8 engine. I hope it will be helpful to you!
 How to use multiple timers on iPhone with iOS 17
Jun 21, 2023 am 08:18 AM
How to use multiple timers on iPhone with iOS 17
Jun 21, 2023 am 08:18 AM
What are multi-timers on iOS17? In iOS17, Apple now offers users the ability to set multiple timers at once on their iPhone. This is a welcome change, one that many have been waiting for for years. The Clock app, which before iOS 16 only allowed users to set one timer at a time, can now be used to activate any number of timers, making it ideal for completing multiple tasks at once. You can set any number of timers in the timer screen. Once the timer is started, all active timers will appear as "Live Activity" notifications on the lock screen and Notification Center. From here, you can view the remaining time until the timer is off, pause, or stop the timer without opening the Clock app. when you are on the clock
 An article about memory control in Node
Apr 26, 2023 pm 05:37 PM
An article about memory control in Node
Apr 26, 2023 pm 05:37 PM
The Node service built based on non-blocking and event-driven has the advantage of low memory consumption and is very suitable for handling massive network requests. Under the premise of massive requests, issues related to "memory control" need to be considered. 1. V8’s garbage collection mechanism and memory limitations Js is controlled by the garbage collection machine
 Let's talk about how to choose the best Node.js Docker image?
Dec 13, 2022 pm 08:00 PM
Let's talk about how to choose the best Node.js Docker image?
Dec 13, 2022 pm 08:00 PM
Choosing a Docker image for Node may seem like a trivial matter, but the size and potential vulnerabilities of the image can have a significant impact on your CI/CD process and security. So how do we choose the best Node.js Docker image?
 Windows 7 timer location introduction
Jul 08, 2023 pm 11:53 PM
Windows 7 timer location introduction
Jul 08, 2023 pm 11:53 PM
Where is the timer in windows 7? Some customers want to know where the countdown is in win7 when using win7. In fact, win7 does not have its own timer, but there is a clock that can keep time. So the following is an introduction to the location of the timer in windows 7. First, according to personality Open it, then find the options of the taskbar and menu bar, then customize with Acura, find the clock, and select Open, so that you can proceed to the technology through the clock. Very simple and fast. Where is the timer in Windows 7? When the computer screen is blank, right-click and select "Personalize". Select the "Taskbar and Menu Bar" option. After opening it, in the taskbar tab, there is a status bar area below. Click the custom button and click "Open" below.
 Let's talk in depth about the File module in Node
Apr 24, 2023 pm 05:49 PM
Let's talk in depth about the File module in Node
Apr 24, 2023 pm 05:49 PM
The file module is an encapsulation of underlying file operations, such as file reading/writing/opening/closing/delete adding, etc. The biggest feature of the file module is that all methods provide two versions of **synchronous** and **asynchronous**, with Methods with the sync suffix are all synchronization methods, and those without are all heterogeneous methods.
 Let's talk about the event loop in Node
Apr 11, 2023 pm 07:08 PM
Let's talk about the event loop in Node
Apr 11, 2023 pm 07:08 PM
The event loop is a fundamental part of Node.js and enables asynchronous programming by ensuring that the main thread is not blocked. Understanding the event loop is crucial to building efficient applications. The following article will give you an in-depth understanding of the event loop in Node. I hope it will be helpful to you!
