
 Backend Development
C#.Net Tutorial
Detailed example of uploading files in .net core version/batch uploading drag and preview function (bootstrap fileinput uploading files)
Backend Development
C#.Net Tutorial
Detailed example of uploading files in .net core version/batch uploading drag and preview function (bootstrap fileinput uploading files)
Detailed example of uploading files in .net core version/batch uploading drag and preview function (bootstrap fileinput uploading files)

The content of this article mainly solves the problem of file upload in .net core. Development environment: ubuntu+vscode. This article introduces you to it in great detail. Friends who are interested should take a look.
The previous article is for everyone. Introduced the MVC file upload support batch upload drag and preview file content verification function
This article mainly solves the problem of file upload in .net core Development environment: ubuntu+vscode
1. Import the required packages: nuget install bootstrap-fileinput
Note: The guide package here needs to be imported in the terminal [you need to execute the nuget command in the wwwroot folder] as shown below
If you find that there is no nuget command, you need to install the nuge package management tool for the system through apt-get or yum. This nuget and the plug-in in vscode are not the same thing
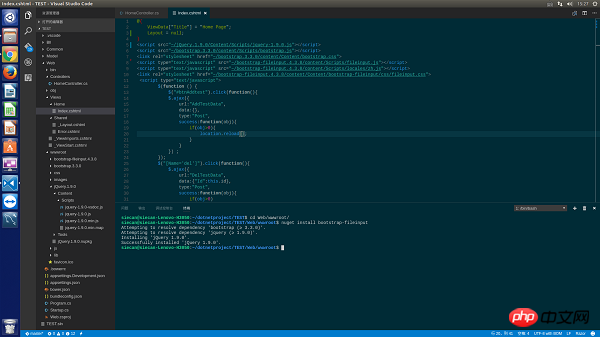
2 Front page writing:
index.cshtml:
@{
ViewData["Title"] = "Home Page";
Layout = null;
}
<script src="~/jQuery.1.9.0/Content/scripts/jquery-1.9.0.js"></script>
<script src="~/bootstrap.3.3.0/content/scripts/bootstrap.js"></script>
<link rel="stylesheet" href="~/bootstrap.3.3.0/content/Content/bootstrap.css" rel="external nofollow" >
<script type="text/javascript" src="~/bootstrap-fileinput.4.3.8/content/scripts/fileinput.js"></script>
<script type="text/javascript" src="~/bootstrap-fileinput.4.3.8/content/scripts/locales/zh.js"></script>
<link rel="stylesheet" href="~/bootstrap-fileinput.4.3.8/content/Content/bootstrap-fileinput/css/fileinput.css" rel="external nofollow" >
<script type="text/javascript">
$(function () {
var control = $("#txt_file");
var uploadrul = "/Home/UploadFile";
control.fileinput({
language: 'zh', //设置语言
uploadUrl: uploadrul, //上传的地址
allowedFileExtensions: ['png'],//接收的文件后缀
showUpload: true, //显示批量上传按钮
showCaption: false,//是否显示标题
browseClass: "btn btn-primary", //按钮样式
dropZoneEnabled: true,//是否显示拖拽区域
//minImageWidth: 50, //图片的最小宽度
//minImageHeight: 50,//图片的最小高度
//maxImageWidth: 1000,//图片的最大宽度
//maxImageHeight: 1000,//图片的最大高度
//maxFileSize: 0,//单位为kb,如果为0表示不限制文件大小
//minFileCount: 0,
maxFileCount: 100,
enctype: 'multipart/form-data',
validateInitialCount: true,
previewFileIcon: "<i class='glyphicon glyphicon-king'></i>",
msgFilesTooMany: "选择上传的文件数量({n}) 超过允许的最大数值{m}!",
});
//导入文件上传完成之后的事件
$("#txt_file").on("fileuploaded", function (event, data, previewId, index) {
});
});
</script>
</table>
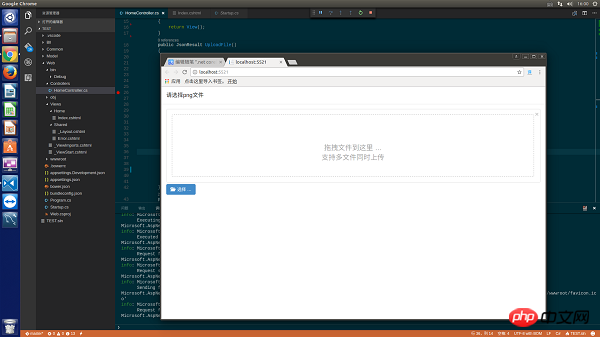
<p>
<form>
<p>
<p class="modal-header">
<h4 class="modal-title" id="myModalLabel">请选择xml文件</h4>
</p>
<p class="modal-body">
<input type="file" name="txt_file" id="txt_file" multiple class="file-loading" />
</p>
</p>
</form>
</p>Basically there is no difference from asp.net mvc. There is only one place that needs special attention, the external script Reference files to css files need to be placed in the wwwroot file, not in the root directory of the project.
Preview:
3. The main difference, the background code
is as follows:
public JsonResult UploadFile()
  {
   uploadResult result = new uploadResult();
   try
   {
    var oFile = Request.Form.Files["txt_file"];
    Stream sm=oFile.OpenReadStream();
    result.fileName = oFile.FileName;
    if(!Directory.Exists(AppContext.BaseDirectory+"/Image/"))
    {
     Directory.CreateDirectory(AppContext.BaseDirectory+"/Image/");
    }
    string filename=AppContext.BaseDirectory+"/Image/" + DateTime.Now.ToString("yyyymmddhhMMssss")+Guid.NewGuid().ToString() + ".png";
    FileStream fs=new FileStream(filename,FileMode.Create);
    byte[] buffer =new byte[sm.Length];
    sm.Read(buffer,0,buffer.Length);
    fs.Write(buffer,0,buffer.Length);
    fs.Dispose();
   }
   catch(Exception ex)
   {
    result.error = ex.Message;
   }
   return Json(result);
  }
  public class uploadResult
  {
   public string fileName { get; set; }
   public string error { get; set; }
}In netcore, the files passed from the front desk can no longer be obtained through the Request.Files object. Here, Request.Form.Files needs to be used to obtain the files submitted from the client. Next, an uploadResult structure is needed to return json to the front desk. Object This structure must contain an error field, which is used to return error data to the front desk. For details, check the official documentation - official website address
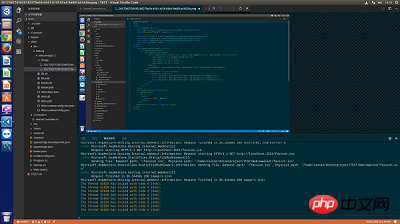
Attached is a picture of the final upload successfully saved to the local:
The above is the detailed content of Detailed example of uploading files in .net core version/batch uploading drag and preview function (bootstrap fileinput uploading files). For more information, please follow other related articles on the PHP Chinese website!

Hot AI Tools

Undresser.AI Undress
AI-powered app for creating realistic nude photos

AI Clothes Remover
Online AI tool for removing clothes from photos.

Undress AI Tool
Undress images for free

Clothoff.io
AI clothes remover

Video Face Swap
Swap faces in any video effortlessly with our completely free AI face swap tool!

Hot Article
Hot Tools

Notepad++7.3.1
Easy-to-use and free code editor

SublimeText3 Chinese version
Chinese version, very easy to use

Zend Studio 13.0.1
Powerful PHP integrated development environment

Dreamweaver CS6
Visual web development tools

SublimeText3 Mac version
God-level code editing software (SublimeText3)
Hot Topics


 How to use bootstrap in vue
Apr 07, 2025 pm 11:33 PM
How to use bootstrap in vue
Apr 07, 2025 pm 11:33 PM
Using Bootstrap in Vue.js is divided into five steps: Install Bootstrap. Import Bootstrap in main.js. Use the Bootstrap component directly in the template. Optional: Custom style. Optional: Use plug-ins.
 How to get the bootstrap search bar
Apr 07, 2025 pm 03:33 PM
How to get the bootstrap search bar
Apr 07, 2025 pm 03:33 PM
How to use Bootstrap to get the value of the search bar: Determines the ID or name of the search bar. Use JavaScript to get DOM elements. Gets the value of the element. Perform the required actions.
 How to do vertical centering of bootstrap
Apr 07, 2025 pm 03:21 PM
How to do vertical centering of bootstrap
Apr 07, 2025 pm 03:21 PM
Use Bootstrap to implement vertical centering: flexbox method: Use the d-flex, justify-content-center, and align-items-center classes to place elements in the flexbox container. align-items-center class method: For browsers that do not support flexbox, use the align-items-center class, provided that the parent element has a defined height.
 How to set up the framework for bootstrap
Apr 07, 2025 pm 03:27 PM
How to set up the framework for bootstrap
Apr 07, 2025 pm 03:27 PM
To set up the Bootstrap framework, you need to follow these steps: 1. Reference the Bootstrap file via CDN; 2. Download and host the file on your own server; 3. Include the Bootstrap file in HTML; 4. Compile Sass/Less as needed; 5. Import a custom file (optional). Once setup is complete, you can use Bootstrap's grid systems, components, and styles to create responsive websites and applications.
 How to write split lines on bootstrap
Apr 07, 2025 pm 03:12 PM
How to write split lines on bootstrap
Apr 07, 2025 pm 03:12 PM
There are two ways to create a Bootstrap split line: using the tag, which creates a horizontal split line. Use the CSS border property to create custom style split lines.
 How to insert pictures on bootstrap
Apr 07, 2025 pm 03:30 PM
How to insert pictures on bootstrap
Apr 07, 2025 pm 03:30 PM
There are several ways to insert images in Bootstrap: insert images directly, using the HTML img tag. With the Bootstrap image component, you can provide responsive images and more styles. Set the image size, use the img-fluid class to make the image adaptable. Set the border, using the img-bordered class. Set the rounded corners and use the img-rounded class. Set the shadow, use the shadow class. Resize and position the image, using CSS style. Using the background image, use the background-image CSS property.
 How to use bootstrap button
Apr 07, 2025 pm 03:09 PM
How to use bootstrap button
Apr 07, 2025 pm 03:09 PM
How to use the Bootstrap button? Introduce Bootstrap CSS to create button elements and add Bootstrap button class to add button text
 How to resize bootstrap
Apr 07, 2025 pm 03:18 PM
How to resize bootstrap
Apr 07, 2025 pm 03:18 PM
To adjust the size of elements in Bootstrap, you can use the dimension class, which includes: adjusting width: .col-, .w-, .mw-adjust height: .h-, .min-h-, .max-h-
