

Summary of usage of GridView in Yii2

This article mainly introduces a summary of the usage of GridView in Yii2. It has a certain reference value. Now I share it with you. Friends in need can refer to it.
We use the yii2.0.14 version , for the convenience of learning, it is written in question and answer format.
Start GridView
GridView is mainly to achieve table reuse. Especially when we are working in the background, you will find that forms and tables occupy most of the page, and the styles of the tables are highly unified. , then it would be great if there was such a widget that could automatically render tables when incoming data sets.
So GridView appeared, a detailed and stable table rendering widget.
Usually GridView is used in conjunction with various dataProviders. I have written an article before about the dataProvider in the yii2 framework. You can read it. This will help you learn GridView. A small talk about the three data providers in yii2 and their use with GridView
Before learning the GridView widget, we need to understand the structure of GridView first, see the figure below.

Simply put, a GridView consists of N columns, and each column has its own header, content and footer operations. This is in the GridView code. It is reflected in
try {
    echo GridView::widget([
        'dataProvider' => $dataProvider,

        'columns'=>[
            'id',
            'created_at:datetime:生成时间',
            [
                'label'=>'会员名',
                'attribute'=>'username',
                'format'=>'text'
            ],
        ]
    ]);
}catch(\Exception $e){
    // todo
}Of course yii2 has done quite a bit of detail. You don’t need to write columns. GridView will automatically render each column according to the dataProvider. Next, we will start the question and answer area and gain a deeper understanding through question and answer. GridView.
Preparation phase
In order for the Q&A to proceed smoothly, we simulated a data table as the source of the result set.
| username | province | city | created_at | updated_at | Sex | |
|---|---|---|---|---|---|---|
| abei | 黑龙江 | 黑河 | 1514201852 | 1528707743 | 1 | ##2 |
| Jilin | Changchun | 1528115243 | 1528115243 | 1 | ##3 | |
| 吉林 | 松元 | 1528180018 | 1528255890 | 1 | 4 | |
| Liaoning | Shenyang | 1528265883 | 1528265883 | 0 | ||
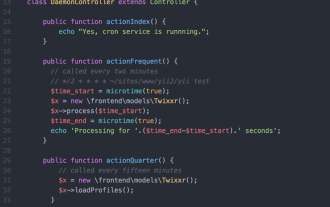
#Column在A系列中我们先说说GridView中column的使用方法。 A1. 请渲染出id、username、province、city和sex。当我们只需要$dataProvider每个对象的某些属性的时,则必须要指定columns属性,代码如下 try {
echo GridView::widget([
'dataProvider' => $dataProvider,
'columns'=>[
'id',
'username',
'province',
'city',
'created_at'
]
]);
}catch(\Exception $e){
// todo
}Copy after login 结果如下
A2.我想更改列的头部内容在A1中我们发现每一列的头部是英文,现在想改成中文,有三个方法 方法1 更改对应模型中的attributeLabels方法 // app\models\User
class User extends \yii\db\ActiveRecord {
public function attributeLabels(){
return [
'id' => 'ID',
'username' => '用户名',
'province' => '省',
'city' => '城市',
'created_at' => '新建时间',
'updated_at' => '最近更新',
'sex' => '性别',
];
}
}Copy after login 当我们重新设置了attributeLabels方法后,对应的GridView会自动去拿取。 方法2 设置一个column的label属性,如下代码 try {
echo GridView::widget([
'dataProvider' => $dataProvider,
'columns'=>[
'username:text:用户名'
]
]);
}catch(\Exception $e){
// todo
}Copy after login 可以通过设置列的label属性实现,就像 username:text:用户名,用英文冒号:分隔,分别是属性名、格式以及label。 方法3 使用GridView的自定义属性,如下代码 try {
echo GridView::widget([
'dataProvider' => $dataProvider,
'columns'=>[
[
'label'=>'用户名',
'attribute'=>'username'
]
]
]);
}catch(\Exception $e){
// todo
}Copy after login 上面3种方法都可以,从1-3越来越灵活,当然代码量也越来越大,第1种最简单,第3种最灵活。
A3.我不要时间戳在A2中,我们看到新建时间这一列的内容竟然直接出现了时间戳,怎么变成对应的时间那?关于这个问题其实也有两种方法。 方法1 设置column的format属性 try {
echo GridView::widget([
'dataProvider' => $dataProvider,
'columns'=>[
'created_at:datetime'
]
]);
}catch(\Exception $e){
// todo
}Copy after login 方法2 通过传递一个数组类型的column并设置其value来实现,如下代码 try {
echo GridView::widget([
'dataProvider' => $dataProvider,
'columns'=>[
[
'attribute'=>'created_at',
'value'=>function($model){// 形参为此行记录对象
return date("Y-m-d H:i:s",$model->created_at);
}
]
]
]);
}catch(\Exception $e){
// todo
}Copy after login
从A3的方法1和方法2来看,其实方法1更多是方法2的快捷方式,因此我们通过设置数组类型column的format属性等于datetime也能实现此题的需求。 A4.我想定义一个属性叫省市,将省和市字段内容合并通过对A2和A3的学习,我想你已经知道可以通过数组类型的column来解决这个,没错,如下代码 try {
echo GridView::widget([
'dataProvider' => $dataProvider,
'columns'=>[
[
'label'=>'省市',
'value'=>function($model){
return "{$model->province}-{$model->city}";
}
]
]
]);
}catch(\Exception $e){
// todo
}Copy after login value 属性代表此单元格的数据内容,将结果返回即可,就像结果图一样。
但是问题出现了,我希望省市一列按照省属性来排序,怎么办?只需要指定attribute即可,这也是我们控制列排序的一种方法。 try {
echo GridView::widget([
'dataProvider' => $dataProvider,
'columns'=>[
[
'label'=>'省市',
'attribute'=>'province',
'value'=>function($model){
return "{$model->province}-{$model->city}";
}
]
]
]);
}catch(\Exception $e){
// todo
}Copy after login A5.如何控制列排序?从A4我们知道通过设置column的attribute属性控制是否排序,但是attribute的本意并不在此,因此我们标准的去掉排序或设置排序的方法是通过其enableSorting属性实现的。 try {
echo GridView::widget([
'dataProvider' => $dataProvider,
'columns'=>[
[
'label'=>'省市',
'attribute'=>'province',
'enableSorting'=>false,
'value'=>function($model){
return "{$model->province}-{$model->city}";
}
]
]
]);
}catch(\Exception $e){
// todo
}Copy after login 默认enableSorting为true,可以通过设置为false来取消此列排序功能,如下图。
A6.列的样式如何控制?到现在你已经知道了5个使用GridView的技巧,我们继续,在A6中我们尝试改变表格某一列的样式。针对于列样式,GridView提供了3个属性,分别为headerOptions、contentOptions和footerOptions。 现在我们来做一个需求,将省市这一列个性化,列的头部编程红色,列的内容编程蓝色,如下 try {
echo GridView::widget([
'dataProvider' => $dataProvider,
'columns'=>[
[
'label'=>'省市',
'attribute'=>'province',
'enableSorting' => false,
'value'=>function($model){
return "{$model->province}-{$model->city}";
},
'headerOptions' => ['style'=>'color:red'],
'contentOptions' => ['style'=>'color:blue'],
]
]
]);
}catch(\Exception $e){
// todo
}Copy after login 是的,使用这一列的headerOptions和contentOptions即可
有个要注意的地方,我们使用浏览器的f12看看标注颜色的列。
你看到了,headerOptions和contentOptions直接作用到了th和td标签,为其增加类似于style等属性,因此如果你的th或td标签中还有其他的html标签,直接定义style就无法生效了,此时可以通过css类解决这个问题。 A7.关于GridView中footerOptions的使用。在A6中我们说GridView的列有一个footerOptions属性,那么这个属性是干嘛用的那?从单词上分析是控制列footer的属性(比如样式等等),但是footer在哪里???在哪里在哪里? 需要先设置GridView的showFooter等于true才可以。才可以才可以。 try {
echo GridView::widget([
'dataProvider' => $dataProvider,
'columns'=>[
[
'label'=>'省市',
'attribute'=>'province',
'enableSorting' => false,
'value'=>function($model){
return "{$model->province}-{$model->city}";
},
'headerOptions' => ['style'=>'color:red'],
'contentOptions' => ['style'=>'color:blue'],
'footerOptions'=>['style'=>'color:yellow']
]
],
'showFooter'=>true
]);
}catch(\Exception $e){
// todo
}Copy after login 在showFooter=true的天空下,列的footerOptions才能自由飞翔。
从原理上说,'showFooter'=>true的结果是让table出现了下面代码 <tfoot> <tr> <td></td> <td></td> <td></td> </tr> <tr> </tr> </tfoot> Copy after login 因此每列的footerOptions就控制着在tfoot中这一列对应的td。 A8.footerRowOptions你是干毛用的?在我们大摇大摆的用着A8中的showFooter的时候,突然PhpStorm自动关联出一个footerRowOptions,这是个什么东西那? footerRowOptions是GridView的属性,它控制着tfoot的tr标签属性,简单点说,你最后在tfoot上每个单元格看到的效果是footerRowOptions + footerOptions 的结合体(就style而言)。 比如针对上面的例子我们在配置下footerRowOptions 'footerRowOptions'=>['style'=>'font-size:20px;'] Copy after login 则你会发现黄色字体变成了20px。 要注意:A6、A7和A8中的这些xxxOptions所能控制的是标签的属性,不单单是style。 A9.showFooter的大家族从A7中我们知道了GridView的showFooter,它决定这table是否显示tfoot信息,除此之外show家族还有一些其他成员。
A10.魔术师visible的戏法这个片段我们说下GridView列的visible属性,此属性默认为true代表此列显示,通过设置visible属性可以隐藏一列,这种隐藏非css的display:none,而是在渲染表格的时候就去掉了此列。 你可能会问,如果我要使用visible来隐藏一列,我不写这一列不就好了么? 是的,你的思路没错,但是visible是可以传递一个表达式,实现逻辑判断,比如下面的需求当1号管理员登录的时候可以看到省市一列。 try {
echo GridView::widget([
'dataProvider' => $dataProvider,
'columns'=>[
[
'label'=>'省市',
'attribute'=>'province',
'enableSorting' => false,
'value'=>function($model){
return "{$model->province}-{$model->city}";
},
'visible'=>(Yii::$app->admin->id === 1)
]
],
'showFooter'=>true
]);
}catch(\Exception $e){
// todo
}Copy after login A1-A10 我们重点说的是GridView每列的公共属性,这并不是全部,针对于不同类型的列还有会其他的属性,比如DataColumn、ActionColumn、CheckboxColumn等等,针对于不同类型列的讲解,要后续放出。 GridView接下来我们进入B系列,B系列的重点在讲解GridView。 B1 关于布局layout默认情况下GridView的布局如下图
这个布局来自于GridView的layout属性,我们可以改变这个模板,比如要去掉summary。 try {
echo GridView::widget([
'dataProvider' => $dataProvider,
'columns'=>[
],
'layout'=>"{items}\n{pager}"
]);
}catch(\Exception $e){
// todo
}Copy after login layout内有5个可以使用的值,分别为{summary}、{errors}、{items}、{sorter}和{pager}。 B2.指定列默认的类型 dataColumnClass在一个表格中每列都有不同的作用,有的是数据类型的、有的是复选框类型,具体有5种
通过GridView可以设置一列的默认类型,当然你可以针对特殊的类单独指定其class。 try {
echo GridView::widget([
'dataProvider' => $dataProvider,
'columns'=>[
],
'dataColumnClass'=>"yii\grid\DataColumn"
]);
}catch(\Exception $e){
// todo
}Copy after login B3.caption属性我们可以通过设置GridView的caption属性来实现table的caption功能,作为table用途非常有用。 try {
echo GridView::widget([
'dataProvider' => $dataProvider,
'columns'=>[
],
'caption'=>"会员列表"
]);
}catch(\Exception $e){
// todo
}Copy after login 效果图如下
当然不用多说,GridView也提供了captionOptions属性来让你控制caption的属性。 B4.tableOptions和options属性这两个属性有的开发者可能会混淆,接下来我用一张图让你瞬间明白。
就是说GridView渲染的时候首先弄出来一个p容器,这是这个GridView的代表,接下来在此容器内放各种元素,比如{summary}、{items}等等。
现在你会改table的样式类了么? B5.一堆好基友 headerRowOptions 和 footerRowOptions我们在A8中讲了footerRowOptions的用法,headerRowOptions的用法和它一样,只不过它管理的是thead下tr的属性。 B6.rowOptions学会了B5,你可能看着rowOptions一眼识破,没错它的目的就是管理tbody下的每个tr,但是它更强大,除了直接接收一个数组外还能传入匿名函数。 你可以融入你的逻辑,比如现在我们要用rowOptions实现隔行换色的功能,来吧。 try {
echo GridView::widget([
'dataProvider' => $dataProvider,
'columns'=>[
],
'rowOptions'=>function($model,$key, $index){
if($index%2 === 0){
return ['style'=>'background:red'];
}
}
]);
}catch(\Exception $e){
// todo
}Copy after login 目的达到,看效果
对于rowOptions接收的匿名行数的4个形参,这里说明一下
B7. beforeRow和afterRow这是一对非常灵活的属性,它们接收一个匿名函数。分别表示在渲染了一行之前和之后发生点什么?当然具体发生什么由你来决定。 要记住的是,匿名函数返回的结果也会作为一行纳入到渲染过程,比如当我们遇到奇数的时候就在此行下面添加一行,可以如下代码 try {
echo GridView::widget([
'dataProvider' => $dataProvider,
'tableOptions' => ['class'=>'table table-bordered'],
'columns'=>[
'id',
'username:text:用户名',
.....
],
'afterRow'=>function($model,$key, $index,$grid){
if(($index+1)%2 != 0){
return "<tr><td>我是基数</td></tr>";
}
}
]);
}catch(\Exception $e){
// todo
}Copy after login 非常好,得到了我们想要的结果
B8. 两个小盆友placeFooterAfterBody & emptyCell很细节的两个小属性
小结不知不觉写了3000多字,本想一篇完成GridView的讲解,现在看来比较困难,毕竟还有很多类型的列要去研究分享,还是变成专题吧,接下来我会对每个列做单独的分析,希望对你有用。 以上就是本文的全部内容,希望对大家的学习有所帮助,更多相关内容请关注PHP中文网! 相关推荐: |


The above is the detailed content of Summary of usage of GridView in Yii2. For more information, please follow other related articles on the PHP Chinese website!

Hot AI Tools

Undresser.AI Undress
AI-powered app for creating realistic nude photos

AI Clothes Remover
Online AI tool for removing clothes from photos.

Undress AI Tool
Undress images for free

Clothoff.io
AI clothes remover

Video Face Swap
Swap faces in any video effortlessly with our completely free AI face swap tool!

Hot Article
Hot Tools

Notepad++7.3.1
Easy-to-use and free code editor

SublimeText3 Chinese version
Chinese version, very easy to use

Zend Studio 13.0.1
Powerful PHP integrated development environment

Dreamweaver CS6
Visual web development tools

SublimeText3 Mac version
God-level code editing software (SublimeText3)
Hot Topics
 1659
1659
 14
1416
52
1310
25
1258
29
1232
24
14
1416
52
1310
25
1258
29
1232
24

 How to remove jquery in yii2
Feb 17, 2023 am 09:55 AM
How to remove jquery in yii2
Feb 17, 2023 am 09:55 AM
How to remove jquery from yii2: 1. Edit the AppAsset.php file and comment out the "yii\web\YiiAsset" value in the variable $depends; 2. Edit the main.php file and add the configuration "'yii" under the field "components" \web\JqueryAsset' => ['js' => [],'sourcePath' => null,]," to remove the jquery script.
 How to use Yii3 framework in php?
May 31, 2023 pm 10:42 PM
How to use Yii3 framework in php?
May 31, 2023 pm 10:42 PM
As the Internet continues to develop, the demand for web application development is also getting higher and higher. For developers, developing applications requires a stable, efficient, and powerful framework, which can improve development efficiency. Yii is a leading high-performance PHP framework that provides rich features and good performance. Yii3 is the next generation version of the Yii framework, which further optimizes performance and code quality based on Yii2. In this article, we will introduce how to use Yii3 framework to develop PHP applications.
 Yii2 vs Phalcon: Which framework is better for developing graphics rendering applications?
Jun 19, 2023 am 08:09 AM
Yii2 vs Phalcon: Which framework is better for developing graphics rendering applications?
Jun 19, 2023 am 08:09 AM
In the current information age, big data, artificial intelligence, cloud computing and other technologies have become the focus of major enterprises. Among these technologies, graphics card rendering technology, as a high-performance graphics processing technology, has received more and more attention. Graphics card rendering technology is widely used in game development, film and television special effects, engineering modeling and other fields. For developers, choosing a framework that suits their projects is a very important decision. Among current languages, PHP is a very dynamic language. Some excellent PHP frameworks such as Yii2, Ph
 How to use PHP framework Yii to develop a highly available cloud backup system
Jun 27, 2023 am 09:04 AM
How to use PHP framework Yii to develop a highly available cloud backup system
Jun 27, 2023 am 09:04 AM
With the continuous development of cloud computing technology, data backup has become something that every enterprise must do. In this context, it is particularly important to develop a highly available cloud backup system. The PHP framework Yii is a powerful framework that can help developers quickly build high-performance web applications. The following will introduce how to use the Yii framework to develop a highly available cloud backup system. Designing the database model In the Yii framework, the database model is a very important part. Because the data backup system requires a lot of tables and relationships
 Data query in Yii framework: access data efficiently
Jun 21, 2023 am 11:22 AM
Data query in Yii framework: access data efficiently
Jun 21, 2023 am 11:22 AM
The Yii framework is an open source PHP Web application framework that provides numerous tools and components to simplify the process of Web application development, of which data query is one of the important components. In the Yii framework, we can use SQL-like syntax to access the database to query and manipulate data efficiently. The query builder of the Yii framework mainly includes the following types: ActiveRecord query, QueryBuilder query, command query and original SQL query
 Symfony vs Yii2: Which framework is better for developing large-scale web applications?
Jun 19, 2023 am 10:57 AM
Symfony vs Yii2: Which framework is better for developing large-scale web applications?
Jun 19, 2023 am 10:57 AM
As the demand for web applications continues to grow, developers have more and more choices in choosing development frameworks. Symfony and Yii2 are two popular PHP frameworks. They both have powerful functions and performance, but when faced with the need to develop large-scale web applications, which framework is more suitable? Next we will conduct a comparative analysis of Symphony and Yii2 to help you make a better choice. Basic Overview Symphony is an open source web application framework written in PHP and is built on
 Yii2 Programming Guide: How to run Cron service
Sep 01, 2023 pm 11:21 PM
Yii2 Programming Guide: How to run Cron service
Sep 01, 2023 pm 11:21 PM
If you're asking "What is Yii?" check out my previous tutorial: Introduction to the Yii Framework, which reviews the benefits of Yii and outlines what's new in Yii 2.0, released in October 2014. Hmm> In this Programming with Yii2 series, I will guide readers in using the Yii2PHP framework. In today's tutorial, I will share with you how to leverage Yii's console functionality to run cron jobs. In the past, I've used wget - a web-accessible URL - in a cron job to run my background tasks. This raises security concerns and has some performance issues. While I discussed some ways to mitigate the risk in our Security for Startup series, I had hoped to transition to console-driven commands
 Yii2 vs Symfony: Which framework is better for API development?
Jun 18, 2023 pm 11:00 PM
Yii2 vs Symfony: Which framework is better for API development?
Jun 18, 2023 pm 11:00 PM
With the rapid development of the Internet, APIs have become an important way to exchange data between various applications. Therefore, it has become increasingly important to develop an API framework that is easy to maintain, efficient, and stable. When choosing an API framework, Yii2 and Symfony are two popular choices among developers. So, which one is more suitable for API development? This article will compare these two frameworks and give some conclusions. 1. Basic introduction Yii2 and Symfony are mature PHP frameworks with corresponding extensions that can be used to develop
