

Implement user registration and login through Laravel

This article shows us in detail the methods and steps for using Laravel to implement user registration and login. Friends in need can refer to it
Laravel is the most elegant PHP framework, and there are many Friends who are learning PHP are often salivating over Laravel. Come realize your wish today. Let us start from scratch and use Laravel to implement the most common registration and login functions of web applications! All course source codes have been placed on Github: laravel-start. Race Start!
Recommended related mysql video tutorials: "mysql tutorial"
First of all we Let’s clarify what we need for this course:
Laravel 4.2
Bootstrap 3.3
Laravel is the core part we care about. Bootstrap is used to quickly set some front-end CSS styles.
1. Install Laravel
After a brief explanation, let’s go to the next step and install Laravel. Here we install it through Composer, open the command line terminal, and execute:
1 |
|
Sites is the root directory of the web application. You can change it to your own root directory as needed, and then execute:
1 |
|
laravel is the name of your application directory, you can choose one A name you like. After executing the above command, wait for a while (after all, Internet speed is a big problem in China). After installation, you will get this bunch of directories:

Our main operations Three directories: models, controllers and views: this is the composition of MVC!
2. Install Bootstrap
Then execute from the command line:
1 |
|
The laravel here corresponds to the application directory above. If you are installing If you use another name, please change it accordingly. Go to the packages directory to install Bootstrap and execute it directly on the command line:
1 |
|
This is faster, and after this is downloaded, you will get the latest stable version of Bootstrap. Bower_components/bootstrap/dist/ in the packages directory contains Bootstrap's css, js, and fonts, three style files, js, and font files that we often use during the development process. After success, you will see this:
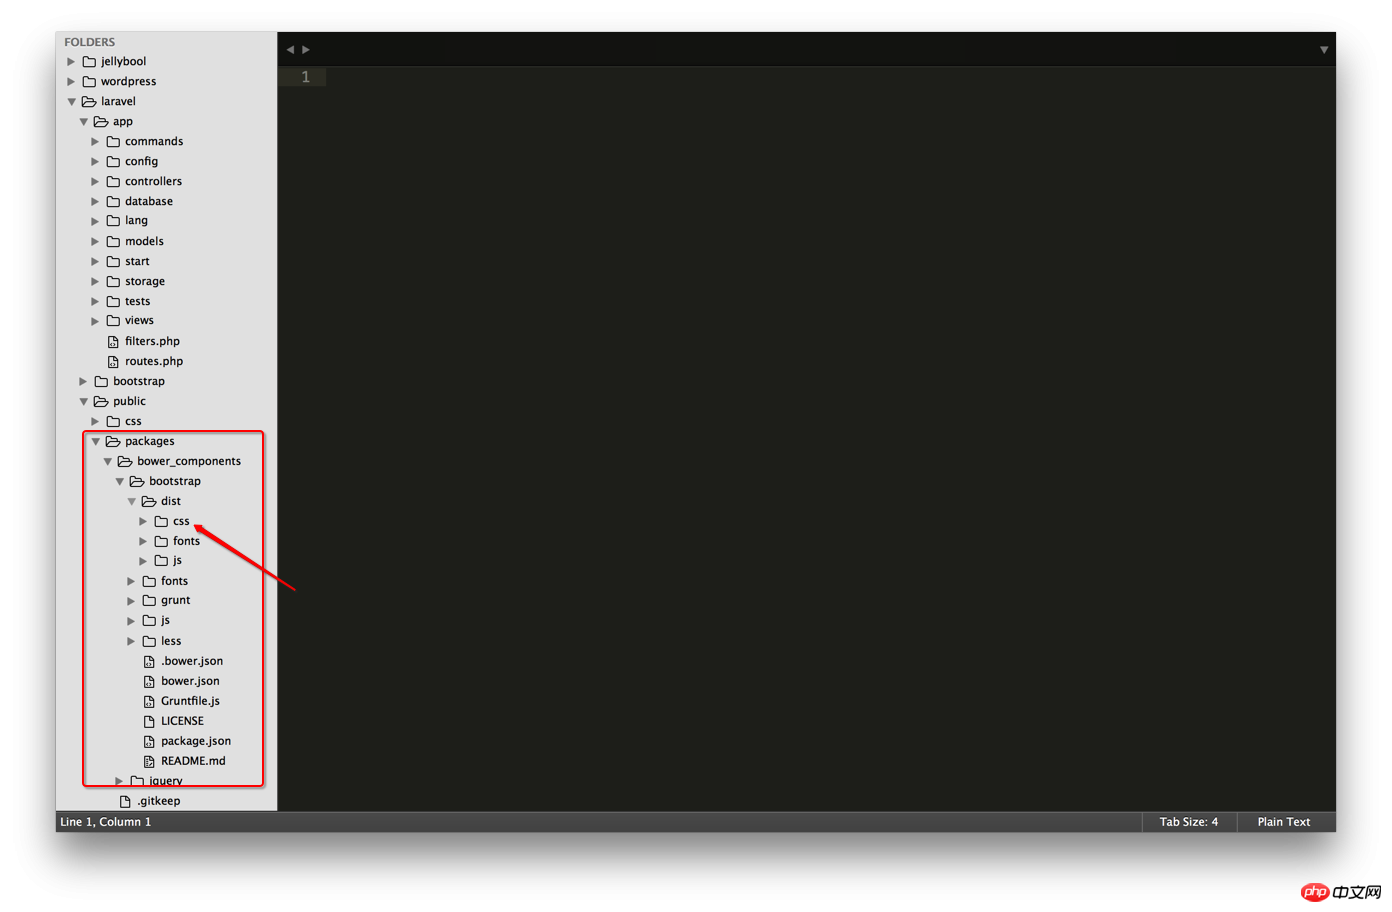
Note: The bower tool used here is responsible for managing some front-end packages.
At this point, our preliminary work is ready. But before going to the next step, we must first ensure that our laravel/app/storage directory has corresponding write permissions, so return to the laravel directory. If you have not touched the command line after installing bower, you can directly pass:
1 |
|
Go back to the laravel directory, and then execute:
1 |
|
After this step is completed, we can enter the real development stage.
3. Configure the database and create tables:
Before starting the configuration, we need to create a database for our laravel application, I named it laravel-start ,
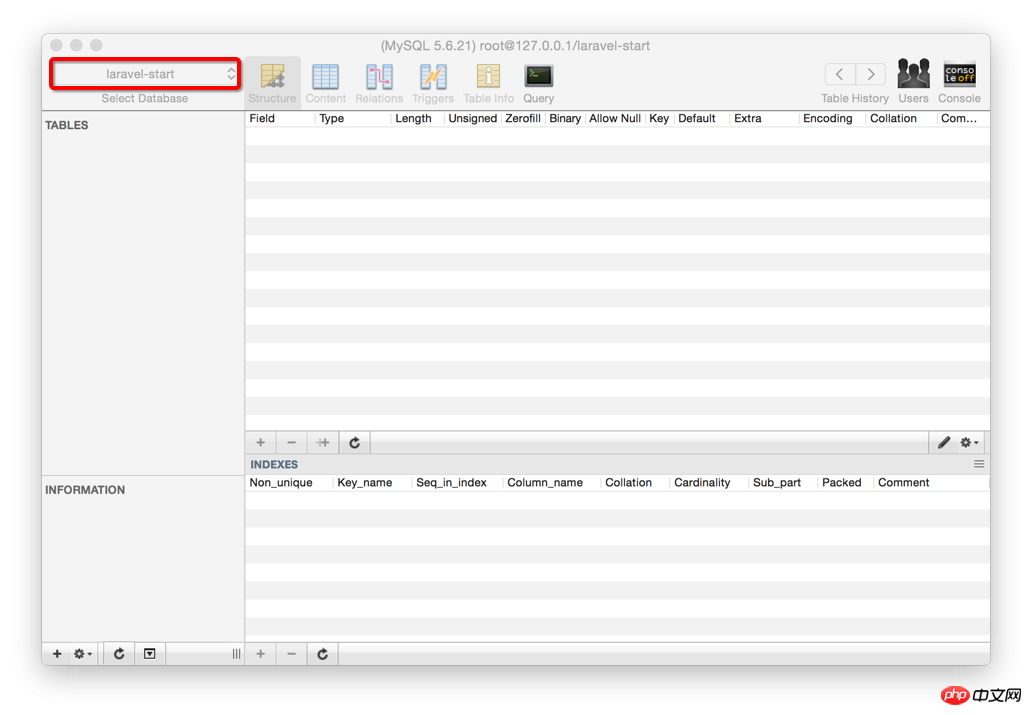
Then open the app/config/database.php file in the editor and fill in the corresponding database configuration items, such as:
1 2 3 4 5 6 7 8 9 10 11 12 13 |
|
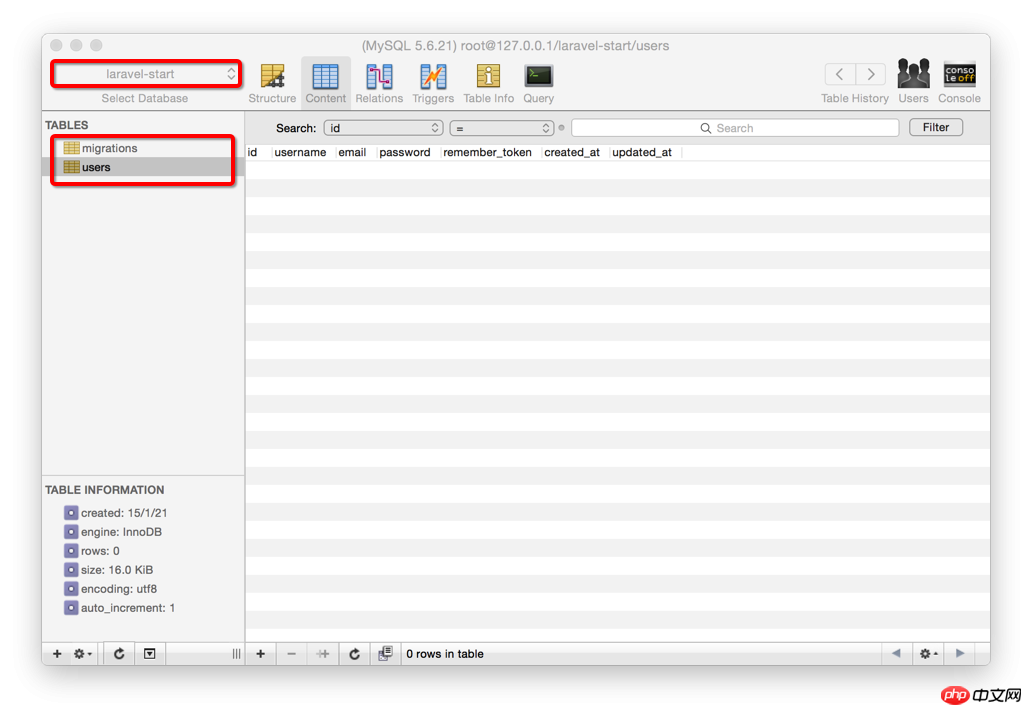
Connection After completing the database, you have to create a Users table. You can create the Users table directly in the database, or you can use Laravel's artisan to create it. Here we use Laravel's artisan to build the table, and learn a little bit about Laravel migrate. Execute the following statement:
php artisan migrate:make create-users-table
The above command will create a migrate file (the file is located in the app/database/migrations directory). The name of this file is create-users -table, then we can create the Users table by editing the migrate file we just generated.
1 2 3 4 5 6 7 8 9 10 |
|
The above method uses laravel's Schema Builder class. The above code uses the up() method to create a users table. There are 5 fields in this table: id auto-increment, username length within 20, The length of email should be within 100 and unique, and the length of password should be within 64. Remember_token is to make it more convenient and practical when logging in. Laravel will automatically fill in the token value, but at the beginning you must set a default value, timestamp the current timestamp. . One thing we need to pay attention to here is: It is best to add the following code to down() in case we need to delete the Users table one day.
1 2 3 4 |
|
After doing the above, execute the following magical command:
1 |
|
There are pictures and the truth:
Finally, we have finished the prelude and can officially come to Laravel.
4. Start the service and try it
Execute directly in the laravel directory:
1 |
|
Open the browser, enter localhost:8000, and press Enter. Bingo!
OK, give yourself thirty seconds of applause first, if you have successfully reached this step. Congratulations, you have entered the door of Laravel, we will come with more surprises one by one...
5. Create a public view
好了,我们现在开始了,首先在app/views/文件夹下创建一个layouts文件夹,再再这个文件夹下新建一个php文件,命名为main.blade.php,在这个文件里写上下面这些代码:
1 2 3 4 5 6 7 8 9 10 |
|
PS:layouts文件夹通常用来存放视图文件的功用部分,比如一些网页的头部

Hot AI Tools

Undresser.AI Undress
AI-powered app for creating realistic nude photos

AI Clothes Remover
Online AI tool for removing clothes from photos.

Undress AI Tool
Undress images for free

Clothoff.io
AI clothes remover

Video Face Swap
Swap faces in any video effortlessly with our completely free AI face swap tool!
Hot Article
Hot Tools

Notepad++7.3.1
Easy-to-use and free code editor

SublimeText3 Chinese version
Chinese version, very easy to use

Zend Studio 13.0.1
Powerful PHP integrated development environment

Dreamweaver CS6
Visual web development tools

SublimeText3 Mac version
God-level code editing software (SublimeText3)
Hot Topics
 1677
1677
 14
1430
52
1333
25
1278
29
1257
24
14
1430
52
1333
25
1278
29
1257
24

 Laravel Introduction Example
Apr 18, 2025 pm 12:45 PM
Laravel Introduction Example
Apr 18, 2025 pm 12:45 PM
Laravel is a PHP framework for easy building of web applications. It provides a range of powerful features including: Installation: Install the Laravel CLI globally with Composer and create applications in the project directory. Routing: Define the relationship between the URL and the handler in routes/web.php. View: Create a view in resources/views to render the application's interface. Database Integration: Provides out-of-the-box integration with databases such as MySQL and uses migration to create and modify tables. Model and Controller: The model represents the database entity and the controller processes HTTP requests.
 How to learn Laravel How to learn Laravel for free
Apr 18, 2025 pm 12:51 PM
How to learn Laravel How to learn Laravel for free
Apr 18, 2025 pm 12:51 PM
Want to learn the Laravel framework, but suffer from no resources or economic pressure? This article provides you with free learning of Laravel, teaching you how to use resources such as online platforms, documents and community forums to lay a solid foundation for your PHP development journey from getting started to master.
 Laravel framework installation method
Apr 18, 2025 pm 12:54 PM
Laravel framework installation method
Apr 18, 2025 pm 12:54 PM
Article summary: This article provides detailed step-by-step instructions to guide readers on how to easily install the Laravel framework. Laravel is a powerful PHP framework that speeds up the development process of web applications. This tutorial covers the installation process from system requirements to configuring databases and setting up routing. By following these steps, readers can quickly and efficiently lay a solid foundation for their Laravel project.
 What versions of laravel are there? How to choose the version of laravel for beginners
Apr 18, 2025 pm 01:03 PM
What versions of laravel are there? How to choose the version of laravel for beginners
Apr 18, 2025 pm 01:03 PM
In the Laravel framework version selection guide for beginners, this article dives into the version differences of Laravel, designed to assist beginners in making informed choices among many versions. We will focus on the key features of each release, compare their pros and cons, and provide useful advice to help beginners choose the most suitable version of Laravel based on their skill level and project requirements. For beginners, choosing a suitable version of Laravel is crucial because it can significantly impact their learning curve and overall development experience.
 How to view the version number of laravel? How to view the version number of laravel
Apr 18, 2025 pm 01:00 PM
How to view the version number of laravel? How to view the version number of laravel
Apr 18, 2025 pm 01:00 PM
The Laravel framework has built-in methods to easily view its version number to meet the different needs of developers. This article will explore these methods, including using the Composer command line tool, accessing .env files, or obtaining version information through PHP code. These methods are essential for maintaining and managing versioning of Laravel applications.
 Laravel user login function
Apr 18, 2025 pm 12:48 PM
Laravel user login function
Apr 18, 2025 pm 12:48 PM
Laravel provides a comprehensive Auth framework for implementing user login functions, including: Defining user models (Eloquent model), creating login forms (Blade template engine), writing login controllers (inheriting Auth\LoginController), verifying login requests (Auth::attempt) Redirecting after login is successful (redirect) considering security factors: hash passwords, anti-CSRF protection, rate limiting and security headers. In addition, the Auth framework also provides functions such as resetting passwords, registering and verifying emails. For details, please refer to the Laravel documentation: https://laravel.com/doc
 The difference between laravel and thinkphp
Apr 18, 2025 pm 01:09 PM
The difference between laravel and thinkphp
Apr 18, 2025 pm 01:09 PM
Laravel and ThinkPHP are both popular PHP frameworks and have their own advantages and disadvantages in development. This article will compare the two in depth, highlighting their architecture, features, and performance differences to help developers make informed choices based on their specific project needs.
 Laravel8 optimization points
Apr 18, 2025 pm 12:24 PM
Laravel8 optimization points
Apr 18, 2025 pm 12:24 PM
Laravel 8 provides the following options for performance optimization: Cache configuration: Use Redis to cache drivers, cache facades, cache views, and page snippets. Database optimization: establish indexing, use query scope, and use Eloquent relationships. JavaScript and CSS optimization: Use version control, merge and shrink assets, use CDN. Code optimization: Use Composer installation package, use Laravel helper functions, and follow PSR standards. Monitoring and analysis: Use Laravel Scout, use Telescope, monitor application metrics.
