

HTML5 WebSocket peer-to-peer chat implementation method

Yesterday, we used HTML5 websocket and Tomcat to implement multi-person chat. It is the simplest and most basic. The most important thing to pay attention to is the development environment, which must meet jdk1.7 and tomcat8. Of course, tom7 7.063 will also work!
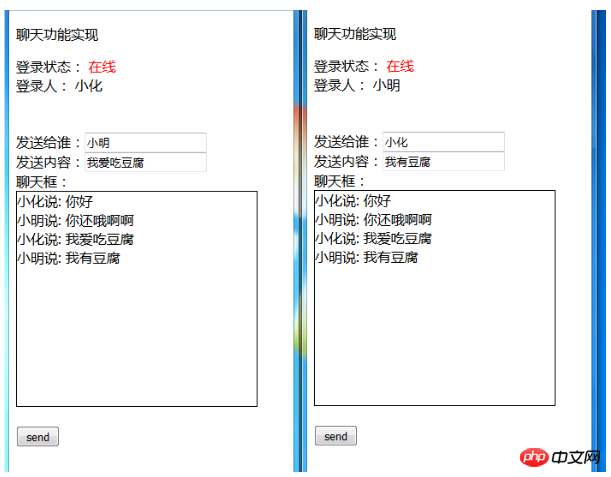
This article mainly introduces to you the relevant information about the sample code of HTML5 WebSocket to implement point-to-point chat. The editor thinks it is quite good, so I will share it with you now and give it as a reference. Let’s follow the editor to take a look, I hope it can help everyone.
Because it is a simulation, what is given here are two JSP pages A and B, which put two names Xiaoming and Xiaohua into the session respectively. Note, The session here is HttpSession session. The session in the previous multi-person chat was javax.websocket.Session; which is different.
Think about it here. What are the benefits of using HttpSession session to control chat users? Guess for yourself~~~
No annotations are used here. The traditional web.xml configuration method is first started in the system. When calling the InitServlet method
public class InitServlet extends HttpServlet {
    private static final long serialVersionUID = -3163557381361759907L;
    private static HashMap<String,MessageInbound> socketList;
    public void init(ServletConfig config) throws ServletException {
        InitServlet.socketList = new HashMap<String,MessageInbound>();
        super.init(config);
        System.out.println("初始化聊天容器");
    }

    public static HashMap<String,MessageInbound> getSocketList() {
        return InitServlet.socketList;
    }
}Here you can combine it with your own system. The corresponding web configuration code is as follows:
<?xml version="1.0" encoding="UTF-8"?>
<web-app version="3.0" xmlns="http://java.sun.com/xml/ns/javaee"
    xmlns:xsi="http://www.w3.org/2001/XMLSchema-instance"
    xsi:schemaLocation="http://java.sun.com/xml/ns/javaee
    http://java.sun.com/xml/ns/javaee/web-app_3_0.xsd">

    <servlet>
        <servlet-name>websocket</servlet-name>
        <servlet-class>socket.MyWebSocketServlet</servlet-class>
    </servlet>
    <servlet-mapping>
        <servlet-name>websocket</servlet-name>
        <url-pattern>*.do</url-pattern>
    </servlet-mapping>

    <servlet>
        <servlet-name>initServlet</servlet-name>
        <servlet-class>socket.InitServlet</servlet-class>
        <load-on-startup>1</load-on-startup><!--方法执行的级别-->
    </servlet>
    <welcome-file-list>
        <welcome-file>index.jsp</welcome-file>
    </welcome-file-list>
</web-app>This is the most common process for the front desk to send requests to the background, and it is also easy to embed into your own system
MyWebSocketServlet:
public class MyWebSocketServlet extends WebSocketServlet {
    public String getUser(HttpServletRequest request){
        String userName = (String) request.getSession().getAttribute("user");
        if(userName==null){
            return null;
        }
        return userName;
    }
    protected StreamInbound createWebSocketInbound(String arg0,
            HttpServletRequest request) {
        System.out.println("用户" + request.getSession().getAttribute("user") + "登录");
        return new MyMessageInbound(this.getUser(request));
    }
}MyMessageInbound inheritance MessageInbound
package socket;
import java.io.IOException;
import java.nio.ByteBuffer;
import java.nio.CharBuffer;
import java.util.HashMap;
import org.apache.catalina.websocket.MessageInbound;
import org.apache.catalina.websocket.WsOutbound;
import util.MessageUtil;
public class MyMessageInbound extends MessageInbound {
    private String name;
    public MyMessageInbound() {
        super();
    }

    public MyMessageInbound(String name) {
        super();
        this.name = name;
    }

    @Override
    protected void onBinaryMessage(ByteBuffer arg0) throws IOException {

    }

    @Override
    protected void onTextMessage(CharBuffer msg) throws IOException {
        //用户所发消息处理后的map
        HashMap<String,String> messageMap = MessageUtil.getMessage(msg);    //处理消息类
        //上线用户集合类map
        HashMap<String, MessageInbound> userMsgMap = InitServlet.getSocketList();
        String fromName = messageMap.get("fromName");    //消息来自人 的userId
        String toName = messageMap.get("toName");         //消息发往人的 userId
        //获取该用户
        MessageInbound messageInbound = userMsgMap.get(toName);    //在仓库中取出发往人的MessageInbound
        MessageInbound messageFromInbound = userMsgMap.get(fromName);
        if(messageInbound!=null && messageFromInbound!=null){     //如果发往人 存在进行操作
            WsOutbound outbound = messageInbound.getWsOutbound();
            WsOutbound outFromBound = messageFromInbound.getWsOutbound();
            String content = messageMap.get("content");  //获取消息内容
            String msgContentString = fromName + "说: " + content;   //构造发送的消息
            //发出去内容
            CharBuffer toMsg =  CharBuffer.wrap(msgContentString.toCharArray());
            CharBuffer fromMsg =  CharBuffer.wrap(msgContentString.toCharArray());
            outFromBound.writeTextMessage(fromMsg);
            outbound.writeTextMessage(toMsg);  //
            outFromBound.flush();
            outbound.flush();
        }
    }

    @Override
    protected void onClose(int status) {
        InitServlet.getSocketList().remove(this);
        super.onClose(status);
    }

    @Override
    protected void onOpen(WsOutbound outbound) {
        super.onOpen(outbound);
        //登录的用户注册进去
        if(name!=null){
            InitServlet.getSocketList().put(name, this);//存放客服ID与用户
        }
    }

    @Override
    public int getReadTimeout() {
        return 0;
    }
}Process the information sent by the foreground in onTextMessage and encapsulate the information to the target
There is also a messageutil
package util;
import java.nio.CharBuffer;
import java.util.HashMap;
public class MessageUtil {
    public static HashMap<String,String> getMessage(CharBuffer msg) {
        HashMap<String,String> map = new HashMap<String,String>();
        String msgString  = msg.toString();
        String m[] = msgString.split(",");
        map.put("fromName", m[0]);
        map.put("toName", m[1]);
        map.put("content", m[2]);
        return map;
    }
}Of course, the front desk must also transmit information according to the prescribed format
<%@ page language="java" contentType="text/html; charset=UTF-8"
pageEncoding="UTF-8"%>
<!DOCTYPE html>
<html>
<head>
<meta http-equiv="Content-Type" content="text/html; charset=UTF-8">
<title>Index</title>
<script type="text/javascript" src="js/jquery-1.7.2.min.js"></script>
<%session.setAttribute("user", "小化");%>
<script type="text/javascript">
var ws = null;
function startWebSocket() {
if ('WebSocket' in window)
ws = new WebSocket("ws://localhost:8080/WebSocketUser/websocket.do");
else if ('MozWebSocket' in window)
ws = new MozWebSocket("ws://localhost:8080/WebSocketUser/websocket.do");
else
alert("not support");
ws.onmessage = function(evt) {
//alert(evt.data);
console.log(evt);
// $("#xiaoxi").val(evt.data);
setMessageInnerHTML(evt.data);
};
function setMessageInnerHTML(innerHTML){
document.getElementById('message').innerHTML += innerHTML + '<br/>';
}
ws.onclose = function(evt) {
//alert("close");
document.getElementById('denglu').innerHTML="离线";
};
ws.onopen = function(evt) {
//alert("open");
document.getElementById('denglu').innerHTML="在线";
document.getElementById('userName').innerHTML='小化';
};
}
function sendMsg() {
var fromName = "小化";
var toName = document.getElementById('name').value; //发给谁
var content = document.getElementById('writeMsg').value; //发送内容
ws.send(fromName+","+toName+","+content);//注意格式
}
</script>
</head>
<body onload="startWebSocket();">
<p>聊天功能实现</p>
登录状态:
<span id="denglu" style="color:red;">正在登录</span>
<br>
登录人:
<span id="userName"></span>
<br>
<br>
<br>
发送给谁:<input type="text" id="name" value="小明"></input>
<br>
发送内容:<input type="text" id="writeMsg"></input>
<br>
聊天框:<p id="message" style="height: 250px;width: 280px;border: 1px solid; overflow: auto;"></p>
<br>
<input type="button" value="send" onclick="sendMsg()"></input>
</body>
</html>This is the A.jsp page, B is the same as above
Through the above code, a point-to-point chat function can be realized. If it is large-scale, it can be made into a web version of the chat system, including chat rooms and single-person chats. It is said that websocket does not support binary transmission, but when I see a Daliu said something like this
But now I feel that using binary is not very meaningful. I have been confused for a long time. It was said that JS does not support binary. I found that it is actually just a bunch of scammers who have not studied this. . (Using filereader)
Related recommendations:
HTML5 imitation WeChat chat interface and circle of friends code
vue component Detailed explanation of chat room examples for communication between father and son
node.js Use socket to implement chat room example sharing
The above is the detailed content of HTML5 WebSocket peer-to-peer chat implementation method. For more information, please follow other related articles on the PHP Chinese website!

Hot AI Tools

Undresser.AI Undress
AI-powered app for creating realistic nude photos

AI Clothes Remover
Online AI tool for removing clothes from photos.

Undress AI Tool
Undress images for free

Clothoff.io
AI clothes remover

Video Face Swap
Swap faces in any video effortlessly with our completely free AI face swap tool!

Hot Article
Hot Tools

Notepad++7.3.1
Easy-to-use and free code editor

SublimeText3 Chinese version
Chinese version, very easy to use

Zend Studio 13.0.1
Powerful PHP integrated development environment

Dreamweaver CS6
Visual web development tools

SublimeText3 Mac version
God-level code editing software (SublimeText3)
Hot Topics


 Table Border in HTML
Sep 04, 2024 pm 04:49 PM
Table Border in HTML
Sep 04, 2024 pm 04:49 PM
Guide to Table Border in HTML. Here we discuss multiple ways for defining table-border with examples of the Table Border in HTML.
 Nested Table in HTML
Sep 04, 2024 pm 04:49 PM
Nested Table in HTML
Sep 04, 2024 pm 04:49 PM
This is a guide to Nested Table in HTML. Here we discuss how to create a table within the table along with the respective examples.
 HTML margin-left
Sep 04, 2024 pm 04:48 PM
HTML margin-left
Sep 04, 2024 pm 04:48 PM
Guide to HTML margin-left. Here we discuss a brief overview on HTML margin-left and its Examples along with its Code Implementation.
 HTML Table Layout
Sep 04, 2024 pm 04:54 PM
HTML Table Layout
Sep 04, 2024 pm 04:54 PM
Guide to HTML Table Layout. Here we discuss the Values of HTML Table Layout along with the examples and outputs n detail.
 HTML Input Placeholder
Sep 04, 2024 pm 04:54 PM
HTML Input Placeholder
Sep 04, 2024 pm 04:54 PM
Guide to HTML Input Placeholder. Here we discuss the Examples of HTML Input Placeholder along with the codes and outputs.
 HTML Ordered List
Sep 04, 2024 pm 04:43 PM
HTML Ordered List
Sep 04, 2024 pm 04:43 PM
Guide to the HTML Ordered List. Here we also discuss introduction of HTML Ordered list and types along with their example respectively
 HTML onclick Button
Sep 04, 2024 pm 04:49 PM
HTML onclick Button
Sep 04, 2024 pm 04:49 PM
Guide to HTML onclick Button. Here we discuss their introduction, working, examples and onclick Event in various events respectively.
 Moving Text in HTML
Sep 04, 2024 pm 04:45 PM
Moving Text in HTML
Sep 04, 2024 pm 04:45 PM
Guide to Moving Text in HTML. Here we discuss an introduction, how marquee tag work with syntax and examples to implement.
