
 Web Front-end
CSS Tutorial
Introduction to the random overlap method of implementing p using CSS
Web Front-end
CSS Tutorial
Introduction to the random overlap method of implementing p using CSS
Introduction to the random overlap method of implementing p using CSS

This article mainly introduces how to make p overlap and overlap in the desired order using CSS, that is, CSS absolute positioning to achieve it. Friends who need it can refer to the following
Letting p overlap and overlap in the desired order requires CSS, that is, CSS absolute positioning.
Overlapping styles require main CSS style explanation
1. z-index overlapping order attribute
2. position:relative and position:absolute set the object attributes to be positionable (overlapping)
3 , left right top bottom absolute positioning specific position setting
matching style
1, css width
2, css height
3, background In order to observe the effect, we set different backgrounds for different p Color distinction
Next, we will provide you with p overlay and overlay example layouts according to your own wishes. We create four new p boxes, one large p box, named ".p-relative" in CSS, and three small p boxes placed in the first large p object box, named ".p-a" and ". p-b", ".p-c".
1. Unsorted, cascading and overlapping examples in sorted order
1. The complete HTML source code is as follows:
1
2
3
4
5
6
7
8
9
10
11
12
13
14
15
16
17
18
19
20
21
22
23
<!DOCTYPE html><html><head><meta charset="utf-8"/><title>p重叠 叠加实例 未排层叠顺序 www.jb51.net</title><style>.p-relative{position:relative; color:#000; border:1px solid #000; width:500px; height:400px}.p-a{ position:absolute; left:30px; top:30px; background:#F00; width:200px; height:100px}/* css注释说明: 背景为红色 */.p-b{ position:absolute; left:50px; top:60px; background:#FF0; width:400px; height:200px}/* 背景为黄色 */.p-c{ position:absolute; left:80px; top:80px; background:#00F; width:300px; height:300px}/* p背景颜色为蓝色 */</style></head><body><pclass="p-relative"><pclass="p-a">我背景为红色</p><pclass="p-b">我背景为黄色</p><pclass="p-c">我背景为蓝色</p></p></body></html>Copy after login
2. Unarranged p stacking order p+css instance screenshot 
#Example description:
We use position to achieve absolute positioning, for the parent Set the position:relative attribute, and set position:absolute on its child plus left or right and top or bottom to achieve arbitrary positioning of the child within the parent. In the original case, the overlap is arranged in the order of the p code itself. The later the p box is entered, the closer it is to the front (floating on top). In addition to changing the order of the p code in the source code itself in html, we can also use css z-index to implement the p layer arrangement order.
2. Control p overlapping order through CSS
We use the above absolute positioning example code, only need to ".p-a", ".p-b", ".p-c" "Add z-index styles respectively to achieve any order.
Extended knowledge:
The value of z-index is a positive integer value. The larger the number, the more the object layer floats to the upper layer (the farther forward.
The default order of the above examples is ".p-c" floats on the top layer (blue background layer), ".p-b" floats on the middle layer (yellow background layer), and ".p-a" floats on the bottom layer (red background layer). We will use the z-index style next. The order is subverted without changing the html code. ".p-b" floats in the middle layer (yellow background layer) and the order remains unchanged. ".p-a" floats on the top layer (red background layer) and ".p-c" floats on the bottom layer (blue background layer). Color background layer).
1. Complete HTML code to arrange p cascading and overlapping order as desired:
1
2
3
4
5
6
7
8
9
10
11
12
13
14
15
16
17
18
19
20
21
22
23
<!DOCTYPE html><html><head><meta charset="utf-8"/><title>p重叠 叠加实例 排层叠顺序 www.jb51.net</title><style>.p-relative{position:relative;color:#000;border:1px solid #000;width:500px;height:400px}.p-a{ position:absolute;left:30px;top:30px;z-index:100;background:#F00;width:200px;height:100px}/* p背景色为红色 */.p-b{ position:absolute;left:50px;top:60px;z-index:80;background:#FF0;width:400px;height:200px}/* 背景为黄色 */.p-c{ position:absolute;left:80px;top:80px;z-index:70;background:#00F;width:300px;height:300px}/* 背景为蓝色 */</style></head><body><pclass="p-relative"><pclass="p-a">我背景为红色</p><pclass="p-b">我背景为黄色</p><pclass="p-c">我背景为蓝色</p></p></body></html>Copy after login
2. Screenshots of examples of p stacking order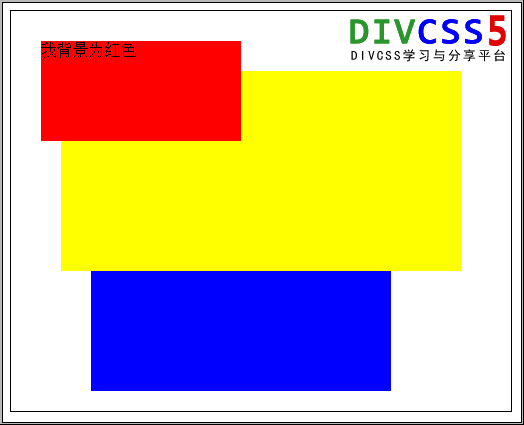
Screenshots of examples of replacing "p-a" with red background and "p-c" with blue background
We are not Change the HTML code of the first example, implement absolute positioning of "p-a", "p-b", and "p-c" and then add z-index to change the stacking order. 3. p Overlap Summary
To achieve p overlapping and change the overlapping order of p boxes, we use position:relative for the parent and position:absolute, z-index (overlapping order), left, right for the child. , top, bottom absolute positioning is equivalent to the specific position of the parent.
The above is the detailed content of Introduction to the random overlap method of implementing p using CSS. For more information, please follow other related articles on the PHP Chinese website!

Hot AI Tools

Undresser.AI Undress
AI-powered app for creating realistic nude photos

AI Clothes Remover
Online AI tool for removing clothes from photos.

Undress AI Tool
Undress images for free

Clothoff.io
AI clothes remover

Video Face Swap
Swap faces in any video effortlessly with our completely free AI face swap tool!
Hot Article
Hot Tools

Notepad++7.3.1
Easy-to-use and free code editor

SublimeText3 Chinese version
Chinese version, very easy to use

Zend Studio 13.0.1
Powerful PHP integrated development environment

Dreamweaver CS6
Visual web development tools

SublimeText3 Mac version
God-level code editing software (SublimeText3)
Hot Topics
 1655
1655
 14
1414
52
1307
25
1253
29
1227
24
14
1414
52
1307
25
1253
29
1227
24

 How to use css to realize that a div is missing a corner
Jan 30, 2023 am 09:23 AM
How to use css to realize that a div is missing a corner
Jan 30, 2023 am 09:23 AM
CSS method to realize that a div is missing a corner: 1. Create an HTML sample file and define a div; 2. Set the width and height background color for the div; 3. Add a pseudo class to the div that needs to delete a corner, and set the pseudo class to Use the same color as the background color, then rotate it 45 degrees, and then position it to the corner that needs to be removed.
 Implementation of word-marking translation browser script based on ChatGPT API
May 01, 2023 pm 03:28 PM
Implementation of word-marking translation browser script based on ChatGPT API
May 01, 2023 pm 03:28 PM
Preface Recently, there is a browser script based on ChatGPTAPI on GitHub, openai-translator. In a short period of time, the star has reached 12k. In addition to supporting translation, it also supports polishing and summarizing functions. In addition to browser plug-ins, it also uses tauri packaging. If you have a desktop client, aside from the fact that tauri uses the rust part, the browser part is still relatively simple to implement. Today we will implement it manually. The interface provided by openAI, for example, we can copy the following code and initiate a request in the browser console to complete the translation //Example constOPENAI_API_KEY="s
 What is the difference between iframe and div
Aug 28, 2023 am 11:46 AM
What is the difference between iframe and div
Aug 28, 2023 am 11:46 AM
The difference between iframe and div is that iframe is mainly used to introduce external content, which can load content from other websites or divide a web page into multiple areas. Each area has its own independent browsing context, while div is mainly used to divide and organize content. block for layout and style control.
 What is the div box model
Oct 09, 2023 pm 05:15 PM
What is the div box model
Oct 09, 2023 pm 05:15 PM
The div box model is a model used for web page layout. It treats elements in a web page as rectangular boxes. This model contains four parts: content area, padding, border and margin. The advantage of the div box model is that it can easily control the layout of the web page and the spacing between elements. By adjusting the size of the content area, inner margin, border and outer margin, various layout effects can be achieved. The box model also provides some Properties and methods can dynamically change the style and behavior of the box through CSS and JavaScript.
 What are the differences between div and span?
Nov 02, 2023 pm 02:29 PM
What are the differences between div and span?
Nov 02, 2023 pm 02:29 PM
The differences are: 1. div is a block-level element, and span is an inline element; 2. div will automatically occupy a line, while span will not automatically wrap; 3. div is used to wrap larger structures and layouts, and span is used to wrap Text or other inline elements; 4. div can contain other block-level elements and inline elements, and span can contain other inline elements.
 jQuery Tips: Master how to add tags in divs
Feb 23, 2024 pm 01:51 PM
jQuery Tips: Master how to add tags in divs
Feb 23, 2024 pm 01:51 PM
Title: jQuery Tips: Master the method of adding tags to divs In web development, we often encounter situations where we need to dynamically add tags to the page. You can use jQuery to easily manipulate DOM elements and achieve fast label adding functions. This article will introduce how to use jQuery to add tags in divs, and attach specific code examples. 1. Preparation work Before using jQuery, you need to introduce the jQuery library into the page. You can introduce it through a CDN link or download it to this page.
 How to display two divs side by side
Nov 01, 2023 am 11:36 AM
How to display two divs side by side
Nov 01, 2023 am 11:36 AM
The methods are: 1. Set the two div elements to the "float:left;" attribute; 2. Use CSS's flex layout to easily display elements side by side; 3. Use CSS's grid layout to also display elements side by side.
 Simple way to add div elements with jQuery
Feb 19, 2024 pm 09:03 PM
Simple way to add div elements with jQuery
Feb 19, 2024 pm 09:03 PM
Simple and easy-to-understand jQuerydiv element adding techniques jQuery is one of the commonly used JavaScript libraries in front-end development. It provides convenient methods to operate DOM elements and can quickly add, delete, modify and other functions of page elements. When using jQuery, we often need to operate div elements. The following will introduce some simple and easy-to-understand techniques for adding div elements and provide specific code examples. 1. Create and add a new div element
