In-depth understanding of Nginx memory management (picture)
This article brings you an in-depth understanding of Nginx's memory management (picture). It has certain reference value. Friends in need can refer to it. I hope it will be helpful to you.
1. Overview
The memory of the application can be simply divided into heap memory and stack memory. For stack memory, when a function is compiled, the compiler will insert code that moves the current pointer position of the stack to realize self-management of the stack space. For heap memory, programmers usually need to manage it. The memory management we usually talk about is only heap space memory management.
For memory, our use can be simplified into three steps, applying for memory, using memory, and releasing memory. Applying for memory and using memory usually require explicit operations by programmers, but releasing memory does not necessarily require explicit operations by programmers. Currently, many high-level languages provide garbage collection mechanisms, and you can choose the time to release memory. For example: Go and Java have implemented garbage collection. Recycling, C language has not yet implemented garbage collection. Garbage collection can be achieved in C through smart pointers.
In addition to language-level memory management, sometimes we need to manage memory by ourselves in the program. Generally speaking, for memory management, I think it is mainly to solve the following problems:
#When a user applies for memory, how to quickly find the memory block that meets the user's needs?
How to avoid memory fragmentation when users release memory?
Whether it is memory management implemented at the language level or memory management implemented by the application itself, memory is mostly divided into several types according to size, each using a different management mode. A common classification is to divide different types of memory into integer powers of 2 through linked lists. When querying, search from linked lists of corresponding sizes. If you cannot find it, you can consider taking a piece from a larger block of memory. , dividing it into multiple small points of memory. Of course, for particularly large memories, language-level memory management can directly call memory management-related system calls, and application-level memory management can directly use language-level memory management.
nginx memory management as a whole can be divided into 2 parts,
The first part is the conventional memory pool, used For the memory management required by the process;
The second part is the management of shared memory. Overall, shared memory is much more complex than memory pools.
2. nginx memory pool management
2.1 Description
The nginx version used in this part is 1.15.3
For specific source code, please refer to the src/core/ngx_palloc.c file
2.2 nginx Implementation
2.2.1 Usage process
The use of nginx memory pool is relatively simple and can be divided into 3 steps,
Call the ngx_create_pool function Get the ngx_pool_t pointer.
//size代表ngx_pool_t一块的大小
ngx_pool_t* ngx_create_pool(size_t size, ngx_log_t *log)
Call ngx_palloc to apply for memory usage
//从pool中申请size大小的内存
void* ngx_palloc(ngx_pool_t *pool, size_t size)
Release memory (can release large blocks memory or release the entire memory pool)
//释放从pool中申请的大块内存
ngx_int_t ngx_pfree(ngx_pool_t *pool, void *p)
//释放整个内存池
void ngx_destroy_pool(ngx_pool_t *pool)
2.2.2 Specific implementation
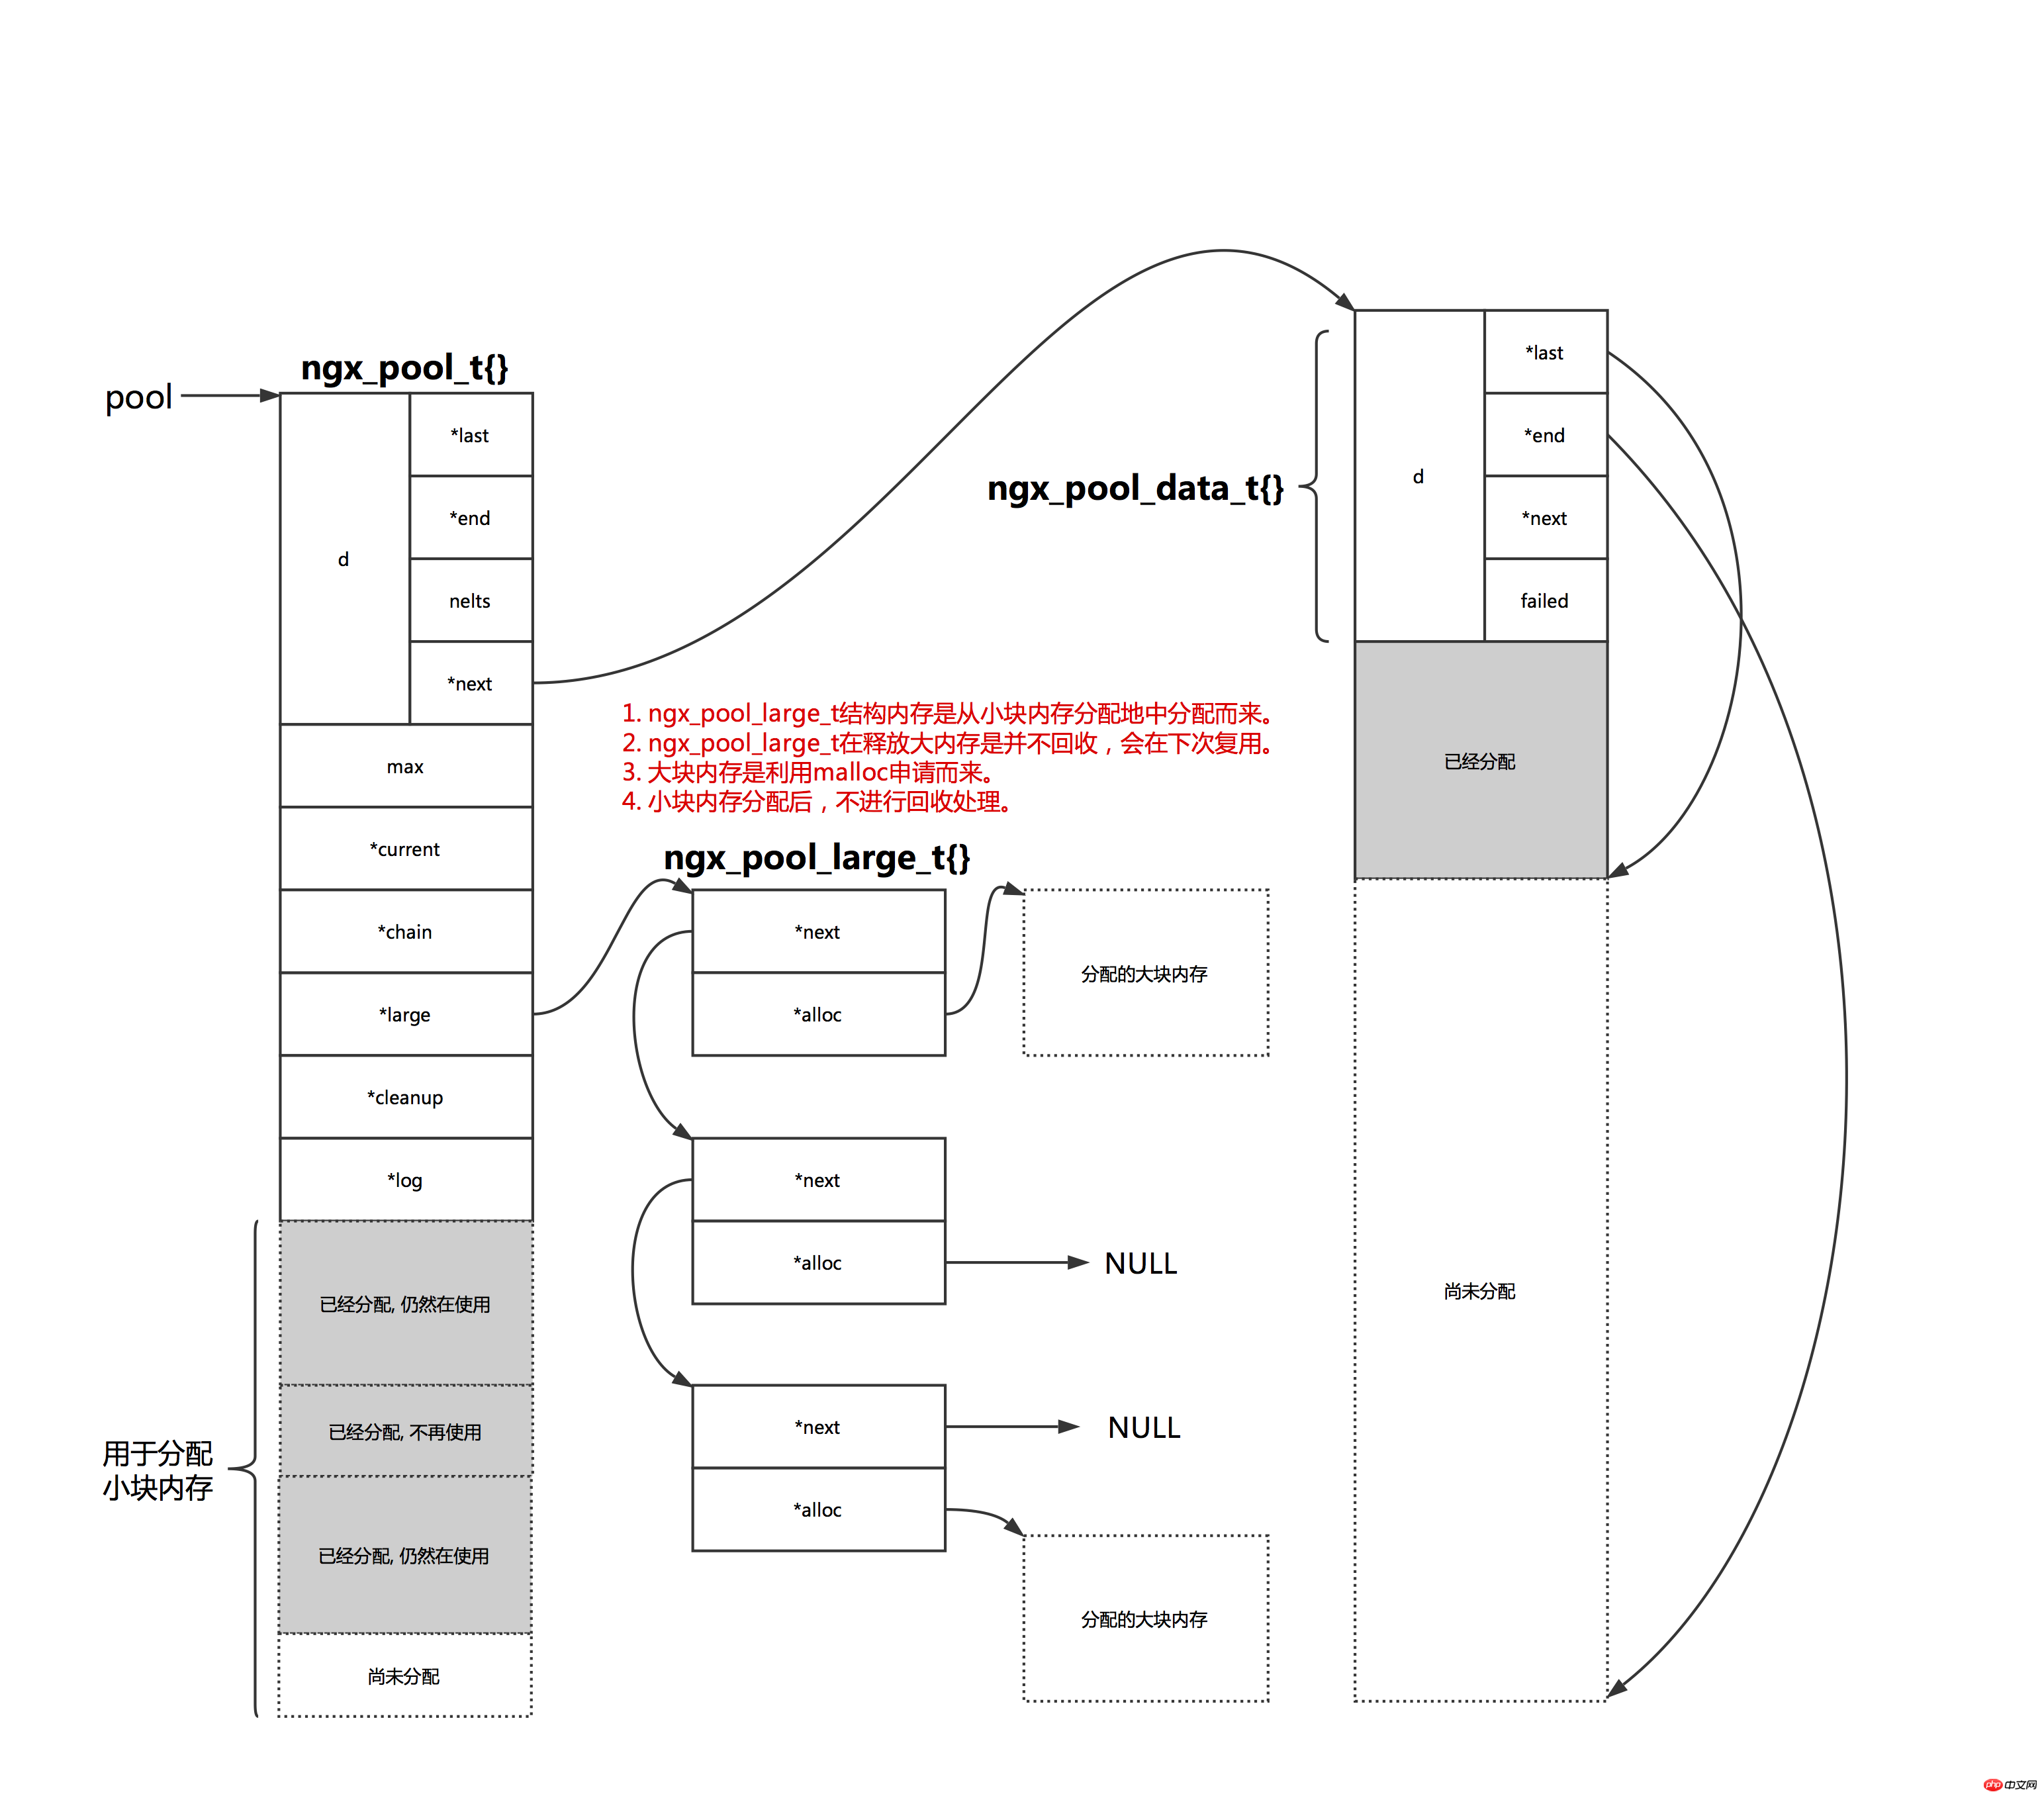
As shown in the figure below, nginx divides memory into two types, One is small memory and the other is large memory. When the applied space is larger than pool->max, we consider it to be large memory space, otherwise it is small memory space.
//创建内存池的参数size减去头部管理结构ngx_pool_t的大小
pool->max = size - sizeof(ngx_pool_t);

For a small memory space, nginx first checks whether the space to be allocated in the current memory block can meet the user's needs. If so, then Return this part of memory directly. If the user's needs cannot be met, you need to re-apply for a memory block. The applied-for memory block has the same size as the current block space. The newly-applied memory block is linked to the previous memory block through a linked list, and the user-required memory block is allocated from the new memory block. Memory.
Small memory is not released. The user can use it directly after applying. Even if it is no longer used later, there is no need to release the memory. Since users sometimes do not know whether the memory block they are using is large or small, they can also call the ngx_pfree function to release the space. This function will search for memory in the large space linked list and release the memory when it is found. For small memory, no processing is done.
For large blocks of memory, nginx will store them in linked lists and manage them through pool->large. It is worth noting that the ngx_pool_large_t structure for user-managed large memory is applied from a small block of memory in this memory pool, which means that these memories cannot be released. nginx directly reuses the ngx_pool_large_t structure. When the user needs to apply for a large memory space, use the c function library malloc to apply for the space, and then mount it on a certain ngx_pool_large_t structure. When nginx needs a new ngx_pool_large_t structure, it will first check the first three elements of the pool->large linked list to see if there is one available. If so, it will be used directly, otherwise it will create a new ngx_pool_large_t structure.
3. nginx shared memory management
3.1 Description
The nginx version used in this part It is 1.15.3
For details of the source code of this part, please see src/core/ngx_slab.c, src/core/ngx_shmtx.c
- ##nginx shared memory The content is relatively large, so this article only gives a brief overview.
3.2 Direct use of shared memory
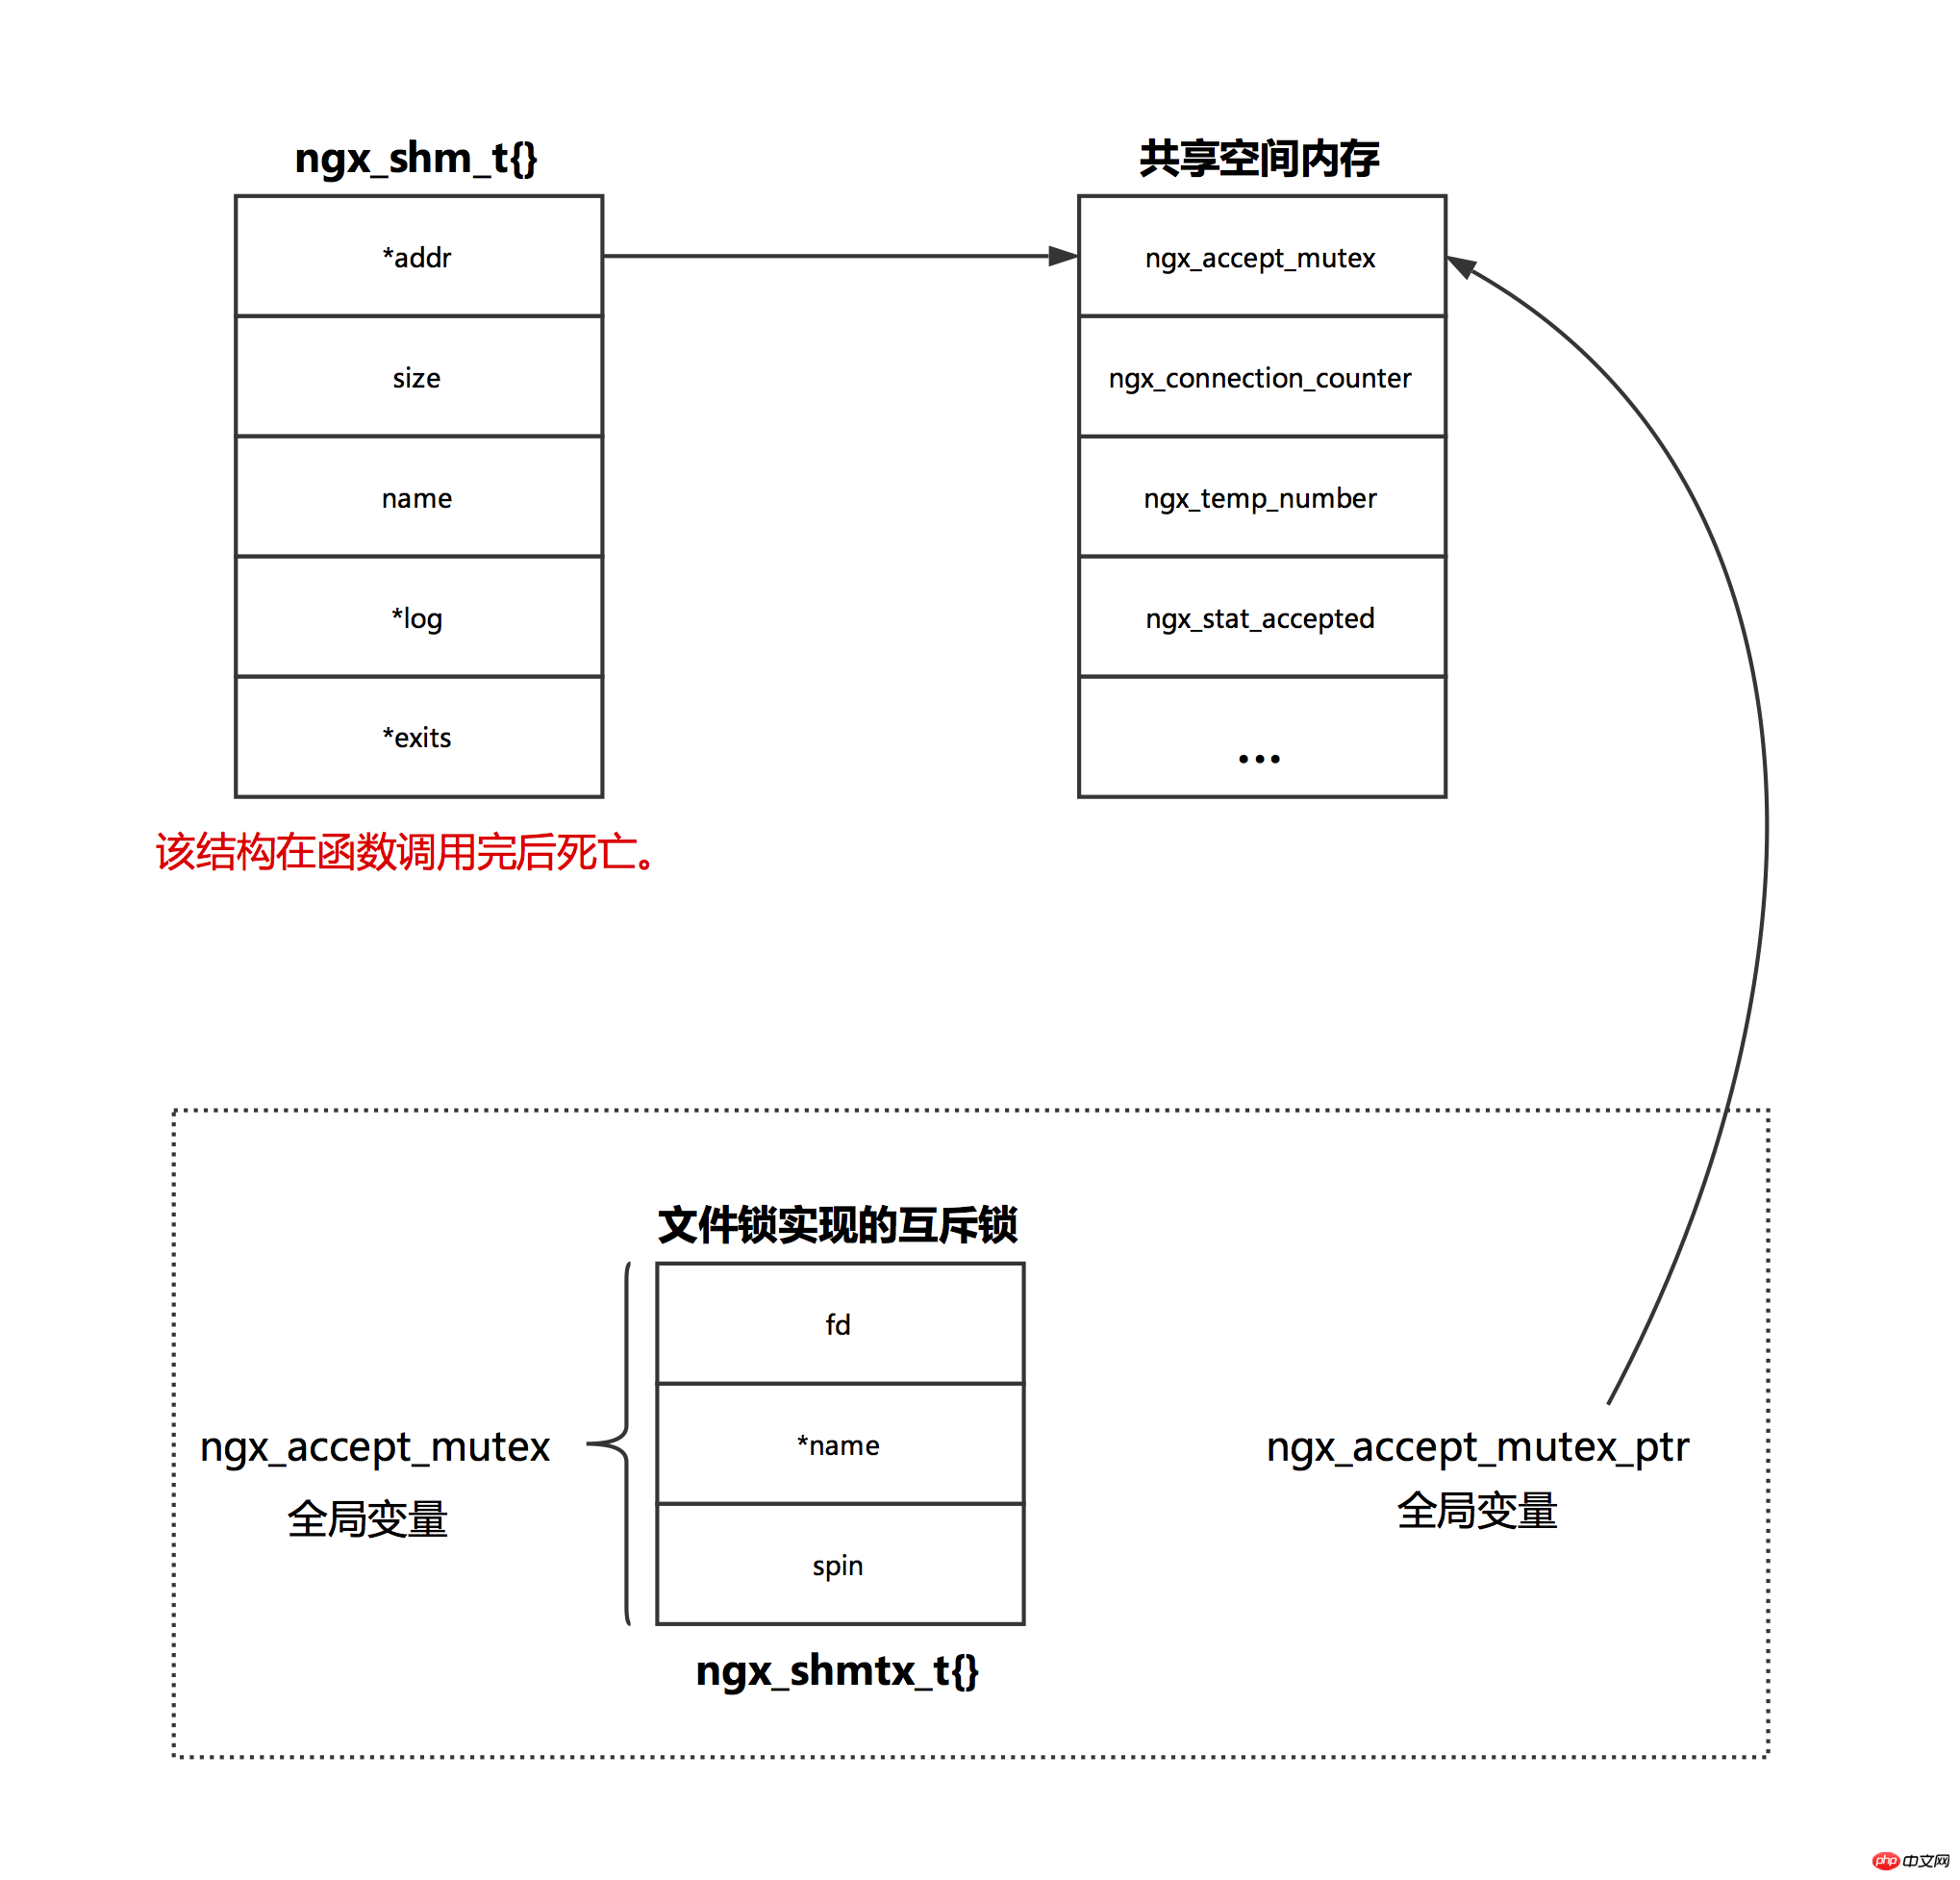
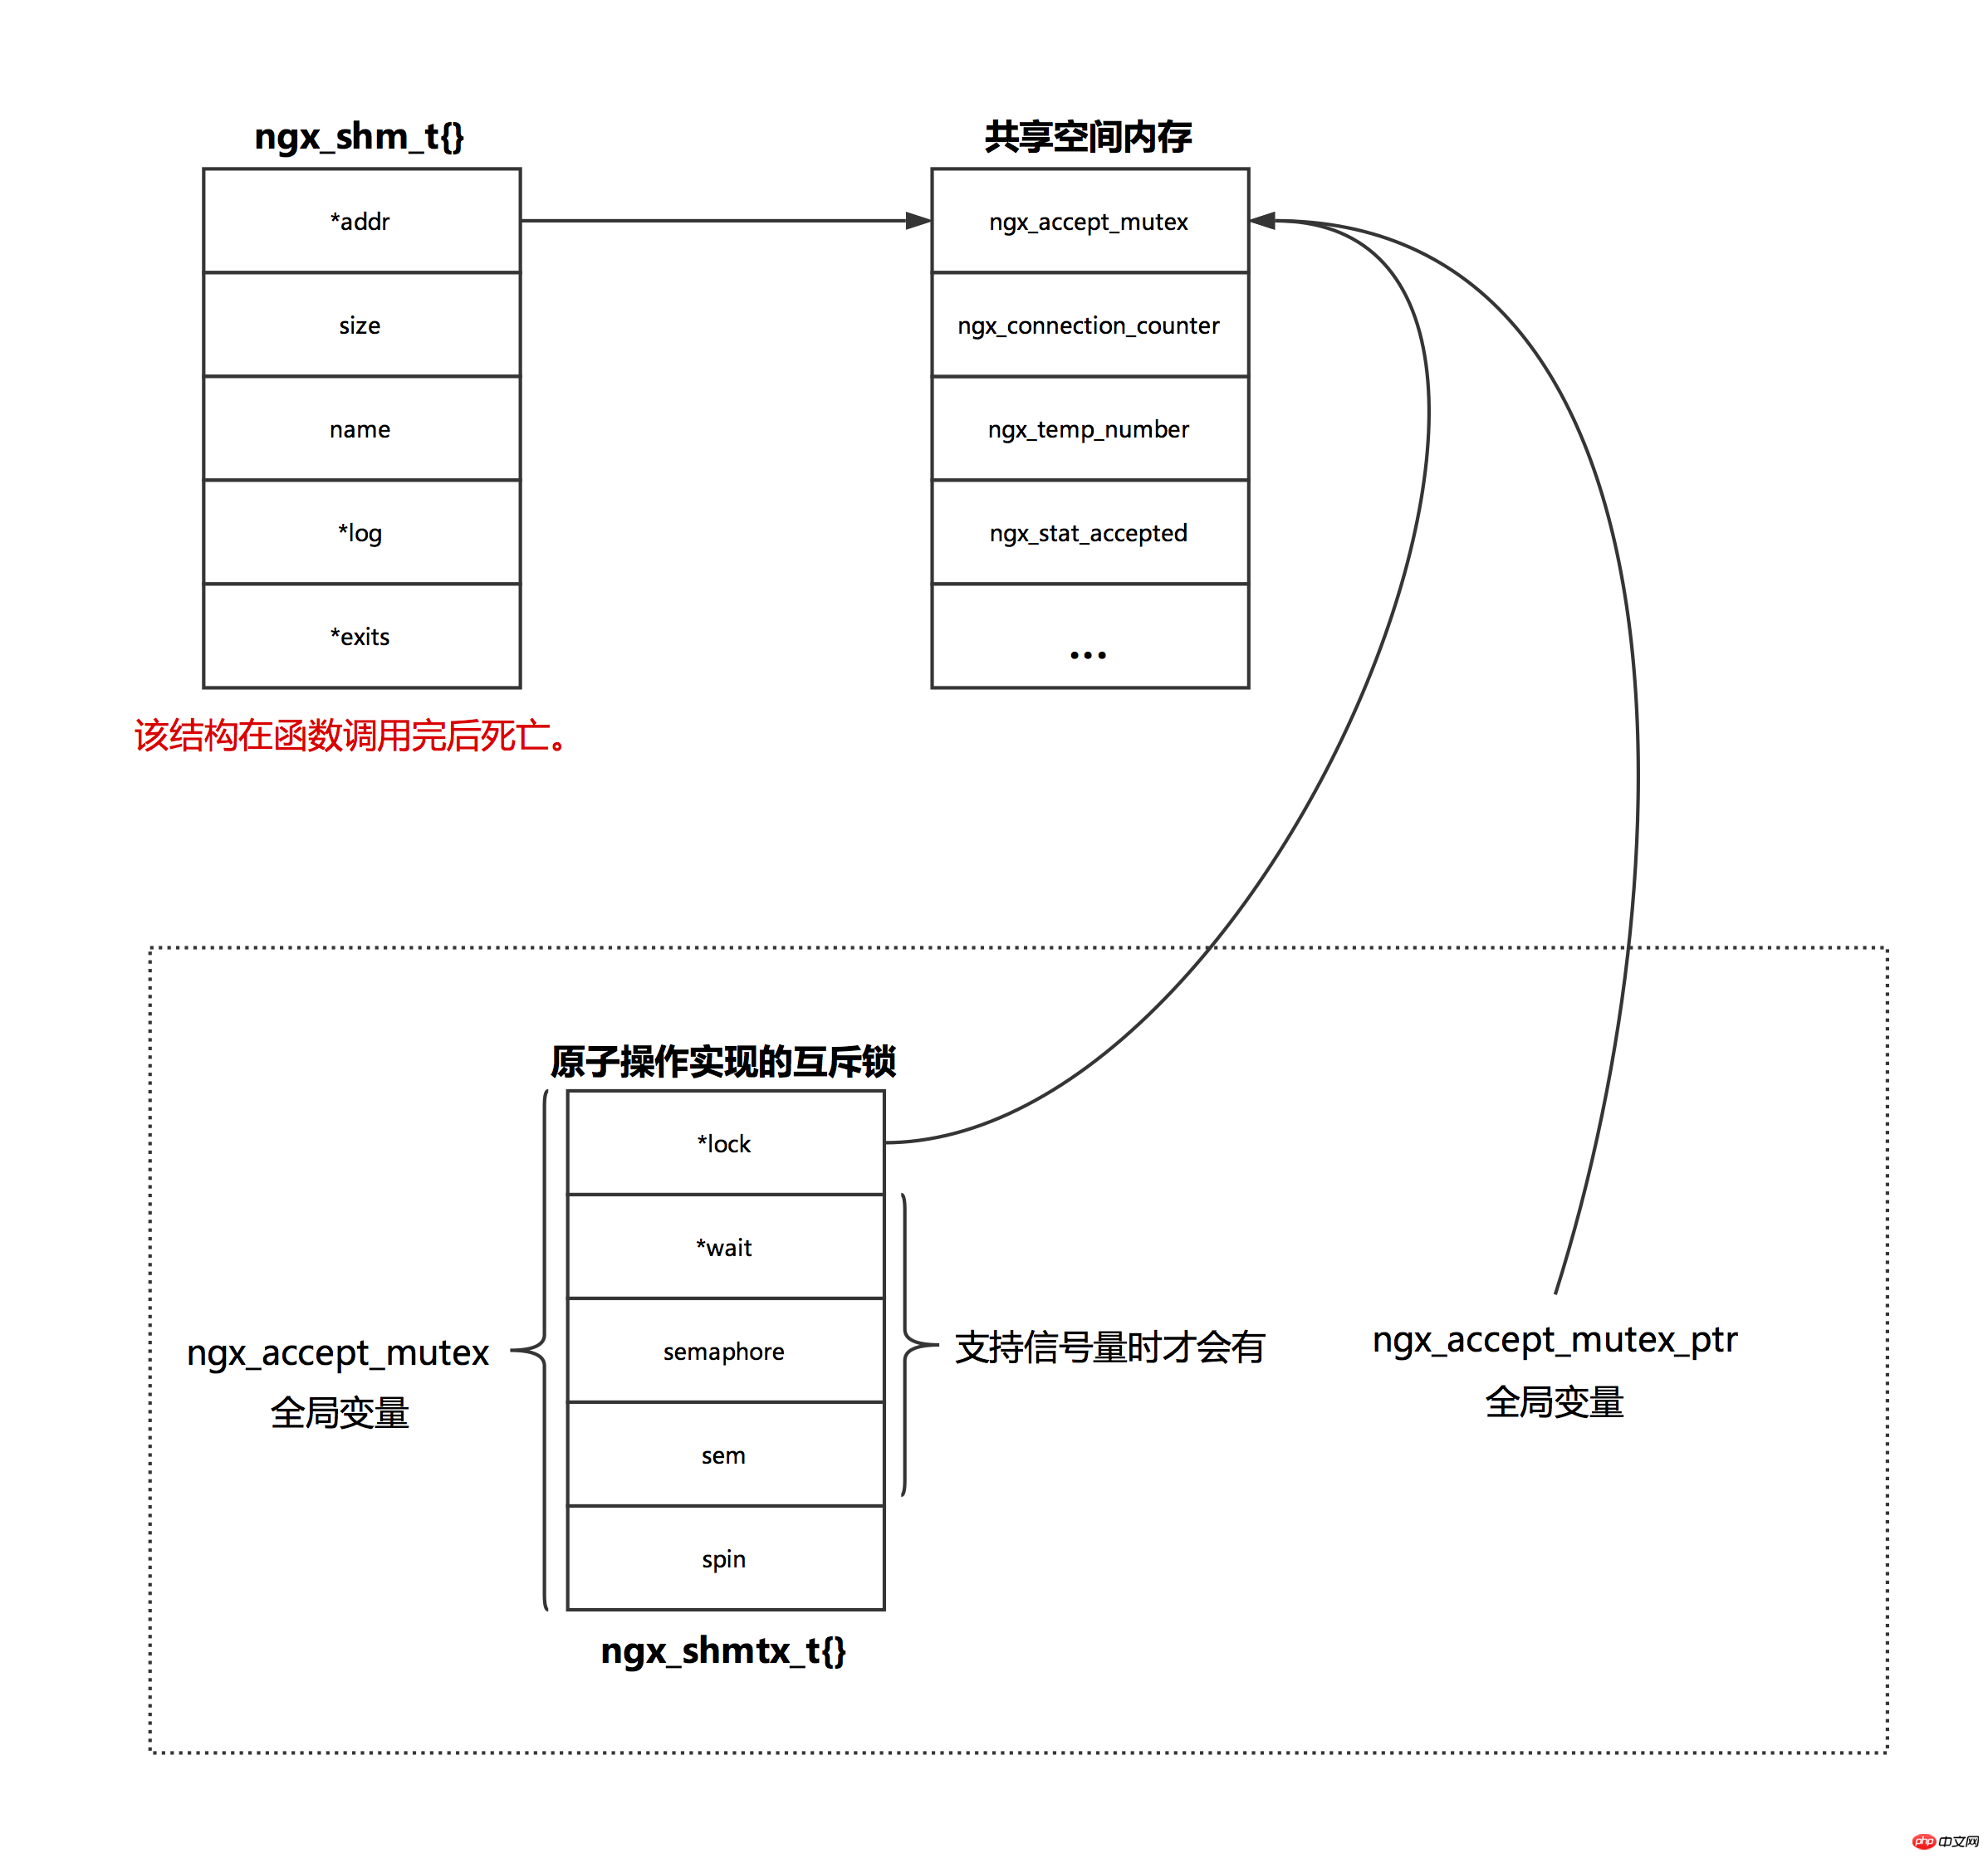
3.2.1 Basics- Need to create an interactive session in nginx Exclusion lock is used for synchronization of multiple processes later. In addition, nginx may need some statistical information, such as settings (stat_stub). We do not need to specially manage these variables. We only need to open the shared space and use them directly.
- The statistical information required after setting stat_stub is also placed in shared memory. We only use the mutex lock in nginx for explanation here.
- nginx mutex lock has two options. When the system supports atomic operations, Atomic operations are used, and file locks are used when not supported. See the ngx_event_module_init function for the source code of this section.
- The following figure is a schematic diagram of a file lock implementing a mutual exclusion lock.

- The following figure is a schematic diagram of atomic operation to implement a mutex lock.

- Problem
3.3 Manage shared memory through slab
- nginx allows each module to open up shared space for use, such as the ngx_http_limit_conn_module module.
- The basic ideas of nginx shared memory management are:
- The basic structure diagram of nginx shared memory is as follows:

In the above figure, except for a section of memory starting from the ngx_slab_pool_t interface on the far right, which is located in the shared memory area, other memories are not shared memory.
Shared memory is ultimately allocated from page.
The above is the detailed content of In-depth understanding of Nginx memory management (picture). For more information, please follow other related articles on the PHP Chinese website!

Hot AI Tools

Undresser.AI Undress
AI-powered app for creating realistic nude photos

AI Clothes Remover
Online AI tool for removing clothes from photos.

Undress AI Tool
Undress images for free

Clothoff.io
AI clothes remover

Video Face Swap
Swap faces in any video effortlessly with our completely free AI face swap tool!

Hot Article

Hot Tools

Notepad++7.3.1
Easy-to-use and free code editor

SublimeText3 Chinese version
Chinese version, very easy to use

Zend Studio 13.0.1
Powerful PHP integrated development environment

Dreamweaver CS6
Visual web development tools

SublimeText3 Mac version
God-level code editing software (SublimeText3)

Hot Topics
 1655
1655
 14
14
 1414
1414
 52
52
 1307
1307
 25
25
 1253
1253
 29
29
 1227
1227
 24
24
 How to configure nginx in Windows
Apr 14, 2025 pm 12:57 PM
How to configure Nginx in Windows? Install Nginx and create a virtual host configuration. Modify the main configuration file and include the virtual host configuration. Start or reload Nginx. Test the configuration and view the website. Selectively enable SSL and configure SSL certificates. Selectively set the firewall to allow port 80 and 443 traffic.
 How to check the name of the docker container
Apr 15, 2025 pm 12:21 PM
You can query the Docker container name by following the steps: List all containers (docker ps). Filter the container list (using the grep command). Gets the container name (located in the "NAMES" column).
 How to start containers by docker
Apr 15, 2025 pm 12:27 PM
Docker container startup steps: Pull the container image: Run "docker pull [mirror name]". Create a container: Use "docker create [options] [mirror name] [commands and parameters]". Start the container: Execute "docker start [Container name or ID]". Check container status: Verify that the container is running with "docker ps".
 How to check whether nginx is started
Apr 14, 2025 pm 01:03 PM
How to confirm whether Nginx is started: 1. Use the command line: systemctl status nginx (Linux/Unix), netstat -ano | findstr 80 (Windows); 2. Check whether port 80 is open; 3. Check the Nginx startup message in the system log; 4. Use third-party tools, such as Nagios, Zabbix, and Icinga.
 How to create containers for docker
Apr 15, 2025 pm 12:18 PM
Create a container in Docker: 1. Pull the image: docker pull [mirror name] 2. Create a container: docker run [Options] [mirror name] [Command] 3. Start the container: docker start [Container name]
 How to check nginx version
Apr 14, 2025 am 11:57 AM
The methods that can query the Nginx version are: use the nginx -v command; view the version directive in the nginx.conf file; open the Nginx error page and view the page title.
 How to configure cloud server domain name in nginx
Apr 14, 2025 pm 12:18 PM
How to configure an Nginx domain name on a cloud server: Create an A record pointing to the public IP address of the cloud server. Add virtual host blocks in the Nginx configuration file, specifying the listening port, domain name, and website root directory. Restart Nginx to apply the changes. Access the domain name test configuration. Other notes: Install the SSL certificate to enable HTTPS, ensure that the firewall allows port 80 traffic, and wait for DNS resolution to take effect.
 What to do if nginx server is hung
Apr 14, 2025 am 11:42 AM
When the Nginx server goes down, you can perform the following troubleshooting steps: Check that the nginx process is running. View the error log for error messages. Check the syntax of nginx configuration. Make sure nginx has the permissions you need to access the file. Check file descriptor to open limits. Confirm that nginx is listening on the correct port. Add firewall rules to allow nginx traffic. Check reverse proxy settings, including backend server availability. For further assistance, please contact technical support.


