Why not call methods in templates in Angular
This article will introduce to you the reasons why methods are not called in the template (template) in Angular, as well as the solutions. I hope it will be helpful to everyone!

When you create an angular component after running the ng generate component <component-name></component-name> command, four files will be generated by default:
- A component file
<component-name>.component.ts</component-name> - A template file
<component-name>.component.html</component-name> - A CSS file,
<component-name>.component.css</component-name> - Test file
<component-name>.component.spec. ts</component-name>
[Related tutorial recommendation: "angular tutorial"]
template is your HTML code, you need to avoid calling non-events in it class methods. For example
<!--html 模板-->
<p>
translate Name: {{ originName }}
</p>
<p>
translate Name: {{ getTranslatedName('你好') }}
</p>
<button (click)="onClick()">Click Me!</button>// 组件文件
import { Component } from '@angular/core';
@Component({
selector: 'my-app',
templateUrl: './app.component.html',
styleUrls: ['./app.component.css'],
})
export class AppComponent {
originName = '你好';
getTranslatedName(name: string): string {
console.log('getTranslatedName called for', name);
return 'hello world!';
}
onClick() {
console.log('Button clicked!');
}
}
We directly call the getTranslatedName method in the template, which conveniently displays the return value of the method hello world.
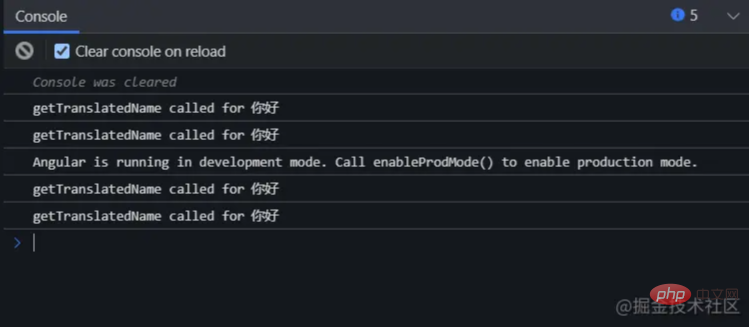
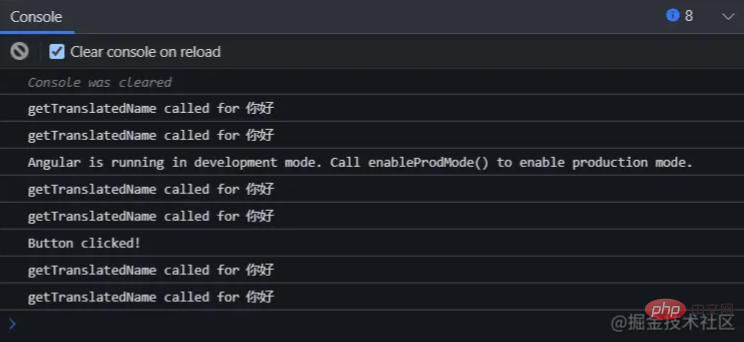
There seems to be no problem, but if we check the console we will find that this method is called more than once.

And when we click the button, even if we don’t want to change originName, we will continue to call this method.

The reason is related to angular's change detection mechanism. Normally we hope to re-render the corresponding module when a value changes, but Angular has no way to detect whether the return value of a function has changed, so it can only be executed once every time a change is detected. This function, which is why when the button is clicked, even if originName is not changed, it is still executed getTranslatedName
. When we bind it is not a click event, but For other events that are easier to trigger, such as mouseenter, mouseleave, mousemove, etc., this function may be called hundreds or thousands of times meaninglessly, which may cause a considerable waste of resources and cause performance problems.
A small Demo:
https://stackblitz.com/edit/angular-ivy-4bahvo?file=src/app/app.component.html
In most cases, we can always find alternatives, such as assigning <div class="code" style="position:relative; padding:0px; margin:0px;"><pre class='brush:php;toolbar:false;'>import { Component, OnInit } from &#39;@angular/core&#39;;
@Component({
selector: &#39;my-app&#39;,
templateUrl: &#39;./app.component.html&#39;,
styleUrls: [&#39;./app.component.css&#39;],
})
export class AppComponent implements OnInit {
originName = &#39;你好&#39;;
TranslatedName: string;
ngOnInit(): void {
this.TranslatedName = this.getTranslatedName(this.originName)
}
getTranslatedName(name: string): string {
console.count(&#39;getTranslatedName&#39;);
return &#39;hello world!&#39;;
}
onClick() {
console.log(&#39;Button clicked!&#39;);
}
}</pre><div class="contentsignin">Copy after login</div></div> in onInit<p> or using <code>pipe to avoid the article being too long, just No more details.
For more programming related knowledge, please visit: Programming Video! !
The above is the detailed content of Why not call methods in templates in Angular. For more information, please follow other related articles on the PHP Chinese website!

Hot AI Tools

Undresser.AI Undress
AI-powered app for creating realistic nude photos

AI Clothes Remover
Online AI tool for removing clothes from photos.

Undress AI Tool
Undress images for free

Clothoff.io
AI clothes remover

Video Face Swap
Swap faces in any video effortlessly with our completely free AI face swap tool!

Hot Article

Hot Tools

Notepad++7.3.1
Easy-to-use and free code editor

SublimeText3 Chinese version
Chinese version, very easy to use

Zend Studio 13.0.1
Powerful PHP integrated development environment

Dreamweaver CS6
Visual web development tools

SublimeText3 Mac version
God-level code editing software (SublimeText3)

Hot Topics
 1666
1666
 14
14
 1425
1425
 52
52
 1326
1326
 25
25
 1273
1273
 29
29
 1252
1252
 24
24
 How to install Angular on Ubuntu 24.04
Mar 23, 2024 pm 12:20 PM
Angular.js is a freely accessible JavaScript platform for creating dynamic applications. It allows you to express various aspects of your application quickly and clearly by extending the syntax of HTML as a template language. Angular.js provides a range of tools to help you write, update and test your code. Additionally, it provides many features such as routing and form management. This guide will discuss how to install Angular on Ubuntu24. First, you need to install Node.js. Node.js is a JavaScript running environment based on the ChromeV8 engine that allows you to run JavaScript code on the server side. To be in Ub
 An article exploring server-side rendering (SSR) in Angular
Dec 27, 2022 pm 07:24 PM
Do you know Angular Universal? It can help the website provide better SEO support!
 How to use PHP and Angular for front-end development
May 11, 2023 pm 04:04 PM
With the rapid development of the Internet, front-end development technology is also constantly improving and iterating. PHP and Angular are two technologies widely used in front-end development. PHP is a server-side scripting language that can handle tasks such as processing forms, generating dynamic pages, and managing access permissions. Angular is a JavaScript framework that can be used to develop single-page applications and build componentized web applications. This article will introduce how to use PHP and Angular for front-end development, and how to combine them
 PHP email templates: customize and personalize your email content.
Sep 19, 2023 pm 01:21 PM
PHP email templates: Customize and personalize your email content With the popularity and widespread use of email, traditional email templates can no longer meet people's needs for personalized and customized email content. Now we can create customized and personalized email templates by using PHP programming language. This article will show you how to use PHP to achieve this goal, and provide some specific code examples. 1. Create an email template First, we need to create a basic email template. This template can be an HTM
 Token-based authentication with Angular and Node
Sep 01, 2023 pm 02:01 PM
Authentication is one of the most important parts of any web application. This tutorial discusses token-based authentication systems and how they differ from traditional login systems. By the end of this tutorial, you will see a fully working demo written in Angular and Node.js. Traditional Authentication Systems Before moving on to token-based authentication systems, let’s take a look at traditional authentication systems. The user provides their username and password in the login form and clicks Login. After making the request, authenticate the user on the backend by querying the database. If the request is valid, a session is created using the user information obtained from the database, and the session information is returned in the response header so that the session ID is stored in the browser. Provides access to applications subject to
 Angular components and their display properties: understanding non-block default values
Mar 15, 2024 pm 04:51 PM
The default display behavior for components in the Angular framework is not for block-level elements. This design choice promotes encapsulation of component styles and encourages developers to consciously define how each component is displayed. By explicitly setting the CSS property display, the display of Angular components can be fully controlled to achieve the desired layout and responsiveness.
 An article explaining in detail how to transfer data between Angular parent and child components
Jan 04, 2023 pm 09:06 PM
This article will take you through the method of transferring data between parent and child components (Component) in Angular. It will introduce the method of parent component transferring data to child component and child component transferring data to parent component in Angular. I hope it will be helpful to you!
 How to add PPT mask
Mar 20, 2024 pm 12:28 PM
Regarding PPT masking, many people must be unfamiliar with it. Most people do not understand it thoroughly when making PPT, but just make it up to make what they like. Therefore, many people do not know what PPT masking means, nor do they understand it. I know what this mask does, and I don’t even know that it can make the picture less monotonous. Friends who want to learn, come and learn, and add some PPT masks to your PPT pictures. Make it less monotonous. So, how to add a PPT mask? Please read below. 1. First we open PPT, select a blank picture, then right-click [Set Background Format] and select a solid color. 2. Click [Insert], word art, enter the word 3. Click [Insert], click [Shape]


