 Web Front-end
 JS Tutorial
 Detailed explanation of template input variables (let-variables) in Angular
Detailed explanation of template input variables (let-variables) in Angular
This article will take you through the template input variables (let-variables) in Angular. It has certain reference value. Friends in need can refer to it. I hope it will be helpful to everyone.

As a person like me, I don’t like to directly copy things from the official website when writing articles or sharing my experiences. It’s really meaningless. I still like to write articles in my vernacular. I spent a long time on the official website today about template input variables, and finally got a preliminary understanding of what it is.
So what exactly is a template input variable?
The reason why I want to study this thing is that when I used ng-zorro before, I used it Its paging component Pagination (Official website link). There is a customize the previous page and next page template function. The code is as follows:
@Component({
selector: 'nz-demo-pagination-item-render',
template: `
<nz-pagination [nzPageIndex]="1" [nzTotal]="500" [nzItemRender]="renderItemTemplate"></nz-pagination>
<ng-template #renderItemTemplate let-type let-page="page">
<ng-container [ngSwitch]="type">
<a *ngSwitchCase="'page'">{{ page }}</a>
<a *ngSwitchCase="'prev'">Previous</a>
<a *ngSwitchCase="'next'">Next</a>
<a *ngSwitchCase="'prev_5'"><<</a>
<a *ngSwitchCase="'next_5'">>></a>
</ng-container>
</ng-template>
`
})
export class NzDemoPaginationItemRenderComponent {}After reading this, I was very confused. What is this let? Why does let- have a value after being followed by a variable? Then I started looking for what this let is on the official website. Finally, I found the explanation about let in the Microgrammar section of Main Concepts-Instructions-Structural Instructions. Official website description: Microgrammar. [Related recommendation: "angular tutorial"]
There is also a brief explanation below:
The official website is still as non-verbal as ever. It introduces it to you in just a few sentences and doesn't tell you how to use it. It also doesn't tell you where the value of the variable declared byTemplate input variable (Template input variable)
A template input variable is a variable whose value you can reference in a single instance of a template. There are several template input variables in this example: hero
......You declare a template,i, andodd. They all useletas the leading keyword.input in a template using the
......letkeyword (such aslet hero) variable. The scope of this variable is limited to the single instance of the template being repeated. In fact, you can use the same variable name in other structural directives.
let comes from. The more I read, the angrier I became. Well, if you don’t tell me about the official website, I’ll find it myself.
The variable declared by let is the variable in the context object of this template template. Otherwise, why is it called template input variable? In the *ngFor Insider section, we learned the inside story. The structural directive actually wraps the host element in a , and then parse the expression in *ngFor on this template into each let template input variable and the value that needs to be passed in for this instruction. Since the code in the template will not be directly rendered into a view, there must be some way to turn the template into a view. Our structural directives do just that, turn our templates into views. The official sample code of
*ngFor is as follows:
//解析前的模板
<div *ngFor="let hero of heroes; let i=index; let odd=odd; trackBy: trackById" [class.odd]="odd">
  ({{i}}) {{hero.name}}
</div>
//angular解析后的模板
<ng-template ngFor let-hero [ngForOf]="heroes" let-i="index" let-odd="odd" [ngForTrackBy]="trackById">
  <div [class.odd]="odd">({{i}}) {{hero.name}}</div>
</ng-template>- As a reminder, the so-called
- host element is the one where the instruction is located Element, like in the above example, div
is the host element of the*ngFordirective. - trackBy
This is similar to the key in vue and react. You can give the template an identifier to reduce the performance overhead when re-rendering it.
After reading this description, we can know:
- let-i
The context attribute ofandlet-oddvariables are Defined bylet i=indexandlet odd=odd. Angular sets them to the current values of theindex and oddproperties in thecontextobject.- let-hero
is not specified here. Its origin is implicit. Angular setslet-heroto the value of the$implicitproperty in this context, which is initialized byNgForwith the hero in the current iteration.
angular sets the context object for this template. But we can't see this process because it is implemented inside the source code of ngFor. And this context object has index and odd attributes, and contains an $implicit (implicit: implicit; not directly stated) properties. Then we infer that this context object has at least the following attributes:
{
    $implicit:null,
    index:null,
    odd:null,
}那么我们声明let变量的本质其实就是声明一个变量获取上下文对象中的同名属性的值。let-hero不进行任何赋值的话,hero默认等于$implicit的值。无论是有多少个let-a,let-b,let-c还是let-me。声明的这个变量的值都等于$implicit的值。而我们进行赋值过的,比如let-i = "index",i的值就等于这个上下文对象中的index属性对应的值。
上下文对象是如何设置的
当我们知道这个上下文对象是什么了,就该想这个上下文对象是怎么设置的了。
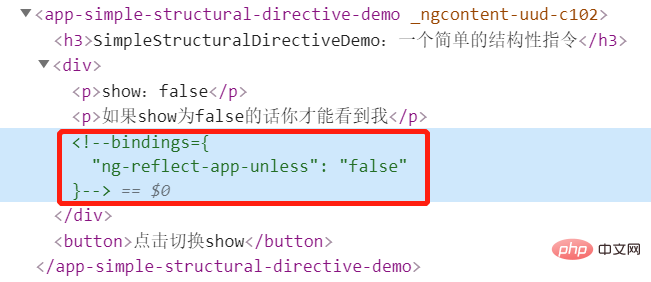
在结构性指令这一节当中,我们跟着官方示例做了一遍这个自定义结构性指令(如果还没有做的话,建议先跟着做一遍)。在UnlessDirective这个指令中,其构造器constructor声明了两个可注入的变量,分别是TemplateRef和ViewContainerRef。官网给的解释我觉得太过晦涩难懂,我这里给出一下我自己的理解:TemplateRef代表的是宿主元素被包裹之后形成的模板的引用。而ViewContainerRef代表的是一个视图容器的引用。那么问题来了,这个视图容器在哪儿呢?我们在constructor构造器中打印一下ViewContainerRef。打印结果如图:

然后我们点进去这个comment元素。发现其就是一个注释元素。如图所示:

其实我也不是很确定这个视图容器到底是不是这个注释元素。但是毋庸置疑的是,视图容器和宿主元素是兄弟关系,紧挨着宿主元素。我们可以使用ViewContainerRef中的createEmbeddedView() 方法(Embedded:嵌入式,内嵌式),将templateRef模板引用传入进去,创建出来一个真实的视图。由于这个视图是被插入到视图容器ViewContainerRef中了,所以又叫内嵌视图。那么这又和我们的上下文对象有什么关系呢?其实createEmbeddedView这个方法不止一个参数,其第二个参数就是给我们的模板设置上下文对象的。API的详情介绍请看createEmbeddedView这个API的详情。

就这样。我们就可以将上下文对象塞入模板中了,这样的话我们也可以直接使用let声明变量的方法来使用这个上下文对象了。
自定义一个简单的类*ngFor指令——appRepeat
那么我们知道是如何设置的了,那么我们就来验证一下是否是对的。接下来,我们仿照ngfor的功能,自己写一个简单的渲染指令。
首先我们定义一个指令:RepeatDirective。代码如下:
@Directive({
  selector: '[appRepeat]',
})
export class RepeatDirective {
  constructor(
    private templateRef: TemplateRef<any>,
    private viewContainer: ViewContainerRef,
  ) { }

  @Input() set appRepeatOf(heroesList: string[]) {
    heroesList.forEach((item, index, arr) => {
      this.viewContainer.createEmbeddedView(this.templateRef, {
        //当前条目的默认值
        $implicit: item,
        //可迭代对象的总数
        count: arr.length,
        //当前条目的索引值
        index: index,
        //如果当前条目在可迭代对象中的索引号为偶数则为 true。
        even: index % 2 === 0,
        //如果当前条目在可迭代对象中的索引号为奇数则为 true。
        odd: index % 2 === 1,
      });
    });
  }
}然后我们将其导入NgModule中,这个过程就省略不写了。然后我们在组件中使用一下这个指令:
@Component({
selector: 'app-structural-likeNgFor-demo',
template: `
<h2 id="原神-版本卡池角色">原神1.5版本卡池角色</h2>
<h4 id="自定义ngFor-appRepeat">自定义ngFor(appRepeat)</h4>
<ul>
<li *appRepeat="let h of heroesList;let i = index;let even = even">
索引:{{i}} -- {{h}} -- 索引值是否是偶数:{{even.toString()}}
</li>
</ul>
<h4 id="真正的ngFor">真正的ngFor</h4>
<ul>
<li *ngFor="let h of heroesList;let i = index;let even = even">
索引:{{i}} -- {{h}} -- 索引值是否是偶数:{{even.toString()}}
</li>
</ul>
`,
})
export class StructuralLikeNgForDemoComponent {
public heroesList: string[] = ['钟离', '烟绯', '诺艾尔', '迪奥娜'];
}在这里需要注意的是指令中的appRepeatOf不是乱写的。在微语法的解析过程中let h of heroesList中的of首先首字母会变成大写的,变成Of。然后在给它加上这个指令的前缀,也就是appRepeat。组合起来就是appRepeatOf了。由它来接收一个可迭代的对象。
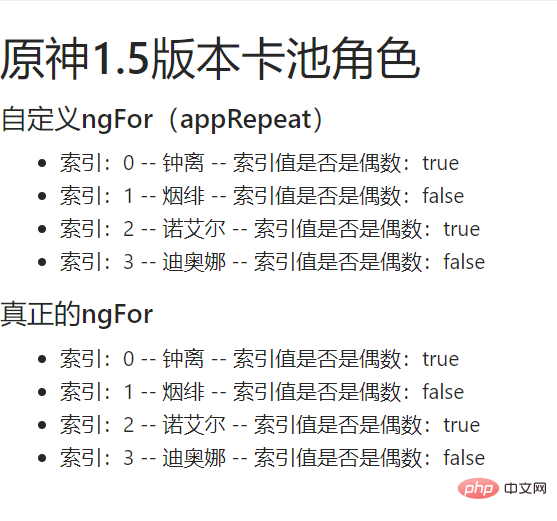
最后显示的效果图:

运行结果的话和*ngFor没有区别。但是功能肯定是欠缺的,如果有能力的小伙伴可以去阅读*ngFor的源码:*ngFor的源码。
Summary
Through this article, we know that let-variableThis template input variable is passed through the template Defined in the context object and get the value. Then if you want to set the context object, you need to set it through the second parameter of the createEmbeddedView method.
Conclusion
But I always feel that the understanding is not thorough enough. I always feel that the context object of setting the template may not be just createEmbeddedView This is a method, but I didn't find any other method. If you guys know of other methods, please leave a message and let me know.
References:
This article is inspired by: Angular implements a "repeat" directive
More programming related For knowledge, please visit: programming video! !
The above is the detailed content of Detailed explanation of template input variables (let-variables) in Angular. For more information, please follow other related articles on the PHP Chinese website!

Hot AI Tools

Undresser.AI Undress
AI-powered app for creating realistic nude photos

AI Clothes Remover
Online AI tool for removing clothes from photos.

Undress AI Tool
Undress images for free

Clothoff.io
AI clothes remover

Video Face Swap
Swap faces in any video effortlessly with our completely free AI face swap tool!

Hot Article

Hot Tools

Notepad++7.3.1
Easy-to-use and free code editor

SublimeText3 Chinese version
Chinese version, very easy to use

Zend Studio 13.0.1
Powerful PHP integrated development environment

Dreamweaver CS6
Visual web development tools

SublimeText3 Mac version
God-level code editing software (SublimeText3)

Hot Topics
 1666
1666
 14
14
 1425
1425
 52
52
 1325
1325
 25
25
 1272
1272
 29
29
 1251
1251
 24
24
 Let's talk about metadata and decorators in Angular
Feb 28, 2022 am 11:10 AM
This article continues the learning of Angular, takes you to understand the metadata and decorators in Angular, and briefly understands their usage. I hope it will be helpful to everyone!
 How to install Angular on Ubuntu 24.04
Mar 23, 2024 pm 12:20 PM
Angular.js is a freely accessible JavaScript platform for creating dynamic applications. It allows you to express various aspects of your application quickly and clearly by extending the syntax of HTML as a template language. Angular.js provides a range of tools to help you write, update and test your code. Additionally, it provides many features such as routing and form management. This guide will discuss how to install Angular on Ubuntu24. First, you need to install Node.js. Node.js is a JavaScript running environment based on the ChromeV8 engine that allows you to run JavaScript code on the server side. To be in Ub
 A brief analysis of how to use monaco-editor in angular
Oct 17, 2022 pm 08:04 PM
How to use monaco-editor in angular? The following article records the use of monaco-editor in angular that was used in a recent business. I hope it will be helpful to everyone!
 An article exploring server-side rendering (SSR) in Angular
Dec 27, 2022 pm 07:24 PM
Do you know Angular Universal? It can help the website provide better SEO support!
 Angular + NG-ZORRO quickly develop a backend system
Apr 21, 2022 am 10:45 AM
This article will share with you an Angular practical experience and learn how to quickly develop a backend system using angualr combined with ng-zorro. I hope it will be helpful to everyone!
 How to use PHP and Angular for front-end development
May 11, 2023 pm 04:04 PM
With the rapid development of the Internet, front-end development technology is also constantly improving and iterating. PHP and Angular are two technologies widely used in front-end development. PHP is a server-side scripting language that can handle tasks such as processing forms, generating dynamic pages, and managing access permissions. Angular is a JavaScript framework that can be used to develop single-page applications and build componentized web applications. This article will introduce how to use PHP and Angular for front-end development, and how to combine them
 Detailed explanation of angular learning state manager NgRx
May 25, 2022 am 11:01 AM
This article will give you an in-depth understanding of Angular's state manager NgRx and introduce how to use NgRx. I hope it will be helpful to you!
 Token-based authentication with Angular and Node
Sep 01, 2023 pm 02:01 PM
Authentication is one of the most important parts of any web application. This tutorial discusses token-based authentication systems and how they differ from traditional login systems. By the end of this tutorial, you will see a fully working demo written in Angular and Node.js. Traditional Authentication Systems Before moving on to token-based authentication systems, let’s take a look at traditional authentication systems. The user provides their username and password in the login form and clicks Login. After making the request, authenticate the user on the backend by querying the database. If the request is valid, a session is created using the user information obtained from the database, and the session information is returned in the response header so that the session ID is stored in the browser. Provides access to applications subject to


