

Six ways to communicate with Vue components
In the normal development process, communication between father-son/sibling components is definitely encountered, so here is a summary of the communication props of 6 Vue components / $e$emit / Vuex$attrs / $ listeners
$parent / $children with ref
provide / inject
##Preface

1. props / $emit
This is one of the methods we usually use more often. Parent component A passes data to child component B through the props parameter. Component B sends an event (carrying parameter data) to component A through $emit. Component A listens to the event triggered by $emit and obtains the data sent by B to A. Let’s explain its implementation steps in detail:1: Parent component passes value to child component // App.vue 父组件
<template>
<a-compontent></a-compontent>
</template>
<script>
import aCompontent from './components/A.vue';
export default {
name: 'app',
compontent: { aCompontent },
data () {
return {
dataA: 'dataA数据'
}
}
}
// aCompontent 子组件
<template>
<p>{{dataA}} // 在子组件中把父组件传递过来的值显示出来
<script>export default {
name: 'aCompontent',
props: {
dataA: {
//这个就是父组件中子标签自定义名字
type: String,
required: true // 或者false
}
}
}
</script>Copy after login
// App.vue 父组件
<template>
<a-compontent></a-compontent>
</template>
<script>
import aCompontent from './components/A.vue';
export default {
name: 'app',
compontent: { aCompontent },
data () {
return {
dataA: 'dataA数据'
}
}
}
// aCompontent 子组件
<template>
<p>{{dataA}} // 在子组件中把父组件传递过来的值显示出来
<script>export default {
name: 'aCompontent',
props: {
dataA: {
//这个就是父组件中子标签自定义名字
type: String,
required: true // 或者false
}
}
}
</script>2: Child component passes value to parent component (Through events) // 子组件
<template>
<p>点击向父组件传递数据</p>
</template>
<script>export default {
name: 'child',
methods:{
changeTitle() {
// 自定义事件,会触发父组件的监听事件,并将数据以参数的形式传递
this.$emit('sendDataToParent','这是子组件向父组件传递的数据');
}
}
}
// 父组件
<template>
<child @sendDataToParent="getChildData">
<script>
import child from './components/child.vue';
export default {
name: 'child',
methods:{
getChildData(data) {
console.log(data); // 这里的得到了子组件的值
}
}
}
</script>Copy after login
// 子组件
<template>
<p>点击向父组件传递数据</p>
</template>
<script>export default {
name: 'child',
methods:{
changeTitle() {
// 自定义事件,会触发父组件的监听事件,并将数据以参数的形式传递
this.$emit('sendDataToParent','这是子组件向父组件传递的数据');
}
}
}
// 父组件
<template>
<child @sendDataToParent="getChildData">
<script>
import child from './components/child.vue';
export default {
name: 'child',
methods:{
getChildData(data) {
console.log(data); // 这里的得到了子组件的值
}
}
}
</script>2. $emit / $on
This method uses an instance similar to App.vue as a module Event Center, use it to trigger and listen for events. If you put it in App.vue, you can implement communication in any component. However, this method is not easy to maintain when the project is relatively large. For example: Suppose there are 4 components now, Home.vue and A/B/C components. These three components AB are sibling components. Home.vue is equivalent to the parent component creating an empty Vue instance. Mount the communication event on the instance -D.js import Vue from 'vue'export default new Vue()
// 我们可以在router-view中监听change事件,也可以在mounted方法中监听
// home.vue<template>  <p>    <child-a></child-a>    <child-b></child-b>    <child-c></child-c>  </p></template>
// A组件
<template>
<p>将A组件的数据发送给C组件 - {{name}}</p>
</template>
<script>
import Event from "./D";export default { data() { return {
name: 'Echo'
}
},
components: { Event },
methods: { dataA() {
Event.$emit('data-a', this.name);
}
}
}
</script>// B组件
<template>
<p>将B组件的数据发送给C组件 - {{age}}</p>
</template>
<script>
import Event from "./D";export default { data() { return {
age: '18'
}
},
components: { Event },
methods: { dataB() {
Event.$emit('data-b', this.age);
}
}
}
</script>// C组件
<template>
<p>C组件得到的数据 {{name}} {{age}}</p>
</template>
<script>
import Event from "./D";export default { data() { return {
name: '',
age: ''
}
},
components: { Event }, mounted() {
// 在模板编译完成后执行
Event.$on('data-a', name => {
this.name = name;
})
Event.$on('data-b', age => {
this.age = age;
})
}
}
</script>3. Vuex
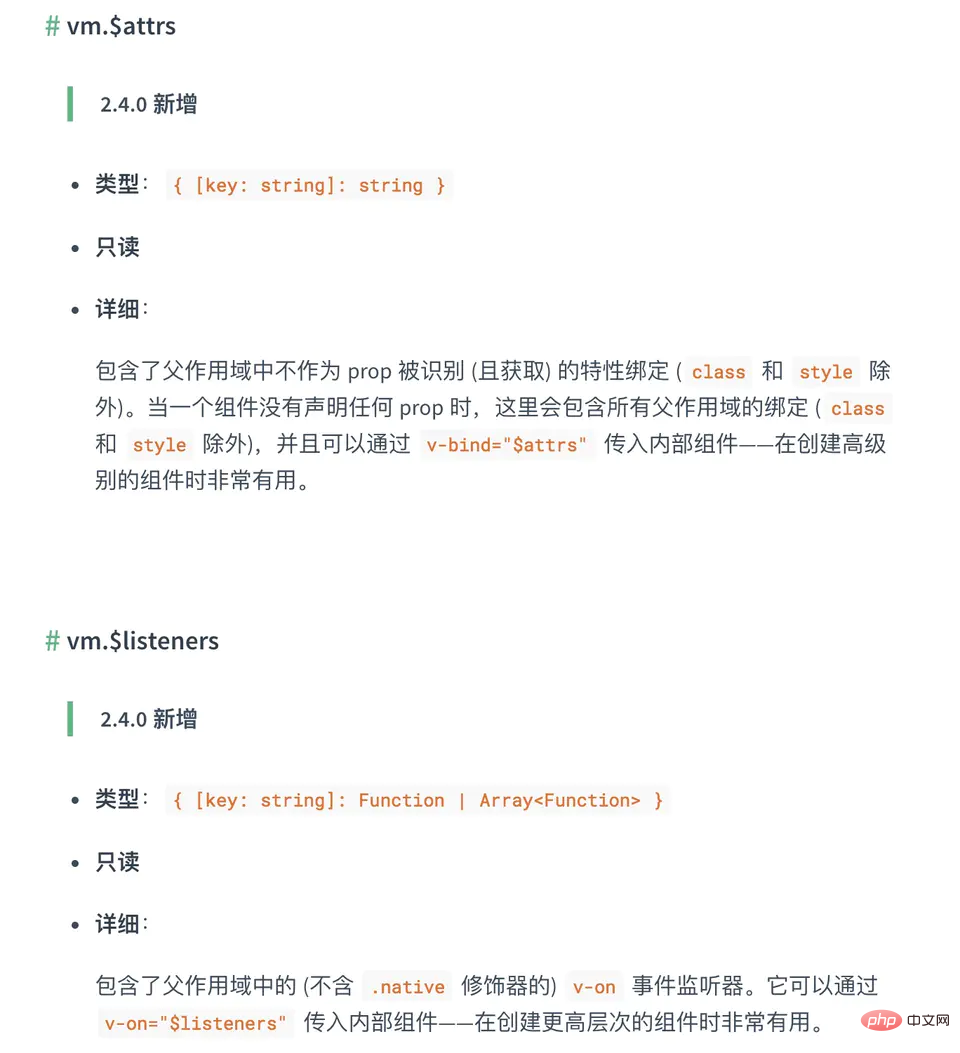
Vuex is a state management mode. It uses centralized storage to manage the state of all components of the application, and uses corresponding rules to ensure that the state changes in a predictable way. The core of the Vuex application is the store (warehouse, a container). The store contains most of the state in your application; This part will not be introduced in detail, the official document is very detailed vuex.vuejs .org/zh/guide/st…Four. $attrs / $listeners
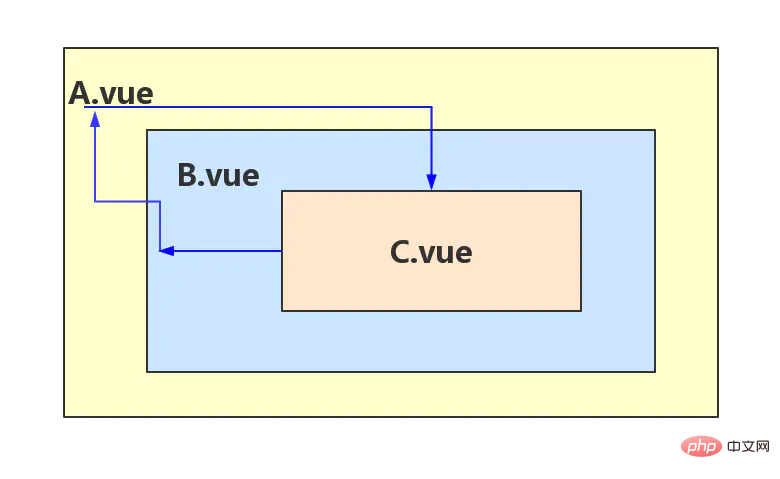
- Use Vuex for data management, but the problem with using vuex is that if the project is relatively small and there is less shared state between components, then use vuex is like killing a chicken with a knife.
- Use B component as a transfer station. When A component needs to pass information to C component, B accepts the information of A component and then uses props to pass it to C component. However, if there are too many nested components, it will The code is cumbersome and code maintenance is difficult; if the change of state in C needs to be passed to A, the event system must be used to pass it up level by level.
// App.vue
<template>
<p>
</p>
<p>App.vue</p>
<hr>
// 这里我们可以看到,app.vue向下一集的child1组件传递了5个参数,分别是name / age / job / sayHi / title
<child1></child1>
</template>
<script>
const child1 = () => import("./components/child1.vue");
export default {
name: 'app',
components: { child1 }, data() { return {
name: "Echo",
age: "18",
job: "FE",
say: "this is Hi~"
};
}
};
</script>// child1.vue
<template>
<p>
</p>
<p>child1.vue</p>
<p>name: {{ name }}</p>
<p>childCom1的$attrs: {{ $attrs }}</p>
<p>可以看到,$attrs这个对象集合中的值 = 所有传值过来的参数 - props中显示定义的参数</p>
<hr>
<child2></child2>
</template>
<script>
const child2 = () => import("./child2.vue");
export default {
components: {
child2
},
// 这个inheritAttrs默认值为true,不定义这个参数值就是true,可手动设置为false
// inheritAttrs的意义在用,可以在从父组件获得参数的子组件根节点上,将所有的$attrs以dom属性的方式显示
inheritAttrs: true, // 可以关闭自动挂载到组件根元素上的没有在props声明的属性
props: {
name: String // name作为props属性绑定
}, created() {
// 这里的$attrs就是所有从父组件传递过来的所有参数 然后 除去props中显式定义的参数后剩下的所有参数!!!
console.log(this.$attrs); // 输出{age: "18", job: "FE", say-Hi: "this is Hi~", title: "App.vue的title"}
}
};
</script>// child2.vue
<template>
<p>
</p>
<p>child2.vue</p>
<p>age: {{ age }}</p>
<p>childCom2: {{ $attrs }}</p>
<hr>
<child3></child3>
</template>
<script>
const child3 = () => import("./child3.vue");
export default {
components: {
child3
},
// 将inheritAttrs设置为false之后,将关闭自动挂载到组件根元素上的没有在props声明的属性
inheritAttrs: false,
props: {
age: String
}, created() {
// 同理和上面一样,$attrs这个对象集合中的值 = 所有传值过来的参数 - props中显示定义的参数
console.log(this.$attrs);
}
};
</script>// child3.vue
<template>
<p>
</p>
<p>child3.vue</p>
<p>job: {{job}}</p>
<p>title: {{title}}</p>
<p>childCom3: {{ $attrs }}</p>
</template>
<script>export default {
inheritAttrs: true,
props: {
job: String,
title: String
}
};
</script>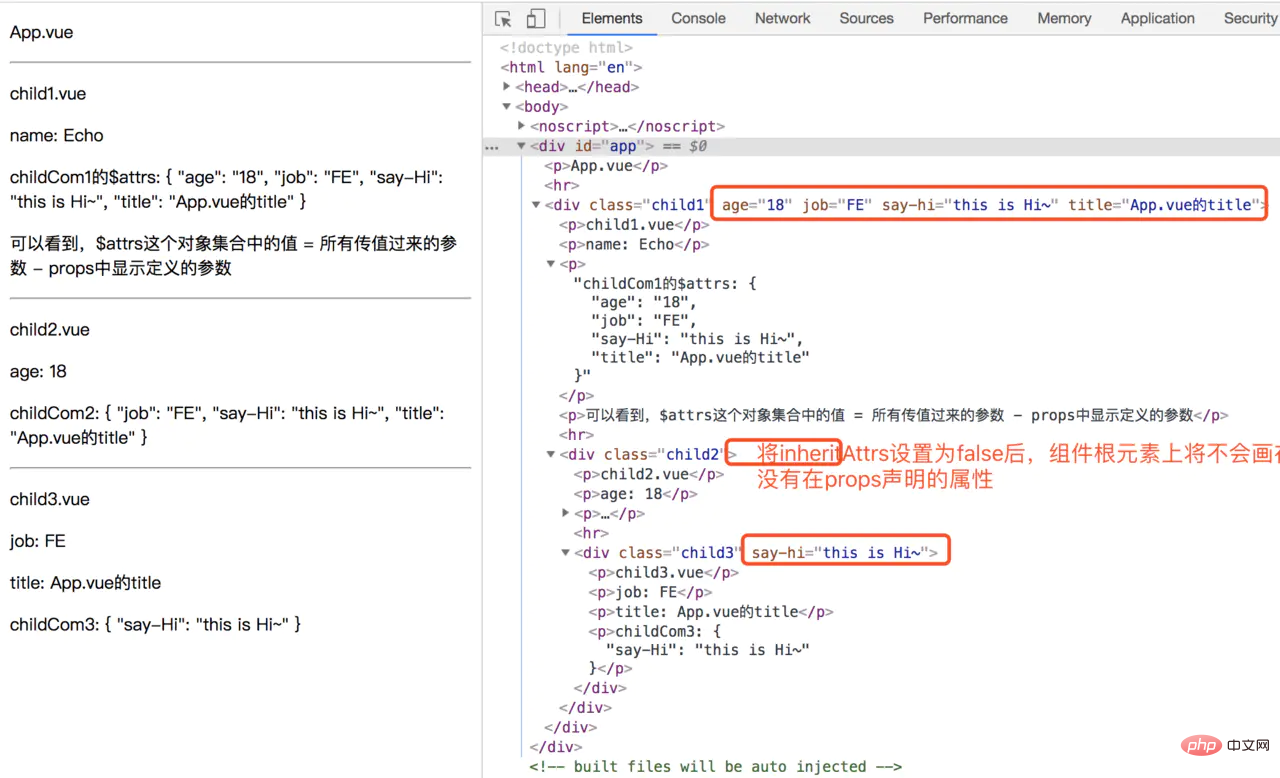
<template>
  <p>
    <child2></child2>
  </p>
</template>
<script>
const child2 = () => import("./child2.vue");
export default {
  components: {
    child2
  },
  methods: {    reciveRocket() {
      console.log("reciveRocket success");
    }
  }
};
</script>复制代码<template>
<p>
<child3></child3>
</p>
</template>
<script>
const child3 = () => import("./child3.vue");
export default {
components: {
child3
}, created() {
this.$emit('child2', 'child2-data');
}
};
</script>复制代码// child3.vue
<template>
<p>
</p>
<p>child3</p>
</template>
<script>
export default {
methods: { startUpRocket() {
this.$emit("upRocket");
console.log("startUpRocket");
}
}
};
</script>复制代码这里的结果是,当我们点击 child3 组件的 child3 文字,触发 startUpRocket 事件,child1 组件就可以接收到,并触发 reciveRocket 打印结果如下:
> reciveRocket success
> startUpRocket
五. $parent / $children 与 ref
- ref:如果在普通的 DOM 元素上使用,引用指向的就是 DOM 元素;如果用在子组件上,引用就指向组件实例
- $parent / $children:访问父 / 子实例
这两种方式都是直接得到组件实例,使用后可以直接调用组件的方法或访问数据。
我们先来看个用 ref 来访问组件的:
// child1子组件
export default {
        data() {
            return {
      title: 'Vue.js'
    };
  },
  methods: {
      sayHello() {
      console.log('child1!!');
    }
  }
};// 父组件
<template>
<child1></child1>
</template>
<script>
export default {
methods: {
sayHi () {
const child1 = this.$refs.child1;
console.log(child1.title); // Vue.js
child1.sayHello(); // 弹窗
}
}
}
</script>六. provide/inject
provide/inject 是 Vue2.2.0 新增 API,这对选项需要一起使用,以允许一个祖先组件向其所有子孙后代注入一个依赖,不论组件层次有多深,并在起上下游关系成立的时间里始终生效。如果你熟悉 React,这与 React 的上下文特性很相似。
provide 和 inject 主要为高阶插件/组件库提供用例。并不推荐直接用于应用程序代码中。
由于自己对这部分的内容理解不是很深刻,所以感兴趣的可以前往官方文档查看: cn.vuejs.org/v2/api/#pro…
总结
常见使用场景可以分为三类:
- 父子通信:props / $emit;$parent / $children;$attrs/$listeners;provide / inject API; ref
- 兄弟通信:Vuex
- 跨级通信:Vuex;$attrs/$listeners;provide / inject API
4.接下来我还会在我的裙里用视频讲解的方式给大家讲解【以下图中的内容】有兴趣的可以来我的扣扣裙 519293536 免费交流学习,我都会尽力帮大家哦 

推荐教程:《JS教程》
The above is the detailed content of Six ways to communicate with Vue components. For more information, please follow other related articles on the PHP Chinese website!

Hot AI Tools

Undresser.AI Undress
AI-powered app for creating realistic nude photos

AI Clothes Remover
Online AI tool for removing clothes from photos.

Undress AI Tool
Undress images for free

Clothoff.io
AI clothes remover

Video Face Swap
Swap faces in any video effortlessly with our completely free AI face swap tool!

Hot Article
Hot Tools

Notepad++7.3.1
Easy-to-use and free code editor

SublimeText3 Chinese version
Chinese version, very easy to use

Zend Studio 13.0.1
Powerful PHP integrated development environment

Dreamweaver CS6
Visual web development tools

SublimeText3 Mac version
God-level code editing software (SublimeText3)
Hot Topics
 1664
1664
 14
1423
52
1317
25
1268
29
1246
24
14
1423
52
1317
25
1268
29
1246
24

 How to use bootstrap in vue
Apr 07, 2025 pm 11:33 PM
How to use bootstrap in vue
Apr 07, 2025 pm 11:33 PM
Using Bootstrap in Vue.js is divided into five steps: Install Bootstrap. Import Bootstrap in main.js. Use the Bootstrap component directly in the template. Optional: Custom style. Optional: Use plug-ins.
 How to add functions to buttons for vue
Apr 08, 2025 am 08:51 AM
How to add functions to buttons for vue
Apr 08, 2025 am 08:51 AM
You can add a function to the Vue button by binding the button in the HTML template to a method. Define the method and write function logic in the Vue instance.
 How to use watch in vue
Apr 07, 2025 pm 11:36 PM
How to use watch in vue
Apr 07, 2025 pm 11:36 PM
The watch option in Vue.js allows developers to listen for changes in specific data. When the data changes, watch triggers a callback function to perform update views or other tasks. Its configuration options include immediate, which specifies whether to execute a callback immediately, and deep, which specifies whether to recursively listen to changes to objects or arrays.
 What does vue multi-page development mean?
Apr 07, 2025 pm 11:57 PM
What does vue multi-page development mean?
Apr 07, 2025 pm 11:57 PM
Vue multi-page development is a way to build applications using the Vue.js framework, where the application is divided into separate pages: Code Maintenance: Splitting the application into multiple pages can make the code easier to manage and maintain. Modularity: Each page can be used as a separate module for easy reuse and replacement. Simple routing: Navigation between pages can be managed through simple routing configuration. SEO Optimization: Each page has its own URL, which helps SEO.
 React vs. Vue: Which Framework Does Netflix Use?
Apr 14, 2025 am 12:19 AM
React vs. Vue: Which Framework Does Netflix Use?
Apr 14, 2025 am 12:19 AM
Netflixusesacustomframeworkcalled"Gibbon"builtonReact,notReactorVuedirectly.1)TeamExperience:Choosebasedonfamiliarity.2)ProjectComplexity:Vueforsimplerprojects,Reactforcomplexones.3)CustomizationNeeds:Reactoffersmoreflexibility.4)Ecosystema
 How to return to previous page by vue
Apr 07, 2025 pm 11:30 PM
How to return to previous page by vue
Apr 07, 2025 pm 11:30 PM
Vue.js has four methods to return to the previous page: $router.go(-1)$router.back() uses <router-link to="/" component window.history.back(), and the method selection depends on the scene.
 How to reference js file with vue.js
Apr 07, 2025 pm 11:27 PM
How to reference js file with vue.js
Apr 07, 2025 pm 11:27 PM
There are three ways to refer to JS files in Vue.js: directly specify the path using the <script> tag;; dynamic import using the mounted() lifecycle hook; and importing through the Vuex state management library.
 How to use vue traversal
Apr 07, 2025 pm 11:48 PM
How to use vue traversal
Apr 07, 2025 pm 11:48 PM
There are three common methods for Vue.js to traverse arrays and objects: the v-for directive is used to traverse each element and render templates; the v-bind directive can be used with v-for to dynamically set attribute values for each element; and the .map method can convert array elements into new arrays.
