

springboot中如何利用Tomcat容器实现自启动

一、Spring通过注解导入Bean大体可分为四种方式,我们主要来说以下Import的两种实现方法:
1、通过实现ImportSerlector接口,实现Bean加载:
public class TestServiceImpl {
 public void testImpl() {
 System.out.println("我是通过importSelector导入进来的service");
 }
}
public class TestService implements ImportSelector {
 @Override
 public String[] selectImports(AnnotationMetadata annotationMetadata) {
 return new String[]{"com.ycdhz.service.TestServiceImpl"};
 }
}
@Configuration
@Import(value = {TestService.class})
public class TestConfig {
}
public class TestController {
 @Autowired
 private TestServiceImpl testServiceImpl;

 @RequestMapping("testImpl")
 public String testTuling() {
 testServiceImpl.testImpl();
 return "Ok";
 }
}2、 通过实现ImportSerlector接口,实现Bean加载:
public class TestService {
 public TestService() {
 System.out.println("我是通过ImportBeanDefinitionRegistrar导入进来的组件");
 }
}
public class TestImportBeanDefinitionRegistrar implements ImportBeanDefinitionRegistrar {
 @Override
 public void registerBeanDefinitions(AnnotationMetadata importingClassMetadata, BeanDefinitionRegistry registry) {
 //定义一个BeanDefinition
 RootBeanDefinition beanDefinition = new RootBeanDefinition(TestService.class);
 //把自定义的bean定义导入到容器中
 registry.registerBeanDefinition("testService",beanDefinition);
 }
}
@Configuration
@Import(TestImportBeanDefinitionRegistrar.class)
public class TestConfig {
}二、 Springboot启动过程中会自动装配
我们从spring-boot-autoconfigure-2.0.6.RELEASE.jar下搜索到Tomcat的相关配置,发现有两个自动装配类,分别包含了三个定制器(面向对象的单一职责原则),还有一个工厂类。

2.1、TomcatWebServerFactoryCustomizer:定制Servlet和Reactive服务器通用的Tomcat特定功能。
public class TomcatWebServerFactoryCustomizer implements
 WebServerFactoryCustomizer<ConfigurableTomcatWebServerFactory>, Ordered {
 @Override
 public void customize(ConfigurableTomcatWebServerFactory factory) {
 ServerProperties properties = this.serverProperties;
 ServerProperties.Tomcat tomcatProperties = properties.getTomcat();
 PropertyMapper propertyMapper = PropertyMapper.get();
 propertyMapper.from(tomcatProperties::getBasedir).whenNonNull()
 .to(factory::setBaseDirectory);
 propertyMapper.from(tomcatProperties::getBackgroundProcessorDelay).whenNonNull()
 .as(Duration::getSeconds).as(Long::intValue)
 .to(factory::setBackgroundProcessorDelay);
 customizeRemoteIpValve(factory);
 propertyMapper.from(tomcatProperties::getMaxThreads).when(this::isPositive)
 .to((maxThreads) -> customizeMaxThreads(factory,
  tomcatProperties.getMaxThreads()));
 propertyMapper.from(tomcatProperties::getMinSpareThreads).when(this::isPositive)
 .to((minSpareThreads) -> customizeMinThreads(factory, minSpareThreads));
 propertyMapper.from(() -> determineMaxHttpHeaderSize()).when(this::isPositive)
 .to((maxHttpHeaderSize) -> customizeMaxHttpHeaderSize(factory,
  maxHttpHeaderSize));
 propertyMapper.from(tomcatProperties::getMaxHttpPostSize)
 .when((maxHttpPostSize) -> maxHttpPostSize != 0)
 .to((maxHttpPostSize) -> customizeMaxHttpPostSize(factory,
  maxHttpPostSize));
 propertyMapper.from(tomcatProperties::getAccesslog)
 .when(ServerProperties.Tomcat.Accesslog::isEnabled)
 .to((enabled) -> customizeAccessLog(factory));
 propertyMapper.from(tomcatProperties::getUriEncoding).whenNonNull()
 .to(factory::setUriEncoding);
 propertyMapper.from(properties::getConnectionTimeout).whenNonNull()
 .to((connectionTimeout) -> customizeConnectionTimeout(factory,
  connectionTimeout));
 propertyMapper.from(tomcatProperties::getMaxConnections).when(this::isPositive)
 .to((maxConnections) -> customizeMaxConnections(factory, maxConnections));
 propertyMapper.from(tomcatProperties::getAcceptCount).when(this::isPositive)
 .to((acceptCount) -> customizeAcceptCount(factory, acceptCount));
 customizeStaticResources(factory);
 customizeErrorReportValve(properties.getError(), factory);
 }
}2.2、ServletWebServerFactoryCustomizer:WebServerFactoryCustomizer 将ServerProperties属性应用于Tomcat web服务器。
public class ServletWebServerFactoryCustomizer implements
 WebServerFactoryCustomizer<ConfigurableServletWebServerFactory>, Ordered {
 private final ServerProperties serverProperties;
 public ServletWebServerFactoryCustomizer(ServerProperties serverProperties) {
 this.serverProperties = serverProperties;
 }
 @Override
 public int getOrder() {
 return 0;
 }
 @Override
 public void customize(ConfigurableServletWebServerFactory factory) {
 PropertyMapper map = PropertyMapper.get().alwaysApplyingWhenNonNull();
 map.from(this.serverProperties::getPort).to(factory::setPort);
 map.from(this.serverProperties::getAddress).to(factory::setAddress);
 map.from(this.serverProperties.getServlet()::getContextPath)
 .to(factory::setContextPath);
 map.from(this.serverProperties.getServlet()::getApplicationDisplayName)
 .to(factory::setDisplayName);
 map.from(this.serverProperties.getServlet()::getSession).to(factory::setSession);
 map.from(this.serverProperties::getSsl).to(factory::setSsl);
 map.from(this.serverProperties.getServlet()::getJsp).to(factory::setJsp);
 map.from(this.serverProperties::getCompression).to(factory::setCompression);
 map.from(this.serverProperties::getHttp2).to(factory::setHttp2);
 map.from(this.serverProperties::getServerHeader).to(factory::setServerHeader);
 map.from(this.serverProperties.getServlet()::getContextParameters)
 .to(factory::setInitParameters);
 }
}2.3、ServletWebServerFactoryCustomizer :WebServerFactoryCustomizer 将ServerProperties属性应用于Tomcat web服务器。
public class TomcatServletWebServerFactoryCustomizer
 implements WebServerFactoryCustomizer<TomcatServletWebServerFactory>, Ordered {
 private final ServerProperties serverProperties;
 public TomcatServletWebServerFactoryCustomizer(ServerProperties serverProperties) {
 this.serverProperties = serverProperties;
 }
 @Override
 public void customize(TomcatServletWebServerFactory factory) {
 ServerProperties.Tomcat tomcatProperties = this.serverProperties.getTomcat();
 if (!ObjectUtils.isEmpty(tomcatProperties.getAdditionalTldSkipPatterns())) {
 factory.getTldSkipPatterns()
  .addAll(tomcatProperties.getAdditionalTldSkipPatterns());
 }
 if (tomcatProperties.getRedirectContextRoot() != null) {
 customizeRedirectContextRoot(factory,
  tomcatProperties.getRedirectContextRoot());
 }
 if (tomcatProperties.getUseRelativeRedirects() != null) {
 customizeUseRelativeRedirects(factory,
  tomcatProperties.getUseRelativeRedirects());
 }
 }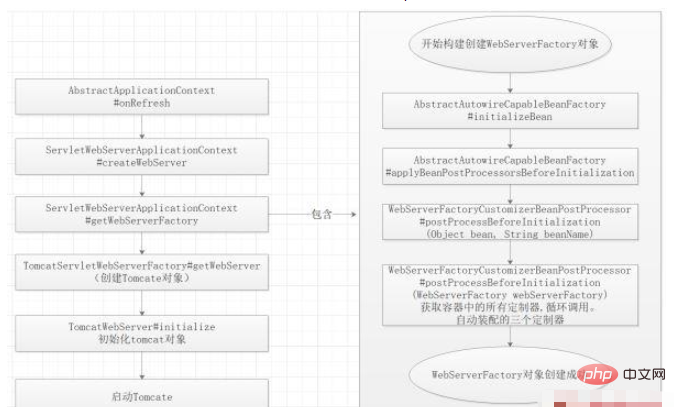
}三、有了TomcatServletWebServerFactory,相当于有了Spring加载的入口
通过AbstractApplicationContext#onReFresh()在IOC 容器中的带动tomcat启动,然后在接着执行 ioc容器的其他步骤。
我们通过断点可以观察Tomcat加载的整个生命周期,以及三个定制器的加载过程。
@Override
public WebServer getWebServer(ServletContextInitializer... initializers) {
 Tomcat tomcat = new Tomcat();
 File baseDir = (this.baseDirectory != null) ? this.baseDirectory
 : createTempDir("tomcat");
 tomcat.setBaseDir(baseDir.getAbsolutePath());
 Connector connector = new Connector(this.protocol);
 tomcat.getService().addConnector(connector);
 customizeConnector(connector);
 tomcat.setConnector(connector);
 //设置是否自动启动
 tomcat.getHost().setAutoDeploy(false);
 //创建Tomcat引擎
 configureEngine(tomcat.getEngine());
 for (Connector additionalConnector : this.additionalTomcatConnectors) {
 tomcat.getService().addConnector(additionalConnector);
 }
 //刷新上下文
 prepareContext(tomcat.getHost(), initializers);
 //准备启动
 return getTomcatWebServer(tomcat);
}private void initialize() throws WebServerException {
TomcatWebServer.logger
.info("Tomcat initialized with port(s): " + getPortsDescription(false));
synchronized (this.monitor) {
try {
addInstanceIdToEngineName();
Context context = findContext();
context.addLifecycleListener((event) -> {
if (context.equals(event.getSource())
&& Lifecycle.START_EVENT.equals(event.getType())) {
// Remove service connectors so that protocol binding doesn't
// happen when the service is started.
removeServiceConnectors();
}
});
// Start the server to trigger initialization listeners
this.tomcat.start();
// We can re-throw failure exception directly in the main thread
rethrowDeferredStartupExceptions();
try {
ContextBindings.bindClassLoader(context, context.getNamingToken(),
getClass().getClassLoader());
}
catch (NamingException ex) {
// Naming is not enabled. Continue
}
// Unlike Jetty, all Tomcat threads are daemon threads. We create a
// blocking non-daemon to stop immediate shutdown
startDaemonAwaitThread();
}
catch (Exception ex) {
stopSilently();
throw new WebServerException("Unable to start embedded Tomcat", ex);
}
}
}备注: 在这个过程中我们需要了解Bean的生命周期,Tomcat的三个定制器均在BeanPostProcessorsRegistrar(Bean后置处理器)过程中加载;
构造方法-->Bean后置处理器Before-->InitializingBean-->init-method-->Bean后置处理器After
org.springframework.beans.factory.support.AbstractAutowireCapableBeanFactory#doCreateBean
  org.springframework.beans.factory.support.AbstractAutowireCapableBeanFactory#initializeBean
protected Object doCreateBean(final String beanName, final RootBeanDefinition mbd, final @Nullable Object[] args)
 throws BeanCreationException {
 // Instantiate the bean.
 BeanWrapper instanceWrapper = null;
 if (mbd.isSingleton()) {
 instanceWrapper = this.factoryBeanInstanceCache.remove(beanName);
 }
 if (instanceWrapper == null) {
 //构造方法
 instanceWrapper = createBeanInstance(beanName, mbd, args);
 }
 final Object bean = instanceWrapper.getWrappedInstance();
 Class<?> beanType = instanceWrapper.getWrappedClass();
 if (beanType != NullBean.class) {
 mbd.resolvedTargetType = beanType;
 }
 // Initialize the bean instance.
 ......
 return exposedObject;
}
protected Object initializeBean(final String beanName, final Object bean, @Nullable RootBeanDefinition mbd) {
 if (System.getSecurityManager() != null) {
 AccessController.doPrivileged((PrivilegedAction<Object>) () -> {
 invokeAwareMethods(beanName, bean);
 return null;
 }, getAccessControlContext());
 }
 else {
 invokeAwareMethods(beanName, bean);
 }
 Object wrappedBean = bean;
 if (mbd == null || !mbd.isSynthetic()) {
 //Bean后置处理器Before
 wrappedBean = applyBeanPostProcessorsBeforeInitialization(wrappedBean, beanName);
 }
 try {
 invokeInitMethods(beanName, wrappedBean, mbd);
 }
 catch (Throwable ex) {
 throw new BeanCreationException(
 (mbd != null ? mbd.getResourceDescription() : null),
 beanName, "Invocation of init method failed", ex);
 }
 if (mbd == null || !mbd.isSynthetic()) {
 //Bean后置处理器After
 wrappedBean = applyBeanPostProcessorsAfterInitialization(wrappedBean, beanName);
 }
 return wrappedBean;
}以上是springboot中如何利用Tomcat容器实现自启动的详细内容。更多信息请关注PHP中文网其他相关文章!

热AI工具

Undresser.AI Undress
人工智能驱动的应用程序,用于创建逼真的裸体照片

AI Clothes Remover
用于从照片中去除衣服的在线人工智能工具。

Undress AI Tool
免费脱衣服图片

Clothoff.io
AI脱衣机

Video Face Swap
使用我们完全免费的人工智能换脸工具轻松在任何视频中换脸!

热门文章
热工具

记事本++7.3.1
好用且免费的代码编辑器

SublimeText3汉化版
中文版,非常好用

禅工作室 13.0.1
功能强大的PHP集成开发环境

Dreamweaver CS6
视觉化网页开发工具

SublimeText3 Mac版
神级代码编辑软件(SublimeText3)


 tomcat如何部署jar项目
Apr 21, 2024 am 07:27 AM
tomcat如何部署jar项目
Apr 21, 2024 am 07:27 AM
要将 JAR 项目部署到 Tomcat,请遵循以下步骤:下载并解压 Tomcat。配置 server.xml 文件,设置端口和项目部署路径。将 JAR 文件复制到指定的部署路径中。启动 Tomcat。使用提供的 URL 访问已部署的项目。
 tomcat服务器怎么让外网访问
Apr 21, 2024 am 07:22 AM
tomcat服务器怎么让外网访问
Apr 21, 2024 am 07:22 AM
要让 Tomcat 服务器对外网访问,需要:修改 Tomcat 配置文件,允许外部连接。添加防火墙规则,允许访问 Tomcat 服务器端口。创建 DNS 记录,将域名指向 Tomcat 服务器公有 IP。可选:使用反向代理提升安全性和性能。可选:设置 HTTPS 以提高安全性。
 tomcat安装目录在哪里
Apr 21, 2024 am 07:48 AM
tomcat安装目录在哪里
Apr 21, 2024 am 07:48 AM
Tomcat 安装目录:默认路径:Windows:C:\Program Files\Apache Software Foundation\Tomcat 9.0macOS:/Library/Tomcat/Tomcat 9.0Linux:/opt/tomcat/tomcat9自定义路径:安装时可指定。查找安装目录:使用 whereis 或 locate 命令。
 tomcat怎么部署多个项目
Apr 21, 2024 am 09:33 AM
tomcat怎么部署多个项目
Apr 21, 2024 am 09:33 AM
要通过 Tomcat 部署多个项目,需要创建每个项目的 webapp 目录,然后:自动部署:将 webapp 目录放置在 Tomcat 的 webapps 目录中。手动部署:在 Tomcat 的 manager 应用程序中手动部署项目。项目部署后,可以通过其部署名称访问,例如:http://localhost:8080/project1。
 tomcat并发连接数怎么查看
Apr 21, 2024 am 08:12 AM
tomcat并发连接数怎么查看
Apr 21, 2024 am 08:12 AM
查看Tomcat并发连接数的方法:访问Tomcat Manager页面(http://localhost:8080/manager/html),输入用户名和密码。在左侧导航栏中点击Status->Sessions,即可在页面顶部看到并发连接数。
 tomcat网站根目录在哪里
Apr 21, 2024 am 09:27 AM
tomcat网站根目录在哪里
Apr 21, 2024 am 09:27 AM
Tomcat 网站根目录位于 Tomcat 的 webapps 子目录中,用于存储 Web 应用程序文件、静态资源和 WEB-INF 目录;它可以通过查找 Tomcat 配置文件中的 docBase 属性来找到。
 tomcat的端口号怎么看
Apr 21, 2024 am 08:00 AM
tomcat的端口号怎么看
Apr 21, 2024 am 08:00 AM
Tomcat端口号可通过以下方法查看:检查server.xml文件中的<Connector>元素的port属性。访问Tomcat管理界面(http://localhost:8080/manager/html)并查看"Status"选项卡。在命令行中运行"catalina.sh version"并查看"Port:"行。
 tomcat怎么配置域名
Apr 21, 2024 am 09:52 AM
tomcat怎么配置域名
Apr 21, 2024 am 09:52 AM
要配置 Tomcat 使用域名,请执行以下步骤:创建服务器.xml 备份。打开 server.xml 并添加 Host 元素,将 example.com 替换为你的域名。为域名创建 SSL 证书(如果需要)。在 server.xml 中添加 SSL 连接器,更改端口、密钥库文件和密码。保存 server.xml。重新启动 Tomcat。
