

Python语音合成小工具的实现方法

TTS简介
TTS(Text To Speech)是一种语音合成技术,可以让机器将输入文本以语音的方式播放出来,实现机器说话的效果。
TTS分成语音处理及语音合成,先由机器识别输入的文字,再根据语音库进行语音合成。现在有很多可供调用的TTS接口,比如百度智能云的语音合成接口。微软在Windows系统中也提供了TTS的接口,可以调用此接口实现离线的TTS语音合成功能。
本文将使用pyttsx3库作为示范,编写一个语音合成小工具。
安装需要的包
安装PyQt5及其GUI设计工具
# 安装PyQt5
pip install PyQt5

# 安装PyQt5设计器
pip install PyQt5Designer
本文使用的编辑器是VSCode,不是PyCharm,使用PyQt5的方式可能存在差异,具体使用时可以根据实际情况进行配置。
安装pyttsx3
pip install pyttsx3
UI界面
可参考下图设计简单的GUI界面,由于本文主要为功能实例,故不考虑界面美观问题。
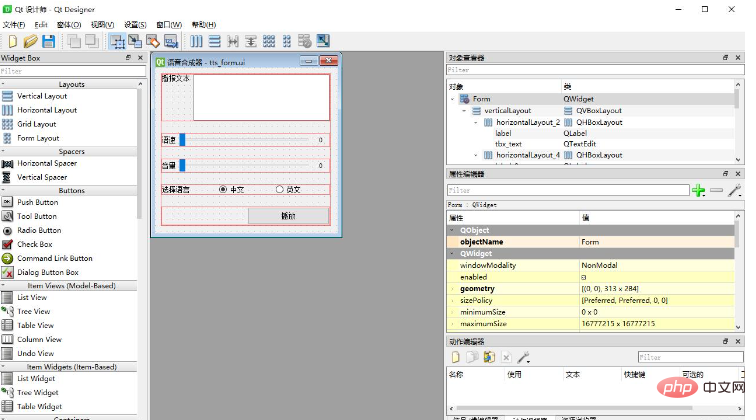
界面应有一个文本输入框,用以输入将要转化为语音的文本,同时需要一个播放按钮,用以触发语音播放的方法。语速、音量和语言可以按需选择。
使用PyQt5的设计工具,可以根据以上配置的GUI界面生成以下UI(XML)代码:
<?xml version="1.0" encoding="UTF-8"?>
<ui version="4.0">
 <class>Form</class>
 <widget class="QWidget" name="Form">
  <property name="geometry">
   <rect>
    <x>0</x>
    <y>0</y>
    <width>313</width>
    <height>284</height>
   </rect>
  </property>
  <property name="windowTitle">
   <string>语音合成器</string>
  </property>
  <property name="windowIcon">
   <iconset>
    <normaloff>voice.ico</normaloff>voice.ico</iconset>
  </property>
  <widget class="QWidget" name="verticalLayoutWidget">
   <property name="geometry">
    <rect>
     <x>10</x>
     <y>10</y>
     <width>291</width>
     <height>261</height>
    </rect>
   </property>
   <layout class="QVBoxLayout" name="verticalLayout">
    <property name="spacing">
     <number>20</number>
    </property>
    <item>
     <layout class="QHBoxLayout" name="horizontalLayout_2">
      <item>
       <widget class="QLabel" name="label">
        <property name="text">
         <string>播报文本</string>
        </property>
        <property name="alignment">
         <set>Qt::AlignJustify|Qt::AlignTop</set>
        </property>
       </widget>
      </item>
      <item>
       <widget class="QTextEdit" name="tbx_text"/>
      </item>
     </layout>
    </item>
    <item>
     <layout class="QHBoxLayout" name="horizontalLayout_4">
      <item>
       <widget class="QLabel" name="label_3">
        <property name="text">
         <string>语速</string>
        </property>
       </widget>
      </item>
      <item>
       <widget class="QSlider" name="slider_rate">
        <property name="maximum">
         <number>300</number>
        </property>
        <property name="orientation">
         <enum>Qt::Horizontal</enum>
        </property>
       </widget>
      </item>
      <item>
       <widget class="QLabel" name="label_rate">
        <property name="minimumSize">
         <size>
          <width>30</width>
          <height>0</height>
         </size>
        </property>
        <property name="text">
         <string>0</string>
        </property>
        <property name="alignment">
         <set>Qt::AlignCenter</set>
        </property>
       </widget>
      </item>
     </layout>
    </item>
    <item>
     <layout class="QHBoxLayout" name="horizontalLayout_3">
      <item>
       <widget class="QLabel" name="label_2">
        <property name="text">
         <string>音量</string>
        </property>
       </widget>
      </item>
      <item>
       <widget class="QSlider" name="slider_volumn">
        <property name="maximum">
         <number>100</number>
        </property>
        <property name="orientation">
         <enum>Qt::Horizontal</enum>
        </property>
       </widget>
      </item>
      <item>
       <widget class="QLabel" name="label_volumn">
        <property name="minimumSize">
         <size>
          <width>30</width>
          <height>0</height>
         </size>
        </property>
        <property name="text">
         <string>0</string>
        </property>
        <property name="alignment">
         <set>Qt::AlignCenter</set>
        </property>
       </widget>
      </item>
     </layout>
    </item>
    <item>
     <layout class="QHBoxLayout" name="horizontalLayout">
      <item>
       <widget class="QLabel" name="label_4">
        <property name="text">
         <string>选择语言</string>
        </property>
       </widget>
      </item>
      <item>
       <widget class="QRadioButton" name="rbtn_zh">
        <property name="text">
         <string>中文</string>
        </property>
        <property name="checked">
         <bool>true</bool>
        </property>
       </widget>
      </item>
      <item>
       <widget class="QRadioButton" name="rbtn_en">
        <property name="text">
         <string>英文</string>
        </property>
       </widget>
      </item>
     </layout>
    </item>
    <item>
     <layout class="QHBoxLayout" name="horizontalLayout_5">
      <item>
       <widget class="QLabel" name="label_5">
        <property name="minimumSize">
         <size>
          <width>60</width>
          <height>0</height>
         </size>
        </property>
        <property name="text">
         <string/>
        </property>
       </widget>
      </item>
      <item>
       <widget class="QPushButton" name="btn_play">
        <property name="minimumSize">
         <size>
          <width>0</width>
          <height>30</height>
         </size>
        </property>
        <property name="text">
         <string>播放</string>
        </property>
       </widget>
      </item>
     </layout>
    </item>
   </layout>
  </widget>
 </widget>
 <resources/>
 <connections/>
</ui>最后再使用PyQt5的界面工具,可以根据以上UI的代码,生成以下的窗体类:
# -*- coding: utf-8 -*-

# Form implementation generated from reading ui file 'd:\Program\VSCode\Python\TTS_PyQT\tts_form.ui'
#
# Created by: PyQt5 UI code generator 5.15.7
#
# WARNING: Any manual changes made to this file will be lost when pyuic5 is
# run again.  Do not edit this file unless you know what you are doing.

from PyQt5 import QtCore, QtGui, QtWidgets


class Ui_Form(object):

    def setupUi(self, Form):
        Form.setObjectName("Form")
        Form.resize(313, 284)
        icon = QtGui.QIcon()
        icon.addPixmap(
            QtGui.QPixmap("./voice.ico"),
            QtGui.QIcon.Normal, QtGui.QIcon.Off)
        Form.setWindowIcon(icon)
        self.verticalLayoutWidget = QtWidgets.QWidget(Form)
        self.verticalLayoutWidget.setGeometry(QtCore.QRect(10, 10, 291, 261))
        self.verticalLayoutWidget.setObjectName("verticalLayoutWidget")
        self.verticalLayout = QtWidgets.QVBoxLayout(self.verticalLayoutWidget)
        self.verticalLayout.setContentsMargins(0, 0, 0, 0)
        self.verticalLayout.setSpacing(20)
        self.verticalLayout.setObjectName("verticalLayout")
        self.horizontalLayout_2 = QtWidgets.QHBoxLayout()
        self.horizontalLayout_2.setObjectName("horizontalLayout_2")
        self.label = QtWidgets.QLabel(self.verticalLayoutWidget)
        self.label.setAlignment(QtCore.Qt.AlignJustify | QtCore.Qt.AlignTop)
        self.label.setObjectName("label")
        self.horizontalLayout_2.addWidget(self.label)
        self.tbx_text = QtWidgets.QTextEdit(self.verticalLayoutWidget)
        self.tbx_text.setObjectName("tbx_text")
        self.horizontalLayout_2.addWidget(self.tbx_text)
        self.verticalLayout.addLayout(self.horizontalLayout_2)
        self.horizontalLayout_4 = QtWidgets.QHBoxLayout()
        self.horizontalLayout_4.setObjectName("horizontalLayout_4")
        self.label_3 = QtWidgets.QLabel(self.verticalLayoutWidget)
        self.label_3.setObjectName("label_3")
        self.horizontalLayout_4.addWidget(self.label_3)
        self.slider_rate = QtWidgets.QSlider(self.verticalLayoutWidget)
        self.slider_rate.setMaximum(300)
        self.slider_rate.setOrientation(QtCore.Qt.Horizontal)
        self.slider_rate.setObjectName("slider_rate")
        self.horizontalLayout_4.addWidget(self.slider_rate)
        self.label_rate = QtWidgets.QLabel(self.verticalLayoutWidget)
        self.label_rate.setMinimumSize(QtCore.QSize(30, 0))
        self.label_rate.setAlignment(QtCore.Qt.AlignCenter)
        self.label_rate.setObjectName("label_rate")
        self.horizontalLayout_4.addWidget(self.label_rate)
        self.verticalLayout.addLayout(self.horizontalLayout_4)
        self.horizontalLayout_3 = QtWidgets.QHBoxLayout()
        self.horizontalLayout_3.setObjectName("horizontalLayout_3")
        self.label_2 = QtWidgets.QLabel(self.verticalLayoutWidget)
        self.label_2.setObjectName("label_2")
        self.horizontalLayout_3.addWidget(self.label_2)
        self.slider_volumn = QtWidgets.QSlider(self.verticalLayoutWidget)
        self.slider_volumn.setMaximum(100)
        self.slider_volumn.setOrientation(QtCore.Qt.Horizontal)
        self.slider_volumn.setObjectName("slider_volumn")
        self.horizontalLayout_3.addWidget(self.slider_volumn)
        self.label_volumn = QtWidgets.QLabel(self.verticalLayoutWidget)
        self.label_volumn.setMinimumSize(QtCore.QSize(30, 0))
        self.label_volumn.setAlignment(QtCore.Qt.AlignCenter)
        self.label_volumn.setObjectName("label_volumn")
        self.horizontalLayout_3.addWidget(self.label_volumn)
        self.verticalLayout.addLayout(self.horizontalLayout_3)
        self.horizontalLayout = QtWidgets.QHBoxLayout()
        self.horizontalLayout.setObjectName("horizontalLayout")
        self.label_4 = QtWidgets.QLabel(self.verticalLayoutWidget)
        self.label_4.setObjectName("label_4")
        self.horizontalLayout.addWidget(self.label_4)
        self.rbtn_zh = QtWidgets.QRadioButton(self.verticalLayoutWidget)
        self.rbtn_zh.setChecked(True)
        self.rbtn_zh.setObjectName("rbtn_zh")
        self.horizontalLayout.addWidget(self.rbtn_zh)
        self.rbtn_en = QtWidgets.QRadioButton(self.verticalLayoutWidget)
        self.rbtn_en.setObjectName("rbtn_en")
        self.horizontalLayout.addWidget(self.rbtn_en)
        self.verticalLayout.addLayout(self.horizontalLayout)
        self.horizontalLayout_5 = QtWidgets.QHBoxLayout()
        self.horizontalLayout_5.setObjectName("horizontalLayout_5")
        self.label_5 = QtWidgets.QLabel(self.verticalLayoutWidget)
        self.label_5.setMinimumSize(QtCore.QSize(60, 0))
        self.label_5.setText("")
        self.label_5.setObjectName("label_5")
        self.horizontalLayout_5.addWidget(self.label_5)
        self.btn_play = QtWidgets.QPushButton(self.verticalLayoutWidget)
        self.btn_play.setMinimumSize(QtCore.QSize(0, 30))
        self.btn_play.setObjectName("btn_play")
        self.horizontalLayout_5.addWidget(self.btn_play)
        self.verticalLayout.addLayout(self.horizontalLayout_5)

        self.retranslateUi(Form)
        QtCore.QMetaObject.connectSlotsByName(Form)

    def retranslateUi(self, Form):
        _translate = QtCore.QCoreApplication.translate
        Form.setWindowTitle(_translate("Form", "语音合成器"))
        self.label.setText(_translate("Form", "播报文本"))
        self.label_3.setText(_translate("Form", "语速"))
        self.label_rate.setText(_translate("Form", "0"))
        self.label_2.setText(_translate("Form", "音量"))
        self.label_volumn.setText(_translate("Form", "0"))
        self.label_4.setText(_translate("Form", "选择语言"))
        self.rbtn_zh.setText(_translate("Form", "中文"))
        self.rbtn_en.setText(_translate("Form", "英文"))
self.btn_play.setText(_translate("Form", "播放"))如果直接复制此代码,可能会出现图标丢失的问题。这个需要根据实际情况修改icon的配置,并添加要使用的ico图标文件。
功能代码
语音工具类
首先我们需要初始化并获取语音合成用的语音引擎对象。
# tts对象
engine = pyttsx3.init()
我们可以通过该对象的setProperty方法,对语音合成的对象的属性进行修改:
| 属性名 | 解释 |
| rate | 以每分钟字数表示的整数语速 |
| volume | 音量,取值范围为[0.0, 1.0] |
| voices | 语音的字符串标识符 |
语音工具类代码如下,代码含义可参考注释:
import pyttsx3


class VoiceEngine():
    '''
    tts 语音工具类
    '''

    def __init__(self):
        '''
        初始化
        '''
        # tts对象
        self.__engine = pyttsx3.init()
        # 语速
        self.__rate = 150
        # 音量
        self.__volume = 100
        # 语音ID,0为中文,1为英文
        self.__voice = 0

    @property
    def Rate(self):
        '''
        语速属性
        '''
        return self.__rate

    @Rate.setter
    def Rate(self, value):
        self.__rate = value

    @property
    def Volume(self):
        '''
        音量属性
        '''
        return self.__volume

    @Volume.setter
    def Volume(self, value):
        self.__volume = value

    @property
    def VoiceID(self):
        '''
        语音ID:0 -- 中文;1 -- 英文
        '''

        return self.__voice

    @VoiceID.setter
    def VoiceID(self, value):
        self.__voice = value

    def Say(self, text):
        '''
        播放语音
        '''
        self.__engine.setProperty('rate', self.__rate)
        self.__engine.setProperty('volume', self.__volume)

        # 获取可用语音列表,并设置语音
        voices = self.__engine.getProperty('voices')
        self.__engine.setProperty('voice', voices[self.__voice].id)

        # 保存语音文件
        # self.__engine.save_to_file(text, 'test.mp3')

        self.__engine.say(text)
        self.__engine.runAndWait()
self.__engine.stop()窗体类
我们可以创建一个继承于我们刚刚创建的PyQt5的窗体类,并为窗体的拖拽事件和点击事件注册回调函数,同时创建一个语音工具类的实例,用以实现指定事件触发时需要执行的语音操作。
import sys
import _thread as th
from PyQt5.QtWidgets import QMainWindow, QApplication
from Ui_tts_form import Ui_Form

class MainWindow(QMainWindow, Ui_Form):
    '''
    窗体类
    '''

    def __init__(self, parent=None):
        '''
        初始化窗体
        '''
        super(MainWindow, self).__init__(parent)
        self.setupUi(self)

        # 获取tts工具类实例
        self.engine = VoiceEngine()
        self.__isPlaying = False

        # 设置初始文本
        self.tbx_text.setText('床前明月光,疑似地上霜。\n举头望明月,低头思故乡。')

        # 进度条数据绑定到label中显示
        self.slider_rate.valueChanged.connect(self.setRateTextValue)
        self.slider_volumn.valueChanged.connect(self.setVolumnTextValue)

        # 设置进度条初始值
        self.slider_rate.setValue(self.engine.Rate)
        self.slider_volumn.setValue(self.engine.Volume)

        # RadioButton选择事件
        self.rbtn_zh.toggled.connect(self.onSelectVoice_zh)
        self.rbtn_en.toggled.connect(self.onSelectVoice_en)

        # 播放按钮点击事件
        self.btn_play.clicked.connect(self.onPlayButtonClick)

    def setRateTextValue(self):
        '''
        修改语速label文本值
        '''
        value = self.slider_rate.value()
        self.label_rate.setText(str(value))
        self.engine.Rate = value

    def setVolumnTextValue(self):
        '''
        修改音量label文本值
        '''
        value = self.slider_volumn.value()
        self.label_volumn.setText(str(value / 100))
        self.engine.Volume = value

    def onSelectVoice_zh(self):
        '''
        修改中文的语音配置及默认播放文本
        '''
        self.tbx_text.setText('床前明月光,疑似地上霜。\n举头望明月,低头思故乡。')
        self.engine.VoiceID = 0

    def onSelectVoice_en(self):
        '''
        修改英文的语音配置及默认的播放文本
        '''
        self.tbx_text.setText('Hello World')
        self.engine.VoiceID = 1

    def playVoice(self):
        '''
        播放
        '''

        if self.__isPlaying is not True:
            self.__isPlaying = True
            text = self.tbx_text.toPlainText()
            self.engine.Say(text)
            self.__isPlaying = False

    def onPlayButtonClick(self):
        '''
        播放按钮点击事件
        开启线程新线程播放语音,避免窗体因为语音播放而假卡死
        '''
th.start_new_thread(self.playVoice, ())完整代码
import sys
import _thread as th
from PyQt5.QtWidgets import QMainWindow, QApplication
from Ui_tts_form import Ui_Form
import pyttsx3


class VoiceEngine():
    '''
    tts 语音工具类
    '''

    def __init__(self):
        '''
        初始化
        '''
        # tts对象
        self.__engine = pyttsx3.init()
        # 语速
        self.__rate = 150
        # 音量
        self.__volume = 100
        # 语音ID,0为中文,1为英文
        self.__voice = 0

    @property
    def Rate(self):
        '''
        语速属性
        '''
        return self.__rate

    @Rate.setter
    def Rate(self, value):
        self.__rate = value

    @property
    def Volume(self):
        '''
        音量属性
        '''
        return self.__volume

    @Volume.setter
    def Volume(self, value):
        self.__volume = value

    @property
    def VoiceID(self):
        '''
        语音ID:0 -- 中文;1 -- 英文
        '''

        return self.__voice

    @VoiceID.setter
    def VoiceID(self, value):
        self.__voice = value

    def Say(self, text):
        '''
        播放语音
        '''
        self.__engine.setProperty('rate', self.__rate)
        self.__engine.setProperty('volume', self.__volume)
        voices = self.__engine.getProperty('voices')
        self.__engine.setProperty('voice', voices[self.__voice])

        # 保存语音文件
        # self.__engine.save_to_file(text, 'test.mp3')

        self.__engine.say(text)
        self.__engine.runAndWait()
        self.__engine.stop()


class MainWindow(QMainWindow, Ui_Form):
    '''
    窗体类
    '''

    def __init__(self, parent=None):
        '''
        初始化窗体
        '''
        super(MainWindow, self).__init__(parent)
        self.setupUi(self)

        # 获取tts工具类实例
        self.engine = VoiceEngine()
        self.__isPlaying = False

        # 设置初始文本
        self.tbx_text.setText('床前明月光,疑似地上霜。\n举头望明月,低头思故乡。')

        # 进度条数据绑定到label中显示
        self.slider_rate.valueChanged.connect(self.setRateTextValue)
        self.slider_volumn.valueChanged.connect(self.setVolumnTextValue)

        # 设置进度条初始值
        self.slider_rate.setValue(self.engine.Rate)
        self.slider_volumn.setValue(self.engine.Volume)

        # RadioButton选择事件
        self.rbtn_zh.toggled.connect(self.onSelectVoice_zh)
        self.rbtn_en.toggled.connect(self.onSelectVoice_en)

        # 播放按钮点击事件
        self.btn_play.clicked.connect(self.onPlayButtonClick)

    def setRateTextValue(self):
        '''
        修改语速label文本值
        '''
        value = self.slider_rate.value()
        self.label_rate.setText(str(value))
        self.engine.Rate = value

    def setVolumnTextValue(self):
        '''
        修改音量label文本值
        '''
        value = self.slider_volumn.value()
        self.label_volumn.setText(str(value / 100))
        self.engine.Volume = value

    def onSelectVoice_zh(self):
        '''
        修改中文的语音配置及默认播放文本
        '''
        self.tbx_text.setText('床前明月光,疑似地上霜。\n举头望明月,低头思故乡。')
        self.engine.VoiceID = 0

    def onSelectVoice_en(self):
        '''
        修改英文的语音配置及默认的播放文本
        '''
        self.tbx_text.setText('Hello World')
        self.engine.VoiceID = 1

    def playVoice(self):
        '''
        播放
        '''

        if self.__isPlaying is not True:
            self.__isPlaying = True
            text = self.tbx_text.toPlainText()
            self.engine.Say(text)
            self.__isPlaying = False

    def onPlayButtonClick(self):
        '''
        修改语速label文本值
        '''
        th.start_new_thread(self.playVoice, ())


if __name__ == "__main__":
    '''
    主函数
    '''
    app = QApplication(sys.argv)
    form = MainWindow()
    form.show()
sys.exit(app.exec_())以上是Python语音合成小工具的实现方法的详细内容。更多信息请关注PHP中文网其他相关文章!

热AI工具

Undresser.AI Undress
人工智能驱动的应用程序,用于创建逼真的裸体照片

AI Clothes Remover
用于从照片中去除衣服的在线人工智能工具。

Undress AI Tool
免费脱衣服图片

Clothoff.io
AI脱衣机

Video Face Swap
使用我们完全免费的人工智能换脸工具轻松在任何视频中换脸!

热门文章
热工具

记事本++7.3.1
好用且免费的代码编辑器

SublimeText3汉化版
中文版,非常好用

禅工作室 13.0.1
功能强大的PHP集成开发环境

Dreamweaver CS6
视觉化网页开发工具

SublimeText3 Mac版
神级代码编辑软件(SublimeText3)


 PHP和Python:解释了不同的范例
Apr 18, 2025 am 12:26 AM
PHP和Python:解释了不同的范例
Apr 18, 2025 am 12:26 AM
PHP主要是过程式编程,但也支持面向对象编程(OOP);Python支持多种范式,包括OOP、函数式和过程式编程。PHP适合web开发,Python适用于多种应用,如数据分析和机器学习。
 在PHP和Python之间进行选择:指南
Apr 18, 2025 am 12:24 AM
在PHP和Python之间进行选择:指南
Apr 18, 2025 am 12:24 AM
PHP适合网页开发和快速原型开发,Python适用于数据科学和机器学习。1.PHP用于动态网页开发,语法简单,适合快速开发。2.Python语法简洁,适用于多领域,库生态系统强大。
 sublime怎么运行代码python
Apr 16, 2025 am 08:48 AM
sublime怎么运行代码python
Apr 16, 2025 am 08:48 AM
在 Sublime Text 中运行 Python 代码,需先安装 Python 插件,再创建 .py 文件并编写代码,最后按 Ctrl B 运行代码,输出会在控制台中显示。
 PHP和Python:深入了解他们的历史
Apr 18, 2025 am 12:25 AM
PHP和Python:深入了解他们的历史
Apr 18, 2025 am 12:25 AM
PHP起源于1994年,由RasmusLerdorf开发,最初用于跟踪网站访问者,逐渐演变为服务器端脚本语言,广泛应用于网页开发。Python由GuidovanRossum于1980年代末开发,1991年首次发布,强调代码可读性和简洁性,适用于科学计算、数据分析等领域。
 Python vs. JavaScript:学习曲线和易用性
Apr 16, 2025 am 12:12 AM
Python vs. JavaScript:学习曲线和易用性
Apr 16, 2025 am 12:12 AM
Python更适合初学者,学习曲线平缓,语法简洁;JavaScript适合前端开发,学习曲线较陡,语法灵活。1.Python语法直观,适用于数据科学和后端开发。2.JavaScript灵活,广泛用于前端和服务器端编程。
 Golang vs. Python:性能和可伸缩性
Apr 19, 2025 am 12:18 AM
Golang vs. Python:性能和可伸缩性
Apr 19, 2025 am 12:18 AM
Golang在性能和可扩展性方面优于Python。1)Golang的编译型特性和高效并发模型使其在高并发场景下表现出色。2)Python作为解释型语言,执行速度较慢,但通过工具如Cython可优化性能。
 vscode在哪写代码
Apr 15, 2025 pm 09:54 PM
vscode在哪写代码
Apr 15, 2025 pm 09:54 PM
在 Visual Studio Code(VSCode)中编写代码简单易行,只需安装 VSCode、创建项目、选择语言、创建文件、编写代码、保存并运行即可。VSCode 的优点包括跨平台、免费开源、强大功能、扩展丰富,以及轻量快速。
 notepad 怎么运行python
Apr 16, 2025 pm 07:33 PM
notepad 怎么运行python
Apr 16, 2025 pm 07:33 PM
在 Notepad 中运行 Python 代码需要安装 Python 可执行文件和 NppExec 插件。安装 Python 并为其添加 PATH 后,在 NppExec 插件中配置命令为“python”、参数为“{CURRENT_DIRECTORY}{FILE_NAME}”,即可在 Notepad 中通过快捷键“F6”运行 Python 代码。
