JS CSS快速实现新手引导效果
本篇文章给大家带来了关于JavaScript的相关知识,其中主要跟大家介绍怎么通过简单的CSS及JS实现一下新手引导效果,感兴趣的朋友下面一起来看一下吧,希望对大家有帮助。
废话开篇:通过一些简单 CSS 及 JS 实现一下新手引导效果
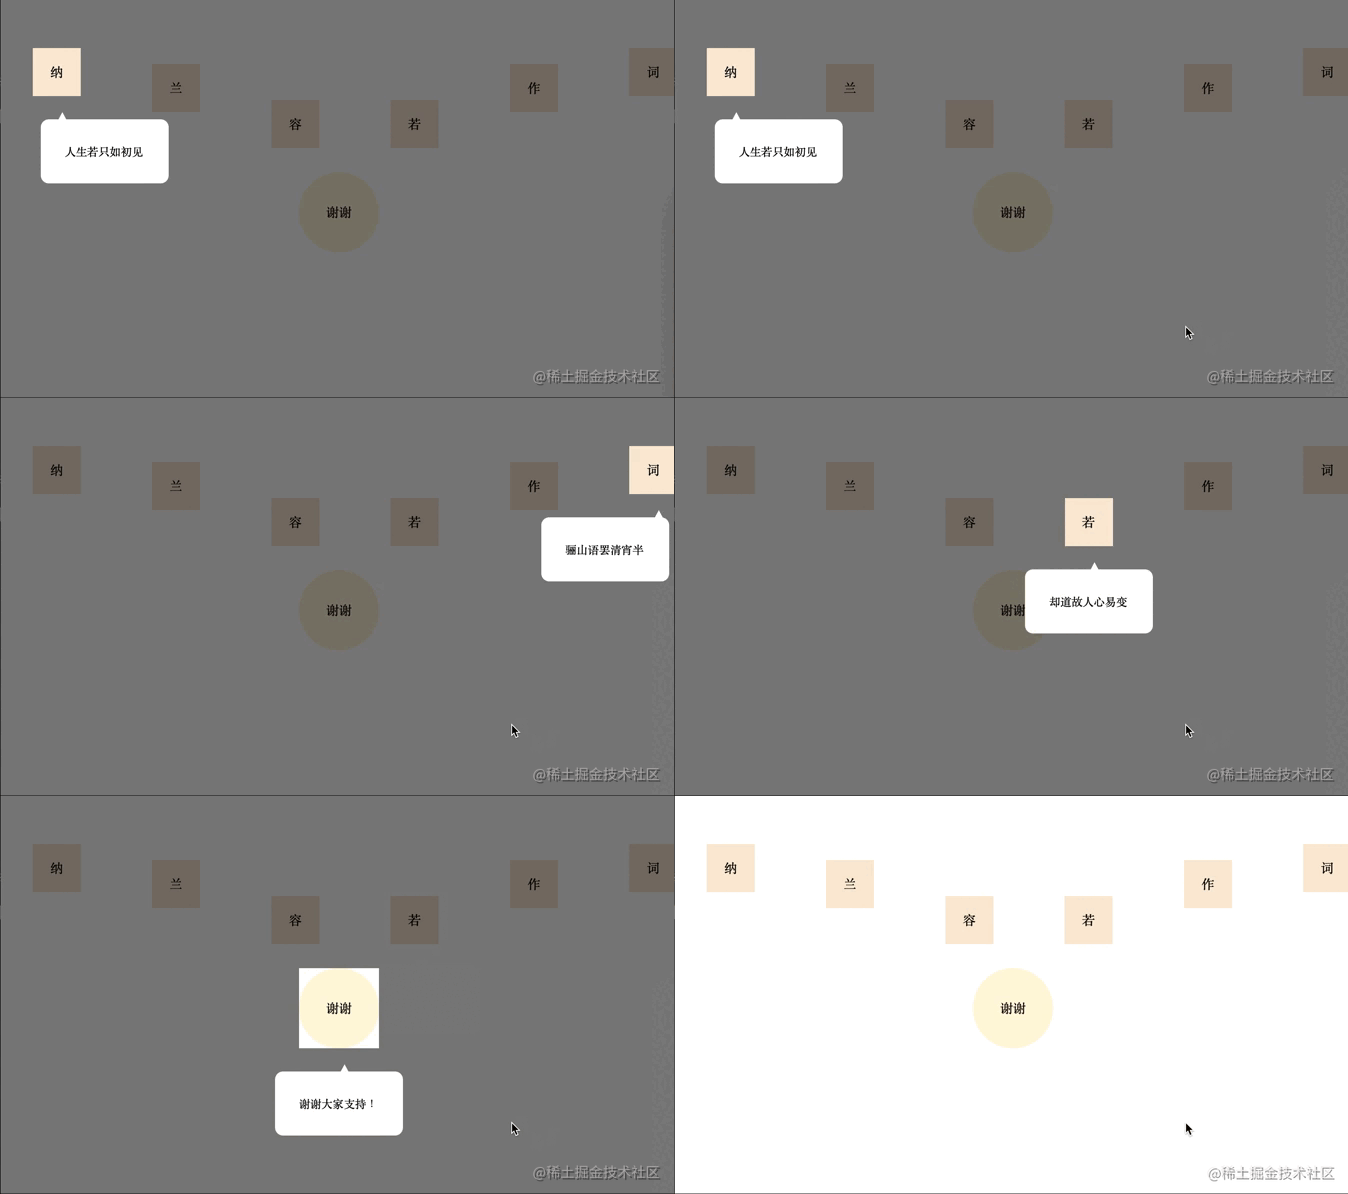
一、实现效果

二、实现
实现其实很简单,mask蒙版就是平铺一个整屏的 div,设置背景颜色为透明 transparent ,然后,再设置 outline 为半透明及足够宽就可以了,再用同样的方式创建一个 箭头 跟 警告 标签。
1、用法
let maskIntroduceManage = new MaskIntroduceManage([
    new MaskIntroduceItem('one','人生若只如初见'),
    new MaskIntroduceItem('two','何事秋风悲画扇'),
    new MaskIntroduceItem('five','等闲却变故人心'),
    new MaskIntroduceItem('six','骊山语罢清宵半'),
    new MaskIntroduceItem('four','却道故人心易变'),
    new MaskIntroduceItem('finally','谢谢大家支持!')
])
maskIntroduceManage.benginIntroduce()2、HTML
<!DOCTYPE html>
<html>
<head>
<meta charset="utf-8">
</head>
<style type="text/css">
*{
    padding: 0;
    margin: 0;
}
.content {
    padding: 0;
    display: flex;
    flex-direction: row;
    justify-content: space-between;
    align-items: center;
    width: 100%;
}
span {
    width: 60px;
    height: 60px;
    line-height: 60px;
    margin-left: 40px;
    margin-top: 140px;
    margin-bottom: 0px;
    text-align: center;
    display: block;
    background-color: antiquewhite;
}

.finally {
    width: 100px;
    height: 100px;
    background-color: cornsilk;
    border-radius: 50%;
    line-height: 100px;
    text-align: center;
    margin-top: 30px;
    margin-left: auto;
    margin-right: auto;
}
span:nth-of-type(1){
    margin-top: 30px;
}
span:nth-of-type(2){
    margin-top: 70px;
}
span:nth-of-type(3){
    margin-top: 160px;
}
span:nth-of-type(4){
    margin-top: 160px;
}
span:nth-of-type(5){
    margin-top: 70px;
}
span:nth-of-type(6){
    margin-top: 30px;
}
</style>
<body>
<div class="content">
    <span id="one">纳</span>
    <span id="two">兰</span>
    <span id="three">容</span>
    <span id="four">若</span>
    <span id="five">作</span>
    <span id="six">词</span>
</div>
<div class="finally" id="finally">
    谢谢
</div>
</body>
<script src="./maskIntroduce.js"></script>
<script>
let maskIntroduceManage = new MaskIntroduceManage([
    new MaskIntroduceItem('one','人生若只如初见'),
    new MaskIntroduceItem('two','何事秋风悲画扇'),
    new MaskIntroduceItem('five','等闲却变故人心'),
    new MaskIntroduceItem('six','骊山语罢清宵半'),
    new MaskIntroduceItem('four','却道故人心易变'),
    new MaskIntroduceItem('finally','谢谢大家支持!')
])
maskIntroduceManage.benginIntroduce()
</script>
</html>3、JS
// 单元信息model
class MaskIntroduceItem {
    // 需要引导的dom的ID
    id
    // 需要引导的dom功能描述
    warming
    constructor(id,warming){
        this.id = id
        this.warming = warming
    }
}

// 遮罩操作类
class MaskIntroduceManage {
    // 消息展示类集合
    maskIntroduceItems
    // 遮罩层
    el
    // 遮罩层提示框
    warmingEl
    // 指引肩头
    guidanceEl
    // 展示的第几个
    currentShowIndex = 0
    // 记录window事件
    windowEvent = null

    constructor(maskIntroduceItems){
        this.maskIntroduceItems = maskIntroduceItems
    }

    // 添加消息展示类
    addIntroduceItem(introduceItem){
        this.maskIntroduceItems.push(introduceItem)
    }

    // body增加遮罩
    addMaskToBody(){
        //添加遮罩框
        this.el = document.createElement('div')
        this.el.style.cssText = 'position: fixed;background: transparent;outline:rgba(0, 0, 0, 0.5) 3500px solid;'
        let body = document.getElementsByTagName('body')[0]
        body.appendChild(this.el)
        //添加提示框
        this.warmingEl = document.createElement('div')
        this.warmingEl.style.cssText = 'position:fixed;width:100px;background:white;border-radius: 10px;padding: 30px;font-size: 14px;'
        body.appendChild(this.warmingEl)
        //添加指引箭头
        this.guidanceEl = document.createElement('div')
        this.guidanceEl.style.cssText = 'position:fixed;width: 14px; height: 13px; background-color: white;clip-path: polygon(50% 0,100% 100%,0 100%);'
        body.appendChild(this.guidanceEl)
        //设置body禁止滚动
        body.style.overflow = 'hidden'
        //保留window事件
        if(window.onclick){
            this.windowEvent = window.onclick
        }
        window.onclick = ()=>{
            this.nextIntroduce()
        }
    }

    // 开始引导
    benginIntroduce(){
        this.addMaskToBody()
        this.nextIntroduce()
    }

    // 下一步
    nextIntroduce(){
        let maskIntroduceItem = this.maskIntroduceItems.length > 0 ? this.maskIntroduceItems[this.currentShowIndex] : null
        if(!maskIntroduceItem){
            return
        }
        let needIntroduceEl = document.getElementById(maskIntroduceItem.id)
        //遮罩层的镂空位置
        this.el.style.width = needIntroduceEl.offsetWidth + 'px'
        this.el.style.height = needIntroduceEl.offsetHeight + 'px'
        this.el.style.top = this.getElementPosition(needIntroduceEl).top + 'px'
        this.el.style.left = this.getElementPosition(needIntroduceEl).left + 'px'
        //设置对应倒角,但是由于背景颜色是透明的,所以,没有效果(???)
        //this.el.style.borderRadius = window.getComputedStyle(needIntroduceEl,null)['border-radius']
        this.currentShowIndex ++
        //指引箭头位置
        let guidanceElLeft = this.getElementPosition(needIntroduceEl).left + needIntroduceEl.offsetWidth / 2.0
        this.guidanceEl.style.top = this.getElementPosition(needIntroduceEl).top + needIntroduceEl.offsetHeight + 20 + 'px'
        this.guidanceEl.style.left = guidanceElLeft + 'px'
        //提示框的位置
        this.warmingEl.style.top = this.getElementPosition(this.guidanceEl).top + this.guidanceEl.offsetHeight - 4 + 'px'
        let warmingElLeft = this.getElementPosition(needIntroduceEl).left - ((this.warmingEl.offsetWidth - needIntroduceEl.offsetWidth) / 2.0)
        if(warmingElLeft < 0){
            warmingElLeft = this.getElementPosition(needIntroduceEl).left + 10
        }
        if(warmingElLeft + this.warmingEl.offsetWidth > document.getElementsByTagName('body')[0].offsetWidth){
            warmingElLeft = warmingElLeft - 10 - (this.warmingEl.offsetWidth - needIntroduceEl.offsetWidth) / 2.0
        }
        this.warmingEl.style.left = warmingElLeft + 'px'
        this.warmingEl.innerHTML = maskIntroduceItem.warming
        //最后一个展示完恢复window点击事件
        if(this.currentShowIndex >= this.maskIntroduceItems.length){
            setTimeout(() => {
                //移除当前遮罩
                this.el.remove()
                //移除当前提示框
                this.warmingEl.remove()
                //移除箭头
                this.guidanceEl.remove()
                //设置body可以滚动
                document.getElementsByTagName('body')[0].style.overflow = 'auto'
                //恢复window事件
                if(this.windowEvent){
                    window.onclick = this.windowEvent
                }
            }, 2000);
        }
    }

    // 获取元素在屏幕的位置
    getElementPosition(element){
        var top = element.offsetTop
        var left = element.offsetLeft
        var currentParent = element.offsetParent;
        while (currentParent !== null) {
            top += currentParent.offsetTop
            left += currentParent.offsetLeft
            currentParent = currentParent.offsetParent
        }
        return {top,left}
    }
}三、总结与思考
实现原理特别简单,没有太多复杂的逻辑在里面,想通过当前“需要介绍”的标签的 borderRadius 来设置镂空部分的倒角值,但是背景颜色是透明的,因此设置了,可以生效但也没有效果。代码拙劣,大神勿笑~
推荐学习:《JavaScript视频教程》
以上是JS CSS快速实现新手引导效果的详细内容。更多信息请关注PHP中文网其他相关文章!

热AI工具

Undresser.AI Undress
人工智能驱动的应用程序,用于创建逼真的裸体照片

AI Clothes Remover
用于从照片中去除衣服的在线人工智能工具。

Undress AI Tool
免费脱衣服图片

Clothoff.io
AI脱衣机

Video Face Swap
使用我们完全免费的人工智能换脸工具轻松在任何视频中换脸!

热门文章

热工具

记事本++7.3.1
好用且免费的代码编辑器

SublimeText3汉化版
中文版,非常好用

禅工作室 13.0.1
功能强大的PHP集成开发环境

Dreamweaver CS6
视觉化网页开发工具

SublimeText3 Mac版
神级代码编辑软件(SublimeText3)
 vue中怎么用bootstrap
Apr 07, 2025 pm 11:33 PM
在 Vue.js 中使用 Bootstrap 分为五个步骤:安装 Bootstrap。在 main.js 中导入 Bootstrap。直接在模板中使用 Bootstrap 组件。可选:自定义样式。可选:使用插件。
 了解HTML,CSS和JavaScript:初学者指南
Apr 12, 2025 am 12:02 AM
WebDevelovermentReliesonHtml,CSS和JavaScript:1)HTMLStructuresContent,2)CSSStyleSIT和3)JavaScriptAddSstractivity,形成thebasisofmodernWebemodernWebExexperiences。
 HTML,CSS和JavaScript的角色:核心职责
Apr 08, 2025 pm 07:05 PM
HTML定义网页结构,CSS负责样式和布局,JavaScript赋予动态交互。三者在网页开发中各司其职,共同构建丰富多彩的网站。
 bootstrap怎么插入图片
Apr 07, 2025 pm 03:30 PM
在 Bootstrap 中插入图片有以下几种方法:直接插入图片,使用 HTML 的 img 标签。使用 Bootstrap 图像组件,可以提供响应式图片和更多样式。设置图片大小,使用 img-fluid 类可以使图片自适应。设置边框,使用 img-bordered 类。设置圆角,使用 img-rounded 类。设置阴影,使用 shadow 类。调整图片大小和位置,使用 CSS 样式。使用背景图片,使用 background-image CSS 属性。
 bootstrap怎么写分割线
Apr 07, 2025 pm 03:12 PM
创建 Bootstrap 分割线有两种方法:使用 标签,可创建水平分割线。使用 CSS border 属性,可创建自定义样式的分割线。
 bootstrap怎么设置框架
Apr 07, 2025 pm 03:27 PM
要设置 Bootstrap 框架,需要按照以下步骤:1. 通过 CDN 引用 Bootstrap 文件;2. 下载文件并将其托管在自己的服务器上;3. 在 HTML 中包含 Bootstrap 文件;4. 根据需要编译 Sass/Less;5. 导入定制文件(可选)。设置完成后,即可使用 Bootstrap 的网格系统、组件和样式创建响应式网站和应用程序。
 bootstrap怎么调整大小
Apr 07, 2025 pm 03:18 PM
要调整 Bootstrap 中元素大小,可以使用尺寸类,具体包括:调整宽度:.col-、.w-、.mw-调整高度:.h-、.min-h-、.max-h-
 bootstrap按钮怎么用
Apr 07, 2025 pm 03:09 PM
如何使用 Bootstrap 按钮?引入 Bootstrap CSS创建按钮元素并添加 Bootstrap 按钮类添加按钮文本


