

使用VS Code编辑器如何开发AngularJS 2应用程序
这篇文章主要给大家介绍了关于利用VS Code如何开发你的第一个AngularJS 2应用程序的相关资料,文中通过示例代码介绍的非常详细,对大家的学习或者工作具有一定的参考学习价值,需要的朋友下面来一起看看吧。
前言
之前已经给大家介绍了Angular2开发环境搭建教程之VS Code,本文将详细介绍利用VS Code如何开发AngularJS2应用程序的相关内容,分享出来供大家参考学习,下面话不多说了,来一起看看详细的介绍吧。
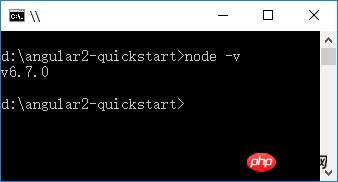
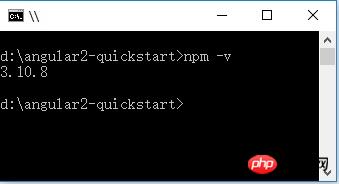
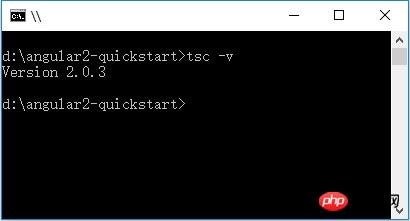
运行环境:
1、Windows 10
2、Node 6.7.0
3、npm 3.10.8
4、TypeScript 2.0.3
创建项目
1、创建文件夹:angular2-quickstart,启动VS Code,打开刚创建的文件夹:angular2-quickstart。
2、在根文件夹(angular2-quickstart)下,创建package.json文件:
{
 "name": "angular-quickstart",
 "version": "1.0.0",
 "scripts": {
 "start": "tsc && concurrently \"tsc -w\" \"lite-server\" ",
 "lite": "lite-server",
 "postinstall": "typings install",
 "tsc": "tsc",
 "tsc:w": "tsc -w",
 "typings": "typings"
 },
 "license": "ISC",
 "dependencies": {
 "@angular/common": "~2.0.2",
 "@angular/compiler": "~2.0.2",
 "@angular/core": "~2.0.2",
 "@angular/forms": "~2.0.2",
 "@angular/http": "~2.0.2",
 "@angular/platform-browser": "~2.0.2",
 "@angular/platform-browser-dynamic": "~2.0.2",
 "@angular/router": "~3.0.2",
 "@angular/upgrade": "~2.0.2",
 "angular-in-memory-web-api": "~0.1.5",
 "bootstrap": "^3.3.7",
 "core-js": "^2.4.1",
 "reflect-metadata": "^0.1.8",
 "rxjs": "5.0.0-beta.12",
 "systemjs": "0.19.39",
 "zone.js": "^0.6.25"
 },
 "devDependencies": {
 "concurrently": "^3.1.0",
 "lite-server": "^2.2.2",
 "typescript": "^2.0.3",
 "typings": "^1.4.0"
 }
}3、在根文件夹(angular2-quickstart)下,创建tsconfig.json文件:
{
 "compilerOptions": {
 "target": "es5",
 "module": "commonjs",
 "moduleResolution": "node",
 "sourceMap": true,
 "emitDecoratorMetadata": true,
 "experimentalDecorators": true,
 "removeComments": false,
 "noImplicitAny": false
 }
}4、在根文件夹(angular2-quickstart)下,创建typings.json文件:
{
 "globalDependencies": {
 "core-js": "registry:dt/core-js#0.0.0+20160725163759",
 "jasmine": "registry:dt/jasmine#2.2.0+20160621224255",
 "node": "registry:dt/node#6.0.0+20160909174046"
 }
}5、在根文件夹(angular2-quickstart)下,创建systemjs.config.js(JavaScript脚本)文件:
/**
 * System configuration for Angular samples
 * Adjust as necessary for your application needs.
 */
(function(global) {
 System.config({
 paths: {
  // paths serve as alias
  'npm:': 'node_modules/'
 },
 // map tells the System loader where to look for things
 map: {
  // our app is within the app folder
  app: 'app',
  // angular bundles
  '@angular/core': 'npm:@angular/core/bundles/core.umd.js',
  '@angular/common': 'npm:@angular/common/bundles/common.umd.js',
  '@angular/compiler': 'npm:@angular/compiler/bundles/compiler.umd.js',
  '@angular/platform-browser': 'npm:@angular/platform-browser/bundles/platform-browser.umd.js',
  '@angular/platform-browser-dynamic': 'npm:@angular/platform-browser-dynamic/bundles/platform-browser-dynamic.umd.js',
  '@angular/http': 'npm:@angular/http/bundles/http.umd.js',
  '@angular/router': 'npm:@angular/router/bundles/router.umd.js',
  '@angular/forms': 'npm:@angular/forms/bundles/forms.umd.js',
  // other libraries
  'rxjs': 'npm:rxjs',
  'angular-in-memory-web-api': 'npm:angular-in-memory-web-api',
 },
 // packages tells the System loader how to load when no filename and/or no extension
 packages: {
  app: {
  main: './main.js',
  defaultExtension: 'js'
  },
  rxjs: {
  defaultExtension: 'js'
  },
  'angular-in-memory-web-api': {
  main: './index.js',
  defaultExtension: 'js'
  }
 }
 });
})(this);文件结构:
|_ angular2-quickstart
|_ app
| |_ app.component.ts
| |_ main.ts
|_ node_modules ...
|_ typings ...
|_ index.html
|_ package.json
|_ tsconfig.json
|_ typings.json
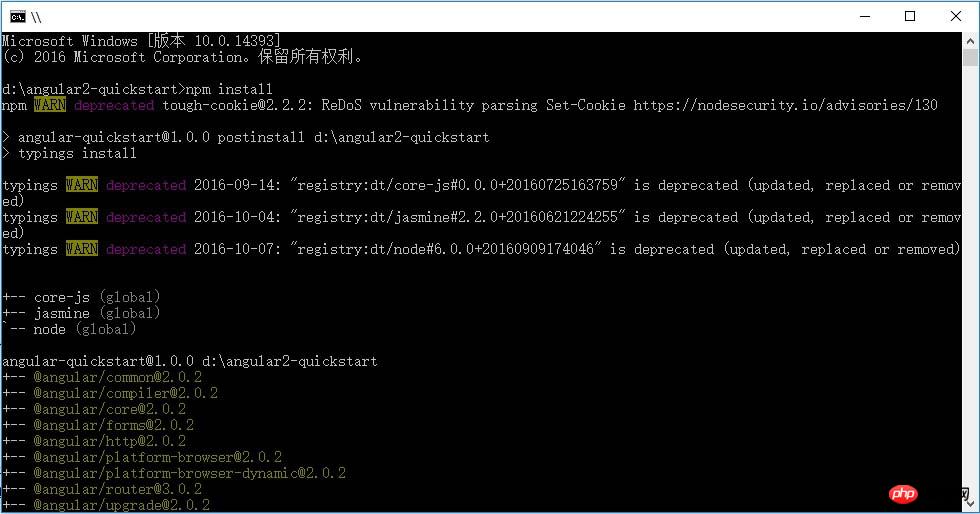
安装依赖包(最关键一步)
使用 npm 命令来安装 package.json 中列出的依赖包。在命令行 cmd 窗口,输入:cd angular2-quickstart,进入angular2-quickstar文件夹下,输入下列命令:
npm install
创建TypeScript应用程序
1、在VS Code中,在根文件夹(angular2-quickstart)下,创建app子文件夹。
2、在子app文件夹下,创建TypeScript文件app.module.ts:
import { NgModule } from '@angular/core';
import { BrowserModule } from '@angular/platform-browser';
import { AppComponent } from './app.component';
@NgModule({
 imports: [ BrowserModule ],
 declarations: [ AppComponent ],
 bootstrap: [ AppComponent ]
})
export class AppModule { }3、在子app文件夹下,创建TypeScript文件app.component.ts:
import { Component } from '@angular/core';
@Component({
selector: 'my-app',
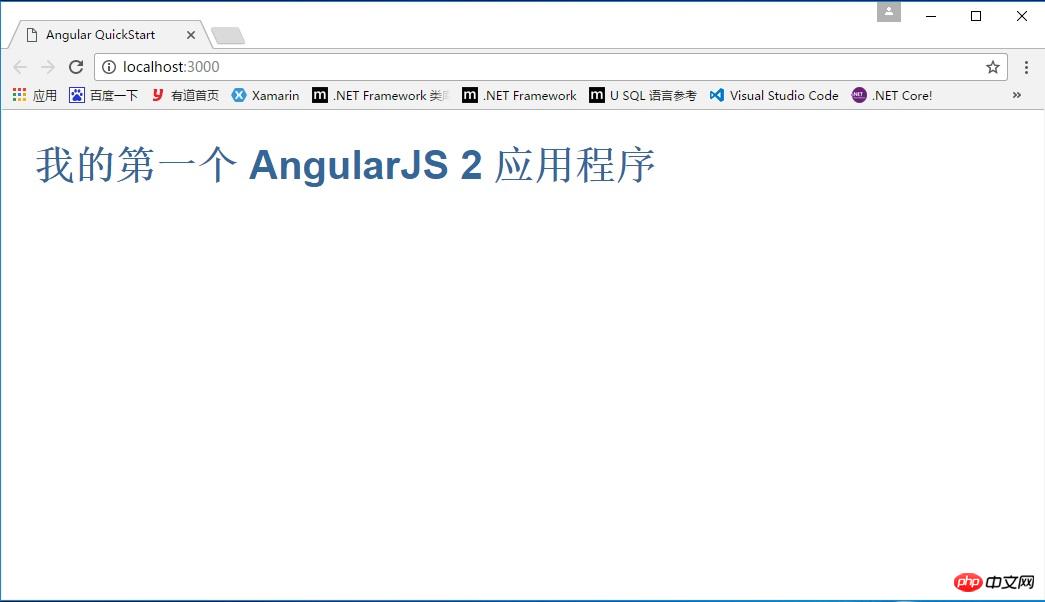
template: '<h1>我的第一个 AngularJS 2 应用程序</h1>'
})
export class AppComponent { }4、在子app文件夹下,创建TypeScript文件main.ts:
import { platformBrowserDynamic } from '@angular/platform-browser-dynamic';
import { AppModule } from './app.module';
const platform = platformBrowserDynamic();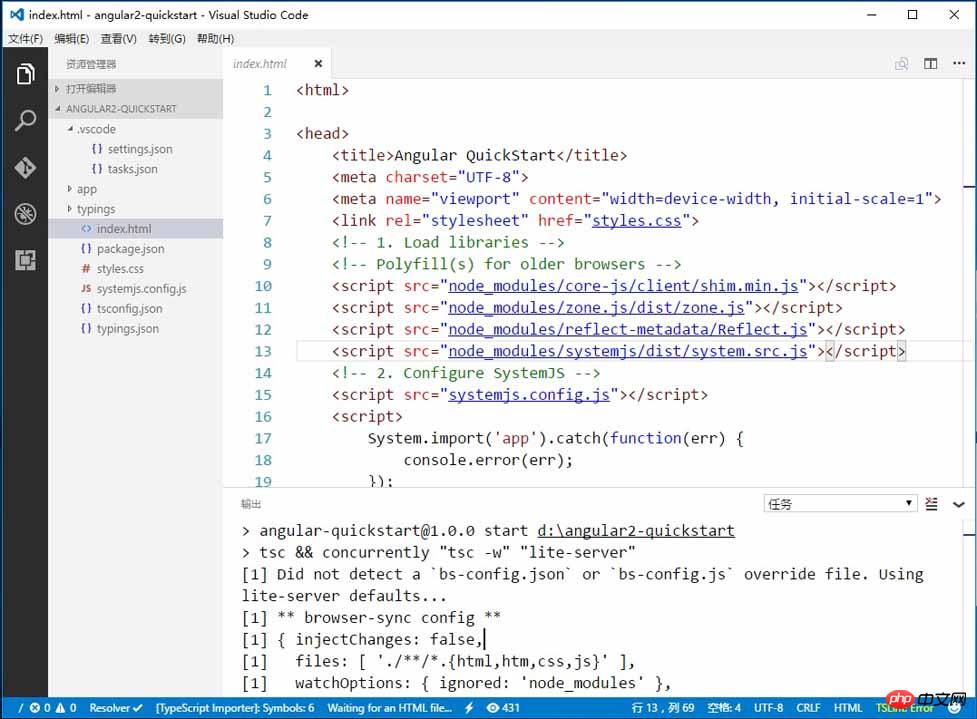
platform.bootstrapModule(AppModule);5、在根文件夹(angular2-quickstart)下,创建html文件index.html:
<html>
<head>
<title>Angular QuickStart</title>
<meta charset="UTF-8">
<meta name="viewport" content="width=device-width, initial-scale=1">
<link rel="stylesheet" href="styles.css">
<!-- 1. Load libraries -->
<!-- Polyfill(s) for older browsers -->
<script src="node_modules/core-js/client/shim.min.js"></script>
<script src="node_modules/zone.js/dist/zone.js"></script>
<script src="node_modules/reflect-metadata/Reflect.js"></script>
<script src="node_modules/systemjs/dist/system.src.js"></script>
<!-- 2. Configure SystemJS -->
<script src="systemjs.config.js"></script>
<script>
System.import('app').catch(function(err) {
console.error(err);
});
</script>
</head>
<!-- 3. Display the application -->
<body>
<my-app>Loading...</my-app>
</body>
</html>6、在根文件夹(angular2-quickstart)下,创建css文件styles.css:
/* Master Styles */
h1 {
 color: #369;
 font-family: Arial, Helvetica, sans-serif;
 font-size: 250%;
}
h2,
h3 {
 color: #444;
 font-family: Arial, Helvetica, sans-serif;
 font-weight: lighter;
}
body {
 margin: 2em;
}配置应用程序
1、在VS Code中,在根文件夹(angular2-quickstart)下,创建.vscode子文件夹。
2、在.vscode子文件夹下,创建settings.json文件:
// 将设置放入此文件中以覆盖默认值和用户设置。
{
 "typescript.tsdk": "node_modules/typescript/lib",
 // ts 项目, 隐藏 .js 和 .js.map 文件
 "files.exclude": {
  "node_modules": true,
  "**/*.js": { "when": "$(basename).ts" },
  "**/*.js.map": true
 }
}3、在.vscode子文件夹下,创建tasks.json文件:
{
 // See https://go.microsoft.com/fwlink/?LinkId=733558
 // for the documentation about the tasks.json format
 "version": "0.1.0",
 "command": "cmd",
 "isShellCommand": true,
 "showOutput": "always",
 "args": ["/C npm start"]
}运行应用程序至此,配置完毕,按 Ctrl + Shift + B 编译,程序将会将Typescript编译成 Javascript ,同时启动一个 lite-server, 加载我们编写的index.html。 显示:我的第一个 Angular 2 应用程序
上面是我整理给大家的,希望今后会对大家有帮助。
相关文章:
以上是使用VS Code编辑器如何开发AngularJS 2应用程序的详细内容。更多信息请关注PHP中文网其他相关文章!

热AI工具

Undresser.AI Undress
人工智能驱动的应用程序,用于创建逼真的裸体照片

AI Clothes Remover
用于从照片中去除衣服的在线人工智能工具。

Undress AI Tool
免费脱衣服图片

Clothoff.io
AI脱衣机

Video Face Swap
使用我们完全免费的人工智能换脸工具轻松在任何视频中换脸!

热门文章
热工具

记事本++7.3.1
好用且免费的代码编辑器

SublimeText3汉化版
中文版,非常好用

禅工作室 13.0.1
功能强大的PHP集成开发环境

Dreamweaver CS6
视觉化网页开发工具

SublimeText3 Mac版
神级代码编辑软件(SublimeText3)


 vscode需要什么电脑配置
Apr 15, 2025 pm 09:48 PM
vscode需要什么电脑配置
Apr 15, 2025 pm 09:48 PM
VS Code 系统要求:操作系统:Windows 10 及以上、macOS 10.12 及以上、Linux 发行版处理器:最低 1.6 GHz,推荐 2.0 GHz 及以上内存:最低 512 MB,推荐 4 GB 及以上存储空间:最低 250 MB,推荐 1 GB 及以上其他要求:稳定网络连接,Xorg/Wayland(Linux)
 vscode怎么定义头文件
Apr 15, 2025 pm 09:09 PM
vscode怎么定义头文件
Apr 15, 2025 pm 09:09 PM
如何使用 Visual Studio Code 定义头文件?创建头文件并使用 .h 或 .hpp 后缀命名在头文件中声明符号(例如类、函数、变量)使用 #include 指令在源文件中包含头文件编译程序,头文件将被包含并使声明的符号可用
 vscode终端使用教程
Apr 15, 2025 pm 10:09 PM
vscode终端使用教程
Apr 15, 2025 pm 10:09 PM
vscode 内置终端是一个开发工具,允许在编辑器内运行命令和脚本,以简化开发流程。如何使用 vscode 终端:通过快捷键 (Ctrl/Cmd ) 打开终端。输入命令或运行脚本。使用热键 (如 Ctrl L 清除终端)。更改工作目录 (如 cd 命令)。高级功能包括调试模式、代码片段自动补全和交互式命令历史。
 vscode在哪写代码
Apr 15, 2025 pm 09:54 PM
vscode在哪写代码
Apr 15, 2025 pm 09:54 PM
在 Visual Studio Code(VSCode)中编写代码简单易行,只需安装 VSCode、创建项目、选择语言、创建文件、编写代码、保存并运行即可。VSCode 的优点包括跨平台、免费开源、强大功能、扩展丰富,以及轻量快速。
 vscode中文注释变成问号怎么解决
Apr 15, 2025 pm 11:36 PM
vscode中文注释变成问号怎么解决
Apr 15, 2025 pm 11:36 PM
解决 Visual Studio Code 中中文注释变为问号的方法:检查文件编码,确保为“UTF-8 without BOM”。更改字体为支持中文字符的字体,如“宋体”或“微软雅黑”。重新安装字体。启用 Unicode 支持。升级 VSCode,重启计算机,重新创建源文件。
 vscode终端常用命令
Apr 15, 2025 pm 10:06 PM
vscode终端常用命令
Apr 15, 2025 pm 10:06 PM
VS Code 终端常用命令包括:清除终端屏幕(clear)列出当前目录文件(ls)更改当前工作目录(cd)打印当前工作目录路径(pwd)创建新目录(mkdir)删除空目录(rmdir)创建新文件(touch)删除文件或目录(rm)复制文件或目录(cp)移动或重命名文件或目录(mv)显示文件内容(cat)查看文件内容并滚动(less)查看文件内容只能向下滚动(more)显示文件前几行(head)
 vscode终端命令不能用
Apr 15, 2025 pm 10:03 PM
vscode终端命令不能用
Apr 15, 2025 pm 10:03 PM
VS Code 终端命令无法使用的原因及解决办法:未安装必要的工具(Windows:WSL;macOS:Xcode 命令行工具)路径配置错误(添加可执行文件到 PATH 环境变量中)权限问题(以管理员身份运行 VS Code)防火墙或代理限制(检查设置,解除限制)终端设置不正确(启用使用外部终端)VS Code 安装损坏(重新安装或更新)终端配置不兼容(尝试不同的终端类型或命令)特定环境变量缺失(设置必要的环境变量)
 vscode上一步下一步快捷键
Apr 15, 2025 pm 10:51 PM
vscode上一步下一步快捷键
Apr 15, 2025 pm 10:51 PM
VS Code 一步/下一步快捷键的使用方法:一步(向后):Windows/Linux:Ctrl ←;macOS:Cmd ←下一步(向前):Windows/Linux:Ctrl →;macOS:Cmd →
