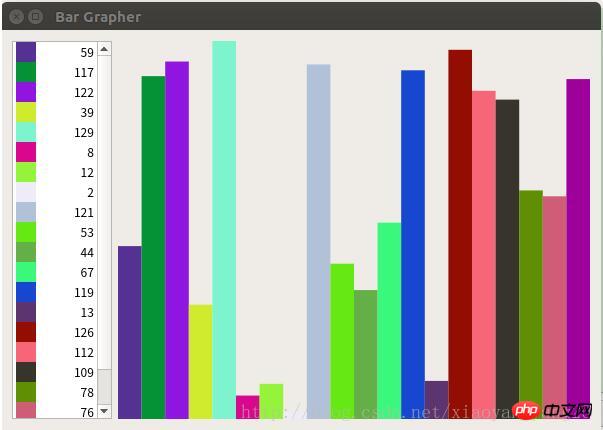
python3+PyQt5实现柱状图
这篇文章主要为大家详细介绍了python3+PyQt5实现柱状图的方法,具有一定的参考价值,感兴趣的小伙伴们可以参考一下
本文通过Python3+pyqt5实现了python Qt GUI 快速编程的16章的excise例子。
#!/usr/bin/env python3

import random
import sys
from PyQt5.QtCore import (QAbstractListModel, QAbstractTableModel,
  QModelIndex, QSize, QTimer, QVariant, Qt,pyqtSignal)
from PyQt5.QtWidgets import (QApplication, QDialog, QHBoxLayout,
  QListView, QSpinBox, QStyledItemDelegate,QStyleOptionViewItem, QWidget)
from PyQt5.QtGui import QColor,QPainter,QPixmap

class BarGraphModel(QAbstractListModel):
 dataChanged=pyqtSignal(QModelIndex,QModelIndex)
 def __init__(self):
  super(BarGraphModel, self).__init__()
  self.__data = []
  self.__colors = {}
  self.minValue = 0
  self.maxValue = 0


 def rowCount(self, index=QModelIndex()):
  return len(self.__data)


 def insertRows(self, row, count):
  extra = row + count
  if extra >= len(self.__data):
   self.beginInsertRows(QModelIndex(), row, row + count - 1)
   self.__data.extend([0] * (extra - len(self.__data) + 1))
   self.endInsertRows()
   return True
  return False


 def flags(self, index):
  #return (QAbstractTableModel.flags(self, index)|Qt.ItemIsEditable)
  return (QAbstractListModel.flags(self, index)|Qt.ItemIsEditable)

 def setData(self, index, value, role=Qt.DisplayRole):
  row = index.row()
  if not index.isValid() or 0 > row >= len(self.__data):
   return False
  changed = False
  if role == Qt.DisplayRole:
   value = value
   self.__data[row] = value
   if self.minValue > value:
    self.minValue = value
   if self.maxValue < value:
    self.maxValue = value
   changed = True
  elif role == Qt.UserRole:
   self.__colors[row] = value
   #self.emit(SIGNAL("dataChanged(QModelIndex,QModelIndex)"),
   #   index, index)
   self.dataChanged[QModelIndex,QModelIndex].emit(index, index)
   changed = True
  if changed:
   #self.emit(SIGNAL("dataChanged(QModelIndex,QModelIndex)"),
    #   index, index)
   self.dataChanged[QModelIndex,QModelIndex].emit(index, index)
  return changed


 def data(self, index, role=Qt.DisplayRole):
  row = index.row()
  if not index.isValid() or 0 > row >= len(self.__data):
   return QVariant()
  if role == Qt.DisplayRole:
   return self.__data[row]
  if role == Qt.UserRole:
   return QVariant(self.__colors.get(row,
     QColor(Qt.red)))
  if role == Qt.DecorationRole:
   color = QColor(self.__colors.get(row,
     QColor(Qt.red)))
   pixmap = QPixmap(20, 20)
   pixmap.fill(color)
   return QVariant(pixmap)
  return QVariant()


class BarGraphDelegate(QStyledItemDelegate):

 def __init__(self, minimum=0, maximum=100, parent=None):
  super(BarGraphDelegate, self).__init__(parent)
  self.minimum = minimum
  self.maximum = maximum


 def paint(self, painter, option, index):
  myoption = QStyleOptionViewItem(option)
  myoption.displayAlignment |= (Qt.AlignRight|Qt.AlignVCenter)
  QStyledItemDelegate.paint(self, painter, myoption, index)


 def createEditor(self, parent, option, index):
  spinbox = QSpinBox(parent)
  spinbox.setRange(self.minimum, self.maximum)
  spinbox.setAlignment(Qt.AlignRight|Qt.AlignVCenter)
  return spinbox


 def setEditorData(self, editor, index):
  value = index.model().data(index, Qt.DisplayRole)
  editor.setValue(value)


 def setModelData(self, editor, model, index):
  editor.interpretText()
  model.setData(index, editor.value())


class BarGraphView(QWidget):

 WIDTH = 20

 def __init__(self, parent=None):
  super(BarGraphView, self).__init__(parent)
  self.model = None


 def setModel(self, model):
  self.model = model
  #self.connect(self.model,
  #  SIGNAL("dataChanged(QModelIndex,QModelIndex)"),
  #  self.update)
  self.model.dataChanged[QModelIndex,QModelIndex].connect(self.update)
  #self.connect(self.model, SIGNAL("modelReset()"), self.update)
  self.model.modelReset.connect(self.update)


 def sizeHint(self):
  return self.minimumSizeHint()


 def minimumSizeHint(self):
  if self.model is None:
   return QSize(BarGraphView.WIDTH * 10, 100)
  return QSize(BarGraphView.WIDTH * self.model.rowCount(), 100)


 def paintEvent(self, event):
  if self.model is None:
   return
  painter = QPainter(self)
  painter.setRenderHint(QPainter.Antialiasing)
  span = self.model.maxValue - self.model.minValue
  painter.setWindow(0, 0, BarGraphView.WIDTH * self.model.rowCount(),
       span)
  for row in range(self.model.rowCount()):
   x = row * BarGraphView.WIDTH
   index = self.model.index(row)
   color = QColor(self.model.data(index, Qt.UserRole))
   y = self.model.data(index)
   painter.fillRect(x, span - y, BarGraphView.WIDTH, y, color)


class MainForm(QDialog):

 def __init__(self, parent=None):
  super(MainForm, self).__init__(parent)

  self.model = BarGraphModel()
  self.barGraphView = BarGraphView()
  self.barGraphView.setModel(self.model)
  self.listView = QListView()
  self.listView.setModel(self.model)
  self.listView.setItemDelegate(BarGraphDelegate(0, 1000, self))
  self.listView.setMaximumWidth(100)
  self.listView.setEditTriggers(QListView.DoubleClicked|
          QListView.EditKeyPressed)
  layout = QHBoxLayout()
  layout.addWidget(self.listView)
  layout.addWidget(self.barGraphView, 1)
  self.setLayout(layout)

  self.setWindowTitle("Bar Grapher")
  QTimer.singleShot(0, self.initialLoad)


 def initialLoad(self):
  # Generate fake data
  count = 20
  self.model.insertRows(0, count - 1)
  for row in range(count):
   value = random.randint(1, 150)
   color = QColor(random.randint(0, 255), random.randint(0, 255),
       random.randint(0, 255))
   index = self.model.index(row)
   self.model.setData(index, value)
   self.model.setData(index, QVariant(color), Qt.UserRole)


app = QApplication(sys.argv)
form = MainForm()
form.resize(600, 400)
form.show()
app.exec_()运行结果:

相关推荐:
以上是python3+PyQt5实现柱状图的详细内容。更多信息请关注PHP中文网其他相关文章!

热AI工具

Undresser.AI Undress
人工智能驱动的应用程序,用于创建逼真的裸体照片

AI Clothes Remover
用于从照片中去除衣服的在线人工智能工具。

Undress AI Tool
免费脱衣服图片

Clothoff.io
AI脱衣机

Video Face Swap
使用我们完全免费的人工智能换脸工具轻松在任何视频中换脸!

热门文章

热工具

记事本++7.3.1
好用且免费的代码编辑器

SublimeText3汉化版
中文版,非常好用

禅工作室 13.0.1
功能强大的PHP集成开发环境

Dreamweaver CS6
视觉化网页开发工具

SublimeText3 Mac版
神级代码编辑软件(SublimeText3)
 PHP和Python:解释了不同的范例
Apr 18, 2025 am 12:26 AM
PHP主要是过程式编程,但也支持面向对象编程(OOP);Python支持多种范式,包括OOP、函数式和过程式编程。PHP适合web开发,Python适用于多种应用,如数据分析和机器学习。
 在PHP和Python之间进行选择:指南
Apr 18, 2025 am 12:24 AM
PHP适合网页开发和快速原型开发,Python适用于数据科学和机器学习。1.PHP用于动态网页开发,语法简单,适合快速开发。2.Python语法简洁,适用于多领域,库生态系统强大。
 PHP和Python:深入了解他们的历史
Apr 18, 2025 am 12:25 AM
PHP起源于1994年,由RasmusLerdorf开发,最初用于跟踪网站访问者,逐渐演变为服务器端脚本语言,广泛应用于网页开发。Python由GuidovanRossum于1980年代末开发,1991年首次发布,强调代码可读性和简洁性,适用于科学计算、数据分析等领域。
 Python vs. JavaScript:学习曲线和易用性
Apr 16, 2025 am 12:12 AM
Python更适合初学者,学习曲线平缓,语法简洁;JavaScript适合前端开发,学习曲线较陡,语法灵活。1.Python语法直观,适用于数据科学和后端开发。2.JavaScript灵活,广泛用于前端和服务器端编程。
 sublime怎么运行代码python
Apr 16, 2025 am 08:48 AM
在 Sublime Text 中运行 Python 代码,需先安装 Python 插件,再创建 .py 文件并编写代码,最后按 Ctrl B 运行代码,输出会在控制台中显示。
 vscode在哪写代码
Apr 15, 2025 pm 09:54 PM
在 Visual Studio Code(VSCode)中编写代码简单易行,只需安装 VSCode、创建项目、选择语言、创建文件、编写代码、保存并运行即可。VSCode 的优点包括跨平台、免费开源、强大功能、扩展丰富,以及轻量快速。
 visual studio code 可以用于 python 吗
Apr 15, 2025 pm 08:18 PM
VS Code 可用于编写 Python,并提供许多功能,使其成为开发 Python 应用程序的理想工具。它允许用户:安装 Python 扩展,以获得代码补全、语法高亮和调试等功能。使用调试器逐步跟踪代码,查找和修复错误。集成 Git,进行版本控制。使用代码格式化工具,保持代码一致性。使用 Linting 工具,提前发现潜在问题。
 notepad 怎么运行python
Apr 16, 2025 pm 07:33 PM
在 Notepad 中运行 Python 代码需要安装 Python 可执行文件和 NppExec 插件。安装 Python 并为其添加 PATH 后,在 NppExec 插件中配置命令为“python”、参数为“{CURRENT_DIRECTORY}{FILE_NAME}”,即可在 Notepad 中通过快捷键“F6”运行 Python 代码。


