

Debian 6.04下PostgreSQL-9.1.3 安装教程

第一阶段-编译安装:1,从postgresql官网下载postgresql-9.1.3.tar.bz2这个我想大家都知道的2,把源代码复制到/usr/src/postgres
前言:本人机器:AMD64x2 4400++ 1G 内存
第一阶段-编译安装:
1,从postgresql官网下载postgresql-9.1.3.tar.bz2这个我想大家都知道的
2,把源代码复制到/usr/src/postgresql-9.1.3.tar.bz2 且 cd /usr/src
3,解压: tar xjvf postgresql-9.1.3.tar.bz2
4,进入源码目录: cd postgresql-9.1.3
5,建立pgsql安装目录。这里我选择 :mkdir /usr/pgsql-9.1.3
6,安装必须的工具执行:aptitude install build-essential zlib1g-dev libpam0g-dev libssl-dev libperl-dev kernel-package libncurses5-dev flex bison gawk chkconfig系统会自动安装所以来的软件
7,在源码目录里面执行下面命令:
./configure CFLAGS='-DLINUX_OOM_ADJ=0 -O2 -pipe -march=athlon64 -fomit-frame-pointer -fstack-protector' --prefix=/usr/pgsql-9.1.3 --with-perl --with-openssl --with-pam --enable-nls --disable-debug
8,开始编译 :make -j 4
9,变成成功后,执行 make install 安装
10,,建立postgresql数据库专用普通权限用户 :adduser psqlroot
11,切换到安装目录: cd /usr/pgsql-9.1.3建立初始化数据库集群文件夹:mkdir date
12,改变date所有权限 chown psqlroot:psqlroot date
13,执行数据库初始化(必须使用psqlroot用户):su - psqlroot -c './initdb /usr/pgsql-9.1.3/date'
14,好了,进入date目录可以看到初始化后的文件,比如conf配置文件等等。
第二阶段-制作启动脚本:
1,从源代码目录里面复制出原始的开机脚本:
cp /usr/src/postgresql-9.1.3/contrib/start-scripts/linux /etc/init.d/postgresql
2,给予执行权限:chmod 700 /etc/init.d/postgresql
3,建立s 2 3 4 5 6各个级别启动连接在(/etc/rcS.d rc1.d rc2.d rc3.d rc4.d rc5.d rc6.d)
使用:chkconfig /etc/init.d/postgresql自动建立 呵呵很方便哦!
4,修改/etc/init.d/postgresql文件,这个文件是用/bin/sh基础的,改成/bin/bash的:
#! /bin/bash
# chkconfig: 2345 98 02
# description: PostgreSQL RDBMS
# This is an example of a start/stop script for SysV-style init, such
# as is used on Linux systems. You should edit some of the variables
# and maybe the 'echo' commands.
#
# Place this file at /etc/init.d/postgresql (or
# /etc/rc.d/init.d/postgresql) and make symlinks to
# /etc/rc.d/rc0.d/K02postgresql
# /etc/rc.d/rc1.d/K02postgresql
# /etc/rc.d/rc2.d/K02postgresql
# /etc/rc.d/rc3.d/S98postgresql
# /etc/rc.d/rc4.d/S98postgresql
# /etc/rc.d/rc5.d/S98postgresql
# Or, if you have chkconfig, simply:
# chkconfig --add postgresql
#
# Proper init scripts on Linux systems normally require setting lock
# and pid files under /var/run as well as reacting to network
# settings, so you should treat this with care.
# Original author: Ryan Kirkpatrick
# contrib/start-scripts/linux
## EDIT FROM HERE
# Installation PREFIX
PREFIX=/usr/pgsql-9.1.3
# Data directory
PGDATA=$PREFIX/date
# Who to run the postmaster as, usually "postgres". (NOT "root")
PGUSER=psqlroot
# Where to keep a log file
PGLOG=/var/log/serverlog
# It's often a good idea to protect the postmaster from being killed by the
# OOM killer (which will tend to preferentially kill the postmaster because
# of the way it accounts for shared memory). Setting the OOM_ADJ value to
# -17 will disable OOM kill altogether. If you enable this, you probably want
# to compile PostgreSQL with "-DLINUX_OOM_ADJ=0", so that individual backends
# can still be killed by the OOM killer.
OOM_ADJ=-17
## STOP EDITING HERE
# The path that is to be used for the script
PATH=/usr/local/sbin:/usr/local/bin:/sbin:/bin:/usr/sbin:/usr/bin
# What to use to start up the postmaster. (If you want the script to wait
# until the server has started, you could use "pg_ctl start -w" here.
# But without -w, pg_ctl adds no value.)
DAEMON="$PREFIX/bin/postmaster"
# What to use to shut down the postmaster
PGCTL="$PREFIX/bin/pg_ctl"
set -e
# Only start if we can find the postmaster.
test -x $DAEMON ||
{
echo "$DAEMON not found"
if [ "$1" = "stop" ]
then exit 0
else exit 5
fi
}
# Parse command line parameters.
case $1 in
start)
echo -n "Starting PostgreSQL: "
test x"$OOM_ADJ" != x && echo "$OOM_ADJ" > /proc/self/oom_adj
su - $PGUSER -c "$DAEMON -D $PGDATA &" >>$PGLOG 2>&1
echo "ok"
;;
stop)
echo -n "Stopping PostgreSQL: "
su - $PGUSER -c "$PGCTL stop -D '$PGDATA' -s -m fast"
echo "ok"
;;
restart)
echo -n "Restarting PostgreSQL: "
su - $PGUSER -c "$PGCTL stop -D '$PGDATA' -s -m fast -w"
test x"$OOM_ADJ" != x && echo "$OOM_ADJ" > /proc/self/oom_adj
su - $PGUSER -c "$DAEMON -D '$PGDATA' &" >>$PGLOG 2>&1
echo "ok"
;;
reload)
echo -n "Reload PostgreSQL: "
su - $PGUSER -c "$PGCTL reload -D '$PGDATA' -s"
echo "ok"
;;
status)
su - $PGUSER -c "$PGCTL status -D '$PGDATA'"
;;
*)
# Print help
echo "Usage: $0 {start|stop|restart|reload|status}" 1>&2
exit 1
;;
esac
exit 0
5,注意上文提到的OOM_ADJ=-17 是为了逃避OOM自动封杀,OK!执行/etc/init.d/postgresql start stop restart 等等命令试试,大工告成!!
6,把安装目录中的conf配置文件复制到/etc/postgresql下面去,方便以后更改配置
mkdir /etc/postgresql
mv /usr/pgsql-9.1.3/date/*conf /etc/postgresql/
cd /usr/pgsql-9.1.3/date
su - psqlroot -c 'ln -s /etc/postgresql/pg_hba.conf pg_hba.conf'
su - psqlroot -c 'ln -s /etc/postgresql/pg_ident.conf pg_ident.conf'
su - psqlroot -c 'ln -s /etc/postgresql/postgresql.conf postgresql.conf'
第三阶段-优化
![]()

热AI工具

Undresser.AI Undress
人工智能驱动的应用程序,用于创建逼真的裸体照片

AI Clothes Remover
用于从照片中去除衣服的在线人工智能工具。

Undress AI Tool
免费脱衣服图片

Clothoff.io
AI脱衣机

Video Face Swap
使用我们完全免费的人工智能换脸工具轻松在任何视频中换脸!

热门文章
热工具

记事本++7.3.1
好用且免费的代码编辑器

SublimeText3汉化版
中文版,非常好用

禅工作室 13.0.1
功能强大的PHP集成开发环境

Dreamweaver CS6
视觉化网页开发工具

SublimeText3 Mac版
神级代码编辑软件(SublimeText3)


 如何在Debian 12上安装Snap
Mar 20, 2024 pm 08:51 PM
如何在Debian 12上安装Snap
Mar 20, 2024 pm 08:51 PM
Snap是一个针对Linux系统设计的外部包管理器,它为您提供了安装容器化应用程序的便捷途径。通过Snap,您可以轻松地下载和安装软件包,无需担心安装额外的依赖项。该管理器会自动解决软件包所需的依赖项,确保软件包能够在您的系统上顺利运行。Snap与本地的apt包管理器相辅相成,为您提供了另一种在系统中安装和运行应用程序的选择。在本指南中,您将找到有关如何在Debian12上安装Snap的完整指南。提纲:如何在Debian12上安装Snap如何在Snap上查找包可用性如何在Snap上查找有关包的信
 Debian安装Wine及Debian安装Wine教程
Feb 12, 2024 am 10:36 AM
Debian安装Wine及Debian安装Wine教程
Feb 12, 2024 am 10:36 AM
Wine是一种可以在Linux系统上运行Windows应用程序的兼容层,它可以让用户在Linux系统上无缝运行Windows应用程序,而无需进行双系统安装或虚拟机设置,本文将介绍如何在Debian系统上安装Wine以及提供一些相关的教程。安装Wine在Debian系统上安装Wine非常简单,只需要使用apt命令即可,打开终端,并输入以下命令:```shellsudoapt-getupdatesudoapt-getinstallwine```这将更新您的软件包列表,并安装Wine,安装完成后,您可
 Windows下安装Debian及deb文件的全攻略
Feb 14, 2024 pm 11:03 PM
Windows下安装Debian及deb文件的全攻略
Feb 14, 2024 pm 11:03 PM
在Windows系统中安装Debian,以及直接在Windows中安装deb文件,是许多Linux爱好者探索双系统或尝试新软件的方式,本文将详细介绍这两种安装方式的步骤及注意事项。Windows下安装Debian要在Windows系统中安装Debian,通常需要通过虚拟机软件,如VirtualBox,以下是具体步骤:1.下载并安装VirtualBox,这是一个免费的虚拟化软件,可以在同一台计算机上运行多个操作系统。2.下载Debian的ISO镜像文件,可以在Debian官网上找到下载链接。3.在
 如何在Debian 12上安装Steam
Mar 21, 2024 pm 10:10 PM
如何在Debian 12上安装Steam
Mar 21, 2024 pm 10:10 PM
STEAM是由ValveCorporation开发的一个流行的游戏平台,允许您购买、下载、安装和玩游戏。它提供自动更新、配对和社区论坛等功能,以解决与软件相关的问题。除此之外,你还可以使用STeam与其他玩家和开发者互动,因为它有广泛的社区支持。在本指南中,您将学习到:如何在Debian12上安装Steam如何在Debian12上运行STeam如何从Debian12中删除STeam结论如何在Debian12上安装Steam您可以在Debian12上安装Steam:Debian官方资料库deb包S
 Debian安装GCC及GCC10的详细指南
Feb 10, 2024 pm 03:57 PM
Debian安装GCC及GCC10的详细指南
Feb 10, 2024 pm 03:57 PM
Debian是一种流行的Linux发行版,广泛应用于服务器和桌面系统,GCC(GNUCompilerCollection)是一款开源的编译器套件,用于编译C、C++、Fortran等多种编程语言,在Debian系统中,安装GCC及GCC10非常简单,本文将为您提供详细的安装指南。安装GCC1.打开终端(Terminal),使用以下命令更新软件包列表:```shellsudoaptupdate```2.安装GCC及其相关工具:sudoaptinstallbuild-essential这个命令将安装
 如何在Debian 11中注销或关闭系统
Dec 27, 2023 pm 02:22 PM
如何在Debian 11中注销或关闭系统
Dec 27, 2023 pm 02:22 PM
Debian11怎么关闭系统?随小编一起看一下具体操作吧。方法一、依次点【所有应用程序】-【注销】。在弹出的界面,点【关机】。方法二、在终端中执行如下命令:sudoshutdown-hnow
 在Debian11上如何添加桌面快捷图标
Jan 09, 2024 am 10:06 AM
在Debian11上如何添加桌面快捷图标
Jan 09, 2024 am 10:06 AM
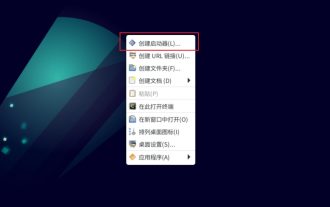
Debian11怎么在桌面创建应用程序快捷方式?windows系统安装程序一般都会在桌面创建应用快捷方式,Debian11怎么创建呢?下面我们就来看看详细的教程。桌面空白处右键选择【创建启动器】。在弹出的界面中,在【命令】中设置要建立快捷方式的程序,小编以终端模拟器为例,用户可自行设置图标,设置完成后,点【创建】。之后就可以看到快捷方式了,如下图所示。当快捷方式不需要时,在图标上右键选择【删除】即可。
 Debian安装GNOME桌面环境:一步步走向华丽的Linux世界
Feb 10, 2024 am 10:15 AM
Debian安装GNOME桌面环境:一步步走向华丽的Linux世界
Feb 10, 2024 am 10:15 AM
Debian是一款广泛使用的Linux发行版,以其稳定性和可靠性而闻名,默认的Debian安装并不包括图形用户界面(GUI),这使得一些新手用户可能会感到困惑,本文将指导您在Debian上安装GNOME桌面环境,为您的Linux体验增添一抹亮丽的色彩。在安装GNOME之前,请确保您的Debian系统已经更新到最新版本,可以通过以下命令完成更新:```sqlsudoaptupdatesudoaptupgrade```接下来,我们可以开始安装GNOME桌面环境,安装GNOME的核心组件:```ard
