淺談小程式怎麼實現清單滾動上下連動效果
小程式怎麼實現列表滾動上下連動效果?以下這篇文章為大家介紹微信小程式開發清單滾動上下連動效果的方法,希望對大家有幫助!

1、背景
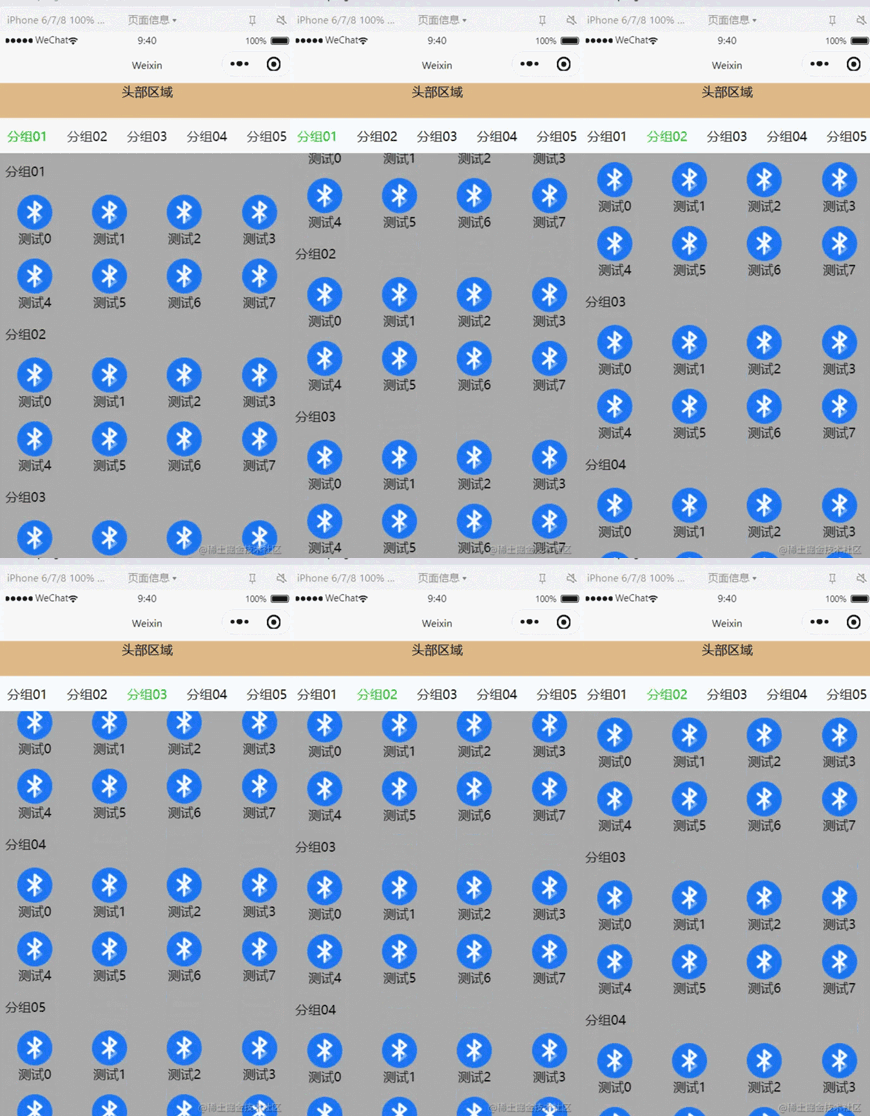
最近在做公司的一款小程序,其中有一塊的設計的是在列表做上下滾動的是時候,頂部的tab欄跟著一起聯動,當點擊tab欄的時候,列表資料也跟著聯動。
下面是實現的一個效果圖:

頂部的頭部區域不跟隨列表滾動; 頭部區域以下屬於滾動區域。
2、實作
2.1 原理介紹
這個地方的實作主要藉助了微信小程式原生的scroll-view元件。
使用它的scroll-into-view 屬性,可以實現點擊頂部的tab欄,將頁面滾動到指定的列表位置;
使用bindscroll 事件,可以知道當前頁面滾動的距離,根據滾動的距離做tab欄的切換操作;
2.1 頁面佈局代碼
#先說下界面的整體佈局,主要分為兩部分,頭部固定區域可滾動列表區域。
可捲動的清單區域的標題列當滾動一定的距離後,它也要固定在頂部。
程式碼實作:
<!--index.wxml-->
<view class="list">
<!--顶部固定区域-->
<view style="height: 88rpx;width: 100%;background-color: burlywood;text-align: center;">头部区域</view>
<!--可滚动区域-->
<scroll-view scroll-y="true" style="width: 100%; height: {{scrollAreaHeight}}px;" bindscroll="scroll" scroll-into-view="{{scrollToItem}}" scroll-with-animation="true" scroll-top="{{scrollTop}}">
<!--水平滚动的tab栏-->
<scroll-view scroll-x="true" style="height: 88rpx;width: 100%;">
<view class="head-area {{float ? 'head-float' : ''}}" >
<view class="head-area-item {{curSelectTab === index ? 'head-area-item-select' : ''}}" wx:for="{{appGroupList}}" bindtap="tabClick" data-index="{{index}}">
{{item.name}}
</view>
</view>
</scroll-view>
<!--数据列表-->
<view class="list-group" style="height: {{listGroupHeight}}px;">
<view class="list-group-item" id="v_{{index}}" wx:for="{{appGroupList}}" data-index="{{index}}">
<view class="group-name">
{{item.name}}
</view>
<view class="group-children" >
<view wx:for="{{item.children}}" class="group-children-item" style="width: {{itemWidth}}px;">
<image src="{{item.url}}"></image>
<view>{{item.name}}</view>
</view>
</view>
</view>
</view>
</scroll-view>
</view>在佈局程式碼中有幾個點要注意:
1、scrollAreaHeight 捲動區域的高度計算。 --- 透過取得目前裝置的視窗高度減去頂部固定區域的高度
2、水平tab欄是否置頂。 --- 根據頁面的滾動距離來判斷,如果滾動距離大於或等於水平tab欄的高度,則置頂;
#3、設定資料清單的id="v_{{index}}" id,後續點擊tab欄滾動到指定的位置就是根據這個id去實現的。
2.2 樣式程式碼
/**index.wxss**/
.list{
  width: 100%;
  height: 100%;
  display: flex;
  flex-direction: column;
}

.head-area{
  display: flex;
  flex-direction: row;
  flex-wrap: nowrap;
  height: 88rpx;
  width: 100%;
  padding: 0 10;
}

.head-area-item{
  display: flex;
  height: 88rpx;
  text-align: center;
  width: 150rpx;
  align-items: center;
  justify-content: center;
}

.head-area-item-select{
  color: #09bb07;
}

image{
  width: 88rpx;
  height: 88rpx;
}

.list-group{
  display: flex;
  width: 100%;
  height: 1000%;
  flex-direction: column;
}

.list-group-item{
  display: flex;
  width: 100%;
  background-color: #aaa;
  flex-direction: column;
}

.group-name{
  height: 88rpx;
  display: flex;
  text-align: center;
  align-items: center;
  margin-left: 20rpx;
}

.group-children{
  display: flex;
  flex-direction: row;
  flex-wrap: wrap;
  width: 100%;
}

.group-children-item{
  height: 160rpx;
  display: flex;
  flex-direction: column;
  justify-content: center;
  align-items: center;
}

.head-float{
  position: fixed;
  top: 88rpx;
  background-color: #ffffff;
}2.3 邏輯程式碼
// index.js
Page({
heightArr: [],
//记录scroll-view滚动过程中距离顶部的高度
distance: 0,
data: {
appGroupList:[
{name:"分组01",children:[{"name":"测试0","url":"/images/bluetooth.png"},
{"name":"测试1","url":"/images/bluetooth.png"},
{"name":"测试2","url":"/images/bluetooth.png"},
{"name":"测试3","url":"/images/bluetooth.png"},
{"name":"测试4","url":"/images/bluetooth.png"},
{"name":"测试5","url":"/images/bluetooth.png"},
{"name":"测试6","url":"/images/bluetooth.png"},
{"name":"测试7","url":"/images/bluetooth.png"}]},
{name:"分组02",children:[{"name":"测试0","url":"/images/bluetooth.png"},
{"name":"测试1","url":"/images/bluetooth.png"},
{"name":"测试2","url":"/images/bluetooth.png"},
{"name":"测试3","url":"/images/bluetooth.png"},
{"name":"测试4","url":"/images/bluetooth.png"},
{"name":"测试5","url":"/images/bluetooth.png"},
{"name":"测试6","url":"/images/bluetooth.png"},
{"name":"测试7","url":"/images/bluetooth.png"}]},
{name:"分组03",children:[{"name":"测试0","url":"/images/bluetooth.png"},
{"name":"测试1","url":"/images/bluetooth.png"},
{"name":"测试2","url":"/images/bluetooth.png"},
{"name":"测试3","url":"/images/bluetooth.png"},
{"name":"测试4","url":"/images/bluetooth.png"},
{"name":"测试5","url":"/images/bluetooth.png"},
{"name":"测试6","url":"/images/bluetooth.png"},
{"name":"测试7","url":"/images/bluetooth.png"}]},
{name:"分组04",children:[{"name":"测试0","url":"/images/bluetooth.png"},
{"name":"测试1","url":"/images/bluetooth.png"},
{"name":"测试2","url":"/images/bluetooth.png"},
{"name":"测试3","url":"/images/bluetooth.png"},
{"name":"测试4","url":"/images/bluetooth.png"},
{"name":"测试5","url":"/images/bluetooth.png"},
{"name":"测试6","url":"/images/bluetooth.png"},
{"name":"测试7","url":"/images/bluetooth.png"}]},
{name:"分组05",children:[{"name":"测试0","url":"/images/bluetooth.png"},
{"name":"测试1","url":"/images/bluetooth.png"},
{"name":"测试2","url":"/images/bluetooth.png"},
{"name":"测试3","url":"/images/bluetooth.png"},
{"name":"测试4","url":"/images/bluetooth.png"},
{"name":"测试5","url":"/images/bluetooth.png"},
{"name":"测试6","url":"/images/bluetooth.png"},
{"name":"测试7","url":"/images/bluetooth.png"}]},
],
itemWidth: wx.getSystemInfoSync().windowWidth / 4,
scrollAreaHeight:wx.getSystemInfoSync().windowHeight - 44,
float:false,
curSelectTab:0,
scrollToItem:null,
scrollTop: 0, //到顶部的距离
listGroupHeight:0,
},
onReady: function () {
this.cacluItemHeight();
},
scroll:function(e){
console.log("scroll:",e);
if(e.detail.scrollTop>=44){
this.setData({
float : true
})
} else if(e.detail.scrollTop<44) {
this.setData({
float : false
})
}
let scrollTop = e.detail.scrollTop;
let current = this.data.curSelectTab;
if (scrollTop >= this.distance) {
//页面向上滑动
//列表当前可视区域最底部到顶部的距离 超过 当前列表选中项距顶部的高度(且没有下标越界),则更新tab栏
if (current + 1 < this.heightArr.length && scrollTop >= this.heightArr[current]) {
this.setData({
curSelectTab: current + 1
})
}
} else {
//页面向下滑动
//如果列表当前可视区域最顶部到顶部的距离 小于 当前列表选中的项距顶部的高度,则切换tab栏的选中项
if (current - 1 >= 0 && scrollTop < this.heightArr[current - 1]) {
this.setData({
curSelectTab: current - 1
})
}
}
//更新到顶部的距离
this.distance = scrollTop;
},
tabClick(e){
this.setData({
curSelectTab: e.currentTarget.dataset.index,
scrollToItem: "v_"+e.currentTarget.dataset.index
})
},
//计算每一个item高度
cacluItemHeight() {
let that = this;
this.heightArr = [];
let h = 0;
const query = wx.createSelectorQuery();
query.selectAll('.list-group-item').boundingClientRect()
query.exec(function(res) {
res[0].forEach((item) => {
h += item.height;
that.heightArr.push(h);
})
console.log(that.heightArr);
that.setData({
listGroupHeight: that.heightArr[that.heightArr.length - 1 ]
})
})
},
})在邏輯程式碼中最主要的有兩個地方:
1、cacluItemHeight 計算清單中item的高度數組,並將最終計算的結果保存在heightArr數組中。
heightArr數組中的每一項的值是在前一項的基礎之上進行累加。
2、scroll 中判斷目前的滾動方向,根據滾動判斷目前的方向,然後根據滾動的距離設定目前選擇的tab。
好了,就這麼多,基於以上的內容基本上可以實現想要的滾動連動、切換tab連動效果。
【相關學習推薦:小程式開發教學】
以上是淺談小程式怎麼實現清單滾動上下連動效果的詳細內容。更多資訊請關注PHP中文網其他相關文章!

熱AI工具

Undresser.AI Undress
人工智慧驅動的應用程序,用於創建逼真的裸體照片

AI Clothes Remover
用於從照片中去除衣服的線上人工智慧工具。

Undress AI Tool
免費脫衣圖片

Clothoff.io
AI脫衣器

Video Face Swap
使用我們完全免費的人工智慧換臉工具,輕鬆在任何影片中換臉!

熱門文章

熱工具

記事本++7.3.1
好用且免費的程式碼編輯器

SublimeText3漢化版
中文版,非常好用

禪工作室 13.0.1
強大的PHP整合開發環境

Dreamweaver CS6
視覺化網頁開發工具

SublimeText3 Mac版
神級程式碼編輯軟體(SublimeText3)
 使用Python開發微信小程式
Jun 17, 2023 pm 06:34 PM
隨著行動互聯網技術和智慧型手機的普及,微信成為了人們生活中不可或缺的一個應用。而微信小程式則讓人們可以在不需要下載安裝應用程式的情況下,直接使用小程式來解決一些簡單的需求。本文將介紹如何使用Python來開發微信小程式。一、準備工作在使用Python開發微信小程式之前,需要先安裝相關的Python函式庫。這裡推薦使用wxpy和itchat這兩個函式庫。 wxpy是一個微信機器
 實作微信小程式中的卡片翻轉特效
Nov 21, 2023 am 10:55 AM
實作微信小程式中的卡片翻轉特效在微信小程式中,實現卡片翻轉特效是一種常見的動畫效果,可以提升使用者體驗和介面互動的吸引力。以下將具體介紹如何在微信小程式中實現卡片翻轉的特效,並提供相關程式碼範例。首先,需要在小程式的頁面佈局檔案中定義兩個卡片元素,一個用於顯示正面內容,一個用於顯示背面內容,具體範例程式碼如下:<!--index.wxml-->&l
 支付寶上線「漢字拾光-生僻字」小程序,用於徵集、補充生僻字庫
Oct 31, 2023 pm 09:25 PM
本站10月31日消息,今年5月27日,螞蟻集團宣布啟動“漢字拾光計劃”,最近又迎來新進展:支付寶上線“漢字拾光-生僻字”小程序,用於向社會徵集生僻字,補充生僻字庫,同時提供不同的生僻字輸入體驗,以幫助完善支付寶內的生僻字輸入方法。目前,用戶搜尋「漢字拾光」、「生僻字」等關鍵字就可以進入「生僻字」小程式。在小程式裡,使用者可以提交尚未被系統辨識輸入的生僻字圖片,支付寶工程師確認後,將會對字庫進行補錄入。本站注意到,使用者也可以在小程式體驗最新的拆字輸入法,這項輸入法針對讀音不明確的生僻字設計。用戶拆
 小程式能用react嗎
Dec 29, 2022 am 11:06 AM
小程式能用react,其使用方法:1、基於「react-reconciler」實作一個渲染器,產生一個DSL;2、建立一個小程式元件,去解析和渲染DSL;3、安裝npm,並執行開發者工具中的建構npm;4、在自己的頁面中引入包,再利用api即可完成開發。
 uniapp如何實現小程式和H5的快速轉換
Oct 20, 2023 pm 02:12 PM
uniapp如何實現小程式和H5的快速轉換,需要具體程式碼範例近年來,隨著行動網路的發展和智慧型手機的普及,小程式和H5成為了不可或缺的應用形式。而uniapp作為一個跨平台的開發框架,可以在一套程式碼的基礎上,快速實現小程式和H5的轉換,大大提高了開發效率。本文將介紹uniapp如何實現小程式和H5的快速轉換,並給出具體的程式碼範例。一、uniapp簡介unia
 用Python編寫簡單的聊天程式教程
May 08, 2023 pm 06:37 PM
實現思路x01服務端的建立首先,在服務端,使用socket進行訊息的接受,每接受一個socket的請求,就開啟一個新的線程來管理訊息的分發與接受,同時,又存在一個handler來管理所有的線程,從而實現對聊天室的各種功能的處理x02客戶端的建立客戶端的建立就要比服務端簡單多了,客戶端的作用只是對消息的發送以及接受,以及按照特定的規則去輸入特定的字符從而實現不同的功能的使用,因此,在客戶端這裡,只需要去使用兩個線程,一個是專門用於接受消息,一個是專門用於發送消息的至於為什麼不用一個呢,那是因為,只
 教你如何在小程式中用公眾號範本訊息(附詳細想法)
Nov 04, 2022 pm 04:53 PM
這篇文章給大家帶來了關於微信小程式的相關問題,其中主要介紹瞭如何在小程式中用公眾號範本訊息,下面一起來看一下,希望對大家有幫助。
 PHP與小程式的地理位置定位與地圖顯示
Jul 04, 2023 pm 04:01 PM
PHP與小程式的地理位置定位與地圖顯示地理位置定位與地圖顯示在現代科技中已經成為了必備的功能之一。隨著行動裝置的普及,人們對於定位和地圖顯示的需求也越來越高。在開發過程中,PHP和小程式是常見的兩種技術選擇。本文將為大家介紹PHP與小程式中的地理位置定位與地圖顯示的實作方法,並附上對應的程式碼範例。一、PHP中的地理位置定位在PHP中,我們可以使用第三方地理位


