微信小程式開發錄音機、音訊播放、動畫
本文主要和大家分享微信小程式開發錄音機、音訊播放、動畫,希望能幫助大家。
1.為了進來看得清楚.剛開始沒有載入音訊清單.程式碼往前挪一挪即可.
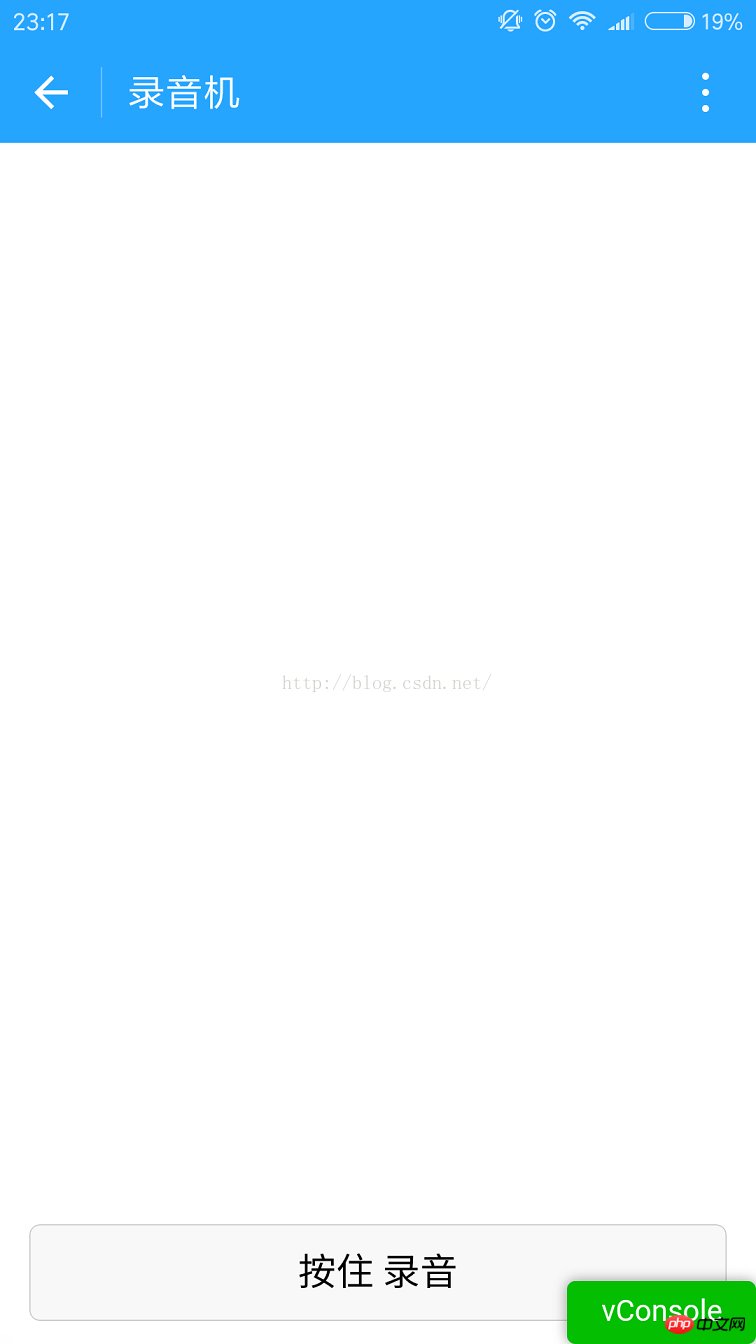
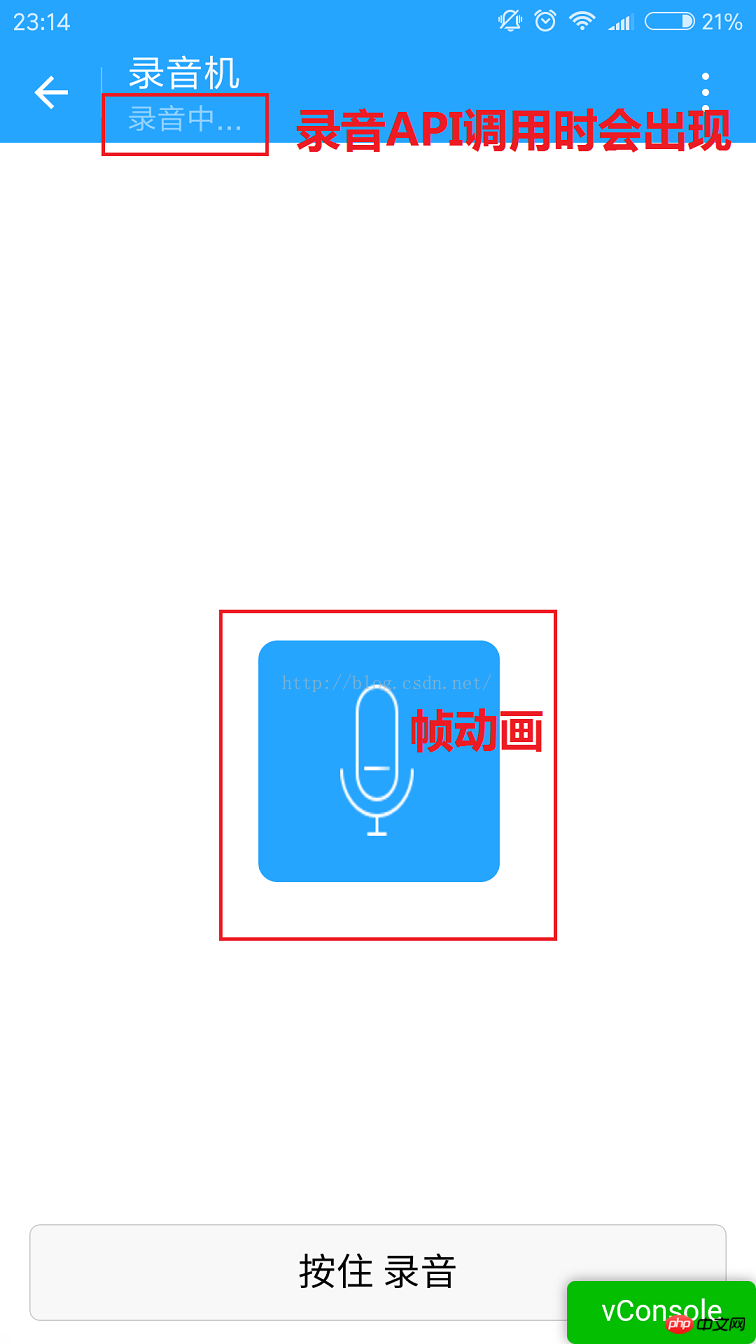
##2.按住錄音按鈕的時候會出現麥克風.中間的麥克風是個幀動畫.
其實就是用js控制圖片顯示隱藏.沒啥好說的.這裡值得說一說的是錄音.微信的錄音API後,如果錄音時間太短,會錄音失敗.所以fail的時候還是需要處理一下.錄音時間的限制和微信語音是一樣的.60秒.
#3.錄音完成後才載入清單.
下圖就是從微信儲存的檔案裡取得到的清單資訊.有儲存路徑,建立時間,檔案大小.
這裡的檔案可能不只是音頻.這裡我沒做判斷.下面的路徑都是wx:file//store_...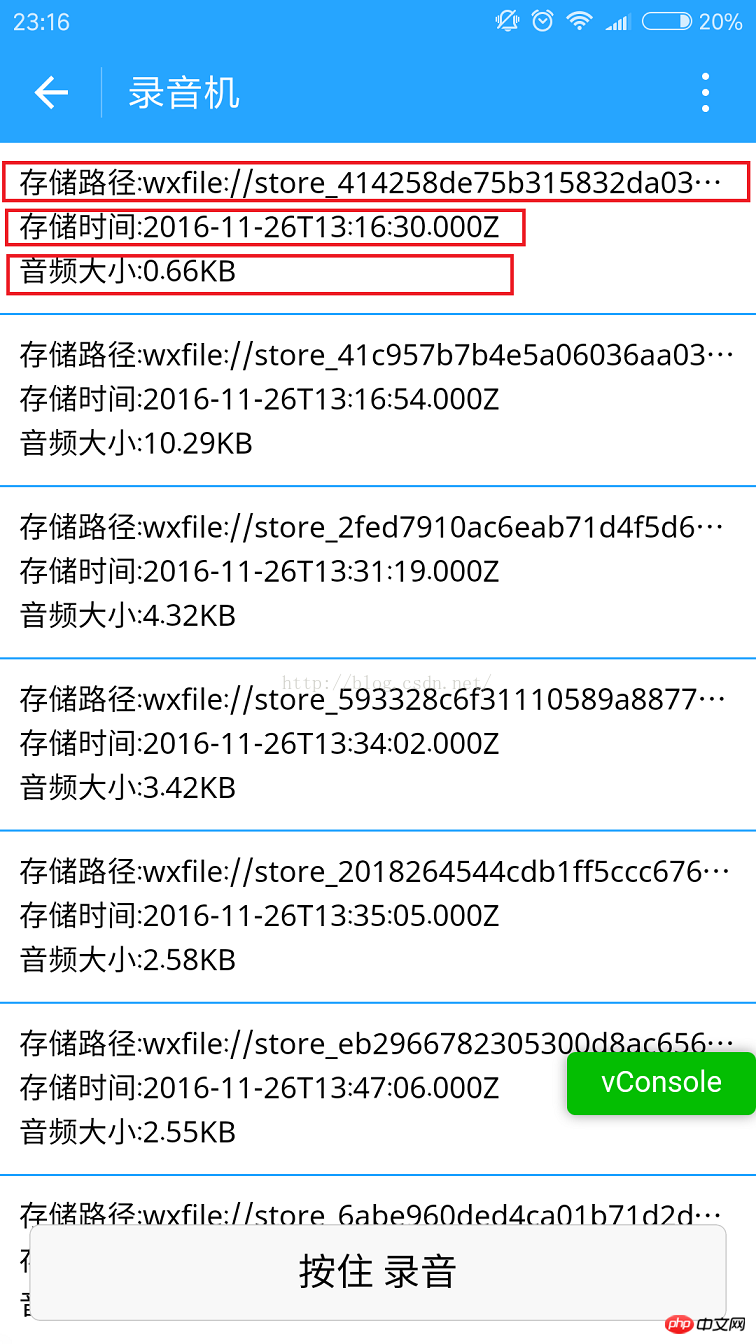
#我也去找了下.在Tencent/micromsg/wxafiles/ wx..../這一級目錄就能找到了.
時間是格式化之後的.檔案大小是B,轉成KB如下.
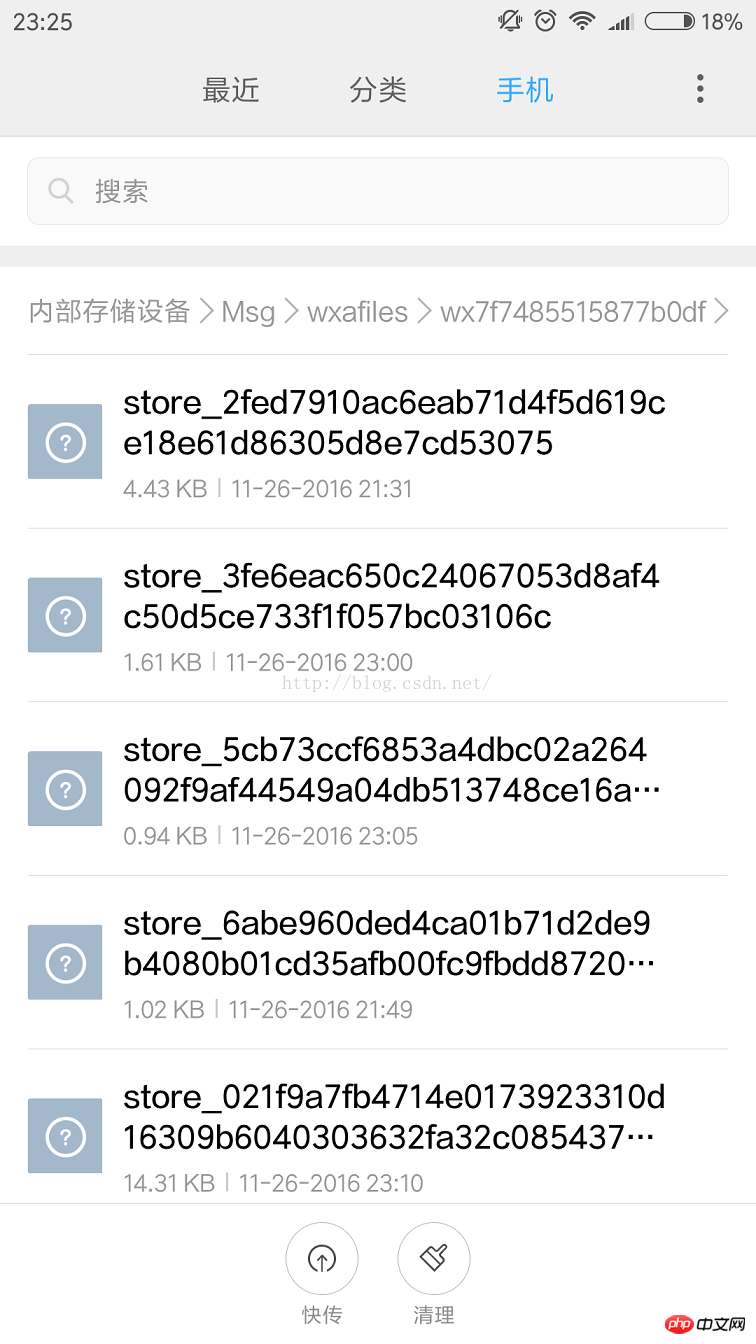
手機目錄如下.但開啟之後播放不了.目前原因不明.
#下面是檔案全名稱.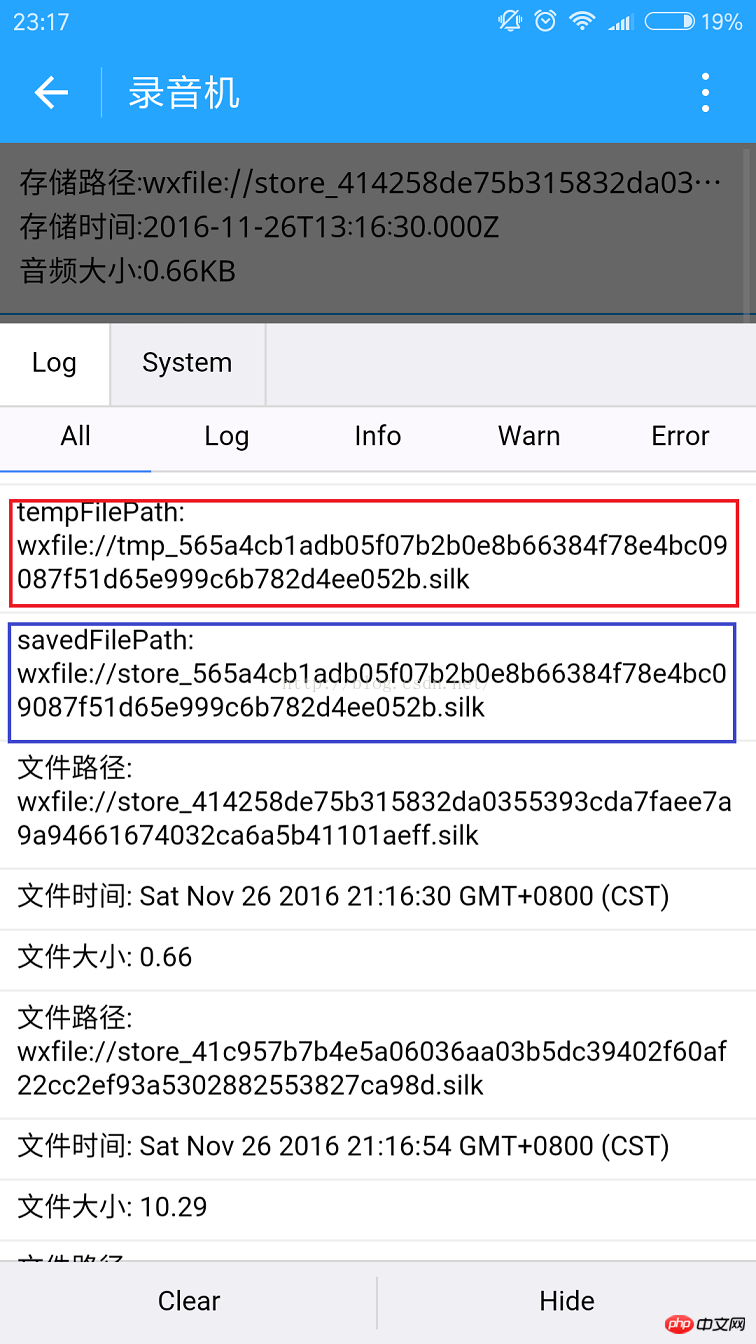
1.tempFilePath : 錄音之後的臨時檔案.第二次進入小程式就不能正常使用了.
2.savedFilePath :持久保存的檔案路徑.值得注意的是微信只給100M的儲存空間.還是盡早上傳到後台吧.
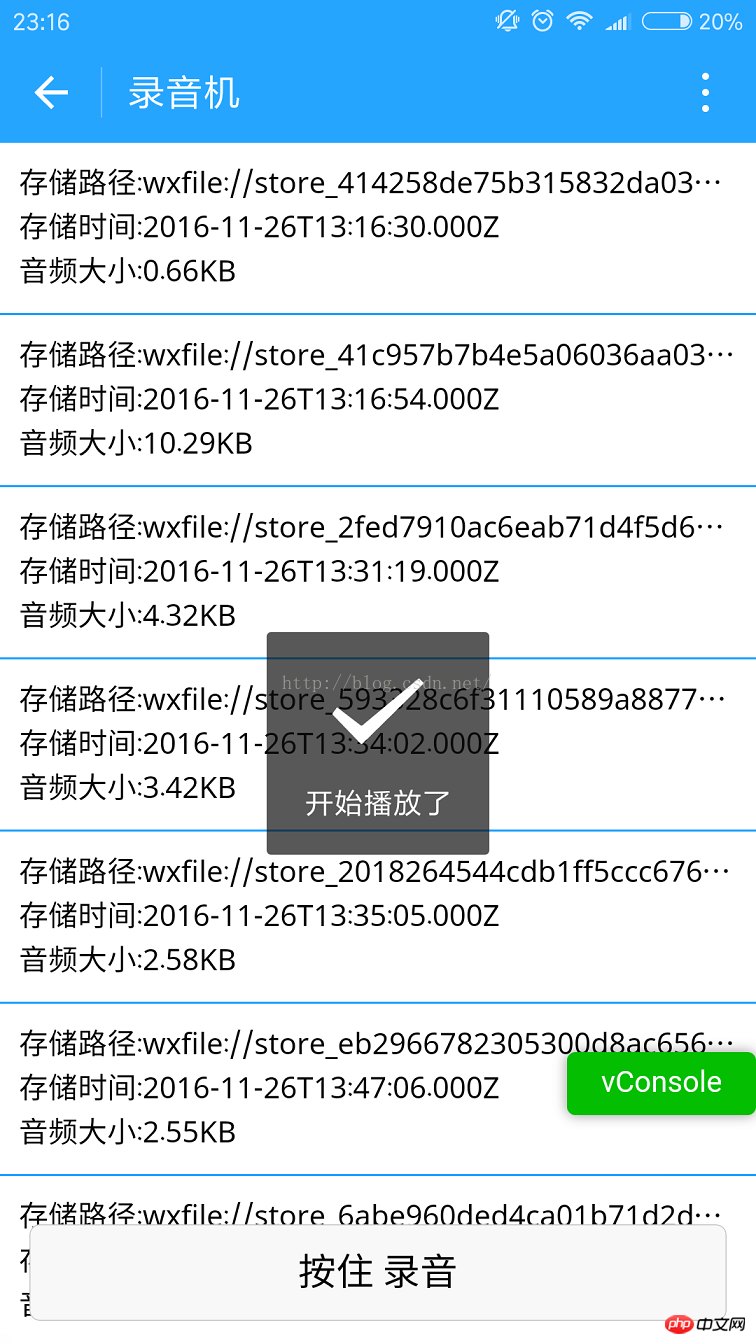
#4.播放錄音音訊.
點擊item就能聽到你的聲音了.別被自己嚇住.哈哈.
#上程式碼:
#########1.index.wxml##### ##<!--index.wxml-->
<scroll-view>
<view wx:if="{{voices}}" class="common-list" style="margin-bottom:120rpx;">
<block wx:for="{{voices}}">
<view class="board">
<view class="cell" >
<view class="cell-bd" data-key="{{item.filePath}}" bindtap="gotoPlay" >
<view class="date">存储路径:{{item.filePath}}</view>
<view class="date" >存储时间:{{item.createTime}}</view>
<view class="date">音频大小:{{item.size}}KB</view>
</view>
</view>
</view>
</block>
</view>
</scroll-view>
<view wx:if="{{isSpeaking}}" class="speak-style">
<image class="sound-style" src="../../images/voice_icon_speech_sound_1.png" ></image>
<image wx:if="{{j==2}}" class="sound-style" src="../images/voice_icon_speech_sound_2.png" ></image>
<image wx:if="{{j==3}}" class="sound-style" src="../images/voice_icon_speech_sound_3.png" ></image>
<image wx:if="{{j==4}}" class="sound-style" src="../images/voice_icon_speech_sound_4.png" ></image>
<image wx:if="{{j==5}}"class="sound-style" src="../images/voice_icon_speech_sound_5.png" ></image>
</view>
<view class="record-style">
<button class="btn-style" bindtouchstart="touchdown" bindtouchend="touchup">按住 录音</button>
</view>/**index.wxss**/
.speak-style{
position: relative;
height: 240rpx;
width: 240rpx;
border-radius: 20rpx;
margin: 50% auto;
background: #26A5FF;
}
.item-style{
margin-top: 30rpx;
margin-bottom: 30rpx;
}
.text-style{
text-align: center;
}
.record-style{
position: fixed;
bottom: 0;
left: 0;
height: 120rpx;
width: 100%;
}
.btn-style{
margin-left: 30rpx;
margin-right: 30rpx;
}
.sound-style{
position: absolute;
width: 74rpx;
height:150rpx;
margin-top: 45rpx;
margin-left: 83rpx;
}
.board {
overflow: hidden;
border-bottom: 2rpx solid #26A5FF;
}
/*列布局*/
.cell{
display: flex;
margin: 20rpx;
}
.cell-hd{
margin-left: 10rpx;
color: #885A38;
}
.cell .cell-bd{
flex:1;
position: relative;
}
/**只显示一行*/
.date{
font-size: 30rpx;
text-overflow: ellipsis;
white-space:nowrap;
overflow:hidden;
}//index.js
//获取应用实例
var app = getApp()
Page({
data: {
j: 1,//帧动画初始图片
isSpeaking: false,//是否正在说话
voices: [],//音频数组
},
onLoad: function () {
},
//手指按下
touchdown: function () {
console.log("手指按下了...")
console.log("new date : " + new Date)
var _this = this;
speaking.call(this);
this.setData({
isSpeaking: true
})
//开始录音
wx.startRecord({
success: function (res) {
//临时路径,下次进入小程序时无法正常使用
var tempFilePath = res.tempFilePath
console.log("tempFilePath: " + tempFilePath)
//持久保存
wx.saveFile({
tempFilePath: tempFilePath,
success: function (res) {
//持久路径
//本地文件存储的大小限制为 100M
var savedFilePath = res.savedFilePath
console.log("savedFilePath: " + savedFilePath)
}
})
wx.showToast({
title: '恭喜!录音成功',
icon: 'success',
duration: 1000
})
//获取录音音频列表
wx.getSavedFileList({
success: function (res) {
var voices = [];
for (var i = 0; i < res.fileList.length; i++) {
//格式化时间
var createTime = new Date(res.fileList[i].createTime)
//将音频大小B转为KB
var size = (res.fileList[i].size / 1024).toFixed(2);
var voice = { filePath: res.fileList[i].filePath, createTime: createTime, size: size };
console.log("文件路径: " + res.fileList[i].filePath)
console.log("文件时间: " + createTime)
console.log("文件大小: " + size)
voices = voices.concat(voice);
}
_this.setData({
voices: voices
})
}
})
},
fail: function (res) {
//录音失败
wx.showModal({
title: '提示',
content: '录音的姿势不对!',
showCancel: false,
success: function (res) {
if (res.confirm) {
console.log('用户点击确定')
return
}
}
})
}
})
},
//手指抬起
touchup: function () {
console.log("手指抬起了...")
this.setData({
isSpeaking: false,
})
clearInterval(this.timer)
wx.stopRecord()
},
//点击播放录音
gotoPlay: function (e) {
var filePath = e.currentTarget.dataset.key;
//点击开始播放
wx.showToast({
title: '开始播放',
icon: 'success',
duration: 1000
})
wx.playVoice({
filePath: filePath,
success: function () {
wx.showToast({
title: '播放结束',
icon: 'success',
duration: 1000
})
}
})
}
})
//麦克风帧动画
function speaking() {
var _this = this;
//话筒帧动画
var i = 1;
this.timer = setInterval(function () {
i++;
i = i % 5;
_this.setData({
j: i
})
}, 200);
}2.录音的时间不能太短.否则会失败;也不能超过60秒.到了60秒会自动停止录音.
3.音频播放不能同时播放多个音频.看文档.微信小程序 播放音频文档
1.为了进来看得清楚.刚开始没有加载音频列表.代码往前挪一挪即可.

2.按住 录音按钮的时候会出现麦克风.中间的麦克风是个帧动画.
其实就是用js控制图片显示隐藏.没啥好说的.这里值得说一说的是录音.微信的录音API后,如果录音时间太短,会录音失败.所以fail的时候还是需要处理一下.录音时间的限制和微信语音是一样的.60秒.

3.我在录音完成后才加载列表.
下图就是从微信存储的文件里获取到的列表信息.有储存路径,创建时间,文件大小.
这里的文件可能不只是音频.这里我没做判断.下面的路径都是wx:file//store_...
我也去找了下.在Tencent/micromsg/wxafiles/wx..../这一级目录就能找到了.
时间是格式化之后的.文件大小是B,转成KB如下.

手机目录如下.但是打开之后播放不了.目前原因不明.

下面是文件全名称.
1.tempFilePath : 录音之后的临时文件.第二次进入小程序就不能正常使用了.
2.savedFilePath :持久保存的文件路径.值得注意的是微信只给100M的储存空间.还是尽早上传到后台吧.

4.播放录音音频.
点击item就能听到你的声音了.别被自己吓住.哈哈.

上代码:
1.index.wxml
<!--index.wxml-->
<scroll-view>
	<view wx:if="{{voices}}" class="common-list" style="margin-bottom:120rpx;">
		<block  wx:for="{{voices}}">
		    <view class="board">
		        <view class="cell"  >
		            <view class="cell-bd" data-key="{{item.filePath}}" bindtap="gotoPlay" >
		                <view  class="date">存储路径:{{item.filePath}}</view>
		                <view  class="date" >存储时间:{{item.createTime}}</view>
		                <view  class="date">音频大小:{{item.size}}KB</view>
		            </view>
		        </view>
		    </view>
		</block>
	</view>
</scroll-view>
<view  wx:if="{{isSpeaking}}"  class="speak-style">
	<image class="sound-style" src="../../images/voice_icon_speech_sound_1.png" ></image>
	<image wx:if="{{j==2}}" class="sound-style" src="../images/voice_icon_speech_sound_2.png" ></image>
	<image wx:if="{{j==3}}" class="sound-style" src="../images/voice_icon_speech_sound_3.png" ></image>
	<image wx:if="{{j==4}}" class="sound-style" src="../images/voice_icon_speech_sound_4.png" ></image>
	<image wx:if="{{j==5}}"class="sound-style" src="../images/voice_icon_speech_sound_5.png" ></image>
</view>
<view class="record-style">
	<button class="btn-style" bindtouchstart="touchdown" bindtouchend="touchup">按住 录音</button>
</view>2.index.wxss
/**index.wxss**/
.speak-style{
    position: relative;
    height: 240rpx;
    width: 240rpx;
    border-radius: 20rpx;
    margin: 50% auto;
    background: #26A5FF;
}
.item-style{
    margin-top: 30rpx;
    margin-bottom: 30rpx;
}
.text-style{
    text-align: center;

}
.record-style{
    position: fixed;
    bottom: 0;
    left: 0;
    height: 120rpx;
    width: 100%;
}
.btn-style{
  margin-left: 30rpx;
  margin-right: 30rpx;
}

.sound-style{
  position: absolute;
  width: 74rpx;
  height:150rpx;
  margin-top: 45rpx;
  margin-left: 83rpx;
}


.board {
  overflow: hidden;
  border-bottom: 2rpx solid #26A5FF;
}
/*列布局*/
.cell{
    display: flex;
    margin: 20rpx;
}
.cell-hd{
    margin-left: 10rpx;
    color: #885A38;
}
.cell .cell-bd{
    flex:1;
    position: relative;

}
/**只显示一行*/
.date{
    font-size: 30rpx;
    text-overflow: ellipsis;
    white-space:nowrap;
    overflow:hidden;
}
3.index.js
//index.js
//获取应用实例
var app = getApp()
Page({
data: {
j: 1,//帧动画初始图片
isSpeaking: false,//是否正在说话
voices: [],//音频数组
},
onLoad: function () {
},
//手指按下
touchdown: function () {
console.log("手指按下了...")
console.log("new date : " + new Date)
var _this = this;
speaking.call(this);
this.setData({
isSpeaking: true
})
//开始录音
wx.startRecord({
success: function (res) {
//临时路径,下次进入小程序时无法正常使用
var tempFilePath = res.tempFilePath
console.log("tempFilePath: " + tempFilePath)
//持久保存
wx.saveFile({
tempFilePath: tempFilePath,
success: function (res) {
//持久路径
//本地文件存储的大小限制为 100M
var savedFilePath = res.savedFilePath
console.log("savedFilePath: " + savedFilePath)
}
})
wx.showToast({
title: '恭喜!录音成功',
icon: 'success',
duration: 1000
})
//获取录音音频列表
wx.getSavedFileList({
success: function (res) {
var voices = [];
for (var i = 0; i < res.fileList.length; i++) {
//格式化时间
var createTime = new Date(res.fileList[i].createTime)
//将音频大小B转为KB
var size = (res.fileList[i].size / 1024).toFixed(2);
var voice = { filePath: res.fileList[i].filePath, createTime: createTime, size: size };
console.log("文件路径: " + res.fileList[i].filePath)
console.log("文件时间: " + createTime)
console.log("文件大小: " + size)
voices = voices.concat(voice);
}
_this.setData({
voices: voices
})
}
})
},
fail: function (res) {
//录音失败
wx.showModal({
title: '提示',
content: '录音的姿势不对!',
showCancel: false,
success: function (res) {
if (res.confirm) {
console.log('用户点击确定')
return
}
}
})
}
})
},
//手指抬起
touchup: function () {
console.log("手指抬起了...")
this.setData({
isSpeaking: false,
})
clearInterval(this.timer)
wx.stopRecord()
},
//点击播放录音
gotoPlay: function (e) {
var filePath = e.currentTarget.dataset.key;
//点击开始播放
wx.showToast({
title: '开始播放',
icon: 'success',
duration: 1000
})
wx.playVoice({
filePath: filePath,
success: function () {
wx.showToast({
title: '播放结束',
icon: 'success',
duration: 1000
})
}
})
}
})
//麦克风帧动画
function speaking() {
var _this = this;
//话筒帧动画
var i = 1;
this.timer = setInterval(function () {
i++;
i = i % 5;
_this.setData({
j: i
})
}, 200);
}注意:
1.錄音的音訊預設是存在本地的臨時路徑下.第二次進入小程式無法正常使用,可以存持久,但是本地檔案大小的限制是100M,最好還是上傳後台.
2.錄音的時間不能太短.否則會失敗;也不能超過60秒.到了60秒會自動停止錄音.
3.音訊播放不能同時播放多個音訊.看文件.微信小程式播放音訊文件
相關推薦:
#以上是微信小程式開發錄音機、音訊播放、動畫的詳細內容。更多資訊請關注PHP中文網其他相關文章!

熱AI工具

Undresser.AI Undress
人工智慧驅動的應用程序,用於創建逼真的裸體照片

AI Clothes Remover
用於從照片中去除衣服的線上人工智慧工具。

Undress AI Tool
免費脫衣圖片

Clothoff.io
AI脫衣器

Video Face Swap
使用我們完全免費的人工智慧換臉工具,輕鬆在任何影片中換臉!

熱門文章

熱工具

記事本++7.3.1
好用且免費的程式碼編輯器

SublimeText3漢化版
中文版,非常好用

禪工作室 13.0.1
強大的PHP整合開發環境

Dreamweaver CS6
視覺化網頁開發工具

SublimeText3 Mac版
神級程式碼編輯軟體(SublimeText3)
 如何在 Ubuntu Linux 發行版錄製串流音訊
Feb 25, 2024 pm 03:46 PM
如何在Ubuntu和其他Linux發行版中錄製音訊?如果您想透過電腦的麥克風錄製畫外音,可以使用GNOME錄音機或Audacity。使用GNOME錄音機操作簡單易懂,但功能較為有限。而對於Audacity,初次接觸可能會感到有些吃力,但其擁有許多進階的錄音功能。然而,在本教程中不會深入探討這一點。 GNOME錄音機可以與麥克風搭配使用。另外,還有一種稱為錄音機的工具,不僅可以使用麥克風輸入,還可以錄製串流音樂。在本教學中,我們將向您展示以下步驟如何使用GNOME錄音機錄製聲音,使用AudioR
 使用Python開發微信小程式
Jun 17, 2023 pm 06:34 PM
隨著行動互聯網技術和智慧型手機的普及,微信成為了人們生活中不可或缺的一個應用。而微信小程式則讓人們可以在不需要下載安裝應用程式的情況下,直接使用小程式來解決一些簡單的需求。本文將介紹如何使用Python來開發微信小程式。一、準備工作在使用Python開發微信小程式之前,需要先安裝相關的Python函式庫。這裡推薦使用wxpy和itchat這兩個函式庫。 wxpy是一個微信機器
 實作微信小程式中的卡片翻轉特效
Nov 21, 2023 am 10:55 AM
實作微信小程式中的卡片翻轉特效在微信小程式中,實現卡片翻轉特效是一種常見的動畫效果,可以提升使用者體驗和介面互動的吸引力。以下將具體介紹如何在微信小程式中實現卡片翻轉的特效,並提供相關程式碼範例。首先,需要在小程式的頁面佈局檔案中定義兩個卡片元素,一個用於顯示正面內容,一個用於顯示背面內容,具體範例程式碼如下:<!--index.wxml-->&l
 支付寶上線「漢字拾光-生僻字」小程序,用於徵集、補充生僻字庫
Oct 31, 2023 pm 09:25 PM
本站10月31日消息,今年5月27日,螞蟻集團宣布啟動“漢字拾光計劃”,最近又迎來新進展:支付寶上線“漢字拾光-生僻字”小程序,用於向社會徵集生僻字,補充生僻字庫,同時提供不同的生僻字輸入體驗,以幫助完善支付寶內的生僻字輸入方法。目前,用戶搜尋「漢字拾光」、「生僻字」等關鍵字就可以進入「生僻字」小程式。在小程式裡,使用者可以提交尚未被系統辨識輸入的生僻字圖片,支付寶工程師確認後,將會對字庫進行補錄入。本站注意到,使用者也可以在小程式體驗最新的拆字輸入法,這項輸入法針對讀音不明確的生僻字設計。用戶拆
 小程式能用react嗎
Dec 29, 2022 am 11:06 AM
小程式能用react,其使用方法:1、基於「react-reconciler」實作一個渲染器,產生一個DSL;2、建立一個小程式元件,去解析和渲染DSL;3、安裝npm,並執行開發者工具中的建構npm;4、在自己的頁面中引入包,再利用api即可完成開發。
 uniapp如何實現小程式和H5的快速轉換
Oct 20, 2023 pm 02:12 PM
uniapp如何實現小程式和H5的快速轉換,需要具體程式碼範例近年來,隨著行動網路的發展和智慧型手機的普及,小程式和H5成為了不可或缺的應用形式。而uniapp作為一個跨平台的開發框架,可以在一套程式碼的基礎上,快速實現小程式和H5的轉換,大大提高了開發效率。本文將介紹uniapp如何實現小程式和H5的快速轉換,並給出具體的程式碼範例。一、uniapp簡介unia
 用Python編寫簡單的聊天程式教程
May 08, 2023 pm 06:37 PM
實現思路x01服務端的建立首先,在服務端,使用socket進行訊息的接受,每接受一個socket的請求,就開啟一個新的線程來管理訊息的分發與接受,同時,又存在一個handler來管理所有的線程,從而實現對聊天室的各種功能的處理x02客戶端的建立客戶端的建立就要比服務端簡單多了,客戶端的作用只是對消息的發送以及接受,以及按照特定的規則去輸入特定的字符從而實現不同的功能的使用,因此,在客戶端這裡,只需要去使用兩個線程,一個是專門用於接受消息,一個是專門用於發送消息的至於為什麼不用一個呢,那是因為,只
 教你如何在小程式中用公眾號範本訊息(附詳細想法)
Nov 04, 2022 pm 04:53 PM
這篇文章給大家帶來了關於微信小程式的相關問題,其中主要介紹瞭如何在小程式中用公眾號範本訊息,下面一起來看一下,希望對大家有幫助。


