

Documenso 和 aws-smage-upload 範例之間的 Spload 功能比較

在本文中,我們將比較 Documenso 和 AWS S3 映像上傳範例之間將檔案上傳到 AWS S3 所涉及的步驟。
我們從 Vercel 提供的簡單範例開始。
範例/aws-s3-image-upload
Vercel 提供了一個將檔案上傳到 AWS S3 的良好範例。
此範例的自述文件提供了兩個選項,您可以使用現有的 S3 儲存桶或建立新儲存桶。了解這一點有幫助
您正確配置了上傳功能。
又到了我們看源碼的時間了。我們正在尋找 type=file 的輸入元素。在 app/page.tsx 中,您將找到以下程式碼:
return (
    <main>
      <h1>Upload a File to S3</h1>
      <form onSubmit={handleSubmit}>
        <input
         >


<h2>


  <strong>onChange</strong>
</h2>

<p>onChange updates state using setFile, but it does not do the uploading. upload happens when you submit this form.<br>
</p>

<pre class="brush:php;toolbar:false">onChange={(e) => {
  const files = e.target.files
  if (files) {
    setFile(files[0])
  }
}}
處理提交
handleSubmit 函數中發生了很多事情。我們需要分析這個handleSubmit函數中的操作列表。我已在此程式碼片段中編寫了註釋來解釋這些步驟。
const handleSubmit = async (e: React.FormEvent<HTMLFormElement>) => {
    e.preventDefault()

    if (!file) {
      alert('Please select a file to upload.')
      return
    }

    setUploading(true)

    const response = await fetch(
      process.env.NEXT_PUBLIC_BASE_URL + '/api/upload',
      {
        method: 'POST',
        headers: {
          'Content-Type': 'application/json',
        },
        body: JSON.stringify({ filename: file.name, contentType: file.type }),
      }
    )

    if (response.ok) {
      const { url, fields } = await response.json()

      const formData = new FormData()
      Object.entries(fields).forEach(([key, value]) => {
        formData.append(key, value as string)
      })
      formData.append('file', file)

      const uploadResponse = await fetch(url, {
        method: 'POST',
        body: formData,
      })

      if (uploadResponse.ok) {
        alert('Upload successful!')
      } else {
        console.error('S3 Upload Error:', uploadResponse)
        alert('Upload failed.')
      }
    } else {
      alert('Failed to get pre-signed URL.')
    }

    setUploading(false)
  }
api/上傳
api/upload/route.ts 有以下程式碼:
import { createPresignedPost } from '@aws-sdk/s3-presigned-post'
import { S3Client } from '@aws-sdk/client-s3'
import { v4 as uuidv4 } from 'uuid'

export async function POST(request: Request) {
  const { filename, contentType } = await request.json()

  try {
    const client = new S3Client({ region: process.env.AWS_REGION })
    const { url, fields } = await createPresignedPost(client, {
      Bucket: process.env.AWS_BUCKET_NAME,
      Key: uuidv4(),
      Conditions: [
        ['content-length-range', 0, 10485760], // up to 10 MB
        ['starts-with', '$Content-Type', contentType],
      ],
      Fields: {
        acl: 'public-read',
        'Content-Type': contentType,
      },
      Expires: 600, // Seconds before the presigned post expires. 3600 by default.
    })

    return Response.json({ url, fields })
  } catch (error) {
    return Response.json({ error: error.message })
  }
}
handleSubmit 中的第一個請求是 /api/upload 並發送內容類型和檔案名稱作為負載。解析如下:
const { filename, contentType } = await request.json()
下一步是建立一個 S3 用戶端,然後建立一個傳回 url 和欄位的預簽名貼文。您將使用此網址上傳您的檔案。
有了這些知識,我們來分析一下Documenso中的上傳工作原理並進行一些比較。
在 Documenso 上傳 PDF 檔案
讓我們從 type=file 的輸入元素開始。 Documenso 中的程式碼組織方式不同。您會在名為 document-dropzone.tsx.
的檔案中找到輸入元素
<input {...getInputProps()} />

<p className="text-foreground mt-8 font-medium">{_(heading[type])}</p>
這裡getInputProps回傳的是useDropzone。 Documenso 使用react-dropzone。
import { useDropzone } from 'react-dropzone';
onDrop 呼叫 props.onDrop,你會在 upload-document.tsx 中找到一個名為 onFileDrop 的屬性值。
<DocumentDropzone
  className="h-[min(400px,50vh)]"
  disabled={remaining.documents === 0 || !session?.user.emailVerified}
  disabledMessage={disabledMessage}
  onDrop={onFileDrop}
  onDropRejected={onFileDropRejected}
/>
讓我們看看 onFileDrop 函數會發生什麼事。
const onFileDrop = async (file: File) => {
    try {
      setIsLoading(true);

      const { type, data } = await putPdfFile(file);

      const { id: documentDataId } = await createDocumentData({
        type,
        data,
      });

      const { id } = await createDocument({
        title: file.name,
        documentDataId,
        teamId: team?.id,
      });

      void refreshLimits();

      toast({
        title: _(msg`Document uploaded`),
        description: _(msg`Your document has been uploaded successfully.`),
        duration: 5000,
      });

      analytics.capture('App: Document Uploaded', {
        userId: session?.user.id,
        documentId: id,
        timestamp: new Date().toISOString(),
      });

      router.push(`${formatDocumentsPath(team?.url)}/${id}/edit`);
    } catch (err) {
      const error = AppError.parseError(err);

      console.error(err);

      if (error.code === 'INVALID_DOCUMENT_FILE') {
        toast({
          title: _(msg`Invalid file`),
          description: _(msg`You cannot upload encrypted PDFs`),
          variant: 'destructive',
        });
      } else if (err instanceof TRPCClientError) {
        toast({
          title: _(msg`Error`),
          description: err.message,
          variant: 'destructive',
        });
      } else {
        toast({
          title: _(msg`Error`),
          description: _(msg`An error occurred while uploading your document.`),
          variant: 'destructive',
        });
      }
    } finally {
      setIsLoading(false);
    }
  };
發生了很多事情,但為了我們的分析,我們只考慮名為 putFile 的函數。
putPdf檔案
putPdfFile 定義在 upload/put-file.ts
/**
 * Uploads a document file to the appropriate storage location and creates
 * a document data record.
 */
export const putPdfFile = async (file: File) => {
  const isEncryptedDocumentsAllowed = await getFlag('app_allow_encrypted_documents').catch(
    () => false,
  );

  const pdf = await PDFDocument.load(await file.arrayBuffer()).catch((e) => {
    console.error(`PDF upload parse error: ${e.message}`);

    throw new AppError('INVALID_DOCUMENT_FILE');
  });

  if (!isEncryptedDocumentsAllowed && pdf.isEncrypted) {
    throw new AppError('INVALID_DOCUMENT_FILE');
  }

  if (!file.name.endsWith('.pdf')) {
    file.name = `${file.name}.pdf`;
  }

  removeOptionalContentGroups(pdf);

  const bytes = await pdf.save();

  const { type, data } = await putFile(new File([bytes], file.name, { type: 'application/pdf' }));

  return await createDocumentData({ type, data });
};
放置檔案
這會呼叫 putFile 函數。
/**
 * Uploads a file to the appropriate storage location.
 */
export const putFile = async (file: File) => {
  const NEXT_PUBLIC_UPLOAD_TRANSPORT = env('NEXT_PUBLIC_UPLOAD_TRANSPORT');

  return await match(NEXT_PUBLIC_UPLOAD_TRANSPORT)
    .with('s3', async () => putFileInS3(file))
    .otherwise(async () => putFileInDatabase(file));
};
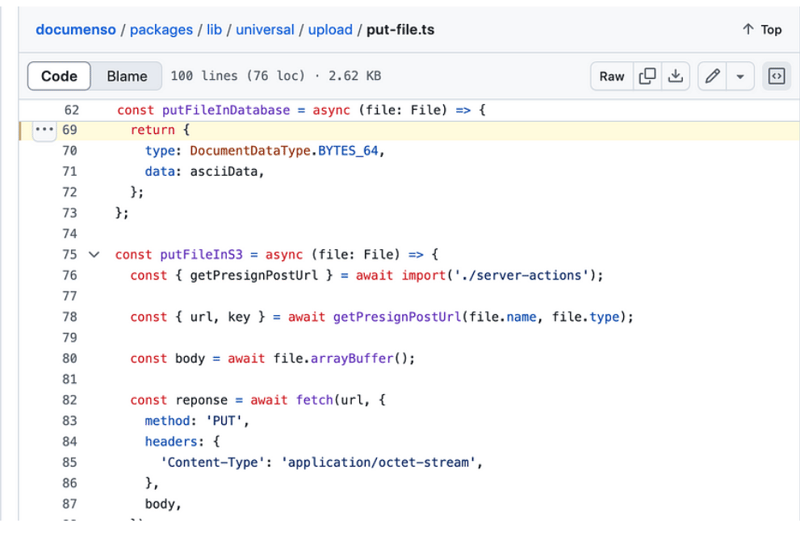
putFileInS3
const putFileInS3 = async (file: File) => {
  const { getPresignPostUrl } = await import('./server-actions');

  const { url, key } = await getPresignPostUrl(file.name, file.type);

  const body = await file.arrayBuffer();

  const reponse = await fetch(url, {
    method: 'PUT',
    headers: {
      'Content-Type': 'application/octet-stream',
    },
    body,
  });

  if (!reponse.ok) {
    throw new Error(
      `Failed to upload file "${file.name}", failed with status code ${reponse.status}`,
    );
  }

  return {
    type: DocumentDataType.S3_PATH,
    data: key,
  };
};
getPresignPostUrl
export const getPresignPostUrl = async (fileName: string, contentType: string) => {
  const client = getS3Client();

  const { getSignedUrl } = await import('@aws-sdk/s3-request-presigner');

  let token: JWT | null = null;

  try {
    const baseUrl = APP_BASE_URL() ?? 'http://localhost:3000';

    token = await getToken({
      req: new NextRequest(baseUrl, {
        headers: headers(),
      }),
    });
  } catch (err) {
    // Non server-component environment
  }

  // Get the basename and extension for the file
  const { name, ext } = path.parse(fileName);

  let key = `${alphaid(12)}/${slugify(name)}${ext}`;

  if (token) {
    key = `${token.id}/${key}`;
  }

  const putObjectCommand = new PutObjectCommand({
    Bucket: process.env.NEXT_PRIVATE_UPLOAD_BUCKET,
    Key: key,
    ContentType: contentType,
  });

  const url = await getSignedUrl(client, putObjectCommand, {
    expiresIn: ONE_HOUR / ONE_SECOND,
  });

  return { key, url };
};
比較
您在 Documenso 中看不到任何 POST 要求。它使用名為 getSignedUrl 的函數來取得 url,而
vercel 範例向 api/upload 路由發出 POST 請求。在 Vercel 範例中可以輕鬆找到輸入元素,因為這只是一個範例,但找到了 Documenso
使用react-dropzone並且輸入元素根據業務上下文定位。
關於我們:
在 Thinkthroo,我們研究大型開源專案並提供架構指南。我們開發了使用 Tailwind 建構的可重複使用元件,您可以在您的專案中使用它們。
我們提供 Next.js、React 和 Node 開發服務。
與我們預約會面討論您的專案。

參考資料:
https://github.com/documenso/documenso/blob/main/packages/lib/universal/upload/put-file.ts#L69
https://github.com/vercel/examples/blob/main/solutions/aws-s3-image-upload/README.md
https://github.com/vercel/examples/tree/main/solutions/aws-s3-image-upload
https://github.com/vercel/examples/blob/main/solutions/aws-s3-image-upload/app/page.tsx#L58C5-L76C12
https://github.com/vercel/examples/blob/main/solutions/aws-s3-image-upload/app/api/upload/route.ts
https://github.com/documenso/documenso/blob/main/packages/ui/primitives/document-dropzone.tsx#L157
https://react-dropzone.js.org/
https://github.com/documenso/documenso/blob/main/apps/web/src/app/(dashboard)/documents/upload-document.tsx#L61
https://github.com/documenso/documenso/blob/main/packages/lib/universal/upload/put-file.ts#L22
以上是Documenso 和 aws-smage-upload 範例之間的 Spload 功能比較的詳細內容。更多資訊請關注PHP中文網其他相關文章!

熱AI工具

Undresser.AI Undress
人工智慧驅動的應用程序,用於創建逼真的裸體照片

AI Clothes Remover
用於從照片中去除衣服的線上人工智慧工具。

Undress AI Tool
免費脫衣圖片

Clothoff.io
AI脫衣器

Video Face Swap
使用我們完全免費的人工智慧換臉工具,輕鬆在任何影片中換臉!

熱門文章
熱工具

記事本++7.3.1
好用且免費的程式碼編輯器

SublimeText3漢化版
中文版,非常好用

禪工作室 13.0.1
強大的PHP整合開發環境

Dreamweaver CS6
視覺化網頁開發工具

SublimeText3 Mac版
神級程式碼編輯軟體(SublimeText3)


 Python vs. JavaScript:學習曲線和易用性
Apr 16, 2025 am 12:12 AM
Python vs. JavaScript:學習曲線和易用性
Apr 16, 2025 am 12:12 AM
Python更適合初學者,學習曲線平緩,語法簡潔;JavaScript適合前端開發,學習曲線較陡,語法靈活。 1.Python語法直觀,適用於數據科學和後端開發。 2.JavaScript靈活,廣泛用於前端和服務器端編程。
 JavaScript和Web:核心功能和用例
Apr 18, 2025 am 12:19 AM
JavaScript和Web:核心功能和用例
Apr 18, 2025 am 12:19 AM
JavaScript在Web開發中的主要用途包括客戶端交互、表單驗證和異步通信。 1)通過DOM操作實現動態內容更新和用戶交互;2)在用戶提交數據前進行客戶端驗證,提高用戶體驗;3)通過AJAX技術實現與服務器的無刷新通信。
 JavaScript在行動中:現實世界中的示例和項目
Apr 19, 2025 am 12:13 AM
JavaScript在行動中:現實世界中的示例和項目
Apr 19, 2025 am 12:13 AM
JavaScript在現實世界中的應用包括前端和後端開發。 1)通過構建TODO列表應用展示前端應用,涉及DOM操作和事件處理。 2)通過Node.js和Express構建RESTfulAPI展示後端應用。
 了解JavaScript引擎:實施詳細信息
Apr 17, 2025 am 12:05 AM
了解JavaScript引擎:實施詳細信息
Apr 17, 2025 am 12:05 AM
理解JavaScript引擎內部工作原理對開發者重要,因為它能幫助編寫更高效的代碼並理解性能瓶頸和優化策略。 1)引擎的工作流程包括解析、編譯和執行三個階段;2)執行過程中,引擎會進行動態優化,如內聯緩存和隱藏類;3)最佳實踐包括避免全局變量、優化循環、使用const和let,以及避免過度使用閉包。
 Python vs. JavaScript:社區,圖書館和資源
Apr 15, 2025 am 12:16 AM
Python vs. JavaScript:社區,圖書館和資源
Apr 15, 2025 am 12:16 AM
Python和JavaScript在社區、庫和資源方面的對比各有優劣。 1)Python社區友好,適合初學者,但前端開發資源不如JavaScript豐富。 2)Python在數據科學和機器學習庫方面強大,JavaScript則在前端開發庫和框架上更勝一籌。 3)兩者的學習資源都豐富,但Python適合從官方文檔開始,JavaScript則以MDNWebDocs為佳。選擇應基於項目需求和個人興趣。
 Python vs. JavaScript:開發環境和工具
Apr 26, 2025 am 12:09 AM
Python vs. JavaScript:開發環境和工具
Apr 26, 2025 am 12:09 AM
Python和JavaScript在開發環境上的選擇都很重要。 1)Python的開發環境包括PyCharm、JupyterNotebook和Anaconda,適合數據科學和快速原型開發。 2)JavaScript的開發環境包括Node.js、VSCode和Webpack,適用於前端和後端開發。根據項目需求選擇合適的工具可以提高開發效率和項目成功率。
 C/C在JavaScript口譯員和編譯器中的作用
Apr 20, 2025 am 12:01 AM
C/C在JavaScript口譯員和編譯器中的作用
Apr 20, 2025 am 12:01 AM
C和C 在JavaScript引擎中扮演了至关重要的角色,主要用于实现解释器和JIT编译器。1)C 用于解析JavaScript源码并生成抽象语法树。2)C 负责生成和执行字节码。3)C 实现JIT编译器,在运行时优化和编译热点代码,显著提高JavaScript的执行效率。
 從網站到應用程序:JavaScript的不同應用
Apr 22, 2025 am 12:02 AM
從網站到應用程序:JavaScript的不同應用
Apr 22, 2025 am 12:02 AM
JavaScript在網站、移動應用、桌面應用和服務器端編程中均有廣泛應用。 1)在網站開發中,JavaScript與HTML、CSS一起操作DOM,實現動態效果,並支持如jQuery、React等框架。 2)通過ReactNative和Ionic,JavaScript用於開發跨平台移動應用。 3)Electron框架使JavaScript能構建桌面應用。 4)Node.js讓JavaScript在服務器端運行,支持高並發請求。
