

在雲端運行部署無狀態容器

我將示範如何在cloud run上部署一個簡單的容器。
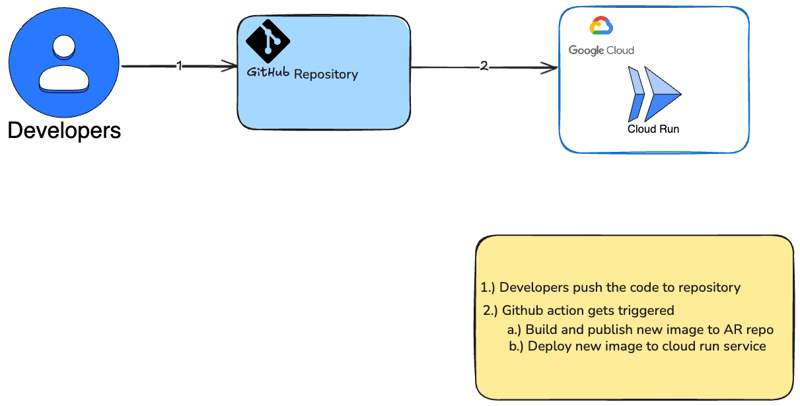
Cloud Run 是一個完全託管的平台,可讓您直接在 Google 可擴展的基礎架構之上運行程式碼。 Cloud Run 簡單、自動化,旨在提高您的工作效率。
- 使用 fastapi 函式庫 (python) 建立一個簡單的 hello world 應用程式
- 容器化應用程式
- 使用 GCP 設定工作流程
- 透過 github 工作流程將容器部署到雲端運行服務上
我按照官方 fastapi 文件啟動了一個 hello world 應用程式
建立requirements.txt檔案
fastapi[standard]
pydantic>=2.7.0,<3.0.0
- 建立app目錄並進入
- 建立一個空檔案init.py
- 使用以下內容建立 main.py 檔案:
from typing import Union

from fastapi import FastAPI

app = FastAPI()


@app.get("/")
def read_root():
    return {"Hello": "World"}


@app.get("/items/{item_id}")
def read_item(item_id: int, q: Union[str, None] = None):
    return {"item_id": item_id, "q": q}
建立 Dockerfile
FROM python:3.9

WORKDIR /code

COPY ./requirements.txt /code/requirements.txt

RUN pip install --no-cache-dir --upgrade -r /code/requirements.txt

COPY ./app /code/app

CMD ["fastapi", "run", "app/main.py", "--port", "80"]
GitHub 操作
為了讓 GitHub 操作流程能夠取得 YAML 文件,它需要有特定的儲存位置。每個使用操作的儲存庫都需要一個名為 /.github/workflows
*使用 GCP 更多資訊配置此工作流程 *
# This workflow build and push a Docker container to Google Artifact Registry
# and deploy it on Cloud Run when a commit is pushed to the $default-branch
# branch.
#
# To configure this workflow:
#
# 1. Enable the following Google Cloud APIs:
#
#    - Artifact Registry (artifactregistry.googleapis.com)
#    - Cloud Run (run.googleapis.com)
#    - IAM Credentials API (iamcredentials.googleapis.com)
#
#    You can learn more about enabling APIs at
#    https://support.google.com/googleapi/answer/6158841.
#
# 2. Create and configure a Workload Identity Provider for GitHub:
#    https://github.com/google-github-actions/auth#preferred-direct-workload-identity-federation.
#
#    Depending on how you authenticate, you will need to grant an IAM principal
#    permissions on Google Cloud:
#
#    - Artifact Registry Administrator (roles/artifactregistry.admin)
#    - Cloud Run Developer (roles/run.developer)
#
#    You can learn more about setting IAM permissions at
#    https://cloud.google.com/iam/docs/manage-access-other-resources
#
# 3. Change the values in the "env" block to match your values.
建立檔案 google-cloudrun-docker.yml
name: 'Build and Deploy to Cloud Run'

on:
  push:
    branches:
      - '$default-branch'

env:
  PROJECT_ID: 'my-project' # TODO: update to your Google Cloud project ID
  REGION: 'us-central1' # TODO: update to your region
  SERVICE: 'my-service' # TODO: update to your service name
  WORKLOAD_IDENTITY_PROVIDER: 'projects/123456789/locations/global/workloadIdentityPools/my-pool/providers/my-provider' # TODO: update to your workload identity provider

jobs:
  deploy:
    runs-on: 'ubuntu-latest'

    permissions:
      contents: 'read'
      id-token: 'write'

    steps:
      - name: 'Checkout'
        uses: 'actions/checkout@692973e3d937129bcbf40652eb9f2f61becf3332' # actions/checkout@v4

      # Configure Workload Identity Federation and generate an access token.
      #
      # See https://github.com/google-github-actions/auth for more options,
      # including authenticating via a JSON credentials file.
      - id: 'auth'
        name: 'Authenticate to Google Cloud'
        uses: 'google-github-actions/auth@f112390a2df9932162083945e46d439060d66ec2' # google-github-actions/auth@v2
        with:
          workload_identity_provider: '${{ env.WORKLOAD_IDENTITY_PROVIDER }}'

      # BEGIN - Docker auth and build
      #
      # If you already have a container image, you can omit these steps.
      - name: 'Docker Auth'
        uses: 'docker/login-action@9780b0c442fbb1117ed29e0efdff1e18412f7567' # docker/login-action@v3
        with:
          username: 'oauth2accesstoken'
          password: '${{ steps.auth.outputs.auth_token }}'
          registry: '${{ env.REGION }}-docker.pkg.dev'

      - name: 'Build and Push Container'
        run: |-
          DOCKER_TAG="$${{ env.REGION }}-docker.pkg.dev/${{ env.PROJECT_ID }}/${{ env.SERVICE }}:${{ github.sha }}"
          docker build --tag "${DOCKER_TAG}" .
          docker push "${DOCKER_TAG}"
      - name: 'Deploy to Cloud Run'

        # END - Docker auth and build

        uses: 'google-github-actions/deploy-cloudrun@33553064113a37d688aa6937bacbdc481580be17' # google-github-actions/deploy-cloudrun@v2
        with:
          service: '${{ env.SERVICE }}'
          region: '${{ env.REGION }}'
          # NOTE: If using a pre-built image, update the image name below:

          image: '${{ env.REGION }}-docker.pkg.dev/${{ env.PROJECT_ID }}/${{ env.SERVICE }}:${{ github.sha }}'
      # If required, use the Cloud Run URL output in later steps
      - name: 'Show output'
        run: |2-

          echo ${{ steps.deploy.outputs.url }}
目錄結構
您現在應該具有以下目錄結構:
├── app
│   ├── __init__.py
│   └── main.py
├── Dockerfile
└── requirements.txt
└── requirements.txt
├── .github
│   ├── workflows
         ├── google-cloudrun-docker.yml
> 1. Create a new repo in gitHUb
> 2. Push your exisisting code to new repository on default branch
以上是在雲端運行部署無狀態容器的詳細內容。更多資訊請關注PHP中文網其他相關文章!

熱AI工具

Undresser.AI Undress
人工智慧驅動的應用程序,用於創建逼真的裸體照片

AI Clothes Remover
用於從照片中去除衣服的線上人工智慧工具。

Undress AI Tool
免費脫衣圖片

Clothoff.io
AI脫衣器

Video Face Swap
使用我們完全免費的人工智慧換臉工具,輕鬆在任何影片中換臉!

熱門文章
熱工具

記事本++7.3.1
好用且免費的程式碼編輯器

SublimeText3漢化版
中文版,非常好用

禪工作室 13.0.1
強大的PHP整合開發環境

Dreamweaver CS6
視覺化網頁開發工具

SublimeText3 Mac版
神級程式碼編輯軟體(SublimeText3)


 Python與C:學習曲線和易用性
Apr 19, 2025 am 12:20 AM
Python與C:學習曲線和易用性
Apr 19, 2025 am 12:20 AM
Python更易學且易用,C 則更強大但複雜。 1.Python語法簡潔,適合初學者,動態類型和自動內存管理使其易用,但可能導致運行時錯誤。 2.C 提供低級控制和高級特性,適合高性能應用,但學習門檻高,需手動管理內存和類型安全。
 學習Python:2小時的每日學習是否足夠?
Apr 18, 2025 am 12:22 AM
學習Python:2小時的每日學習是否足夠?
Apr 18, 2025 am 12:22 AM
每天學習Python兩個小時是否足夠?這取決於你的目標和學習方法。 1)制定清晰的學習計劃,2)選擇合適的學習資源和方法,3)動手實踐和復習鞏固,可以在這段時間內逐步掌握Python的基本知識和高級功能。
 Python vs.C:探索性能和效率
Apr 18, 2025 am 12:20 AM
Python vs.C:探索性能和效率
Apr 18, 2025 am 12:20 AM
Python在開發效率上優於C ,但C 在執行性能上更高。 1.Python的簡潔語法和豐富庫提高開發效率。 2.C 的編譯型特性和硬件控制提升執行性能。選擇時需根據項目需求權衡開發速度與執行效率。
 Python vs. C:了解關鍵差異
Apr 21, 2025 am 12:18 AM
Python vs. C:了解關鍵差異
Apr 21, 2025 am 12:18 AM
Python和C 各有優勢,選擇應基於項目需求。 1)Python適合快速開發和數據處理,因其簡潔語法和動態類型。 2)C 適用於高性能和系統編程,因其靜態類型和手動內存管理。
 Python標準庫的哪一部分是:列表或數組?
Apr 27, 2025 am 12:03 AM
Python標準庫的哪一部分是:列表或數組?
Apr 27, 2025 am 12:03 AM
pythonlistsarepartofthestAndArdLibrary,herilearRaysarenot.listsarebuilt-In,多功能,和Rused ForStoringCollections,而EasaraySaraySaraySaraysaraySaraySaraysaraySaraysarrayModuleandleandleandlesscommonlyusedDduetolimitedFunctionalityFunctionalityFunctionality。
 Python:自動化,腳本和任務管理
Apr 16, 2025 am 12:14 AM
Python:自動化,腳本和任務管理
Apr 16, 2025 am 12:14 AM
Python在自動化、腳本編寫和任務管理中表現出色。 1)自動化:通過標準庫如os、shutil實現文件備份。 2)腳本編寫:使用psutil庫監控系統資源。 3)任務管理:利用schedule庫調度任務。 Python的易用性和豐富庫支持使其在這些領域中成為首選工具。
 科學計算的Python:詳細的外觀
Apr 19, 2025 am 12:15 AM
科學計算的Python:詳細的外觀
Apr 19, 2025 am 12:15 AM
Python在科學計算中的應用包括數據分析、機器學習、數值模擬和可視化。 1.Numpy提供高效的多維數組和數學函數。 2.SciPy擴展Numpy功能,提供優化和線性代數工具。 3.Pandas用於數據處理和分析。 4.Matplotlib用於生成各種圖表和可視化結果。
 Web開發的Python:關鍵應用程序
Apr 18, 2025 am 12:20 AM
Web開發的Python:關鍵應用程序
Apr 18, 2025 am 12:20 AM
Python在Web開發中的關鍵應用包括使用Django和Flask框架、API開發、數據分析與可視化、機器學習與AI、以及性能優化。 1.Django和Flask框架:Django適合快速開發複雜應用,Flask適用於小型或高度自定義項目。 2.API開發:使用Flask或DjangoRESTFramework構建RESTfulAPI。 3.數據分析與可視化:利用Python處理數據並通過Web界面展示。 4.機器學習與AI:Python用於構建智能Web應用。 5.性能優化:通過異步編程、緩存和代碼優
