

最近看 Vue 相关的知识点,看到 KeepAlive 组件时比较好奇它是怎么做到组件间切换时不重新渲染的,于是便稍微深入的了解了一下。(学习视频分享:vue视频教程)
如果你也有兴趣想要了解一下具体内部怎么实现的或者说有一定的了解但是不够熟悉,那么正好你也可以一起巩固下
Tips: 这样面试的时候你就可以大声的问别人这个知识点了?。
<keepalive></keepalive> 是一个内置组件,它的功能是在多个组件间动态切换时缓存被移除的组件实例。
KeepAlive 一词借鉴于 HTTP 协议,在 HTTP 协议里面 KeepAlive 又称持久连接,作用是允许多个请求/响应共用同一个 HTTP 连接,解决了频繁的销毁和创建 HTTP 连接带来的额外性能开销。而同理 Vue 里的 KeepAlive 组件也是为了避免一个组件被频繁的销毁/重建,避免了性能上的开销。
// App.vue <Test :msg="curTab" v-if="curTab === 'Test'"></Test> <HelloWorld :msg="curTab" v-if="curTab === 'HelloWorld'"></HelloWorld> <div @click="toggle">toggle</div>
上述代码可以看到,如果我们频繁点击 toggle 时会频繁的渲染 Test/HelloWorld 组件,当用户频繁的点击时 Test 组件需要频繁的销毁/渲染,这就造成很大的渲染性能损失。
所以为了解决这种性能开销,你需要知道是时候使用 KeepAlive 组件。
<KeepAlive> <component :is="curTab === 'Test' ? Test : HelloWorld" :msg="curTab"></component> </KeepAlive> <div @click="toggle">toggle</div>
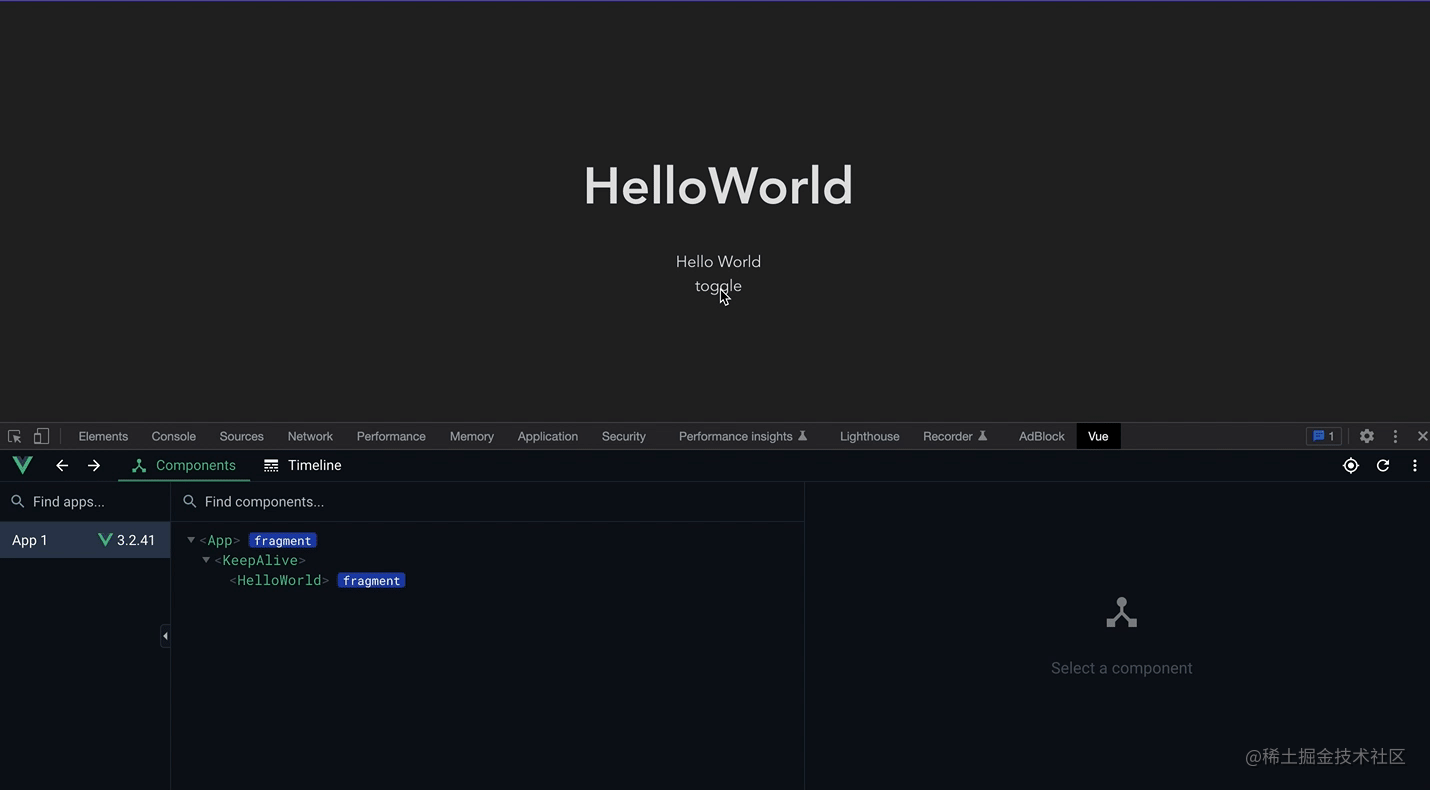
可以看这个录屏,在首次加载后再次频繁的切换并没有重新销毁与挂载,而仅仅是将组件进行了失活(而不是销毁),渲染时只需要重新激活就可以,而不需重新挂载,如果要渲染的组件很大,那就能有不错的性能优化。
想要体验的话可以去看看这个例子?官方demo,其中数据会被缓存这个也需要在开发使用中去注意到的
实现原理其实很简单,其实就是缓存管理和特定的销毁和渲染逻辑,使得它不同于其他组件。
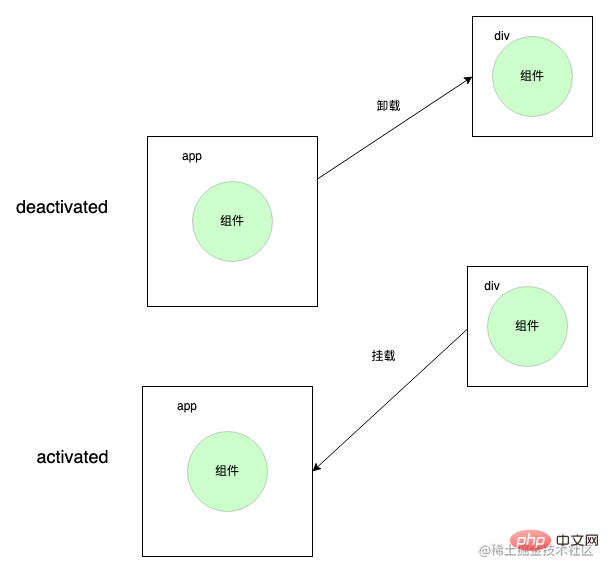
KeepAlive 组件在卸载组件时并不能真的将其卸载,而是将其放到一个隐藏的容器里面,当被激活时再从隐藏的容器中拿出来挂载到真正的 dom 上就行,这也就对应了 KeepAlive 的两个独特的生命周期activated和deactivated。
 所以在 KeepAlive 内的子组件在 mount 和 unmount 的时候会执行特定的渲染逻辑,从而不会去走挂载和销毁逻辑
const KeepAliveImpl: ComponentOptions = {
  name: "KeepAlive",
  // 标识这是一个 KeepAlive 组件
  __isKeepAlive: true,
  // props
  props: {
    exclude: [String, Array, RegExp],
    include: [String, Array, RegExp],
    max: [String, Number]
  }
 }

 // isKeepAlive
 export const isKeepAlive = (vnode: VNode): boolean =>
(vnode.type as any).__isKeepAlive// setup 接着上面的代码
// 获取到当前 KeepAlive 组件实例
const instance = getCurrentInstance()! as any;
// 拿到 ctx
const sharedContext = instance.ctx as KeepAliveContext;
// cache 缓存
// key: vnode.key | vnode.type value: vnode
const cache: Cache = new Map()
// 需要拿到某些的 renderer 操作函数,需要自己特定执行渲染和卸载逻辑
const { renderer: { p: patch, m: move, um: _unmount, o: { createElement } } } = sharedContext
// 隐藏的容器,用来存储需要隐藏的 dom
const storeageContainer = createElement('div')
// 存储当前的子组件的缓存 key
let pendingKey: CacheKey | null = null
sharedContext.activate = (vnode, container, anchor) => {
// KeepAlive 下组件激活时执行的 move 逻辑
move(vnode, container, anchor, 0 /* ENTER */)
}
sharedContext.deactivate = (vnode) => {
// KeepAlive 下组件失活时执行的 move 逻辑
move(vnode, storeageContainer, null, 1 /* LEAVE */)
}
return () => {
// 没有子组件
if (!slots.default) {
return null;
}
const children = slots.default() as VNode[];
const rawNode = children[0];
let vnode = rawNode;
const comp = vnode.type as ConcreteComponent;
const name = comp.displayName || comp.name
const { include, exclude } = props;
// 没有命中的情况
if (
(include && (!name || !matches(include, name))) ||
(exclude && name && matches(exclude, name))
) {
// 直接渲染子组件
return rawNode;
}
// 获取子组件的 vnode key
const key = vnode.key == null ? comp : vnode.key;
// 获取子组件缓存的 vnode
const cachedVNode = cache.get(key);
pendingKey = key;
// 命中缓存
if (cachedVNode) {
vnode.el = cachedVNode.el;
// 继承组件实例
vnode.component = cachedVNode.component;
// 在 vnode 上更新 shapeFlag,标记为 COMPONENT_KEPT_ALIVE 属性,防止渲染器重新挂载
vnode.shapeFlag |= ShapeFlags.COMPONENT_KEPT_ALIVE
} else {
// 没命中将其缓存
cache.set(pendingKey, vnode)
}
// 在 vnode 上更新 shapeFlag,标记为 COMPONENT_SHOULD_KEEP_ALIVE 属性,防止渲染器将组件卸载了
vnode.shapeFlag |= ShapeFlags.COMPONENT_SHOULD_KEEP_ALIVE
// 渲染组件 vnode
return vnode;
}在 KeepAlive 组件内会从 sharedContext 上的 renderer 上拿到一些方法比如 move、createElement 等
function mountComponent() {
 // ...
 if (isKeepAlive(initialVNode)) {
    ;(instance.ctx as KeepAliveContext).renderer = internals
  }
}首先从上面可以看到,在渲染 KeepAlive 组件时会对其子组件的 vnode 上增加对应的 shapeFlag 标志
比如COMPONENT_KEPT_ALIVE标志,组件挂载的时候告诉渲染器这个不需要 mount 而需要特殊处理
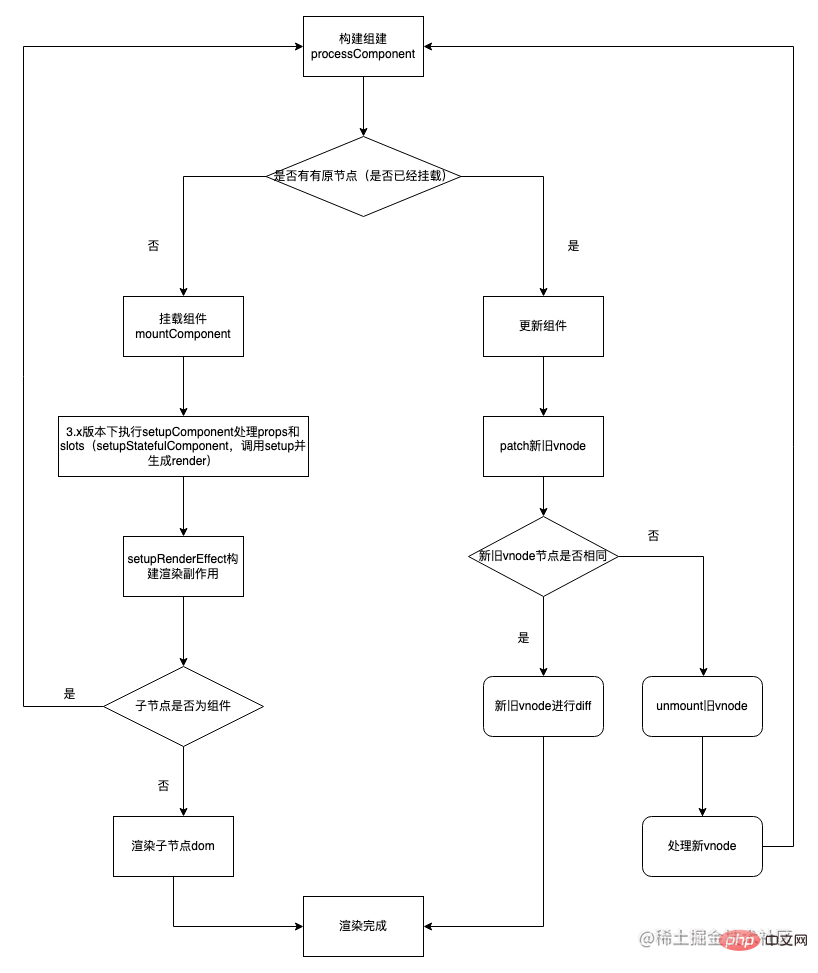
const processComponent = (
    n1: VNode | null,
    n2: VNode,
    container: RendererElement,
    anchor: RendererNode | null,
  ) => {
    if (n1 == null) {
      // 在 KeepAlive 组件渲染时会对子组件增加 COMPONENT_KEPT_ALIVE 标志
      // 挂载子组件时会判断是否 COMPONENT_KEPT_ALIVE ,如果是不会调用 mountComponent 而是直接执行 activate 方法
      if (n2.shapeFlag & ShapeFlags.COMPONENT_KEPT_ALIVE) {
        ;(parentComponent!.ctx as KeepAliveContext).activate(
          n2,
          container,
          anchor
        )
      }
      // ...
    }
}同理COMPONENT_SHOULD_KEEP_ALIVE标志也是用来在组件卸载的时候告诉渲染器这个不需要 unmount 而需要特殊处理。
const unmount: UnmountFn = (vnode) => {
  // ...
  // 在 KeepAlive 组件渲染时会对子组件增加 COMPONENT_SHOULD_KEEP_ALIVE 标志
  // 然后在子组件卸载时并不会真实的卸载而是调用 KeepAlive 的 deactivate 方法
  if (shapeFlag & ShapeFlags.COMPONENT_SHOULD_KEEP_ALIVE) {
    ;(parentComponent!.ctx as KeepAliveContext).deactivate(vnode)
    return
  }
}activated和deactivated生命周期(生命周期相关可以不用重点看)首先这两个生命周期是在 KeepAlive 组件内独特声明的,是直接导出使用的。
export function onActivated(
  hook: Function,
  target?: ComponentInternalInstance | null
) {
  // 注册 activated 的回调函数到当前的 instance 的钩子函数上
  registerKeepAliveHook(hook, LifecycleHooks.ACTIVATED, target)
}
export function onDeactivated(
  hook: Function,
  target?: ComponentInternalInstance | null
) {
  // 注册 deactivated 的回调函数到当前的 instance 的钩子函数上
  registerKeepAliveHook(hook, LifecycleHooks.DEACTIVATED, target)
}然后因为这两个生命周期会注册在 setup 里面,所以只要执行 setup 就会将两个生命周期的回调函数注册到当前的 instance 实例上
// renderer.ts
// mount 函数逻辑
const mountComponent = (initialVNode,
  container,
  anchor,
  parentComponent,
  parentSuspense,
  isSVG,
  optimized
) => {
  // ...
  const instance: ComponentInternalInstance =
    compatMountInstance ||
    (initialVNode.component = createComponentInstance(
    initialVNode,
    parentComponent,
    parentSuspense
  ))
  // 执行 setup
  setupComponent(instance)
}
// setupcomponent 处理 setup 函数值
export function setupComponent(
  instance: ComponentInternalInstance,
  isSSR = false
) {
  // ...
  const isStateful = isStatefulComponent(instance)
  // ...
  const setupResult = isStateful
    // setupStatefulComponent 函数主要功能是设置当前的 instance
    ? setupStatefulComponent(instance, isSSR)
    : undefined
  // ...
}

function setupStatefulComponent(
  instance: ComponentInternalInstance
){
  if (setup) {
    //设置当前实例
    setCurrentInstance(instance)
    // 执行组件内 setup 函数,执行 onActivated 钩子函数进行回调函数收集
    const setupResult = callWithErrorHandling(
      setup,
      instance,
      ErrorCodes.SETUP_FUNCTION,
      [__DEV__ ? shallowReadonly(instance.props) : instance.props, setupContext]
    )
    // currentInstance = null;
    unsetCurrentInstance()
  }
}最后在执行sharedContext.activate和sharedContext.deactivate的时候将注册在实例上的回调函数取出来直接执行就OK了,执行时机在 postRender 之后
sharedContext.activate = (vnode, container, anchor) => {
// KeepAlive 下组件激活时执行的 move 逻辑
move(vnode, container, anchor, 0 /* ENTER */)
// 把回调推入到 postFlush 的异步任务队列中去执行
queuePostRenderEffect(() => {
if (instance.a) {
// a是 activated 钩子的简称
invokeArrayFns(instance.a)
}
})
}
sharedContext.activate = (vnode, container, anchor) => {
// KeepAlive 下组件失活时执行的 move 逻辑
move(vnode, container, anchor, 0 /* ENTER */)
queuePostRenderEffect(() => {
if (instance.da) {
// da是 deactivated 钩子的简称
invokeArrayFns(instance.da)
}
})
}
export const enum LifecycleHooks {
// ... 其他生命周期声明
DEACTIVATED = 'da',
ACTIVATED = 'a',
}
export interface ComponentInternalInstance {
// ... 其他生命周期
[LifecycleHooks.ACTIVATED]: Function[]
[LifecycleHooks.DEACTIVATED]: Function[]
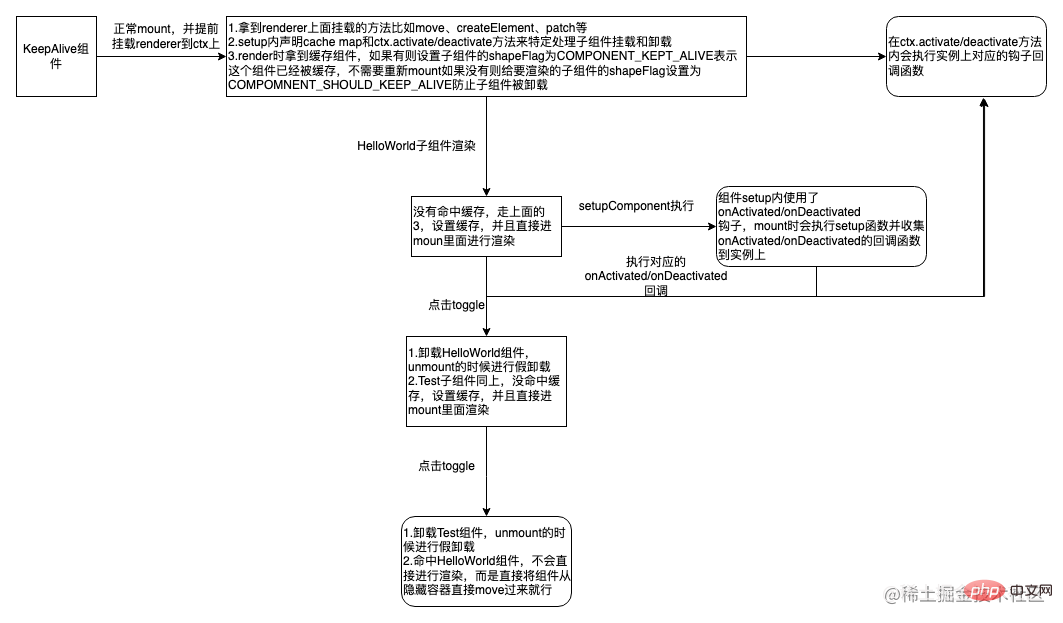
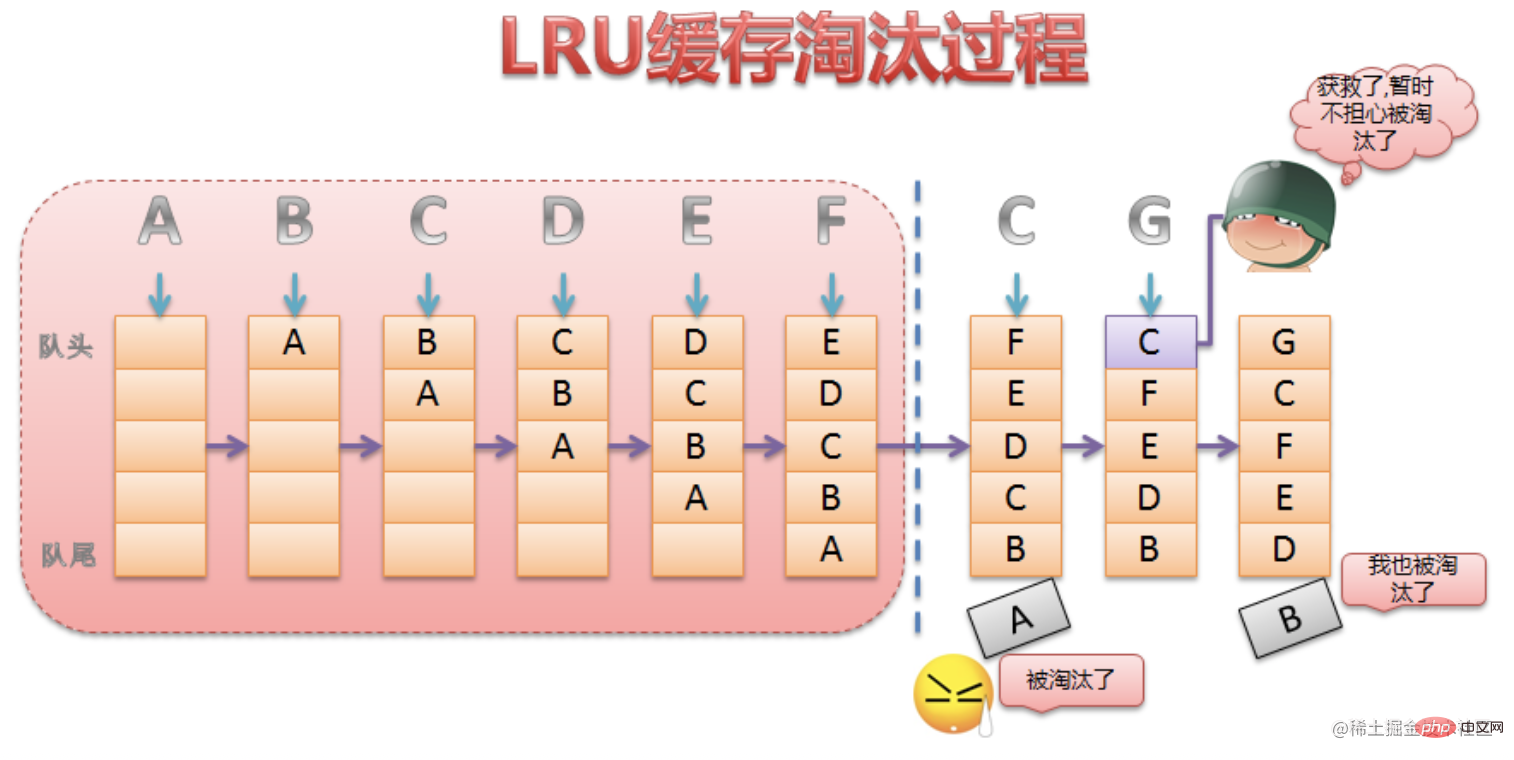
}以下是关于上述demo如何实现的简化流程图
KeepAlive 组件的onMounted和onUpdated生命周期时进行缓存
缓存数量超过设置的 max 时
修剪缓存的时候也要 unmount(如果该缓存不是当前组件)或者 resetShapeFlag 将标志为从 KeepAlive 相关 shapeFlag 状态重置为 STATEFUL_COMPONENT 状态(如果该缓存是当前组件,但是被exclude了),当然 unmount 函数内包含 resetShapeFlag 操作
KeepAlive 组件的缓存策略是 LRU(last recently used)缓存策略
核心思想在于需要把当前访问或渲染的组件作为最新一次渲染的组件,并且该组件在缓存修剪过程中始终是安全的,即不会被修剪。
看下面的图更加直观,图片来源一篇讲keepAlive 缓存优化的文章
sharedContext.activate = (vnode, container, anchor) => {
  // instance 是子组件实例
  const instance = vnode.component!
  // ...
  // dev环境下设置, 自己模拟写的
  devtools.emit('component:added', instance.appContext.app, instance.uid, instance.parent ? instance.parent.uid: undefined, instance)
  // 官方添加
  if (__DEV__ || __FEATURE_PROD_DEVTOOLS__) {
    // Update components tree
    devtoolsComponentAdded(instance)
  }
}
// 同理 sharedContext.deactivates 上也要添加,不然不会显示在组件树上当子组件有 prop 更新时是需要重新去 patch 的,所以在 activate 的时候需要重新执行 patch 进行子组件更新
sharedContext.activate = (vnode, container, anchor) => {
  // ...
  // props 改变需要重新 patch(update)
  patch(
    instance.vnode,
    vnode,
    container,
    anchor,
    instance,
    parentSuspense,
    isSVG,
    vnode.slotScopeIds,
    optimized
  )
}以上就是一文聊聊Vue中的KeepAlive组件的详细内容,更多请关注php中文网其它相关文章!


Copyright 2014-2024 https://www.php.cn/ All Rights Reserved | php.cn | 湘ICP备2023035733号


 0
0 21
21


![ThinkPHP5实战之[教学管理系统]](https://img.php.cn/upload/course/000/000/068/6253d87459486427.png)


