

예제와 함께 Outlook 규칙 : 작성, 관리 및 사용 방법

This easy-to-follow guide with practical examples will show you how to set up custom rules in Outlook to automate your inbox organization and focus on what truly matters.
Imagine your Outlook as a tidy room where important emails are prioritized, distractions are filtered out and everything is neatly sorted into its rightful place. That's what Outlook rules can do for you. Whether you're a super busy professional or just seeking serenity amidst the chaos, learning how to use Outlook rules is like unlocking the secret to a stress-free email life. Let's dive in and make your inbox the most organized it's ever been!
- Outlook rules
- How to create rules in Outlook
- Create rule for specific emails
- Make rule from template
- Set up rule from scratch
- Outlook rules examples
- Export and import Outlook rules
- How to edit rules
- How to manage email rules
- How to delete rules
- Outlook rules order of execution
- Change order of rules
- Stop processing more rules in Outlook
- How to run rules manually
- Server-side vs. client-only rules
Note. This article targets the classic Outlook application. If you are using the new Outlook app or web version, please refer to this tutorial: How to set up email rules in new Outlook and Outlook 365 online.
Outlook rules
Outlook rules are automated instructions that tell the application how to handle incoming or outgoing messages. These rules can be based on a variety of factors, including the email sender, recipient, subject line, message content, and more. When an email meets the conditions specified in a rule, Outlook automatically performs the associated action.
Common actions enabled by Outlook rules include:
- Moving messages to designated folders, ensuring a tidy inbox and easier navigation.
- Deleting unwanted emails automatically, keeping your inbox free from clutter.
- Forwarding messages to another email address, which can be particularly useful for monitoring important communications or managing customer inquiries.
- Categorizing emails with colored flags, providing a visual cue to prioritize and identify emails quickly.
- Marking as read or unread, which can help in maintaining focus on the emails that require immediate attention.
For instance, you can ensure that all emails from a VIP client are immediately moved to a high-priority folder, or that any emails containing the word "invoice" are flagged for follow-up.
Advanced rule options also allow for more sophisticated email management, such as:
- Handling emails with attachments by saving them to a specific folder or forwarding them to a colleague.
- Managing emails from specific domains or distribution lists, which is particularly useful for sorting newsletters, announcements, or group communications.
- Setting exceptions to rules, so that certain emails that meet most criteria but are marked as exceptions do not trigger the rule.
Overall, by setting up rules tailored to your workflow, you can automate repetitive tasks, save time, and maintain a high level of organization within your inbox.

How to create a rule in Outlook
The process differs depending on the version you are using. In classic Outlook, there are 3 ways to define rules:
- Create a rule for specific emails
- Make a rule from a template
- Start from a blank rule
How to create rules for specific emails in Outlook
To create a rule in Outlook based on an existing email message, follow these steps:
- Right-click on the message you want to base the rule on.
- Select Rules > Create Rule.

- Choose the condition(s) for the rule and what actions to take based on those conditions.
- Once you've set up the rule, click OK to close all open dialogs and save the rule.


You'll see a confirmation message indicating that the rule has been successfully created. If you want to apply the rule to messages already in the current folder, check the checkbox that says Run this new rule now on messages already in the current folder and then click OK.

For example, if you want to move messages containing a specific word in the subject line to a designated folder, here's how you can set it up:
- Choose the Subject contains condition. By default, the subject of the current message will display in the box entirely. You're free to refine this by retaining only essential keywords.
- Choose Move the item to folder, and then click the Select Folder button.
- Either select an existing folder from the list or click the New button to create a new one.
- If you've opted to create a new folder to hold these messages, give it a name.
- When done, click OK.

That's it! Now, all messages containing the specified word in the subject line will appear in the selected folder.
How to make an Outlook rule from a template
To set a rule using one of Outlook's built-in templates, carry out these steps:
-
Access Outlook rules:
- On the Home tab, in the Move group, click on Rules > Manage Rules & Alerts.
- Alternatively, you can go to the File tab and choose Manage Rules & Alerts.
-
Create a new rule. In the dialog box that opens, click New Rule…
- Select a template. Under "Step 1: Select a template," choose the template that suits your needs.
- Edit the rule description. Under "Step 2: Edit the rule description," you'll see underlined values. Click on these values to make selections according to your preferences.
-
Finish and save the rule:
- Click Finish to save the rule.
- Or, you can click Next to define additional conditions, actions, and exceptions for the rule.


Some rules may only run when Outlook is running. If you encounter a warning like shown below, just click OK.

For instance, if you want to flag messages from a specific sender for follow-up, this is what you need to do:
- Choose the template Flag messages from someone for follow-up.
- In the Edit the rule description section, do this:
- Click on the underlined value "from people or public group" and select the desired sender.
- Click on the underlined value "follow up at this time" to define when the follow-up should occur.
- Review the rule description to make sure it matches your choices and click Finish.

How to set rules in Outlook from scratch
Creating rules in Outlook from scratch allows you to tailor them precisely to your needs. If none of the pre-built templates suit your requirements, you can start fresh with a blank rule. Here's how:
- On the Home tab, click on Rules > Manage Rules & Alerts.
- In the Rules & Alerts dialog, click New Rule.
- In the Rules Wizard dialog, chose one of the following options, and then click Next:
- Apply the rule on messages I receive - trigger the rule for incoming emails.
- Apply the rule on messages I sent - apply the rule for outgoing emails.
For example, to set up an Outlook forwarding rule, choose the first option:
-
Select conditions. You might want to forward emails from a specific sender, containing certain words, or marked as important. In the upper section, select all the conditions you want to apply. In the lower section, click on underlined values and make your selections. Then, click Next.
-
Choose actions. Decide what to do with the message. In our case, select forward it to people or public groups. Then, click the "people or public groups" value in the lower section and specify the recipient. Click Next when done.
-
Set exceptions. Optionally, set exceptions under which the rule won't apply, and click Next. For example, you might not want to forward messages from a specific sender.
-
Finish and save the rule. In the final step, you do this:
- Name the rule.
- Choose suitable options. To activate the rule, select Turn on the rule. Additionally, you may also opt to run the rule on existing messages in your inbox.
- Review the rule description and make the final edits if necessary.
- If everything looks correct, click Finish.


Done! Now you have a rule in your Outlook that will automatically forward all messages marked with high importance to the specified recipient, except when the sender is the designated recipient themselves.
Examples of Outlook rules
Here are a few practical examples of Outlook rules that can help you solve common tasks and automate various aspects of email management:
- Defer delivery of emails - delay the sending of emails by a specified number of minutes, giving you the chance to check messages before they go off.
- Block emails containing certain words - automatically move messages that contain specified words to the junk folder, helping to filter out unwanted or spam emails.
- Set up an auto reply - set up an automatic out-of-office reply for POP and IMAP/SMTP accounts, ensuring that senders are notified of your absence.
- Get read receipt - request delivery and read receipts for messages that meet certain conditions, providing confirmation that your emails have been received and opened by recipients.
- Auto forward mail - automatically forward or redirect every incoming email or only specific messages that meet predefined conditions.
Exporting and importing rules in Outlook
Exporting and importing Outlook rules is a handy feature, especially when you want to share rules with colleagues or set up rules on multiple devices.
How to export Outlook rules
To export a set of rules from your Outlook, the steps are:
- Navigate to the File tab, then click on Manage Rules & Alerts.
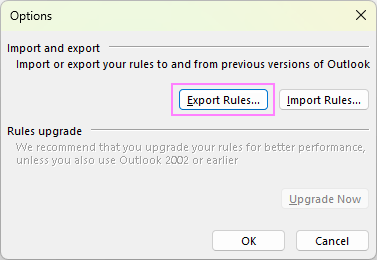
- In the dialog box that appears, click Options.
- In the Options dialog box, click Export rules.
- Choose the folder where you want to save the exported rules, give a name to the .rwz file, and click Save.


Tips and notes:
- The exported Outlook rules are saved in a file with an. rwz extension, which is compatible only within Outlook.
- If you need to export rules for use in a previous version, select Outlook 2002 / 2000 / 98 Compatible Rules from the Save as type list.
How to import Outlook rules
To import rules in your Outlook, the steps are:
- On the File tab, click Manage Rules & Alerts.
- In the Rules & Alerts dialog box, click Options.
- In the Options dialog box, click Import rules.
- Navigate to the folder containing the rules you wish to import, select the .rwz file, and click Open. If you're importing rules for previous versions of Outlook, ensure to choose the corresponding file type from the dropdown list on the right.


Great! Now you have a functional set of rules in your Outlook without having to make each one from scratch.
How to edit rules in Outlook
To modify any aspect of our Outlook rules, such as the name, conditions or behavior, follow these steps:
- Open the Rules and Alerts dialog.
- On the E-mail Rules tab, select the desired folder from the Apply changes to this folder dropdown at the top. Typically, this will be the Inbox folder for different email accounts.
- Select the rule you want to modify and click Change Rule. From the list of available options, pick the change you wish to make. Usually, you click Edit the Rule Settings, and then go through the steps, to change the conditions, actions and exceptions.
- Once you've made your changes, click Apply to save them.
- After finishing editing the rules, click OK to close the dialog.

These steps will help you adjust your Outlook rules to match your changing needs, making sure that your email management stays effective and customized to your liking.
Tip. To quickly get to the rule settings, simply double-click the rule.
How to manage Outlook rules
In the Rules and Alerts dialog, you can also fine-tune your Outlook rules with these additional options:
- To change the order of the rules, use the Up or Down arrow buttons. The rules are executed in the order they appear in the list, from top to bottom.
- To copy the rule to another folder, click the Copy button.
- To customize specific aspects of the rule, such as the target folder, keywords, or category, click on the underlined value in the rule description section, and make the desired adjustments.
- To temporarily disable the rule, uncheck the checkbox next to it.

How to remove rules in Outlook
To permanently delete a rule in Outlook that is no longer needed, this is what you need to do:
- Open the Rules and Alerts dialog box.
- In the displayed list, select the rule you want to remove.
- In the top menu, click Delete, and then confirm by clicking "Yes".

This way, you can remove unnecessary and outdated rules from your Outlook, ensuring that only the relevant and useful ones remain.
Outlook rules order of execution
The order in which you arrange your Outlook rules is crucial because it determines the sequence in which the rules are processed. Rules are executed from top to bottom as they appear in the Rules and Alerts dialog box. If an email meets the criteria of multiple rules, it will be processed by the first rule in the list, and subsequent rules that also apply to that email may be ignored.
For example, if you have a rule that moves emails to a specific folder and another rule that deletes emails from the same sender, the email will only be moved to the folder if the move rule is higher in the list. If the delete rule is higher, the email will be deleted, and the move rule will never be executed.
How to change order of rules in Outlook
To change the order of rules in Outlook, you can follow these steps:
- Open the Rules and Alerts dialog box.
- Select the rule you want to move, and then use the up or down arrow buttons to re-sort the rules.
- After arranging the rules in the desired order, click Apply to save the changes, and then OK to close the dialog.

Remember, the order of rules is important because it affects how incoming emails are processed.
Stop processing more rules in Outlook
Stop processing more rules in Outlook is a setting that allows you to prevent subsequent rules from being applied to an email, even if it meets their conditions. This is useful when you have multiple rules that could potentially trigger on the same email, but you want only the most important one to take effect.
Without this option, Outlook would apply all rules that match the message in the order they appear in the Rules and Alerts dialog box. However, by enabling Stop processing more rules, you can halt this processing after a specific rule is applied, preventing further actions on the same email and avoiding conflicts.
For example, suppose you have a rule to move all emails from a specific sender to a particular folder, and another rule to delete all emails with a certain subject line. By using Stop processing more rules, you can ensure that emails from that sender are not deleted, even if they also match the subject line condition.
For many rules created from a message or template, this option is enabled by default, as indicated in the rule description:

When starting from a blank rule, you can control this feature when selecting actions in the Rules Wizard.

For existing rules, you can enable or disable this option by editing a rule.
In general, it proves to be a helpful tool to prioritize your rules, control the flow of your email processing, and avoid unwanted outcomes.
How to run rules manually in Outlook
The beauty of Outlook rules lies in their automation, working silently in the background without any human intervention. However, there are situations when you might need to apply a rule manually. For example, when you create a new rule, you may wish to run it on emails that are already in your Inbox, not just on new incoming messages.
Here's how you can manually run a rule in Outlook:
- Click the File tab > Manage Rules & Alerts.
- Once in the Rules and Alerts dialog, choose Run Rules Now.
- In the Run Rules Now dialog, select one or more rules that you want to execute.
- To run the rule on a folder other than the default one shown in the Run in Folder box, click Browse, choose the desired folder, and then click OK.
- If you want the rule to apply to subfolders of the selected folder, check the Include subfolders box.
- In the Apply rules to list, you can keep the default setting of all messages, or change it to either read or unread messages, depending on your preference.
- Once you've made your selections, click Run Now to execute the chosen rules.


By following these steps, you can trigger Outlook rules by yourself. That way, they work for both current and new emails, and help you keep your inbox neat and effective.
Server-side vs. client-only rules in Outlook
Outlook rules allow you to manage your emails effectively, whether you’re online or offline.
Server-side rules, managed by the Exchange server, operate independently of Outlook and run directly on the server. This means they remain active even when Outlook is closed, making them ideal for managing emails when you're away from your desk or when using different devices to access your emails. These rules can perform actions such as moving emails to folders, deleting them, or forwarding to another person.
Client-only rules are dependent on the Outlook client and only execute when Outlook is open on your computer. These rules are useful for tasks requiring immediate attention while you are actively working, such as displaying alerts and playing sounds, assigning categories, flagging messages for follow-up, or marking them as read.
Outlook distinguishes between these two types of rules automatically, labeling client-only rules accordingly.

Now armed with the know-how to create and manage rules in Outlook, you're well on your way to sculpting the inbox that works for you, not against you ? So go ahead, give your Outlook rules a personal touch and enjoy the benefits of enhanced email organization.
위 내용은 예제와 함께 Outlook 규칙 : 작성, 관리 및 사용 방법의 상세 내용입니다. 자세한 내용은 PHP 중국어 웹사이트의 기타 관련 기사를 참조하세요!

핫 AI 도구

Undresser.AI Undress
사실적인 누드 사진을 만들기 위한 AI 기반 앱

AI Clothes Remover
사진에서 옷을 제거하는 온라인 AI 도구입니다.

Undress AI Tool
무료로 이미지를 벗다

Clothoff.io
AI 옷 제거제

Video Face Swap
완전히 무료인 AI 얼굴 교환 도구를 사용하여 모든 비디오의 얼굴을 쉽게 바꾸세요!

인기 기사
뜨거운 도구

메모장++7.3.1
사용하기 쉬운 무료 코드 편집기

SublimeText3 중국어 버전
중국어 버전, 사용하기 매우 쉽습니다.

스튜디오 13.0.1 보내기
강력한 PHP 통합 개발 환경

드림위버 CS6
시각적 웹 개발 도구

SublimeText3 Mac 버전
신 수준의 코드 편집 소프트웨어(SublimeText3)


 Excel의 중간 공식 - 실제 예
Apr 11, 2025 pm 12:08 PM
Excel의 중간 공식 - 실제 예
Apr 11, 2025 pm 12:08 PM
이 튜토리얼은 중간 기능을 사용하여 Excel에서 수치 데이터의 중앙값을 계산하는 방법을 설명합니다. 중앙 경향의 주요 척도 인 중앙값은 데이터 세트의 중간 값을 식별하여 Central Tenden의보다 강력한 표현을 제공합니다.
 Excel 공유 통합 문서 : 여러 사용자를위한 Excel 파일을 공유하는 방법
Apr 11, 2025 am 11:58 AM
Excel 공유 통합 문서 : 여러 사용자를위한 Excel 파일을 공유하는 방법
Apr 11, 2025 am 11:58 AM
이 튜토리얼은 다양한 방법, 액세스 제어 및 갈등 해결을 다루는 Excel 통합 문서 공유에 대한 포괄적 인 안내서를 제공합니다. Modern Excel 버전 (2010, 2013, 2016 및 이후) 협업 편집을 단순화하여 M에 대한 필요성을 제거합니다.
 Google 스프레드 시트 Countif 기능은 공식 예제와 함께합니다
Apr 11, 2025 pm 12:03 PM
Google 스프레드 시트 Countif 기능은 공식 예제와 함께합니다
Apr 11, 2025 pm 12:03 PM
마스터 Google Sheets Countif : 포괄적 인 가이드 이 안내서는 Google 시트의 다목적 카운티프 기능을 탐색하여 간단한 셀 카운팅 이외의 응용 프로그램을 보여줍니다. 우리는 정확하고 부분적인 경기에서 Han에 이르기까지 다양한 시나리오를 다룰 것입니다.
 Excel : 그룹 행 자동 또는 수동으로 행을 붕괴하고 확장합니다.
Apr 08, 2025 am 11:17 AM
Excel : 그룹 행 자동 또는 수동으로 행을 붕괴하고 확장합니다.
Apr 08, 2025 am 11:17 AM
이 튜토리얼은 행을 그룹화하여 복잡한 Excel 스프레드 시트를 간소화하여 데이터를보다 쉽게 분석 할 수 있도록하는 방법을 보여줍니다. 행 그룹을 신속하게 숨기거나 보여주고 전체 개요를 특정 수준으로 붕괴시키는 법을 배우십시오. 크고 상세한 스프레드 시트가 될 수 있습니다
 Excel을 JPG로 변환하는 방법 - 이미지 파일로 .xls 또는 .xlsx를 저장
Apr 11, 2025 am 11:31 AM
Excel을 JPG로 변환하는 방법 - 이미지 파일로 .xls 또는 .xlsx를 저장
Apr 11, 2025 am 11:31 AM
이 자습서는 .xls 파일을 .jpg 이미지로 변환하는 다양한 방법을 탐색하여 내장 된 Windows 도구와 무료 온라인 변환기를 모두 포함합니다. 프레젠테이션을 만들거나 스프레드 시트 데이터를 단단히 공유하거나 문서를 디자인해야합니까? YO를 변환합니다
 Google Sheets 차트 자습서 : Google 시트에서 차트를 만드는 방법
Apr 11, 2025 am 09:06 AM
Google Sheets 차트 자습서 : Google 시트에서 차트를 만드는 방법
Apr 11, 2025 am 09:06 AM
이 자습서는 Google 시트에서 다양한 차트를 작성하여 다양한 데이터 시나리오에 적합한 차트 유형을 선택하는 방법을 보여줍니다. 또한 3D 및 Gantt 차트를 만드는 방법과 차트를 편집, 복사 및 삭제하는 방법을 배웁니다. 데이터 시각화는 CRU입니다
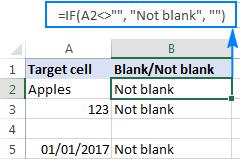 Excel : 셀에 공식 예제가 포함 된 경우
Apr 09, 2025 am 09:04 AM
Excel : 셀에 공식 예제가 포함 된 경우
Apr 09, 2025 am 09:04 AM
이 튜토리얼은 셀에 텍스트, 숫자 또는 문자열 부분을 포함한 특정 값이 포함되어 있는지 확인하기 위해 다양한 Excel 공식을 보여줍니다. if, istext, isnumber, search, find, countif, exact, sumproduct, vlookup 및 neste를 사용하는 시나리오를 다룹니다.
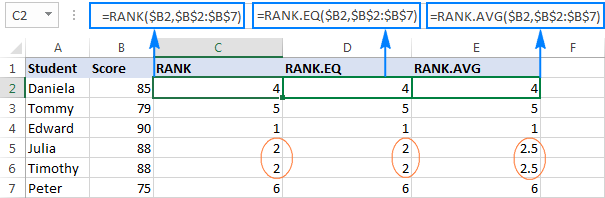 Excel 순위 기능 및 기타 순위를 계산하는 방법
Apr 09, 2025 am 11:35 AM
Excel 순위 기능 및 기타 순위를 계산하는 방법
Apr 09, 2025 am 11:35 AM
이 Excel 튜토리얼은 순위 기능의 뉘앙스를 자세히 설명하고 여러 기준, 그룹 데이터, 백분위 수 순위 계산 등을 기반으로 Excel에서 데이터를 순위하는 방법을 보여줍니다. 목록 내에서 숫자의 상대적 위치를 결정하는 것은 Easi입니다.
