

Outlook 메일을 다른 이메일 주소로 자동으로 전달합니다

In this article, we'll delve into the ins and outs of forwarding mail in Outlook, offering tips and tricks to auto forward or redirect all email or specific messages only.
Balancing multiple email accounts can often feel like juggling countless tasks simultaneously. But what if you could direct all your Outlook mail, perhaps to your trusty Gmail account? That's exactly what we're about to explore in this article. Whether you're managing multiple accounts, ensuring a teammate stays in the loop while you're away, or just tidying up your inbox, setting up automatic forwarding in Outlook can be a lifesaver.
Outlook email forwarding vs. redirecting
Forwarding and redirecting mail are two similar processes meant to transfer messages from one email address to another. However, there are subtle yet crucial differences between the two.
Forwarding email
When you forward an email, it appears to be sent from you. This means that recipients see your email address as the sender. Consequently, when they reply to the forwarded email, their replies are directed back to your address, the one from which you forwarded the message.

Redirecting email
Redirecting an email makes it look like the message comes directly from the original sender. The recipient sees the original sender's email address. So, replies to redirected messages go straight to the original sender, bypassing your email account entirely.
It's important to note that redirection is only possible with a Microsoft Exchange Server account, which includes Outlook.com among its services.

Understanding these nuances allows you to choose a more appropriate method based on your specific needs and preferences.
How to forward an email from Outlook
Every Outlook user knows how to forward an individual message. Even if you opened the Outlook application for the first time, the process is intuitively clear:
- Select the message of interest.
- Click the Forward button in the upper right corner represented by a blue right-pointing arrow.
- Optionally, add your personal touch by typing a message of your own.
- Hit the Send button to dispatch the message on its way.

And voilà! You've successfully forwarded an email to another recipient. But what if you want to make this process automatic? Imagine being able to ensure that every email from a specific sender, or any message containing certain keywords, lands not just in your Outlook inbox, but also in another email account of your choosing, like Gmail. Read on as we show you how to set up automatic forwarding and redirecting in Outlook.
How to auto forward emails in Outlook
To automatically forward mail in Outlook, you need to set up a forwarding rule. This can be a blank rule for all incoming mail or tailored to specific messages based on the criteria you define, such as sender, keywords, or specific account.
To create a forwarding rule in classic Outlook, follow these steps:
- Go to the File tab and select Manage Rules & Alerts.
- In the Rules and Alerts dialog box, click on New Rule.
- Start from a blank rule by selecting the Apply rule on messages I receive option.

- Decide on the triggers for your forwarding rule. You can pick from a variety of conditions such as specific accounts, certain senders, or particular phrases in the subject line. If you're looking to forward every single email, simply proceed to the next step without selecting any conditions.
- In the Actions step, tick the forward it to people or public group option.
- In the rule description section, click the underlined "people or public group" link. In the Rule Address dialog that appears, type the email address where you wish to forward your messages in the To box, or choose from the Global Address List if it's available.
- Select any exceptions if necessary.
- Finish setting up your rule by giving it a name and specifying whether to run this rule on messages already in your inbox.


And there you have it! Your Outlook will now dutifully forward your mail as specified, ensuring you never miss an important message again.
For more information, see How to create and use Outlook rules.
How to redirect emails in Outlook
Redirecting email in Outlook involves creating a rule similar to forwarding, but with a key distinction in the action you select. Here's how to do it:
- Begin by creating a rule like you would for forwarding email.
- When you reach the part where you define what the rule should do, choose the action redirect it to people or public group.
- Finish setting up the rule.

This action will re-send messages to the email address you specify, making it appear as though they came directly from the original sender, not as a forwarded message from you.
Tip. If your forwarding / redirecting rule does not work as expected, check out the common causes and troubleshooting tips: How to fix Outlook rules not running automatically.
Automatic forwarding (redirecting) in new Outlook and web
The latest versions of the new Outlook for Windows, Outlook 365 online, and Outlook.com, offer a convenient feature to automatically forward all incoming emails. Here's how to enable this functionality:
- Click the Settings gear icon in the upper-right corner. Alternatively, you can navigate to Mail > View tab > View settings.
- In the Settings menu, select Mail, then choose Forwarding.
- If you have multiple accounts configured in the new Outlook, pick the desired one from the dropdown menu.
- Toggle the Enable forwarding switch on.
- In the Forward my email to field, enter the address to which you want to forward your messages.
- To retain a copy of forwarded messages in your Outlook inbox, select the Keep a copy of forwarded messages option.
- Confirm your settings by clicking the Save button, which activates the forwarding rule.

Notes:
- While the feature is named "forwarding", it technically operates as redirecting. This means that the message appears to come directly from the original sender, and the recipient won't be aware that it was forwarded by you. If you prefer the "forwarded message" look, then set up a rule to auto-forward your mail as explained below.
- Handling personal data in your email requires caution. If your messages contain sensitive info or personal data, it's advisable not to use the automatic forwarding feature due to privacy concerns. Instead, consider setting up conditional mail forwarding based on specific criteria like sender or subject keywords, ensuring sensitive information is managed securely and appropriately.
Auto forward specific emails in new Outlook and Outlook 365 online
In addition to the automatic forwarding setting discussed earlier, the new Outlook and web version of Outlook 365 allows users to forward specific emails that meet predefined conditions. Like in the classic Outlook, this can be achieved through the creation of an email rule. Here's how to set it up:
- Click the Settings gear icon in the upper-right corner.
- Select Mail > Rules.
- Click Add a new rule to initiate the rule creation process.
- Provide a descriptive name for the rule for easy identification, for example "Forward from Outlook to Gmail".
- Under Add a condition, specify the criteria that a message must meet to trigger the action. If you want a forward or redirect rule to unconditionally apply to all emails, choose the Apply to all messages option.
- Under Add an action, select either the Forward to or Redirect to option, and then enter the email address where the messages should be sent.
- Optionally, you can add exceptions to the rule.
- Depending on your preferences, select to Stop processing more rules if you want this rule to be the only one applied to incoming messages meeting the specified conditions, or leave it unchecked to allow other rules to be executed sequentially.
- Review your forwarding rule settings and click Save to activate it.

By implementing these steps, you can automate the forwarding or redirecting of specific emails in the new Outlook and web app, so that important messages are sent to the right recipients with accuracy.
Useful tips on Outlook email forwarding
When setting up automatic forwarding in the new Outlook and Outlook 365 online, here are some important things to pay attention to:
- Retaining copies. By default, forwarded or redirected messages will be retained in your mailbox. If you prefer not to keep these copies, consider adding an action to move messages to the Deleted folder.
- Multiple addresses. You can configure rules to forward or redirect emails to multiple recipients. However, be aware of potential limitations on the number of addresses you can send to, depending on your account settings. Always test rules with multiple addresses to make sure they work as expected.
- Mailbox limits. Forwarding or redirecting rules may fail if your mailbox exceeds its storage limit. To prevent this, regularly clear the Deleted Items folder, as its contents contribute to your mailbox usage. To learn other reasons why your rules may fail, check out New Outlook rules not working.
- Administrative restrictions. For Outlook on the web users with work or school accounts, administrators may impose restrictions on forwarding or redirecting email outside the organization's domain. It's always a good idea to check with your IT department if you are uncertain about your account's capabilities.
Wrapping up, Outlook's mail forwarding and redirection capabilities are designed to simplify your life. By automating these processes, you can ensure that important emails find their way to the right recipient without any detours, giving you peace of mind and a more organized inbox. Let Outlook do the heavy lifting, so you can focus on what's matters ?
위 내용은 Outlook 메일을 다른 이메일 주소로 자동으로 전달합니다의 상세 내용입니다. 자세한 내용은 PHP 중국어 웹사이트의 기타 관련 기사를 참조하세요!

핫 AI 도구

Undresser.AI Undress
사실적인 누드 사진을 만들기 위한 AI 기반 앱

AI Clothes Remover
사진에서 옷을 제거하는 온라인 AI 도구입니다.

Undress AI Tool
무료로 이미지를 벗다

Clothoff.io
AI 옷 제거제

Video Face Swap
완전히 무료인 AI 얼굴 교환 도구를 사용하여 모든 비디오의 얼굴을 쉽게 바꾸세요!

인기 기사
뜨거운 도구

메모장++7.3.1
사용하기 쉬운 무료 코드 편집기

SublimeText3 중국어 버전
중국어 버전, 사용하기 매우 쉽습니다.

스튜디오 13.0.1 보내기
강력한 PHP 통합 개발 환경

드림위버 CS6
시각적 웹 개발 도구

SublimeText3 Mac 버전
신 수준의 코드 편집 소프트웨어(SublimeText3)
뜨거운 주제
 7884
7884
 15
1649
14
1410
52
1301
25
1245
29
15
1649
14
1410
52
1301
25
1245
29

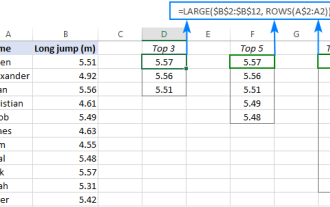 열 또는 행에서 상위 3, 5, 10 값을 찾는 Excel 공식
Apr 01, 2025 am 05:09 AM
열 또는 행에서 상위 3, 5, 10 값을 찾는 Excel 공식
Apr 01, 2025 am 05:09 AM
이 튜토리얼은 데이터 세트 내에서 상단 N 값을 효율적으로 찾아 Excel 공식을 사용하여 관련 데이터를 검색하는 방법을 보여줍니다. 최고, 최저 또는 특정 기준을 충족하는 경우이 안내서는 솔루션을 제공합니다. findi
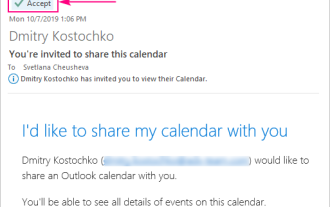 Outlook에 캘린더를 추가하는 방법 : 공유, 인터넷 캘린더, ical 파일
Apr 03, 2025 am 09:06 AM
Outlook에 캘린더를 추가하는 방법 : 공유, 인터넷 캘린더, ical 파일
Apr 03, 2025 am 09:06 AM
이 기사에서는 Outlook Desktop 응용 프로그램 내에서 ICalendar 파일 가져 오기를 포함하여 공유 캘린더에 액세스하고 활용하는 방법을 설명합니다. 이전에는 Outlook 캘린더를 공유했습니다. 이제 공유 된 캘린더를 보는 방법을 살펴 보겠습니다
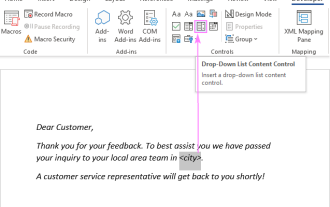 Outlook 이메일 템플릿에 드롭 다운 목록을 추가하십시오
Apr 01, 2025 am 05:13 AM
Outlook 이메일 템플릿에 드롭 다운 목록을 추가하십시오
Apr 01, 2025 am 05:13 AM
이 자습서는 여러 선택 및 데이터베이스 모집단을 포함하여 Outlook 이메일 템플릿에 드롭 다운 목록을 추가하는 방법을 보여줍니다. Outlook은 드롭 다운을 직접 지원하지 않지만이 안내서는 창의적인 해결 방법을 제공합니다. 이메일 템플릿 저장
 플래시 채우기를 사용하는 방법 예제와 함께 Excel
Apr 05, 2025 am 09:15 AM
플래시 채우기를 사용하는 방법 예제와 함께 Excel
Apr 05, 2025 am 09:15 AM
이 튜토리얼은 데이터 입력 작업을 자동화하기위한 강력한 도구 인 Excel의 Flash Clone 기능에 대한 포괄적 인 안내서를 제공합니다. 정의 및 위치에서 고급 사용 및 문제 해결에 이르기까지 다양한 측면을 다룹니다. Excel의 FLA 이해
 Excel의 중간 공식 - 실제 예
Apr 11, 2025 pm 12:08 PM
Excel의 중간 공식 - 실제 예
Apr 11, 2025 pm 12:08 PM
이 튜토리얼은 중간 기능을 사용하여 Excel에서 수치 데이터의 중앙값을 계산하는 방법을 설명합니다. 중앙 경향의 주요 척도 인 중앙값은 데이터 세트의 중간 값을 식별하여 Central Tenden의보다 강력한 표현을 제공합니다.
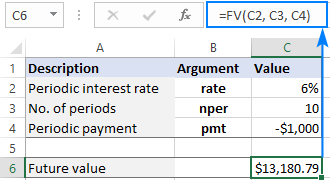 미래의 값을 계산하기위한 엑셀 기능
Apr 01, 2025 am 04:57 AM
미래의 값을 계산하기위한 엑셀 기능
Apr 01, 2025 am 04:57 AM
이 튜토리얼은 Excel의 FV 기능을 사용하여 정기적 인 지불과 덩어리 험 예금을 모두 포함하는 미래의 투자 가치를 결정하는 방법을 설명합니다. 효과적인 재무 계획은 투자 성장 이해에 달려 있으며이 안내서
 Excel 셀에서 텍스트 및 숫자를 제거 / 분할하는 방법
Apr 01, 2025 am 05:07 AM
Excel 셀에서 텍스트 및 숫자를 제거 / 분할하는 방법
Apr 01, 2025 am 05:07 AM
이 튜토리얼은 내장 기능과 사용자 정의 VBA 기능을 모두 사용하여 Excel 셀 내에서 텍스트와 숫자를 분리하는 몇 가지 방법을 보여줍니다. 텍스트를 제거하는 동안 숫자를 추출하는 방법을 배웁니다.
 연락처를 Outlook로 가져 오는 방법 (CSV 및 PST 파일에서)
Apr 02, 2025 am 09:09 AM
연락처를 Outlook로 가져 오는 방법 (CSV 및 PST 파일에서)
Apr 02, 2025 am 09:09 AM
이 튜토리얼은 CSV 및 PST 파일을 사용하는 연락처를 Outlook으로 가져 오는 두 가지 방법을 보여 주며 연락처를 온라인으로 전송하는 것도 포함합니다. 외부 소스에서 데이터를 통합하든 다른 이메일 프로에서 마이그레이션하든
