

Outlook 시간대를 변경하고 캘린더에 여러 번 추가

In this guide, we'll walk you through the steps to adjust the time zone settings in Outlook and add a few different time zones to your calendar. This way, your meetings and appointments will be accurately reflected no matter where you are in the world.
Time zones can be a source of confusion and frustration, especially when managing a busy schedule across different regions. Time area mismatches can lead to missed appointments and communication delays, which might affect your work and your professional relationships. Whether you're a frequent traveler or working with international teams, adjusting the time zone in Outlook is essential to keep your schedule in sync. This step-by-step guide shows how to quickly update your time settings to help you stay on track, regardless of where you are or where your contacts are located.
How to change time zone in Outlook desktop
For the sent times on your emails to be correct and appointments and meetings in the Outlook calendar to accurately reflect your local time, it's crucial that the time region in Outlook matches your current geographic location. This becomes especially vital if you travel a lot and your laptop isn't automatically updating the time.
To change time zone in the classic Outlook desktop app, follow these steps:
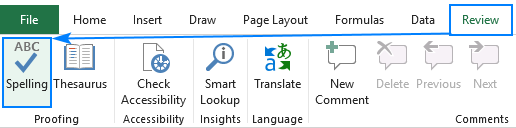
- In your Outlook, navigate to the File tab, and select Options.

- In the Outlook Options dialog box, click on Calendar.
- Under the Time zones section, you'll see a drop-down menu. Click on it to select your current location.
- Click OK to save your changes.


Now, all calendar views and items within Outlook will be synchronized to reflect the new settings.
Notes:
- Changing Outlook's time zone will affect your Windows clock and all Windows programs. It is the same as changing the Date & Time settings in the Control Panel.
- When you set a time zone that observes daylight saving time, Outlook makes this adjustment automatically, provided this option is enabled in your system settings.
- Remember, changing the time zone in Outlook will affect how meeting invitations, event reminders, and emails are displayed. Always double-check your settings, especially if you have upcoming appointments or deadlines.
How to set time zone in Outlook on the web
If you've noticed a discrepancy between the times on emails and appointments in Outlook 365 online or Outlook.com compared to the desktop client, it's likely due to the time zone settings not being properly configured during your initial login or defaulting to an incorrect region.
To adjust the time zone in Outlook on the web, perform these steps:
- Log in to your Microsoft 365 account on the web or Outlook.com.
- Click the Settings icon at the top of the window.
- In the Settings menu, navigate to the Calendar section.
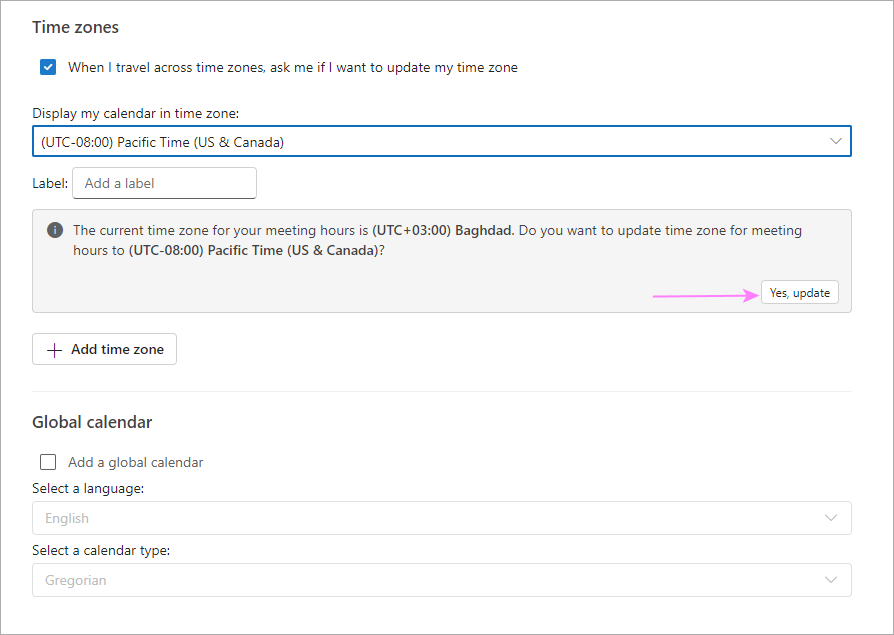
- Under Display my calendar in time zone, pick the desired one from the drop-down menu.
- Click the Save button to apply the changes.
- Once you've adjusted the time region, Outlook will ask if you also want to change timezone for your meeting hours. Click Yes, update in the prompt.

Note. Microsoft periodically updates the interface of Outlook on the web, so your version might look slightly different from what is described here. However, the basic steps for changing the time zone are the same.
How to change time zone in new Outlook
In the new Outlook interface, adjusting your time zone is similar to the web version. Carry out these steps to ensure it is correctly configured:
- Click the Settings gear icon in the upper-right corner.
- In the Settings menu, go to Calendar.
- Under Time Zones, use the drop-down menu to select the region that matches your current location.
- Save the changes.

After changing the time zone for your Outlook calendar, remember to update it for meeting hours too. For this, click Yes, update in the corresponding notification.
Apply Microsoft 365 settings to new Outlook
Instead of setting the time zone directly in the new Outlook, you can opt to synchronize Outlook's date and time settings with your global Microsoft 365 settings. Here's how to do this:
- In the new Outlook app, go to Settings > General.
- Under Sync across Microsoft 365, click on the View and manage Microsoft 365 settings link to review your current settings and make any necessary modifications.
- Toggle the Use my Microsoft 365 settings option on.
- A dialog will appear asking you to verify that you want to synchronize the language, date and time settings across Microsoft 365 apps. Click Sync settings to agree.
- Restart Outlook if prompted.


Now, the time zone settings are accurately configured in the new Outlook, so you can see the right time for all your emails, appointments, and calendar events.
How to add multiple time zones to Outlook calendar
Collaborating with international teams often requires keeping track of different time areas. Microsoft Outlook lets you display multiple times in your calendar, providing a clear view of your local time alongside other important business locations or frequent travel destinations.
This feature is very helpful for scheduling your calendar across the globe without changing your entire system's time settings.
Add different time zones in classic Outlook
The latest version of Outlook 365 allows displaying up to three separate time zones in the calendar, while Outlook 2019 and earlier support two.
To add a second time zone to the Outlook calendar, the steps are:
- Go to File > Options > Calendar and scroll down to the Time zones section.
- Check the Show a second time zone option.
- If needed, select the Show a third-time zone check box.
- For convenience, type a label for each one.
- Click OK to save the changes.

Tips:
- To change the positions of the displayed times in the calendar, click the Swap Time Zones button.
- To remove an additional time zone, uncheck the box next to it.
Add multiple time zones in new Outlook and web
To add a few different time zones in the new Outlook and web version, follow these steps:
- Access the time zone settings via Settings > Calendar.
- Click the Add time zone button to introduce a second time zone to your calendar.
- Choose the desired time zone from the dropdown list or search for a city's name.
- Enter a label for each zone for clarity.
- If needed, repeat the process to add more time regions.

Using the same calendar settings, you can easily manage the time regions displayed in the new Outlook calendar:
- To display a certain time zone, tick the Show in calendar box next to it.
- To rearrange the order, use the Move up and Move down arrows.
- To delete a time zone, click the Remove button.
With these settings, you can easily control regional times in the new Outlook and web, so you can comfortably plan and work across various areas.
How to display multiple time zones in Outlook calendar
Once you've set up additional time regions, you might be curious about how to make them visible on your Outlook calendar.
Display several time zones in classic Outlook
By default, the Outlook Calendar usually shows the Month view, which doesn't have time zones. To see the added time zones, switch to the Week, Day, or Schedule view.
- In the Week and Day views, you'll see a vertical time bar to the left of your calendar.
- In the Schedule view, the time zines are displayed horizontally at the top of the calendar.

View different time zones in new Outlook and web
After adding at least one additional time zone, a time bar with your custom labels will appear to the left of your calendars in the Day, Workweek, and Week views. In the Month view, time zones cannot be shown.
To show and hide the additional time zones in your calendar, just do this:
- Click the top of the time bar where your labels are located.
- In the context menu, select Time zones.
- Click the ticked zone you wish to hide or an unticked zone you want to display.

Tip. For quick access to calendar options, use the Calendar settings button on the top toolbar on the View tab.
Adjust for daylight saving time automatically
In earlier versions, it was possible to manage the daylight saving time (DST) adjustment when changing the time zone in Outlook. In the current version of Outlook 365, this option is no longer available within the application itself. However, you can still control this behavior through your system settings. Here's how:
- Click the Start button and select Settings.
- In the left pane, click on Time & language, then choose Date & time.
- Find the Adjust for daylight saving time automatically option and toggle it on if you wish your computer's clock to automatically adjust for DST changes. If you prefer not to use this feature, simply toggle it off.

By adjusting this setting, you ensure that your computer's clock stays accurate, reflecting the changes associated with daylight saving time.
Note. This option is only visible for time zones that observe daylight saving time.
How to stop Outlook from changing time zone automatically
When you're on the move, Outlook might automatically update your time zone, which can be a bit of a hassle if you're trying to stay on a specific schedule. To keep your time settings consistent, here's what you can do to stop Outlook from changing it automatically:
- Open system Settings on your computer.
- Choose Time & language > Date & time.
- Toggle off the Set time zone automatically option.
This will keep your time zone just the way you set it, no matter where your travels take you.

Remember, this change is at the operating system level, so it'll affect all apps, not just Outlook.
Note. If you want to set your time zone automatically, then enable the option mentioned above. To do this, first allow Outlook to access your location. To enable this, navigate to Settings > Privacy & Security, and toggle on the Let apps access your location option.
How to get Outlook on the web to remind you to change time zones
In Outlook on the web, once you set your preferred time zone, it stays the same unless you decide to change it. But if you want a nudge to switch time regions when you travel, here's a quick way to set it up:
- In the Outlook web app, click the Settings gear icon.
- In the Settings menu, select Calendar.
- Turn on the When I travel across time zones, ask me if I want to update my time zone option.
Now, whenever you land in a new location, Outlook will pop up a reminder asking if you'd like to switch to the local time. It's like having a personal assistant looking out for your schedule :)
This option is also available in the new Outlook:

That's how to change time zone in Outlook and set up your calendar to show different times. This way, you'll always know what time it is for everyone, no matter where they are. It's a simple way to stay organized and avoid scheduling conflicts!
위 내용은 Outlook 시간대를 변경하고 캘린더에 여러 번 추가의 상세 내용입니다. 자세한 내용은 PHP 중국어 웹사이트의 기타 관련 기사를 참조하세요!

핫 AI 도구

Undresser.AI Undress
사실적인 누드 사진을 만들기 위한 AI 기반 앱

AI Clothes Remover
사진에서 옷을 제거하는 온라인 AI 도구입니다.

Undress AI Tool
무료로 이미지를 벗다

Clothoff.io
AI 옷 제거제

Video Face Swap
완전히 무료인 AI 얼굴 교환 도구를 사용하여 모든 비디오의 얼굴을 쉽게 바꾸세요!

인기 기사
뜨거운 도구

메모장++7.3.1
사용하기 쉬운 무료 코드 편집기

SublimeText3 중국어 버전
중국어 버전, 사용하기 매우 쉽습니다.

스튜디오 13.0.1 보내기
강력한 PHP 통합 개발 환경

드림위버 CS6
시각적 웹 개발 도구

SublimeText3 Mac 버전
신 수준의 코드 편집 소프트웨어(SublimeText3)


 플래시 채우기를 사용하는 방법 예제와 함께 Excel
Apr 05, 2025 am 09:15 AM
플래시 채우기를 사용하는 방법 예제와 함께 Excel
Apr 05, 2025 am 09:15 AM
이 튜토리얼은 데이터 입력 작업을 자동화하기위한 강력한 도구 인 Excel의 Flash Clone 기능에 대한 포괄적 인 안내서를 제공합니다. 정의 및 위치에서 고급 사용 및 문제 해결에 이르기까지 다양한 측면을 다룹니다. Excel의 FLA 이해
 Excel의 중간 공식 - 실제 예
Apr 11, 2025 pm 12:08 PM
Excel의 중간 공식 - 실제 예
Apr 11, 2025 pm 12:08 PM
이 튜토리얼은 중간 기능을 사용하여 Excel에서 수치 데이터의 중앙값을 계산하는 방법을 설명합니다. 중앙 경향의 주요 척도 인 중앙값은 데이터 세트의 중간 값을 식별하여 Central Tenden의보다 강력한 표현을 제공합니다.
 Excel을 철자하는 방법
Apr 06, 2025 am 09:10 AM
Excel을 철자하는 방법
Apr 06, 2025 am 09:10 AM
이 튜토리얼은 Excel의 맞춤법 검사를위한 다양한 방법과 같은 수동 점검, VBA 매크로 및 특수 도구를 사용합니다. 셀, 범위, 워크 시트 및 전체 통합 문서의 철자 확인을 배우십시오. Excel은 워드 프로세서는 아니지만 Spel
 Excel 공유 통합 문서 : 여러 사용자를위한 Excel 파일을 공유하는 방법
Apr 11, 2025 am 11:58 AM
Excel 공유 통합 문서 : 여러 사용자를위한 Excel 파일을 공유하는 방법
Apr 11, 2025 am 11:58 AM
이 튜토리얼은 다양한 방법, 액세스 제어 및 갈등 해결을 다루는 Excel 통합 문서 공유에 대한 포괄적 인 안내서를 제공합니다. Modern Excel 버전 (2010, 2013, 2016 및 이후) 협업 편집을 단순화하여 M에 대한 필요성을 제거합니다.
 Google 스프레드 시트 Countif 기능은 공식 예제와 함께합니다
Apr 11, 2025 pm 12:03 PM
Google 스프레드 시트 Countif 기능은 공식 예제와 함께합니다
Apr 11, 2025 pm 12:03 PM
마스터 Google Sheets Countif : 포괄적 인 가이드 이 안내서는 Google 시트의 다목적 카운티프 기능을 탐색하여 간단한 셀 카운팅 이외의 응용 프로그램을 보여줍니다. 우리는 정확하고 부분적인 경기에서 Han에 이르기까지 다양한 시나리오를 다룰 것입니다.
 Excel의 절대 값 : 공식 예제와 함께 ABS 기능
Apr 06, 2025 am 09:12 AM
Excel의 절대 값 : 공식 예제와 함께 ABS 기능
Apr 06, 2025 am 09:12 AM
이 튜토리얼은 절대 값의 개념을 설명하고 데이터 세트 내에서 절대 값을 계산하기위한 ABS 기능의 실질적인 Excel 응용 프로그램을 보여줍니다. 숫자는 긍정적이거나 부정적 일 수 있지만 때로는 양수 값 만 필요합니다.
 Excel : 그룹 행 자동 또는 수동으로 행을 붕괴하고 확장합니다.
Apr 08, 2025 am 11:17 AM
Excel : 그룹 행 자동 또는 수동으로 행을 붕괴하고 확장합니다.
Apr 08, 2025 am 11:17 AM
이 튜토리얼은 행을 그룹화하여 복잡한 Excel 스프레드 시트를 간소화하여 데이터를보다 쉽게 분석 할 수 있도록하는 방법을 보여줍니다. 행 그룹을 신속하게 숨기거나 보여주고 전체 개요를 특정 수준으로 붕괴시키는 법을 배우십시오. 크고 상세한 스프레드 시트가 될 수 있습니다
 Excel을 JPG로 변환하는 방법 - 이미지 파일로 .xls 또는 .xlsx를 저장
Apr 11, 2025 am 11:31 AM
Excel을 JPG로 변환하는 방법 - 이미지 파일로 .xls 또는 .xlsx를 저장
Apr 11, 2025 am 11:31 AM
이 자습서는 .xls 파일을 .jpg 이미지로 변환하는 다양한 방법을 탐색하여 내장 된 Windows 도구와 무료 온라인 변환기를 모두 포함합니다. 프레젠테이션을 만들거나 스프레드 시트 데이터를 단단히 공유하거나 문서를 디자인해야합니까? YO를 변환합니다
