

Documenso와 aws-smage-upload 예제의 Spload 기능 비교

이 글에서는 Documenso와 AWS S3 이미지 업로드 예시를 통해 AWS S3에 파일을 업로드하는 단계를 비교해 보겠습니다.
Vercel에서 제공하는 간단한 예제부터 시작하겠습니다.
예제/aws-s3-이미지 업로드
Vercel은 AWS S3에 파일을 업로드하는 좋은 작업 예제를 제공합니다.
이 예의 README는 기존 S3 버킷을 사용하거나 새 버킷을 생성하는 두 가지 옵션을 제공합니다. 이를 이해하는 것이 도움이 됩니다
업로드 기능을 올바르게 구성했습니다.
소스코드를 살펴볼 차례입니다. type=file인 입력 요소를 찾고 있습니다. app/page.tsx에서 아래 코드를 찾을 수 있습니다:
return (
    <main>
      <h1>Upload a File to S3</h1>
      <form onSubmit={handleSubmit}>
        <input
         >


<h2>


  <strong>onChange</strong>
</h2>

<p>onChange updates state using setFile, but it does not do the uploading. upload happens when you submit this form.<br>
</p>

<pre class="brush:php;toolbar:false">onChange={(e) => {
  const files = e.target.files
  if (files) {
    setFile(files[0])
  }
}}
제출 처리
handleSubmit 함수에서는 많은 일이 일어나고 있습니다. 이 handlerSubmit 함수의 작업 목록을 분석해야 합니다. 단계를 설명하기 위해 이 코드 조각 안에 설명을 작성했습니다.
const handleSubmit = async (e: React.FormEvent<HTMLFormElement>) => {
    e.preventDefault()

    if (!file) {
      alert('Please select a file to upload.')
      return
    }

    setUploading(true)

    const response = await fetch(
      process.env.NEXT_PUBLIC_BASE_URL + '/api/upload',
      {
        method: 'POST',
        headers: {
          'Content-Type': 'application/json',
        },
        body: JSON.stringify({ filename: file.name, contentType: file.type }),
      }
    )

    if (response.ok) {
      const { url, fields } = await response.json()

      const formData = new FormData()
      Object.entries(fields).forEach(([key, value]) => {
        formData.append(key, value as string)
      })
      formData.append('file', file)

      const uploadResponse = await fetch(url, {
        method: 'POST',
        body: formData,
      })

      if (uploadResponse.ok) {
        alert('Upload successful!')
      } else {
        console.error('S3 Upload Error:', uploadResponse)
        alert('Upload failed.')
      }
    } else {
      alert('Failed to get pre-signed URL.')
    }

    setUploading(false)
  }
API/업로드
api/upload/route.ts에는 아래 코드가 있습니다.
import { createPresignedPost } from '@aws-sdk/s3-presigned-post'
import { S3Client } from '@aws-sdk/client-s3'
import { v4 as uuidv4 } from 'uuid'

export async function POST(request: Request) {
  const { filename, contentType } = await request.json()

  try {
    const client = new S3Client({ region: process.env.AWS_REGION })
    const { url, fields } = await createPresignedPost(client, {
      Bucket: process.env.AWS_BUCKET_NAME,
      Key: uuidv4(),
      Conditions: [
        ['content-length-range', 0, 10485760], // up to 10 MB
        ['starts-with', '$Content-Type', contentType],
      ],
      Fields: {
        acl: 'public-read',
        'Content-Type': contentType,
      },
      Expires: 600, // Seconds before the presigned post expires. 3600 by default.
    })

    return Response.json({ url, fields })
  } catch (error) {
    return Response.json({ error: error.message })
  }
}
handleSubmit의 첫 번째 요청은 /api/upload였으며 콘텐츠 유형과 파일 이름을 페이로드로 전송했습니다. 아래와 같이 파싱됩니다:
const { filename, contentType } = await request.json()
다음 단계는 S3 클라이언트를 생성한 다음 URL과 필드를 반환하는 미리 서명된 게시물을 생성하는 것입니다. 이 URL을 사용하여 파일을 업로드합니다.
이 지식을 바탕으로 Documenso에서 업로드가 어떻게 작동하는지 분석하고 비교해 보겠습니다.
Documenso에 PDF 파일 업로드
type=file인 입력 요소부터 시작하겠습니다. Documenso에서는 코드가 다르게 구성됩니다. document-dropzone.tsx라는 파일에서 입력 요소를 찾을 수 있습니다.
<input {...getInputProps()} />

<p className="text-foreground mt-8 font-medium">{_(heading[type])}</p>
여기서 getInputProps는 useDropzone을 반환합니다. Documenso는 React-dropzone을 사용합니다.
import { useDropzone } from 'react-dropzone';
onDrop이 props.onDrop을 호출하면 upload-document.tsx에서 onFileDrop이라는 속성 값을 찾을 수 있습니다.
<DocumentDropzone
  className="h-[min(400px,50vh)]"
  disabled={remaining.documents === 0 || !session?.user.emailVerified}
  disabledMessage={disabledMessage}
  onDrop={onFileDrop}
  onDropRejected={onFileDropRejected}
/>
onFileDrop 함수에서 어떤 일이 일어나는지 살펴보겠습니다.
const onFileDrop = async (file: File) => {
    try {
      setIsLoading(true);

      const { type, data } = await putPdfFile(file);

      const { id: documentDataId } = await createDocumentData({
        type,
        data,
      });

      const { id } = await createDocument({
        title: file.name,
        documentDataId,
        teamId: team?.id,
      });

      void refreshLimits();

      toast({
        title: _(msg`Document uploaded`),
        description: _(msg`Your document has been uploaded successfully.`),
        duration: 5000,
      });

      analytics.capture('App: Document Uploaded', {
        userId: session?.user.id,
        documentId: id,
        timestamp: new Date().toISOString(),
      });

      router.push(`${formatDocumentsPath(team?.url)}/${id}/edit`);
    } catch (err) {
      const error = AppError.parseError(err);

      console.error(err);

      if (error.code === 'INVALID_DOCUMENT_FILE') {
        toast({
          title: _(msg`Invalid file`),
          description: _(msg`You cannot upload encrypted PDFs`),
          variant: 'destructive',
        });
      } else if (err instanceof TRPCClientError) {
        toast({
          title: _(msg`Error`),
          description: err.message,
          variant: 'destructive',
        });
      } else {
        toast({
          title: _(msg`Error`),
          description: _(msg`An error occurred while uploading your document.`),
          variant: 'destructive',
        });
      }
    } finally {
      setIsLoading(false);
    }
  };
많은 일이 일어나고 있지만 분석을 위해 putFile이라는 함수만 고려해 보겠습니다.
putPdf파일
putPdfFile은 upload/put-file.ts에 정의되어 있습니다
/**
 * Uploads a document file to the appropriate storage location and creates
 * a document data record.
 */
export const putPdfFile = async (file: File) => {
  const isEncryptedDocumentsAllowed = await getFlag('app_allow_encrypted_documents').catch(
    () => false,
  );

  const pdf = await PDFDocument.load(await file.arrayBuffer()).catch((e) => {
    console.error(`PDF upload parse error: ${e.message}`);

    throw new AppError('INVALID_DOCUMENT_FILE');
  });

  if (!isEncryptedDocumentsAllowed && pdf.isEncrypted) {
    throw new AppError('INVALID_DOCUMENT_FILE');
  }

  if (!file.name.endsWith('.pdf')) {
    file.name = `${file.name}.pdf`;
  }

  removeOptionalContentGroups(pdf);

  const bytes = await pdf.save();

  const { type, data } = await putFile(new File([bytes], file.name, { type: 'application/pdf' }));

  return await createDocumentData({ type, data });
};
putFile
putFile 함수를 호출합니다.
/**
 * Uploads a file to the appropriate storage location.
 */
export const putFile = async (file: File) => {
  const NEXT_PUBLIC_UPLOAD_TRANSPORT = env('NEXT_PUBLIC_UPLOAD_TRANSPORT');

  return await match(NEXT_PUBLIC_UPLOAD_TRANSPORT)
    .with('s3', async () => putFileInS3(file))
    .otherwise(async () => putFileInDatabase(file));
};
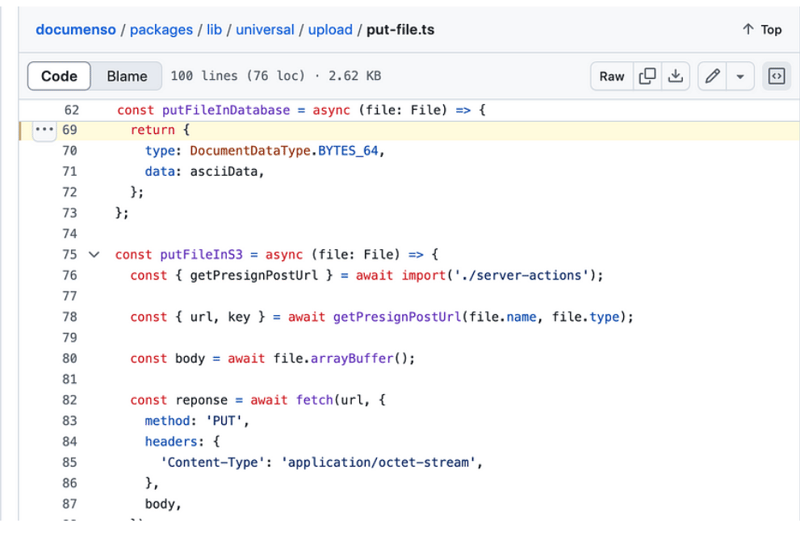
putFileInS3
const putFileInS3 = async (file: File) => {
  const { getPresignPostUrl } = await import('./server-actions');

  const { url, key } = await getPresignPostUrl(file.name, file.type);

  const body = await file.arrayBuffer();

  const reponse = await fetch(url, {
    method: 'PUT',
    headers: {
      'Content-Type': 'application/octet-stream',
    },
    body,
  });

  if (!reponse.ok) {
    throw new Error(
      `Failed to upload file "${file.name}", failed with status code ${reponse.status}`,
    );
  }

  return {
    type: DocumentDataType.S3_PATH,
    data: key,
  };
};
getPresignPostUrl
export const getPresignPostUrl = async (fileName: string, contentType: string) => {
  const client = getS3Client();

  const { getSignedUrl } = await import('@aws-sdk/s3-request-presigner');

  let token: JWT | null = null;

  try {
    const baseUrl = APP_BASE_URL() ?? 'http://localhost:3000';

    token = await getToken({
      req: new NextRequest(baseUrl, {
        headers: headers(),
      }),
    });
  } catch (err) {
    // Non server-component environment
  }

  // Get the basename and extension for the file
  const { name, ext } = path.parse(fileName);

  let key = `${alphaid(12)}/${slugify(name)}${ext}`;

  if (token) {
    key = `${token.id}/${key}`;
  }

  const putObjectCommand = new PutObjectCommand({
    Bucket: process.env.NEXT_PRIVATE_UPLOAD_BUCKET,
    Key: key,
    ContentType: contentType,
  });

  const url = await getSignedUrl(client, putObjectCommand, {
    expiresIn: ONE_HOUR / ONE_SECOND,
  });

  return { key, url };
};
비교
Documenso에 POST 요청이 표시되지 않습니다. URL을 가져오기 위해 getSignedUrl이라는 함수를 사용하는 반면,
vercel 예제는 API/업로드 경로에 대한 POST 요청을 만듭니다.입력 요소는 Vercel 예제에서 예시일 뿐이므로 쉽게 찾을 수 있지만 Documenso는 발견됩니다
React-dropzone을 사용하고 입력 요소가 비즈니스 컨텍스트에 따라 위치합니다.
회사 소개:
Thinkthroo에서는 대규모 오픈소스 프로젝트를 연구하고 아키텍처 가이드를 제공합니다. 우리는 귀하의 프로젝트에서 사용할 수 있는 tailwind로 구축된 재사용 가능한 구성요소를 개발했습니다.
Next.js, React, Node 개발 서비스를 제공합니다.
귀하의 프로젝트에 대해 논의하려면 회의를 예약하세요.

참고자료:
https://github.com/documenso/documenso/blob/main/packages/lib/universal/upload/put-file.ts#L69
https://github.com/vercel/examples/blob/main/solutions/aws-s3-image-upload/README.md
https://github.com/vercel/examples/tree/main/solutions/aws-s3-image-upload
https://github.com/vercel/examples/blob/main/solutions/aws-s3-image-upload/app/page.tsx#L58C5-L76C12
https://github.com/vercel/examples/blob/main/solutions/aws-s3-image-upload/app/api/upload/route.ts
https://github.com/documenso/documenso/blob/main/packages/ui/primitives/document-dropzone.tsx#L157
https://react-dropzone.js.org/
https://github.com/documenso/documenso/blob/main/apps/web/src/app/(dashboard)/documents/upload-document.tsx#L61
https://github.com/documenso/documenso/blob/main/packages/lib/universal/upload/put-file.ts#L22
위 내용은 Documenso와 aws-smage-upload 예제의 Spload 기능 비교의 상세 내용입니다. 자세한 내용은 PHP 중국어 웹사이트의 기타 관련 기사를 참조하세요!

핫 AI 도구

Undresser.AI Undress
사실적인 누드 사진을 만들기 위한 AI 기반 앱

AI Clothes Remover
사진에서 옷을 제거하는 온라인 AI 도구입니다.

Undress AI Tool
무료로 이미지를 벗다

Clothoff.io
AI 옷 제거제

Video Face Swap
완전히 무료인 AI 얼굴 교환 도구를 사용하여 모든 비디오의 얼굴을 쉽게 바꾸세요!

인기 기사
뜨거운 도구

메모장++7.3.1
사용하기 쉬운 무료 코드 편집기

SublimeText3 중국어 버전
중국어 버전, 사용하기 매우 쉽습니다.

스튜디오 13.0.1 보내기
강력한 PHP 통합 개발 환경

드림위버 CS6
시각적 웹 개발 도구

SublimeText3 Mac 버전
신 수준의 코드 편집 소프트웨어(SublimeText3)


 Python vs. JavaScript : 학습 곡선 및 사용 편의성
Apr 16, 2025 am 12:12 AM
Python vs. JavaScript : 학습 곡선 및 사용 편의성
Apr 16, 2025 am 12:12 AM
Python은 부드러운 학습 곡선과 간결한 구문으로 초보자에게 더 적합합니다. JavaScript는 가파른 학습 곡선과 유연한 구문으로 프론트 엔드 개발에 적합합니다. 1. Python Syntax는 직관적이며 데이터 과학 및 백엔드 개발에 적합합니다. 2. JavaScript는 유연하며 프론트 엔드 및 서버 측 프로그래밍에서 널리 사용됩니다.
 JavaScript 및 웹 : 핵심 기능 및 사용 사례
Apr 18, 2025 am 12:19 AM
JavaScript 및 웹 : 핵심 기능 및 사용 사례
Apr 18, 2025 am 12:19 AM
웹 개발에서 JavaScript의 주요 용도에는 클라이언트 상호 작용, 양식 검증 및 비동기 통신이 포함됩니다. 1) DOM 운영을 통한 동적 컨텐츠 업데이트 및 사용자 상호 작용; 2) 사용자가 사용자 경험을 향상시키기 위해 데이터를 제출하기 전에 클라이언트 확인이 수행됩니다. 3) 서버와의 진실한 통신은 Ajax 기술을 통해 달성됩니다.
 자바 스크립트 행동 : 실제 예제 및 프로젝트
Apr 19, 2025 am 12:13 AM
자바 스크립트 행동 : 실제 예제 및 프로젝트
Apr 19, 2025 am 12:13 AM
실제 세계에서 JavaScript의 응용 프로그램에는 프론트 엔드 및 백엔드 개발이 포함됩니다. 1) DOM 운영 및 이벤트 처리와 관련된 TODO 목록 응용 프로그램을 구축하여 프론트 엔드 애플리케이션을 표시합니다. 2) Node.js를 통해 RESTFULAPI를 구축하고 Express를 통해 백엔드 응용 프로그램을 시연하십시오.
 JavaScript 엔진 이해 : 구현 세부 사항
Apr 17, 2025 am 12:05 AM
JavaScript 엔진 이해 : 구현 세부 사항
Apr 17, 2025 am 12:05 AM
보다 효율적인 코드를 작성하고 성능 병목 현상 및 최적화 전략을 이해하는 데 도움이되기 때문에 JavaScript 엔진이 내부적으로 작동하는 방식을 이해하는 것은 개발자에게 중요합니다. 1) 엔진의 워크 플로에는 구문 분석, 컴파일 및 실행; 2) 실행 프로세스 중에 엔진은 인라인 캐시 및 숨겨진 클래스와 같은 동적 최적화를 수행합니다. 3) 모범 사례에는 글로벌 변수를 피하고 루프 최적화, Const 및 Lets 사용 및 과도한 폐쇄 사용을 피하는 것이 포함됩니다.
 Python vs. JavaScript : 커뮤니티, 라이브러리 및 리소스
Apr 15, 2025 am 12:16 AM
Python vs. JavaScript : 커뮤니티, 라이브러리 및 리소스
Apr 15, 2025 am 12:16 AM
Python과 JavaScript는 커뮤니티, 라이브러리 및 리소스 측면에서 고유 한 장점과 단점이 있습니다. 1) Python 커뮤니티는 친절하고 초보자에게 적합하지만 프론트 엔드 개발 리소스는 JavaScript만큼 풍부하지 않습니다. 2) Python은 데이터 과학 및 기계 학습 라이브러리에서 강력하며 JavaScript는 프론트 엔드 개발 라이브러리 및 프레임 워크에서 더 좋습니다. 3) 둘 다 풍부한 학습 리소스를 가지고 있지만 Python은 공식 문서로 시작하는 데 적합하지만 JavaScript는 MDNWebDocs에서 더 좋습니다. 선택은 프로젝트 요구와 개인적인 이익을 기반으로해야합니다.
 Python vs. JavaScript : 개발 환경 및 도구
Apr 26, 2025 am 12:09 AM
Python vs. JavaScript : 개발 환경 및 도구
Apr 26, 2025 am 12:09 AM
개발 환경에서 Python과 JavaScript의 선택이 모두 중요합니다. 1) Python의 개발 환경에는 Pycharm, Jupyternotebook 및 Anaconda가 포함되어 있으며 데이터 과학 및 빠른 프로토 타이핑에 적합합니다. 2) JavaScript의 개발 환경에는 Node.js, VScode 및 Webpack이 포함되어 있으며 프론트 엔드 및 백엔드 개발에 적합합니다. 프로젝트 요구에 따라 올바른 도구를 선택하면 개발 효율성과 프로젝트 성공률이 향상 될 수 있습니다.
 JavaScript 통역사 및 컴파일러에서 C/C의 역할
Apr 20, 2025 am 12:01 AM
JavaScript 통역사 및 컴파일러에서 C/C의 역할
Apr 20, 2025 am 12:01 AM
C와 C는 주로 통역사와 JIT 컴파일러를 구현하는 데 사용되는 JavaScript 엔진에서 중요한 역할을합니다. 1) C는 JavaScript 소스 코드를 구문 분석하고 추상 구문 트리를 생성하는 데 사용됩니다. 2) C는 바이트 코드 생성 및 실행을 담당합니다. 3) C는 JIT 컴파일러를 구현하고 런타임에 핫스팟 코드를 최적화하고 컴파일하며 JavaScript의 실행 효율을 크게 향상시킵니다.
 웹 사이트에서 앱으로 : 다양한 JavaScript 애플리케이션
Apr 22, 2025 am 12:02 AM
웹 사이트에서 앱으로 : 다양한 JavaScript 애플리케이션
Apr 22, 2025 am 12:02 AM
JavaScript는 웹 사이트, 모바일 응용 프로그램, 데스크탑 응용 프로그램 및 서버 측 프로그래밍에서 널리 사용됩니다. 1) 웹 사이트 개발에서 JavaScript는 HTML 및 CSS와 함께 DOM을 운영하여 동적 효과를 달성하고 jQuery 및 React와 같은 프레임 워크를 지원합니다. 2) 반응 및 이온 성을 통해 JavaScript는 크로스 플랫폼 모바일 애플리케이션을 개발하는 데 사용됩니다. 3) 전자 프레임 워크를 사용하면 JavaScript가 데스크탑 애플리케이션을 구축 할 수 있습니다. 4) node.js는 JavaScript가 서버 측에서 실행되도록하고 동시 요청이 높은 높은 요청을 지원합니다.
